Please connect your wallet to continue
\n )}\nFigure 1: NERO Architecture Diagram
\n\n* Access Layer: responsible for accepting various user operations as well as transferring and committing them to the chain.\n{/* * Execution Layer: responsible for the execution of almost all contract-based transactions and supports decentralized applications. It is the application of ZK Rollup, where the execution results are submitted to the settlement layer and the settlement layer establishes undeniable security as well as objective finality. */}\n* Settlement layer: responsible for verifying and settling the execution results of the execution layer and is also the asset layer, responsible for the management and settlement of the assets on the chain.\n* Data availability layer: focusing on execution data, it will ensure data availability in the network based on data sharding, and data sampling technologies."} {"url":"https://docs.nerochain.io/en/core-concepts/architecture/dataAvailabilityLayer","locale":"en","section":"core-concepts","title":"Data Availability Layer: Storage Scalability","summary":"In order to conserve valuable storage capacity within the settlement layer, NERO designed the data availability layer to offer dependable on-chain storage for Rollup. This eliminates the reliance on e","headings":["# Data Availability Layer: Storage Scalability"],"tokens":245,"markdown":"In order to conserve valuable storage capacity within the settlement layer, NERO designed the data availability layer to offer dependable on-chain storage for Rollup. This eliminates the reliance on external storage protocols for the original transaction data associated with Rollup, resolving the issue entirely within the NERO Chain. Moreover, NERO designed the data availability layer with a Sharding architecture to engage a greater number of nodes, enhancing decentralization and scalability. This structure enables each node to store only a portion of data (shard), while a number of nodes ensure data accessibility. As an independent storage layer, NERO's data availability layer possesses several key features compared to traditional blockchains:\n\n* Only data storage is necessary on the chain, with no transaction execution and the absence of a world state.\n* Block verification does not rely on historical data.\n* Only the settlement layer conducts unified management."} {"url":"https://docs.nerochain.io/en/core-concepts/architecture/settlementLayer","locale":"en","section":"core-concepts","title":"Settlement layer: High-performance EVM-compatible Chain","summary":"The execution layer is key to NERO’s scalability. NERO is optimized by transferring resource-intensive transaction processing from the on-chain environment to the off-chain, while retaining the on-cha","headings":["# Settlement layer: High-performance EVM-compatible Chain","## Full Ethereum Compatibility"],"tokens":369,"markdown":"The execution layer is key to NERO’s scalability. NERO is optimized by transferring resource-intensive transaction processing from the on-chain environment to the off-chain, while retaining the on-chain focus on result validation. Dividing the transaction process into two phases. Initially, a multitude of transactions are executed off-chain and subsequently combined. Then, they are collectively submitted to the main chain for validation. The original transaction data is compressed and stored on-chain. This approach minimizes the volume of data transmitted to the main chain, thereby facilitating faster and more cost-effective transactions.\n\n## Full Ethereum Compatibility\n\nNERO believes that Ethereum is the industry standard for blockchain application development. To attract more high-quality dApps projects and developers to join the NERO ecosystem, NERO has implemented the full Ethereum protocol in the settlement layer. NERO not only has full compatibility with EVM but also keeps up with the latest EIPs so that developers can directly deploy the existing DApps on Ethereum to NERO. On the other hand, all the development tools developed on Ethereum, including Wallet, Solidity, Remix, Truffle, and Hardhat, can also be directly used on the NERO Chain. Besides, NERO is also compatible with almost all of the RPC interfaces of Ethereum, so developers can switch to NERO’s application development at no cost and get the rewards for NERO’s ecosystem development."} {"url":"https://docs.nerochain.io/en/core-concepts/consensus-mechanism/overview","locale":"en","section":"core-concepts","title":"Consensus","summary":"Consensus is the core component of a blockchain, and NERO employs a hybrid randomized DPoSA (Delegated Proof of Staked Authority) protocol. This consensus protocol, grounded in DPoSA consensus, integr","headings":["# Consensus"],"tokens":318,"markdown":"Consensus is the core component of a blockchain, and NERO employs a hybrid randomized DPoSA (Delegated Proof of Staked Authority) protocol. This consensus protocol, grounded in DPoSA consensus, integrates a random selection mechanism for nodes, thus widening participation and enhancing system decentralization. Within the consensus nodes, a BFT (Byzantine Fault Tolerance) consensus mechanism ensures fast transaction confirmations. Furthermore, the conventional consensus workflow is divided into phrase of transaction distribution, phrase of execution process and phrase of execution result spread. This approach establishes a pipeline mechanism for transaction processing, improving system throughput greatly.\n\n> ⚠️ **Note:** The randomized selection aspect of the DPoSA protocol is planned for future implementation. Currently, validator selection follows a deterministic process.\n\nThe consensus protocol of NERO selects the set of nodes to propose and validate blocks, which is an important mechanism to introduce more nodes into the system to participate in the consensus process. The consensus process is divided into different epochs according to a fixed number of blocks, and the same set of validators is used in each epoch for proposing and validating blocks."} {"url":"https://docs.nerochain.io/en/core-concepts/consensus-mechanism/pipelinedConsensus","locale":"en","section":"core-concepts","title":"Pipelined Consensus","summary":"In traditional blockchain systems such as Ethereum, the block generation process consists of several steps:","headings":["# Pipelined Consensus"],"tokens":430,"markdown":"In traditional blockchain systems such as Ethereum, the block generation process consists of several steps:\n\n- The miner (block proposer) packs the transaction and executes it;\n- The miner sets the execution results to the block header;\n- Block propagation;\n- Other nodes execute the transactions in the block;\n- And then validate the execution results of the block.\n\nIt can be seen that a transaction undergoes two serial executions from the time it is packaged to the time it reaches network-wide consensus, in addition to a serial propagation process, which has a lot of room for optimization. We take a closer look at the structure of a block, which contains a batch of transactions and various Merkle roots associated with the execution results. The transaction list mainly represents the sequence of transaction execution, while the block header can be seen as the result of the block execution. We can consider separating the consensus of these two into a transaction sequence consensus and an execution result consensus.\n\nAs depicted in Figure 4, if the block under consensus is denoted as block N, the BFT process does not consent to the entire content of block N. Instead, it agrees on the transaction list and certain metadata of block N, along with the block hash of block N - 2. Once the BFT process concludes, the consensus on block N + 1 proceeds, while block N is executed concurrently. Furthermore, given that block N contains the hash of block N - 2, the conclusion of consensus on block N also implies confirmation of block N - 2.\n\n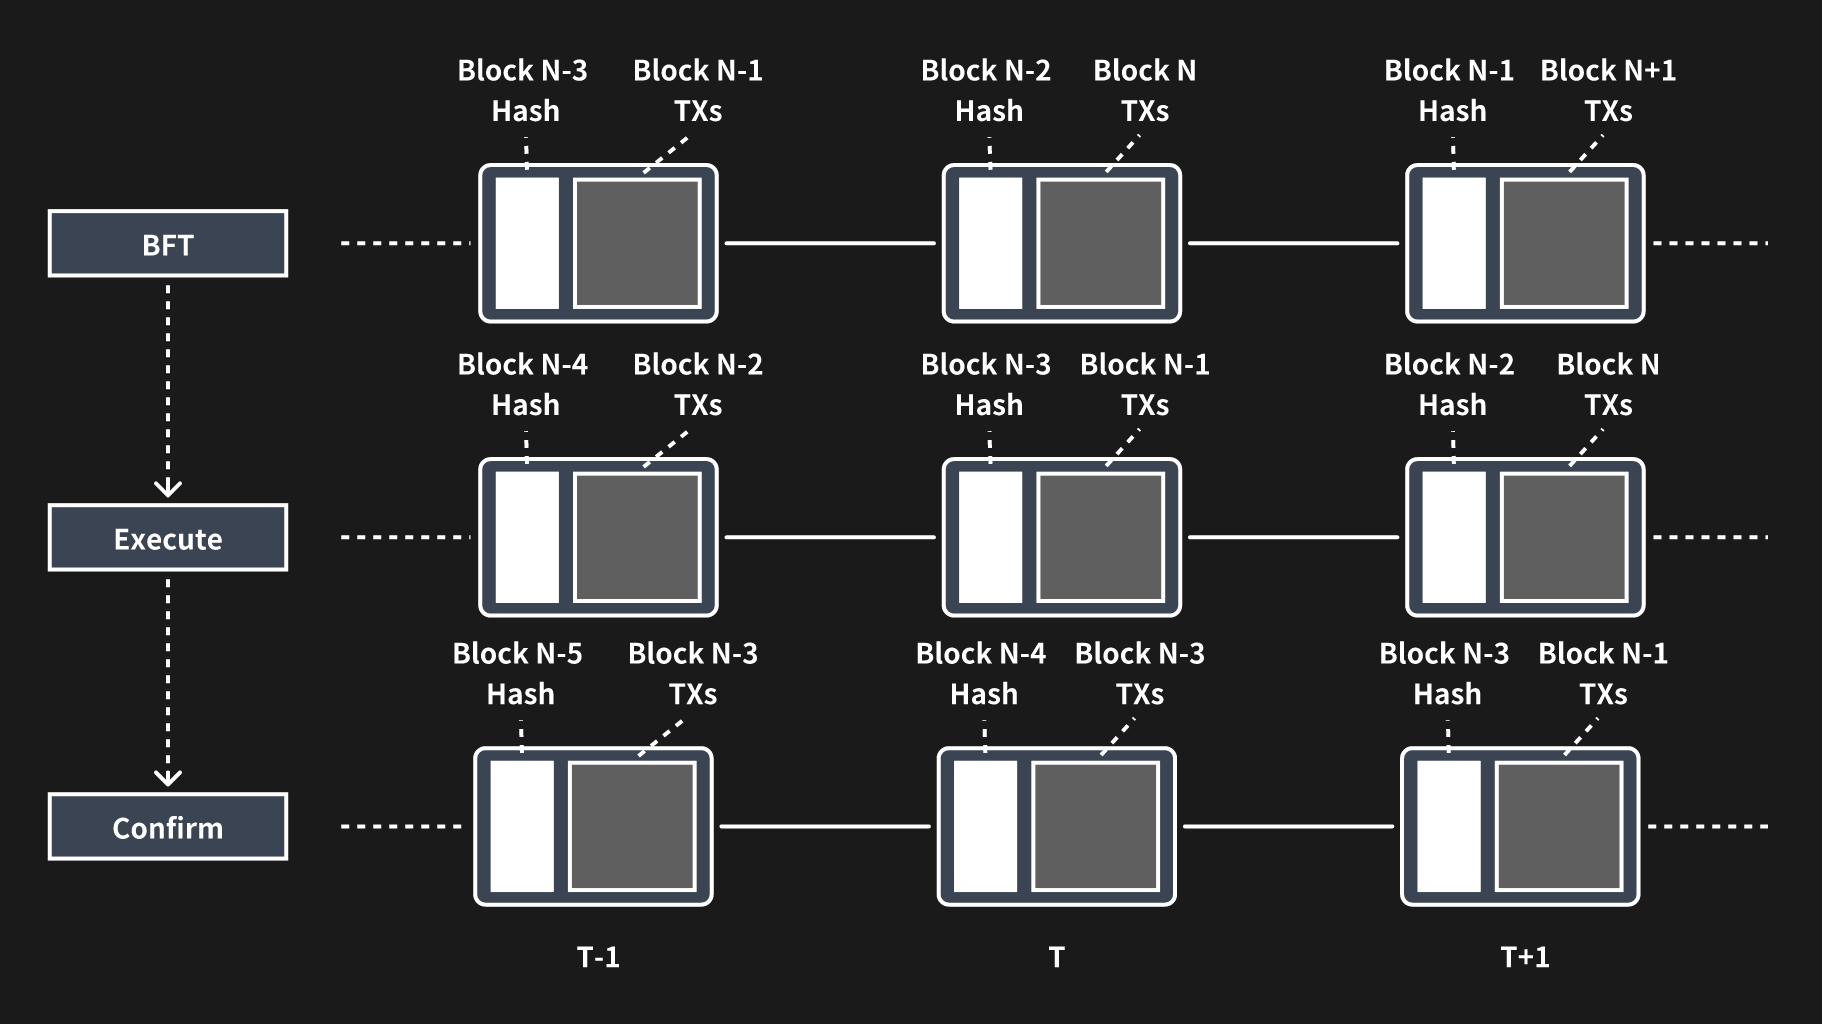\nFigure 4: Pipelined processing of BFT, execution, and validation.
"} {"url":"https://docs.nerochain.io/en/core-concepts/consensus-mechanism/randomNumberGeneration","locale":"en","section":"core-concepts","title":"Random Number Generation","summary":"> ⚠️ **Note:** This feature is planned but not currently implemented. Validator selection is currently deterministic.","headings":["# Random Number Generation"],"tokens":506,"markdown":"> ⚠️ **Note:** This feature is planned but not currently implemented. Validator selection is currently deterministic.\n\nConsidering the security of random selection above, the generation of random numbers must occur through a decentralized scheme. Additionally, it's imperative that the produced random numbers are verifiable and that consistency is ensured across all nodes. Furthermore, during the random number generation process, no single node should have the ability to influence or manipulate the outcome.\n\nThe random numbers in NERO are generated through the MPC (Multiparty Computation) approach. Each participating node initially generates its own random numbers locally. Subsequently, the system utilizes specific operations to produce a public random number derived from the contributions of all nodes. To prevent any node from accessing the random numbers of others prior to generating its own, NERO employs the cryptographic PVSS (Publicly Verifiable Secret Sharing) scheme, based on Shamir Secret Sharing, during the random number generation process. This scheme enables the current set of validators to collaboratively generate a random number while employing cryptographic techniques to safeguard against manipulation of the process. The process is as follows:\n\n* Validator $D$ partitions its secret $S$ into n fragments$(S1,...,Sn)$based on the threshold t. Then it encrypts each fragment using the public keys$(Px,...,PN)$ of the n participants, generates the corresponding commitment (by zero-knowledge proof), and shares all this information.\n* It can be verified that all the n values from validator $D$ are valid without obtaining additional information;\n* If necessary, participants can decrypt the share with their private key, and then share it with others;\n* Anyone can reconstruct the secret $S$ after obtaining $≥ t$ decrypted shares.\n\nLast but not least, the generation of a shared random number occurs at each epoch. The current epoch utilizes the random numbers generated by the previous epoch."} {"url":"https://docs.nerochain.io/en/core-concepts/data-availability/dataAvailabilityVerification/fraudProof","locale":"en","section":"core-concepts","title":"Fraud-Proof","summary":"The random sampling method mentioned above ensures that there are sufficient fragments within the network to recover the corresponding blocks, thus ensuring data availability. However, it does not gua","headings":["# Fraud-Proof"],"tokens":279,"markdown":"The random sampling method mentioned above ensures that there are sufficient fragments within the network to recover the corresponding blocks, thus ensuring data availability. However, it does not guarantee the validity of all data within these fragments. Therefore, it is necessary to address this issue through fraud-proof mechanisms.\n\nFraud proof can be categorized into proof of invalid transaction and proof of invalid data encoding. For the DA chain, the focus lies on the latter. Fraud-proof generation hinges on the ability of the RS code within each row and column of the 2D encoding to accurately reconstruct the original data. Therefore, only one row or column of data is necessary to generate the proof, resulting in a proof size proportional to the size of all data, denoted as n.\n\nIn situations where nodes gather sufficient fragments but are unable to decode them correctly, they must broadcast these fragments along with their Merkle proofs. These proofs serve as the fraud-proof, allowing other nodes to verify their authenticity. The node that first submits the fraud-proof is rewarded accordingly."} {"url":"https://docs.nerochain.io/en/core-concepts/data-availability/dataAvailabilityVerification/overview","locale":"en","section":"core-concepts","title":"Data availability verification","summary":"In terms of verification, we define the following roles of DA nodes in the DA layer of NERO: * **Common DA nodes.** Common DA nodes store the whole block of their sharding DA chain like full nodes and","headings":["# Data availability verification"],"tokens":408,"markdown":"In terms of verification, we define the following roles of DA nodes in the DA layer of NERO:\n* **Common DA nodes.** Common DA nodes store the whole block of their sharding DA chain like full nodes and provide sampled block data to others. They can also broadcast fraud-proof if some invalid block is found.\n* **Maintainer DA nodes.** Regular DA nodes have the option to stake tokens in the settlement layer, thereby qualifying as candidate maintainer DA nodes within their respective sharding chain. The top N nodes with the highest staked amounts will then assume the role of maintainer DA nodes. These nodes are entitled to share the fee generated from providing DA capabilities while also being mandated to submit block sampling data.\n\nData availability verification is conducted by validators within the settlement layer. Upon proposal of a block in the DA chain by the settlement layer's validator, who also serves as the block producer, the hash of the DA block is transmitted to the settlement layer. Subsequently, other validators within the settlement layer verify the data availability of the DA block through random sampling. If successfully verified, a settlement layer validator broadcasts the signature of the DA block hash, indicating validation. Once signatures from 2/3 of these validators are obtained, they are submitted to the settlement layer as confirmation proof.\n\nUpon passing the settlement layer verification in the subsequent settlement block, and provided no fraud-proof has been issued since the DA block is marked as confirmed within the settlement layer. Simultaneously, the next DA block is proposed."} {"url":"https://docs.nerochain.io/en/core-concepts/data-availability/dataAvailabilityVerification/randomSampling","locale":"en","section":"core-concepts","title":"Random Sampling","summary":"The DA block contains a header and body. The header is relatively small and can be downloaded and checked directly, whereas the body is much bigger, which is the one needed to be sampled randomly to v","headings":["# Random Sampling"],"tokens":854,"markdown":"The DA block contains a header and body. The header is relatively small and can be downloaded and checked directly, whereas the body is much bigger, which is the one needed to be sampled randomly to verify data availability. When a block is produced, it is sliced into $k * k$ fragments by size, and then $2k * 2k$ fragments are generated by applying the 2-dimension RS (Reed-Solomon) code. Then the Merkle trees are created for each row and column of each fragment, so there are $2k + 2k = 4k$ Merkle trees.\n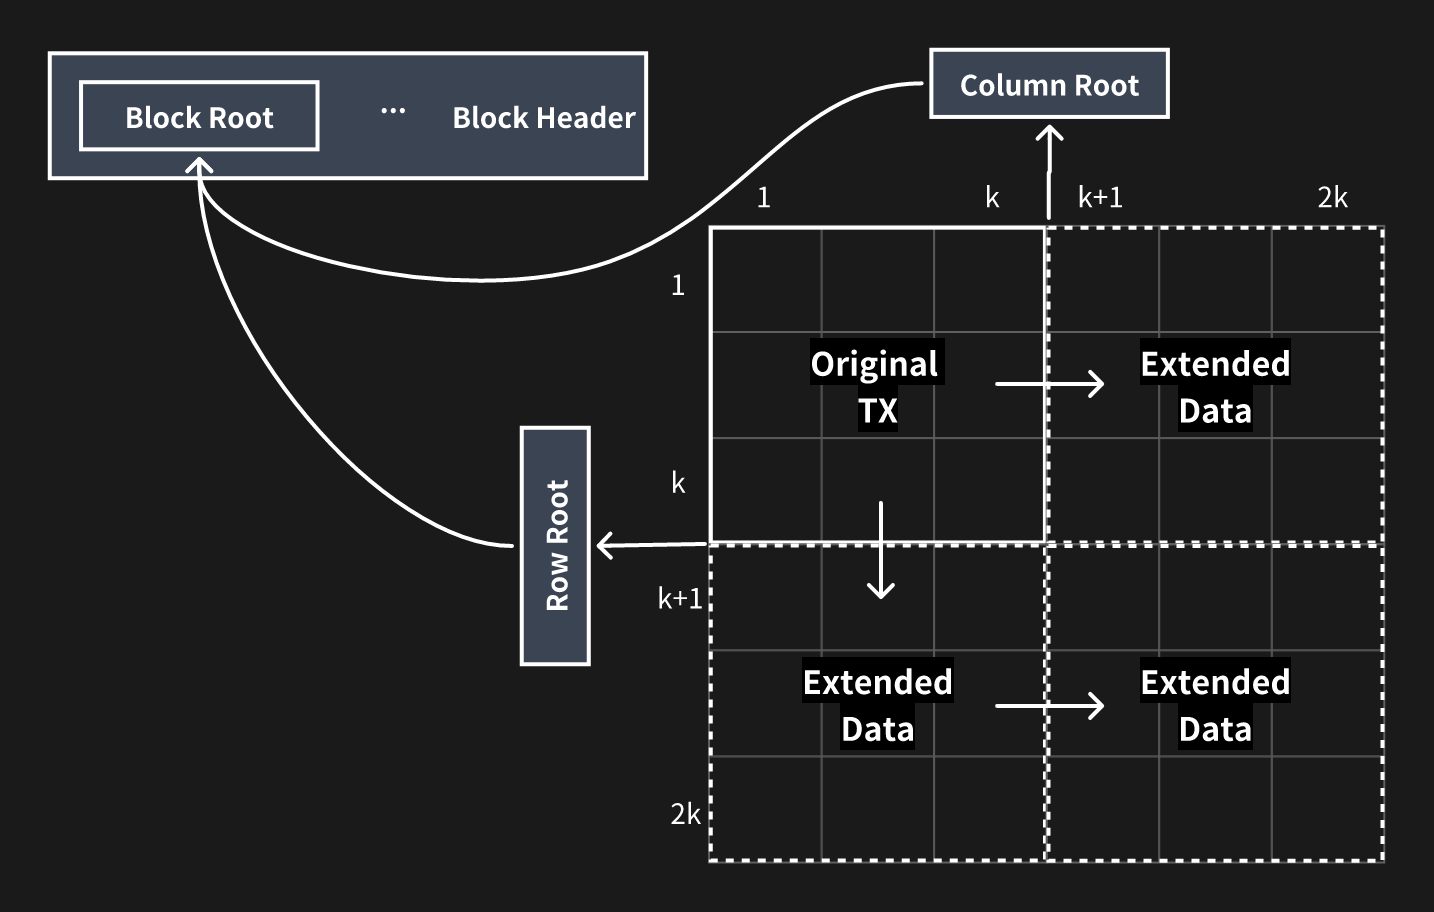\nFigure 5: Block slicing and encoding of data availability layer
\n\nThese $4k$ Merkle roots are finally formed into one Merkle tree and the root of the tree is used as the root of the whole block, and we combine the root and other metadata into the header. Then the header and original body are broadcast through the P2P network. When other DA nodes receive the block, they will repeat the 2-dimension RS encoding the same way above and calculate the root, then accept it if it is the same as the one in the header.\n\nThe validators of the settlement layer receive the header from the DA block proposer and connect to at least one of the DA nodes. These validators randomly download s of the fragments and their Merkle paths to the block root. If all of those fragments can be acquired successfully, the sampling validator can confirm the availability of the DA block at a very high possibility.\n\nNext, we will calculate the probability that an unavailable DA block is recognized as available under such a mechanism of random sampling. As stated above, the DA block is encoded into RS code of $2k * 2k$ fragments, and any k fragments of each row or column can recover that row or column, so the adversary needs to withhold at least fragments to make the whole block unavailable.\n\nAssuming that one validator randomly samples fragments from a DA block, the probability of sampling at least one unavailable fragment performed by a single validator is shown below if the DA block has minimal unavailable pieces.\n\n$$ P_{single}=1-\\frac{C_S^{2k ⋅ 2k-(k+1)^2}}{C_S^{2k ⋅ 2k}}=1-\\prod_{i=0}^{S-1}(1-\\frac{(k+1)^2}{4k^2-i}) $$\n\nThat is also the minimal probability that one can correctly recognize an unavailable DA block. And if we have N active validators in the committee of the settlement layer and at most f of them are malicious, which is less than N/3. Also, we need to collect N - f votes to confirm the DA block. Therefore, at least f+1 validators of the N - f honest ones are required to find out the unavailability to not confirm the invalid DA block. So the unavailable DA block will be recognized by the network at the probability below:\n\n$$ P_{network}=1-\\sum_{i=0}^f C_i^{N-f} ⋅ P_{single} ⋅ (1-P_{single})^{N-f-i} $$\n\nIn NERO, we have N = 21, f = 6, so the probabilities can be calculated under different k and S below\n\n$$ k=64, S=5 ⇒ P_{single}=77.94\\%, P_{network}=99.81\\% $$\n\n$$ k=64, S=10 ⇒ P_{single}=94.94\\%, P_{network}=99.9999917\\% $$\n\n$$ k=128, S=10 ⇒ P_{single}=94.66\\%, P_{network}=99.9999987\\% $$\n\n$$ k=128, S=15 ⇒ P_{single}=98.77\\%, P_{network}=99.9999999999969\\% $$\n\nWe can see that when $k = 128$ and $S = 15$ any unavailable DA block will be revealed at the probability of almost 100%, and the sampling validator only needs to download 0.09% of the original data in such condition."} {"url":"https://docs.nerochain.io/en/core-concepts/data-availability/modelAndAssumptions","locale":"en","section":"core-concepts","title":"Model and Assumptions","summary":"* **Topology:** Nodes are interconnected via a P2P network. * **Maximum network delay:** The network's maximum delay is denoted as $D$. If an honest node receives specific data in the network at time ","headings":["# Model and Assumptions"],"tokens":145,"markdown":"Firstly, we establish the network model:\n\n* **Topology:** Nodes are interconnected via a P2P network.\n* **Maximum network delay:** The network's maximum delay is denoted as $D$. If an honest node receives specific data in the network at time $T$, then other honest nodes can acquire the same data before time $T + D$.\n\nSubsequently, the security model is outlined as follows:\n\n* Detection of any invalid block is guaranteed, as at least one honest node in the network will uncover and disseminate it.\n* Each honest node maintains connections with at least one other honest node."} {"url":"https://docs.nerochain.io/en/core-concepts/data-availability/overview","locale":"en","section":"core-concepts","title":"Data availability","summary":"Data availability is also the key component of NERO, which is quite critical for rollups. In NERO, we designed a new type of chain and transaction, especially for data availability as an independent l","headings":["# Data availability"],"tokens":210,"markdown":"Data availability is also the key component of NERO, which is quite critical for rollups. In NERO, we designed a new type of chain and transaction, especially for data availability as an independent layer, known as the data availability (DA) layer. The DA layer is also under the management of the settlement layer and maintained by a group of nodes (DA nodes) that have staked tokens in the settlement layer. Validators in the settlement layer can check the availability of DA blocks through random sampling and fraud-proof, thus confirming the DA chain.\nIn addition, we can broaden the scope of DA nodes to encompass multiple groups, with each group maintaining a distinct DA chain. This approach enables us to establish a sharding system, thereby catering to diverse storage demands. The overall system architecture is illustrated below."} {"url":"https://docs.nerochain.io/en/core-concepts/data-availability/transactionFeesAndIncentives","locale":"en","section":"core-concepts","title":"Transaction Fees and Incentives","summary":"Figure 6: Data availability layer transaction format","headings":["# Transaction Fees and Incentives"],"tokens":134,"markdown":"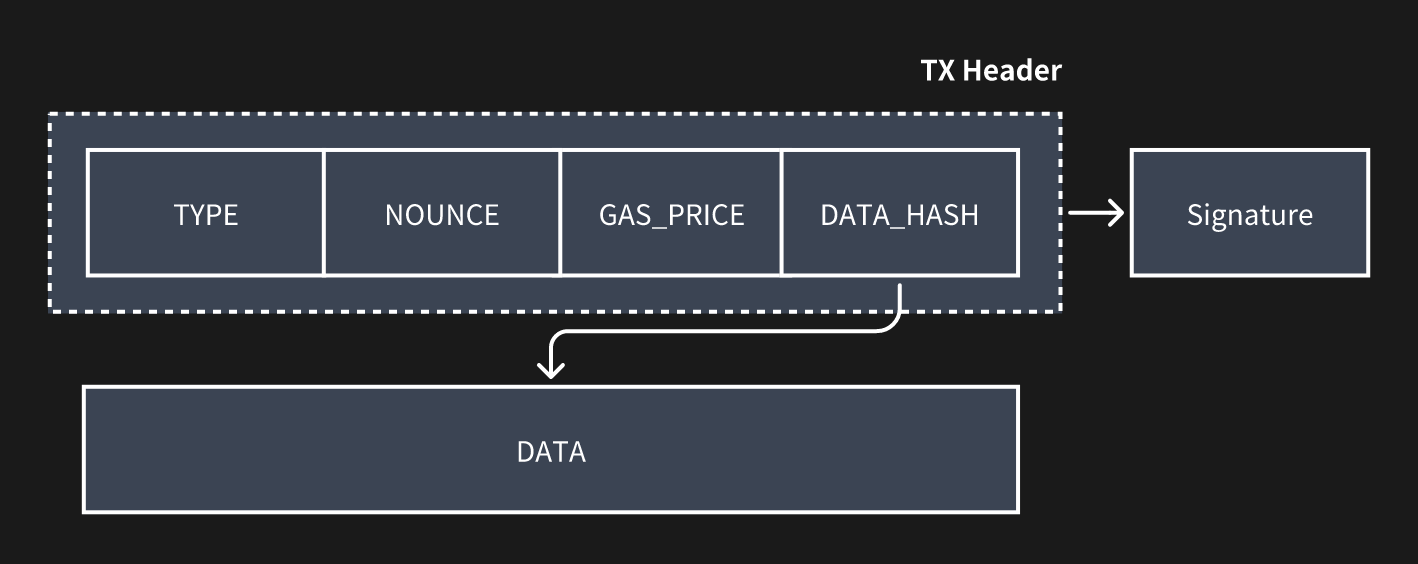\nFigure 6: Data availability layer transaction format
\n\nThe header of the DA transaction will also be committed to the settlement layer alongside the DA block hash when the data availability verification has been passed. Then the transaction fees will be deducted from the senders' accounts and distributed as rewards to the DA block proposer, the DA block confirmation proposer, and all the related DA maintainer nodes of this shard."} {"url":"https://docs.nerochain.io/en/core-concepts/fee-sharing/Overview","locale":"en","section":"core-concepts","title":"Fee-sharing Mechanism in Ecosystem","summary":"> ⚠️ **Note:** The automatic fee-sharing mechanism described here is a future feature and is not yet active in the current mainnet/testnet. Currently, there is a Fee sharing mechanism as a off-chain a","headings":["# Fee-sharing Mechanism in Ecosystem"],"tokens":496,"markdown":"> ⚠️ **Note:** The automatic fee-sharing mechanism described here is a future feature and is not yet active in the current mainnet/testnet. Currently, there is a Fee sharing mechanism as a off-chain agreement with NERO Foundation. \n\nThe application fee-sharing mechanism in NERO is designed to incentivize and reward ecosystem participants for their contributions to the network. This mechanism ensures that transaction fees generated by dApps are redistributed among widely used applications, fostering a sustainable and collaborative economic alignment.\n\n**Contribution-Based Rewards:** NERO's fee-sharing mechanism allocates transaction fees based on the contributions made by various applications in the network. This includes developers who create and deploy dApps, and validators who secure and validate transactions on the blockchain. Each dApp's contribution will be measured and quantified, and they are rewarded accordingly with a portion of the transaction fees generated by them.\n\n**Customizable Parameters:** NERO's fee-sharing mechanism offers flexibility and customization options to accommodate the diverse needs and preferences of ecosystem participants. Developers have the ability to define the specific rules and parameters governing fee-sharing arrangements within their dApps, allowing them to tailor the distribution of transaction fees according to their unique business models and fee-sharing agreements.\n\n**Economic Alignment:** By distributing transaction fees among applications, NERO's fee-sharing mechanism aligns economic incentives and fosters cooperation and alignment of interests within the ecosystem. Developers are incentivized to create high-quality dApps that attract users and generate transaction volume. This economic alignment promotes the growth and sustainability of the NERO ecosystem over time.\n\n\nFigure 10: Fee-sharing mechanism
"} {"url":"https://docs.nerochain.io/en/core-concepts","locale":"en","section":"core-concepts","title":"Overview","summary":"Since the introduction of Bitcoin, blockchain technology and the concept of decentralization have progressively gained popularity. Ethereum, with its smart contracts, opened the door to nearly limitle","headings":["# Overview"],"tokens":961,"markdown":"Since the introduction of Bitcoin, blockchain technology and the concept of decentralization have progressively gained popularity. Ethereum, with its smart contracts, opened the door to nearly limitless applications for distributed ledger technology. Early blockchain technology primarily addressed concerns related to security and decentralization, emphasizing the resolution of trust issues. As the demand for transaction processing capacity surged, Solana and other permissionless blockchains proposed solutions to scale processing performance to tens of thousands of TPS. Nevertheless, the current pivotal challenge lies in delivering an improved experience for users and developers, given the explosive growth of decentralized applications like Defi, GameFi, and NFTs. For instance, users must rely on the encryption method provided by each blockchain exclusively, and nothing will help if they happen to lose their private keys. Besides, dApps also cannot share transaction fees, even if they have a significant contribution to the transaction volumes. This is not conducive to the formation of an ecosystem. The inflexibility in user operations and the fee mechanism are hindering the development of the decentralized economy.\n\nThe account abstraction solution of the Ethereum community has alleviated the mentioned issues above to some extent, but not in a somewhat thorough, native manner. Additionally, there is currently a lack of fee-sharing mechanisms which are widely used within decentralized communities to attract applications and foster ecosystem economic alignment.\n\nThe Flexibility of the blockchain needs to be increased in order to address the issues. Therefore, we propose NERO, a next-generation modular blockchain featuring a native account abstraction mechanism, that is secure, scalable, and most importantly, flexible. NERO introduces a more structured and native mechanism for account abstraction, including integrated smart contracts, user operation pools, Paymaster, and more. This enables users to navigate the Web3 world with the familiarity of web2 experiences. Additionally, NERO has devised a gas fee economics model that empowers DApps by sharing the gas fee according to the contribution, encouraging DApps to make every effort to optimize themselves. Moreover, NERO adopts a modular design to ensure high-performance transaction processing. The entire process is vertically divided into execution, settlement, and data availability. Along with a settlement chain fully compatible with EVM and Ethereum protocols, with the consensus that supports large-scale node participation. Its data availability is based on data sampling validation schemes, which currently have the highest efficiency.\n\nNERO is designed to collaborate with and support the development of dApps within its ecosystem. It establishes a novel foundation by leveraging a high-performance underlying permissionless blockchain, gradually adding flexibility enhancement in phases. NERO actively supports the development of Web 3.0 through innovative concepts, forming a permissionless blockchain with complete underlying capabilities that everyone can participate in. Compared with other permissionless blockchains, NERO is committed to making innovations and contributions in flexibility as well as transaction scaling, with the following 5 core technical features:\n\n- Utilizing native account abstraction for a Web2-like user experience\n- Blockspace 2.0: Implementing a multidimensional gas fee economy with transaction fee redistribution across the ecosystem dApps\n- Employing a pipelined optimized BFT consensus mechanism, ensuring high throughput, decentralization, security, and fast transaction confirmation\n- Ensuring full compatibility with Ethereum protocols and EVM, facilitating seamless application migration within the ecosystem"} {"url":"https://docs.nerochain.io/en/core-concepts/native-account-abstraction/MpcTssTechnologyIntegration","locale":"en","section":"core-concepts","title":"MPC-TSS Technology Integration","summary":"NERO employs a cutting-edge technology known as MPC-TSS(Multi-Party Computation with Threshold Secret Sharing) to enhance the security and control of EOAs(Externally Owned Accounts). MPC-TSS represent","headings":["# MPC-TSS Technology Integration"],"tokens":386,"markdown":"NERO employs a cutting-edge technology known as MPC-TSS(Multi-Party Computation with Threshold Secret Sharing) to enhance the security and control of EOAs(Externally Owned Accounts). MPC-TSS represents a sophisticated cryptographic technique that enables secure and distributed computation among multiple parties, ensuring that no single entity has access to sensitive information in its entirety.\n\nWith MPC-TSS, the control over EOAs in the NERO ecosystem is decentralized and safeguarded against potential security threats. Rather than relying on a single entity or centralized authority to manage and control EOAs, MPC-TSS distributes control among multiple parties, each holding a share of the cryptographic key required to access the EOA. This distribution of control ensures that no single party can access the EOA's assets or perform unauthorized transactions without the cooperation of the other parties involved in the MPC-TSS protocol.\n\nMoreover, MPC-TSS enhances the resilience of EOA control by implementing a threshold mechanism, which specifies the minimum number of parties required to collaboratively reconstruct the cryptographic key and access the EOA. This threshold-based approach adds an additional layer of security, as it ensures that even if some parties become compromised or unavailable, the EOA remains protected as long as the threshold requirement is not breached.\n\n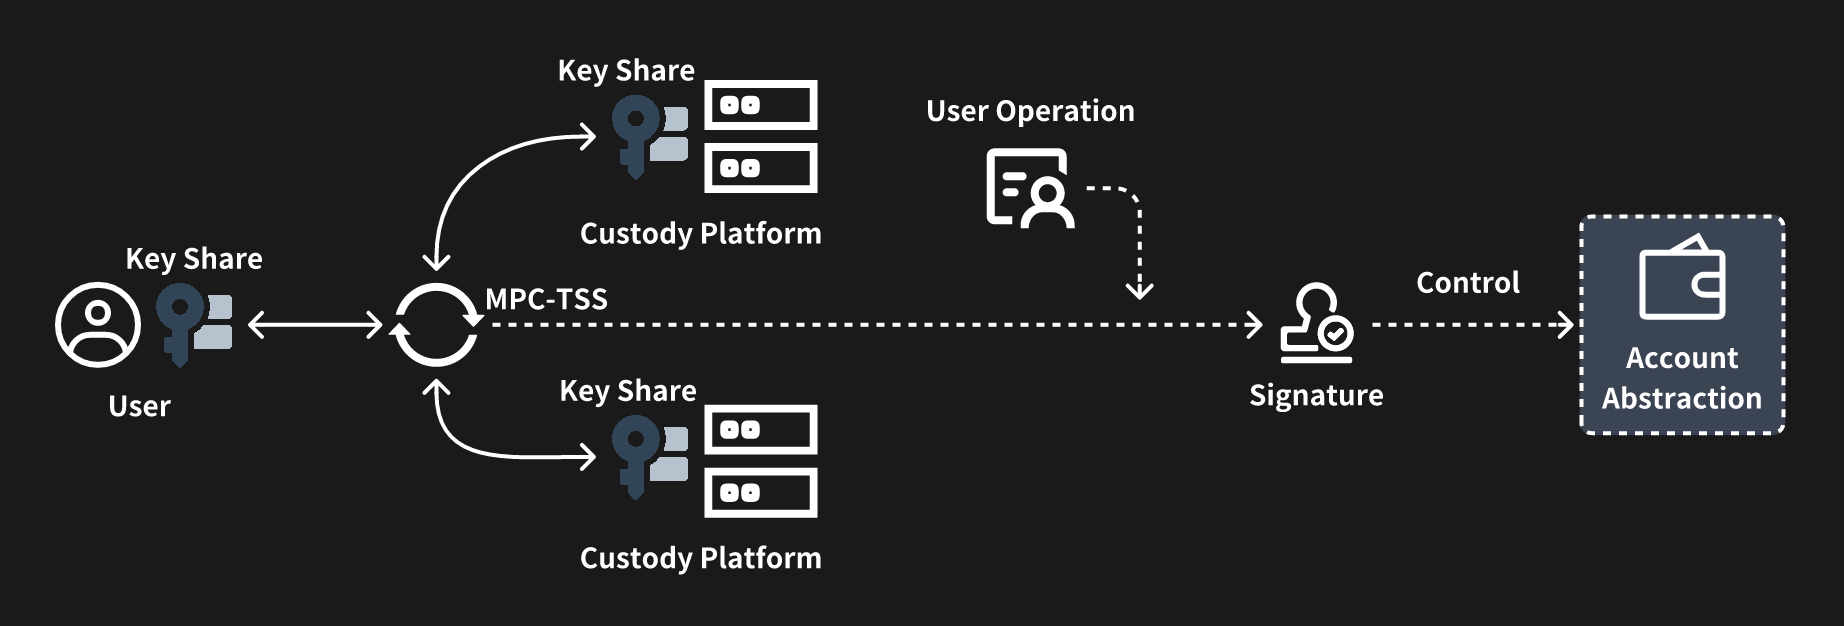\nFigure 9: Account abstraction with MPC-TSS
"} {"url":"https://docs.nerochain.io/en/core-concepts/native-account-abstraction/flexibleGasMechanism","locale":"en","section":"core-concepts","title":"Flexible Gas Mechanism","summary":"NERO developed a module called Paymaster, which is responsible for managing the payment of transaction fees associated with user operations on the blockchain. As part of the account abstraction model,","headings":["# Flexible Gas Mechanism"],"tokens":449,"markdown":"NERO developed a module called Paymaster, which is responsible for managing the payment of transaction fees associated with user operations on the blockchain. As part of the account abstraction model, the Pay Master serves to abstract the handling of transaction fees away from the users and into a centralized contract entity, streamlining the fee payment process and enhancing user experience.\n\nThe primary function of the Pay Master is to facilitate the payment of transaction fees incurred by users when interacting with the blockchain. In traditional blockchain systems, users are required to manually include transaction fees with each transaction they submit to the network. However, in account abstraction, this responsibility is shifted to the Pay Master contract, relieving users of the burden of managing transaction fees directly. When a user initiates a transaction or performs any other operation that incurs a fee, the corresponding operation is processed through the Pay Master contract. The Pay Master calculates the appropriate fee based on factors such as the complexity of the operation and current network conditions. It then deducts the fee from the user's account balance or prompts the user to authorize the payment of the fee through a separate mechanism.\n\nFurthermore, the Pay Master may incorporate additional features and functionalities to enhance its capabilities. For example, it may implement dynamic fee adjustment algorithms to optimize fee pricing based on network congestion levels or user preferences. It may also support various payment methods and fee structures to accommodate diverse user needs and preferences.\n\n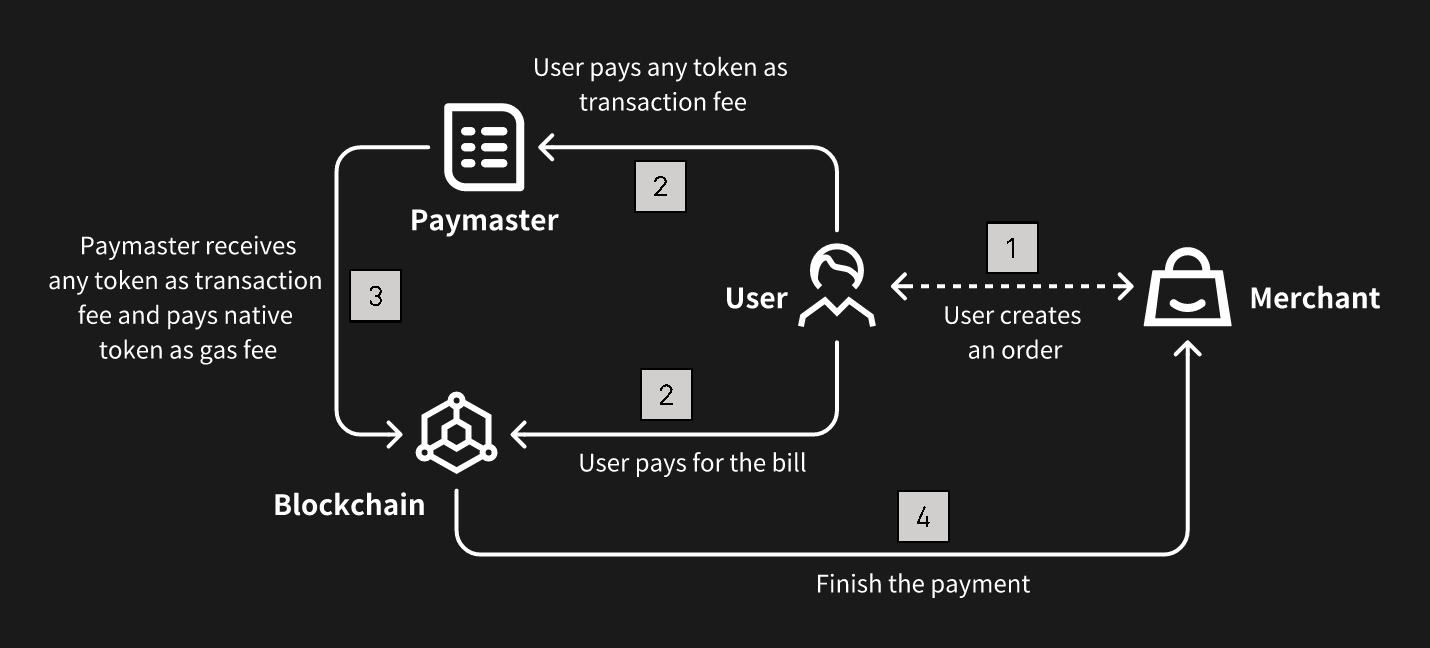\nFigure 8: Flexible gas fee mechanism
"} {"url":"https://docs.nerochain.io/en/core-concepts/native-account-abstraction/keyComponents","locale":"en","section":"core-concepts","title":"Key Components","summary":"Account abstraction redefines the way user accounts are managed and interacted with on the blockchain. By abstracting account management into smart contracts, account abstraction enables greater flexi","headings":["# Key Components"],"tokens":531,"markdown":"Account abstraction redefines the way user accounts are managed and interacted with on the blockchain. By abstracting account management into smart contracts, account abstraction enables greater flexibility, security, and efficiency in DApps. NERO has built all the key components of account abstraction inside its own framework, including the User Operation Mempool, Bundler, and Entry Point Contract:\n\n**User Operation Mempool:** The User Operation Mempool serves as the repository for pending user operations awaiting execution on the blockchain. It functions similarly to the traditional transaction mempool but is specifically designed to handle user operations within the context of account abstraction. When users initiate account-related operations, such as fund transfers or smart contract interactions, these operations are temporarily stored in the User Operation Mempool until they are processed by the blockchain.\n\n**Bundler:** The Bundler is responsible for packaging and bundling user operations from the User Operation Mempool into atomic bundles for execution on the blockchain. It aggregates multiple user operations into a single transaction bundle, optimizing the use of blockchain resources and reducing transaction overhead. The Bundler ensures that bundled operations are executed atomically, meaning that either all operations within the bundle are executed successfully, or none of them are, ensuring consistency and integrity across the blockchain.\n\n**Entry Point Contract:** The Entry Point Contract serves as the interface through which users interact with their abstract accounts on the blockchain. It is a smart contract deployed on the blockchain that acts as the entry point for all user operations related to a specific abstract account. The Entry Point Contract contains the logic necessary to handle incoming user operations, such as depositing funds, withdrawing funds, or invoking custom account functions. Users interact with their abstract accounts by sending transactions to the Entry Point Contract, which then routes the operations to the appropriate account contract for execution."} {"url":"https://docs.nerochain.io/en/core-concepts/native-account-abstraction/nativeAccountAbstractionSupport","locale":"en","section":"core-concepts","title":"Native Account Abstraction Support","summary":"Account abstraction is a concept within blockchain technology that aims to provide flexible management of user accounts based on smart contracts. Traditionally, in blockchain networks, user accounts a","headings":["# Native Account Abstraction Support"],"tokens":661,"markdown":"Account abstraction is a concept within blockchain technology that aims to provide flexible management of user accounts based on smart contracts. Traditionally, in blockchain networks, user accounts are managed directly through the blockchain's native account system, with each account possessing an address and a private key. These accounts are used to send and receive cryptocurrency and interact with smart contracts deployed on the blockchain. However, with account abstraction, the responsibility for managing user accounts is shifted away from the blockchain's native account system and into the realm of smart contracts themselves. In this model, user accounts are represented as smart contracts, with management modules containing the necessary logic to handle transactions and manage balances. Users interact with their accounts by invoking methods on these smart contract representations, rather than by directly interacting with the blockchain's account system.\n\nNERO deeply integrates the account abstraction model, natively supporting various functions of abstract accounts, and systematically enhances user interactions in the following aspects:\n\n* **Enhanced Flexibility:** By abstracting account management into smart contracts, users gain greater flexibility and control over their accounts. They can define custom account structures and behaviors to suit their specific needs, rather than being constrained by the limitations of the blockchain's native account system.\n* **Improved Privacy:** Account abstraction can improve privacy by enabling users to implement sophisticated privacy-enhancing techniques within their account contracts. For example, users can implement privacy-preserving transaction protocols like zero-knowledge proofs or ring signatures directly within their account contracts, enhancing the confidentiality of their transactions.\n* **Reduced Gas Costs:** Account abstraction can potentially reduce gas costs for users by enabling more efficient transaction processing. Since account contracts can implement custom transaction logic tailored to specific use cases, they can optimize transaction execution to minimize gas consumption. This can result in cost savings for users, particularly for complex or frequent transactions.\n* **Enhanced Security:** By abstracting account management into smart contracts, account abstraction can enhance security by reducing the attack surface of the blockchain's native account system. Smart contracts can implement robust security measures, such as multi-signature authentication or time-locked transactions, to protect user funds and prevent unauthorized access."} {"url":"https://docs.nerochain.io/en/core-concepts/references","locale":"en","section":"core-concepts","title":"References","summary":"1. M. Al-Bassam, A. Sonnino, and V. Buterin, \"Fraud proofs: Maximising light client security and scaling blockchains with dishonest majorities,\" *CoRR*, vol. abs/1809.09044, 2018.","headings":["# References"],"tokens":788,"markdown":"1. M. Al-Bassam, A. Sonnino, and V. Buterin, \"Fraud proofs: Maximising light client security and scaling blockchains with dishonest majorities,\" *CoRR*, vol. abs/1809.09044, 2018.\n\n2. E. Syta, P. Jovanovic, E. Kokoris-Kogias, N. Gailly, L. Gasser, I. Khoffi, M. J. Fischer, and B. Ford, \"Scalable Bias-Resistant Distributed Randomness,\" In *38th IEEE Symposium on Security and Privacy*, May 2017.\n\n3. The Ethereum Team, \"A note on data availability and erasure coding,\" [https://github.com/ethereum/research/wiki/A-note-on-data-availability-and-erasure-coding](https://github.com/ethereum/research/wiki/A-note-on-data-availability-and-erasure-coding)\n\n4. Satoshi Nakamoto, \"Bitcoin: A peer-to-peer electronic cash system,\" 2008. [https://bitcoin.org/bitcoin.pdf](https://bitcoin.org/bitcoin.pdf)\n\n5. The Ethereum Foundation, \"Ethereum Whitepaper.\" [https://github.com/ethereum/wiki/wiki/White-Paper](https://github.com/ethereum/wiki/wiki/White-Paper)\n\n6. E. Kokoris-Kogias, P. Jovanovic, L. Gasser, N. Gailly, E. Syta, and B. Ford, \"Omniledger: A secure, scale-out, decentralized ledger via sharding,\" in *2018 IEEE Symposium on Security and Privacy (SP)*, pp. 19–34, 2018.\n\n7. A. Kiayias, I. Konstantinou, A. Russell, B. David, and R. Oliynykov, \"Ouroboros: A provably secure proof-of-stake blockchain protocol,\" *Cryptology ePrint Archive*, Report 2016/889, 2016. [http://eprint.iacr.org/](http://eprint.iacr.org/)\n\n8. George Danezis and Sarah Meiklejohn, \"Centrally banked cryptocurrencies,\" In *23rd Annual Network and Distributed System Security Symposium, NDSS*, 2016.\n\n9. P. Daian, R. Pass and E. Shi, \"Snow White: Robustly reconfigurable consensus and applications to provably secure proofs of stake,\" *Cryptology ePrint Archive*, Report 2016/919, 2017.\n\n10. M. Zamani, M. Movahedi, and M. Raykova, \"RapidChain: A Fast Blockchain Protocol via Full Sharding,\" *Cryptology ePrint Archive*, Report 2018/460, 2018. [https://eprint.iacr.org/2018/460](https://eprint.iacr.org/2018/460)\n\n11. P. Vasin, \"Blackcoin's Proof-of-Stake Protocol v2,\" 2014. [https://blackcoin.co/blackcoin-pos-protocol-v2-whitepaper.pdf](https://blackcoin.co/blackcoin-pos-protocol-v2-whitepaper.pdf)\n\n12. Loi Luu, Viswesh Narayanan, Chaodong Zheng, Kunal Baweja, Seth Gilbert, and Prateek Saxena, \"A secure sharding protocol for open blockchains,\" In *Proceedings of the 2016 ACM SIGSAC Conference on Computer and Communications Security*, CCS '16, pages 17–30, 2016.\n\n13. Rafael Pass and Elaine Shi, \"Thunderella: Blockchains with optimistic instant confirmation.\" [https://eprint.iacr.org/2017/913.pdf](https://eprint.iacr.org/2017/913.pdf)\n\n14. Joseph Poon, Vitalik Buterin, \"Plasma: Scalable Autonomous Smart Contracts.\" [http://plasma.io/plasma-deprecated.pdf](http://plasma.io/plasma-deprecated.pdf)\n\n15. Vitalik Buterin, \"An Incomplete Guide to Rollups,\" [https://vitalik.ca/general/2021/01/05/rollup.html](https://vitalik.ca/general/2021/01/05/rollup.html)\n\n16. S. Dziembowski, S. Faust, and K. Hostakova, \"Foundations of state channel networks,\" *Cryptology ePrint Archive*, Report 2018/320, 2018. [https://eprint.iacr.org/2018/320](https://eprint.iacr.org/2018/320)"} {"url":"https://docs.nerochain.io/en/developer-tools/aa-platform/configuring-policies","locale":"en","section":"developer-tools","title":"Configuring Policies","summary":"Policies determine how your application handles transaction fees for users. There are four main configurations to consider:","headings":["# Configuring Policies","## Enabling ERC20 Payments","### Selecting tokens that supports Gas Payment","### Strategy Types Explained","## Giving Discounts per Address","## Offers for all addresses","## Specify Callbacks","## Next Steps"],"tokens":968,"markdown":"Policies determine how your application handles transaction fees for users. There are four main configurations to consider:\n\n- Enabling ERC20 Payments\n- Discounts per Address\n- Offers for all addresses\n- Specify Callbacks\n\n## Enabling ERC20 Payments\n\n1. Go to the \"API Keys\" tab and select the desired APIKey to configure\n2. Click in the \"Policies\" tab\n3. Click on the ERC-20 Payment toggle\n4. Select Between the Payment modes: Pre-Payment and Post Payment or only Pre-Payment\n\n\n \n \n*Figure 1: Configuring a Gas Policy*\n\n### Selecting tokens that supports Gas Payment\nHere you can select any ERC20 token you wish to receive as Payment for Gas. \n\n1. Click on the \"Select\" button\n2. Select the tokens on the list or Input a Token contract in the text field to make it appear on the list\n3. \"Confirm\" your selection\n4. Configure the Gas-Payment Floating rate.\n5. Click in the \"Save\" button at the end of the dashboard.\n\n\n \n \n*Figure 2: Selecting Tokens for Gas Supported.*\n\n### Strategy Types Explained\n\n#### Free Gas (Type 0)\n\nWith this strategy, you fully cover the gas costs for your users. This is ideal for:\n- Onboarding new users who don't own crypto\n- Promotional campaigns\n- Applications where you want to remove all friction\n- GameFi applications where you want to hide blockchain complexity\n\n#### ERC20 Prepay (Type 1)\n\nUsers pay for gas using ERC20 tokens before the transaction is executed:\n- The full estimated amount is collected upfront\n- Any excess is refunded after execution\n- More secure for the developer as payment is guaranteed\n- Better suited for high-value operations\n\n#### ERC20 Postpay (Type 2)\n\nUsers pay for gas using ERC20 tokens after the transaction is executed:\n- Only the exact gas cost is collected\n- Requires token approval before execution\n- Slightly better UX as users only pay what's needed\n- Has a risk of payment failure after execution\n\n## Giving Discounts per Address\n\nYou can configure the total USD or native tokens you are willing to sponsor per address.\n\n1. On the Policies tab, toggle the \"Discount per address\" option\n2. Configure the amount of times per address per day, week , or month modes.\n3. Maximum free amount per new address : you can use this to set a total limit you can sponsor per address\n4. You can also set the amount of overral free times an address can be sponsored. \n5. Click on the \"Save\" button.\n\n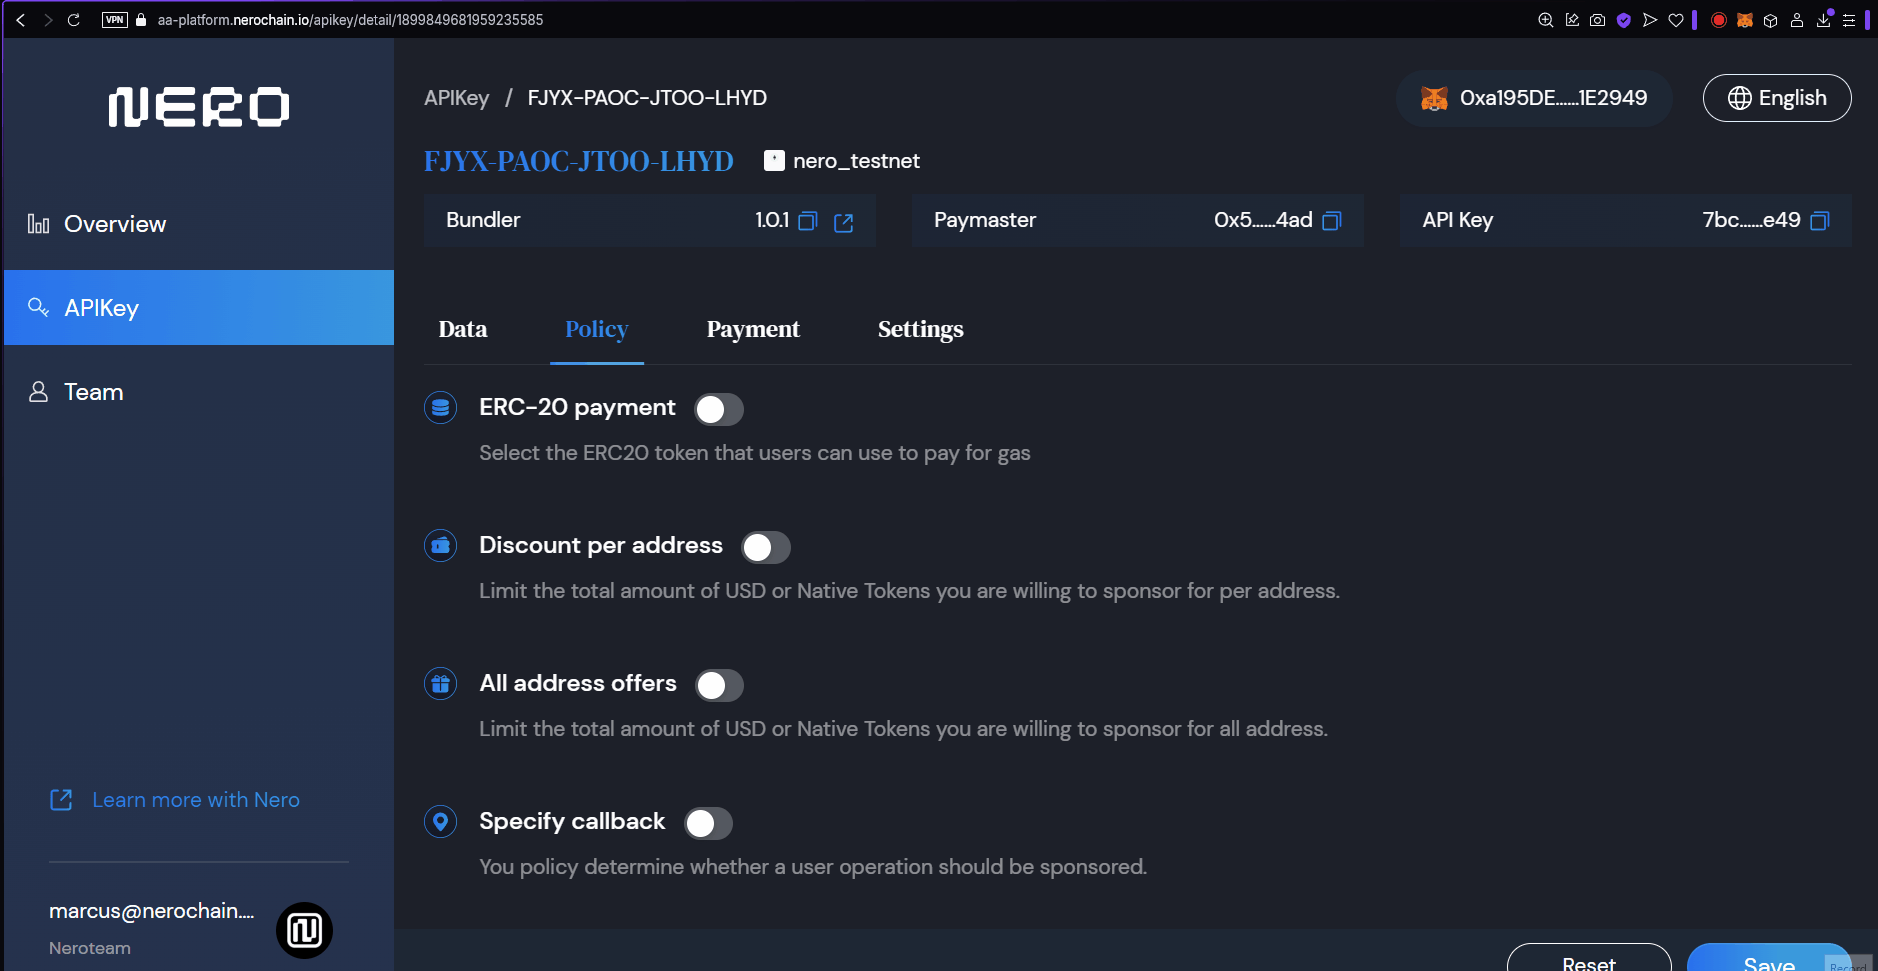\n \n \n*Figure 3: Configuring Discounts.*\n\n## Offers for all addresses\n\nYou can also have a similar configuration configured for all address at the same time.\n\n1. On the Policies tab, toggle the \"All Addresses offer\" option\n2. Configure the amount of times per address per day, week , or month modes.\n3. Maximum free amount per new address : you can use this to set a total limit you can sponsor per address\n4. You can also set the amount of overral free times an address can be sponsored. \n5. Click on the \"Save\" button.\n\n\n \n \n*Figure 4: Configuring Discounts for all addresses.*\n\n## Specify Callbacks\n\nYou can set specific addresses wheter a user operation should be sponsored or not.\n\n1. Toggle the \"Specify Callback\" option.\n2. Set the address\n3. Save\n\n## Next Steps\n\nAfter configuring your policies, you should:\n- [Manage your payments](https://docs.nerochain.io/en/developer-tools/aa-platform/payment-management) to ensure sufficient funds for your strategies\n- [Integrate with your application](https://docs.nerochain.io/en/developer-tools/aa-platform/integration-and-best-practices) to start using your configured policies"} {"url":"https://docs.nerochain.io/en/developer-tools/aa-platform/entrypoint-error-codes","locale":"en","section":"developer-tools","title":"EntryPoint Error Codes Documentation","summary":"This document provides a comprehensive reference for all error codes used in the EntryPoint contract. Error codes follow the pattern `AAmn`, where:","headings":["# EntryPoint Error Codes Documentation","## Error Codes Reference Table","## Notes","## Quick Reference by Category","### Factory/InitCode Errors (AA1x)","### Account Errors (AA2x)","### Paymaster Errors (AA3x)","### Gas/Validation Errors (AA4x)","### PostOp Errors (AA5x)","### Other/Internal Errors (AA9x)"],"tokens":2192,"markdown":"This document provides a comprehensive reference for all error codes used in the EntryPoint contract. Error codes follow the pattern `AAmn`, where:\n\n- `m` indicates the category:\n - `1` = Factory/InitCode issues\n - `2` = Account issues\n - `3` = Paymaster issues\n - `4` = Gas/Validation issues\n - `5` = PostOp issues\n - `9` = Other/Internal issues\n\n- `n` is a specific error number within that category\n\n## Error Codes Reference Table\n\n| Code | Category | Error Message | Description | Location | Common Causes | Resolution |\n|------|----------|---------------|-------------|-----------|----------------|------------|\n| **AA10** | Factory | `\"AA10 sender already constructed\"` | Sender account contract already exists at the specified address | `_createSenderIfNeeded()` | UserOperation includes `initCode` but account already deployed | Remove `initCode` or use different sender address |\n| **AA13** | Factory | `\"AA13 initCode failed or OOG\"` | Account creation via `initCode` failed | `_createSenderIfNeeded()` | Factory reverts, insufficient gas, or returns `address(0)` | Check factory contract, ensure sufficient `verificationGasLimit` |\n| **AA14** | Factory | `\"AA14 initCode must return sender\"` | Factory returned address doesn't match expected sender | `_createSenderIfNeeded()` | Factory returns different address than calculated | Ensure factory uses correct address calculation method |\n| **AA15** | Factory | `\"AA15 initCode must create sender\"` | No code deployed at sender address after `initCode` execution | `_createSenderIfNeeded()` | Factory execution completed but no contract code exists | Verify factory properly deploys account contract |\n| **AA20** | Account | `\"AA20 account not deployed\"` | Account contract doesn't exist and no `initCode` provided | `_validateSenderAndPaymaster()` (simulation only) | Account not deployed, no `initCode` | Provide `initCode` or ensure account is deployed |\n| **AA21** | Account | `\"AA21 didn't pay prefund\"` | Account deposit insufficient to cover required prefund | `_validateAccountPrepayment()` | Account deposit < required prefund | Deposit sufficient funds to EntryPoint for account |\n| **AA22** | Account | `\"AA22 expired or not due\"` | UserOperation outside valid time range | `_validateAccountAndPaymasterValidationData()` | Block timestamp after `validUntil` or before `validAfter` | Submit within valid time window |\n| **AA23** | Account | `\"AA23 reverted:Figure 12: spacify callback
\n\n### 2. API Call\n\n```bash\nPOST /v1/apiKey/policy/saveOrUpdate\n{\n \"projectId\": 123,\n \"policy\": {\n \"isCallback\": true,\n \"callbackUrl\": \"https://your-callback-server.com/paymaster/callback\"\n }\n}\n```\n\n## Callback Protocol\n\n### Request Specification\n\n- URL: Callback URL specified in project settings\n- Method: POST\n- Content-Type: application/json\n- Timeout: 2 seconds\n\n### Headers\n\n```jsx\nAPI-SIGNATURE: MD5 hash signature\nContent-Type: application/json\n```\n\n### Request Body\n\n```json\n{\n \"sender\": \"0x1234...\",\n \"nonce\": \"0x1\",\n \"initCode\": \"0x\",\n \"callData\": \"0x...\",\n \"callGasLimit\": \"0x5208\",\n \"verificationGasLimit\": \"0x5208\",\n \"preVerificationGas\": \"0x5208\",\n \"maxFeePerGas\": \"0x3b9aca00\",\n \"maxPriorityFeePerGas\": \"0x3b9aca00\",\n \"paymasterAndData\": \"0x\",\n \"signature\": \"0x...\"\n}\n```\n\n### Signature Verification\n\nThe signature is generated through the following steps:\n\n1. Sort request body keys in dictionary order\n2. Concatenate in `key + value` format\n3. Append the project's `callbackKey` at the end\n4. Calculate MD5 hash\n\n### Response Specification\n\n```json\n{\n \"status\": 1 // 1: PASS, 2: NOT_PASS, 3: LIMITED\n}\n```\n\n### Status Values\n\n| Status | Value | Meaning | Action |\n| -------- | ----- | -------- | -------------------------------- |\n| PASS | 1 | Approved | Provide free gas fee sponsorship |\n| NOT_PASS | 2 | Rejected | Deny free gas fee sponsorship |\n| LIMITED | 3 | Limited | Mark as limited state |\n\n## Sample Implementation\n\nBelow is an example callback server implementation:\n\n```tsx\n\ninterface PaymasterSupportedToken {\n sender: string;\n nonce: string;\n initCode: string;\n callData: string;\n callGasLimit: string;\n verificationGasLimit: string;\n preVerificationGas: string;\n maxFeePerGas: string;\n maxPriorityFeePerGas: string;\n paymasterAndData: string;\n signature: string;\n}\n\ninterface PaymasterRule {\n is_sponsored: boolean;\n is_blocked: boolean;\n}\n\nconst paymasterRules: MapFigure 1: Login 1
\n\n1. First, locate the power button on the device and click it to turn the device on. This will bring up the main wallet connection screen.\n\n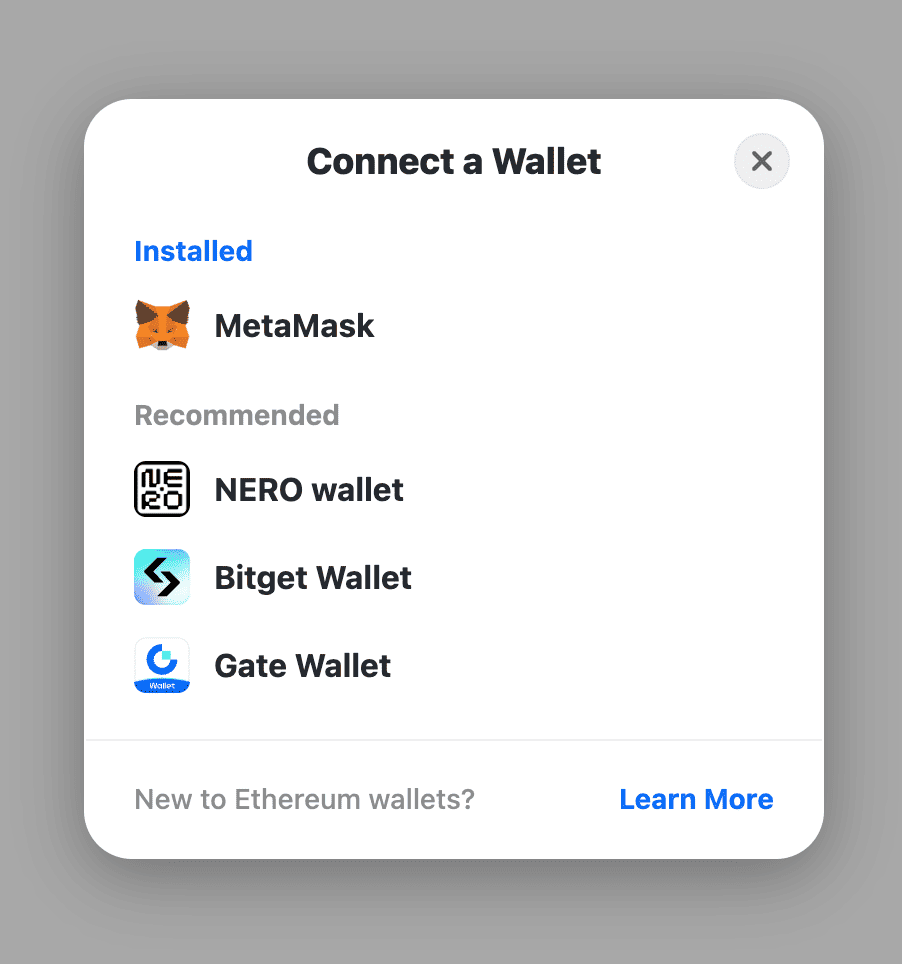\nFigure 2: Login 2
\n\n2. On the \"Connect a Wallet\" screen, you will see a list of installed and recommended wallet options. Scroll down and select \"NERO wallet\" from the Recommended section.\n\n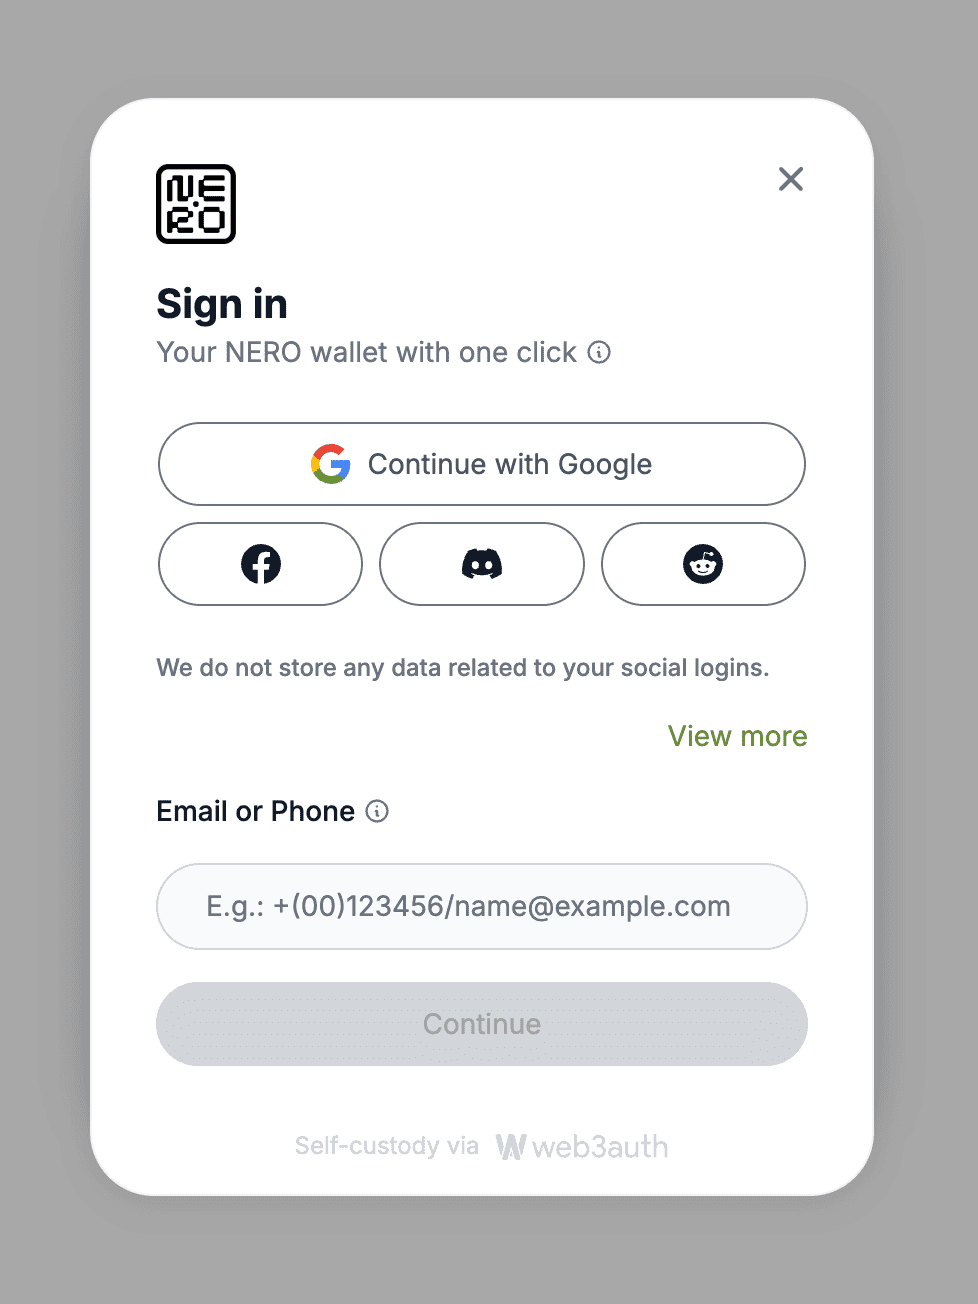\nFigure 3: Login 3
\n\n3. After selecting NERO wallet, you will be prompted to provide some account information to set up the wallet. You can enter your preferred social media account, email address, or phone number that you would like associated with the wallet.\n4. Double-check the information you entered to make sure it's correct, then click the \"Continue\" button at the bottom of the screen.\n4. Double-check the information you entered to make sure it's correct, then click the “Continue” button at the bottom of the screen.\n5. When the setup is finished, you should see the main NERO wallet interface load, indicating that the setup process is complete.\n\n**Note:** Even if you log in with other wallets like **Bitget Wallet** or **Gate Wallet**, you will still be logged in as an AA Wallet.\n\n## Wallet Home\n\n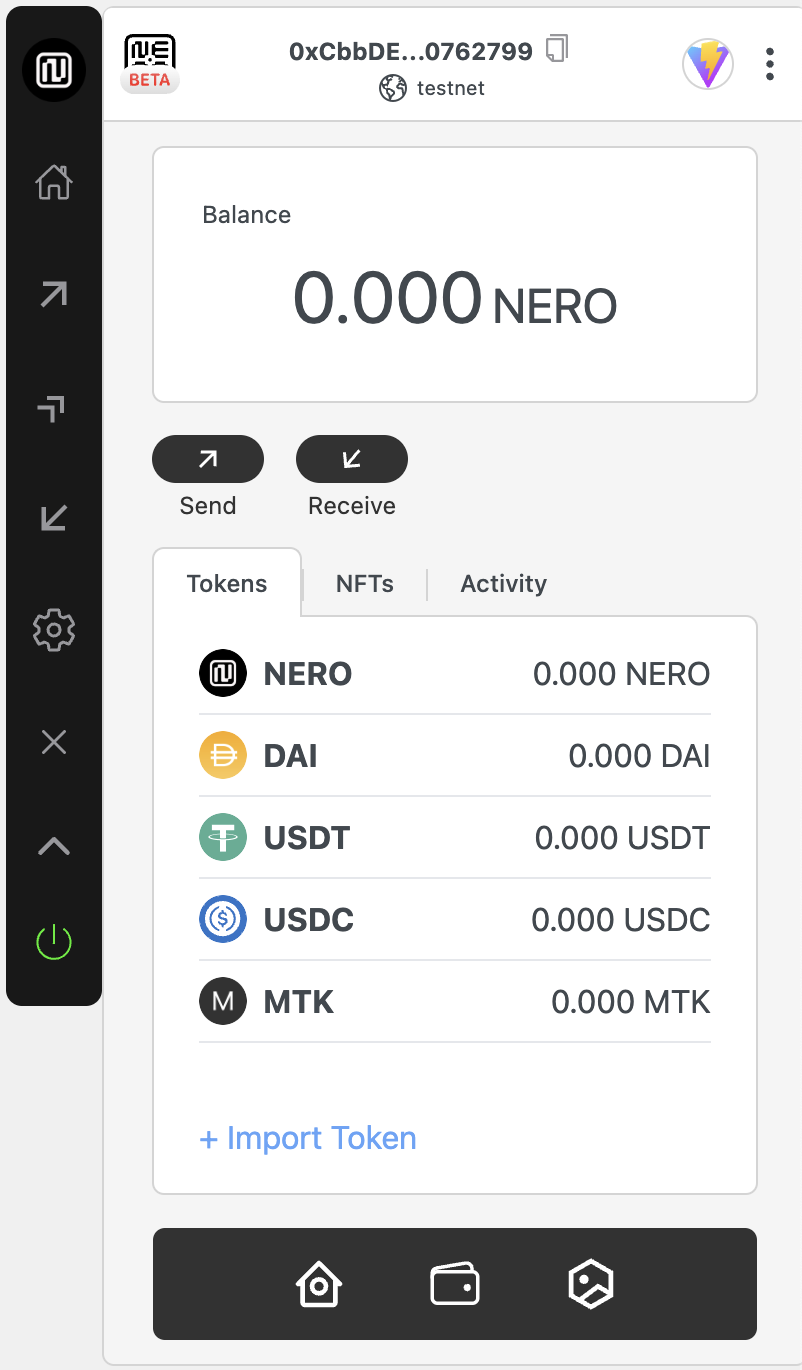\nFigure 4: Home
\n\nThe home screen provides a clean and intuitive interface where users can view their total NERO balance. Below that, users will find two main action buttons: Send for initiating transfers and Receive to get your wallet address for receiving transfers.\n\nThere are also three tabs at the bottom for different features.\n\n#### 1. Tokens:\n\n_Tokens_ shows a list of default tokens and their balances including;\n\n- NERO (native token)\n- DAI\n- USDT\n- USDC\n\n#### 2. NFTs:\n\nNFTs displays your NFT collection\n\n#### 3. Activity:\n\nActivity displays your transaction history.\n\nUsers can tap on any token to see more details. The interface is designed simple and user-friendly, making it easy to access essential wallet functions and monitor token balances at a glance.\n\nNote: These default tokens are pre-configured for convenience, and additional tokens can be added using the “+ Import Token” feature.\n\n## Sidebar Functions\n\n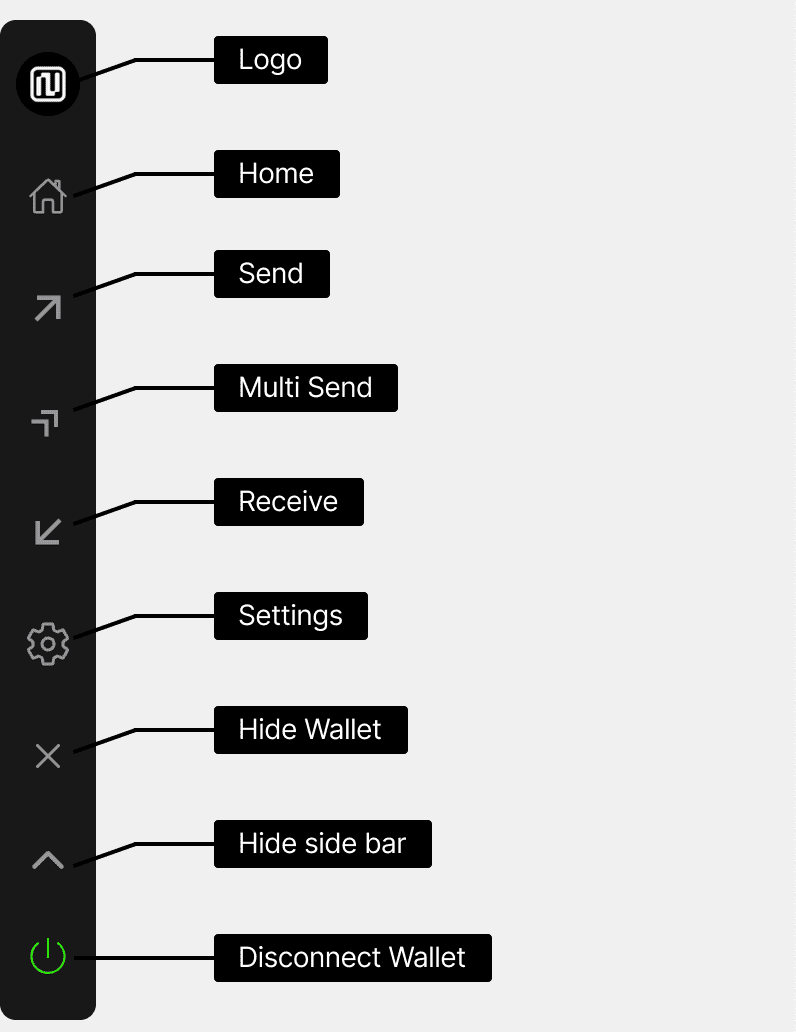\nFigure 5: Sidebar Functions
\n\nThe sidebar is the main navigation menu for the AA Wallet application. The menu items allow users to access the core functionality and settings of the digital wallet.\n\n- **Logo** - Takes you to the main homepage or dashboard\n- **Home** - Takes you to the wallet's main dashboard or home screen\n- **Send** - Allows users to start a transaction\n- **Multi Send** - Send assets to multiple addresses in a single transaction\n- **Receive** - Provides QR code and wallet address to receive assets\n- **Settings** - Adjust your wallet preference and configuration options\n- **Hide Wallet** - Hide your main wallet interface for privacy or security\n- **Hide Sidebar** - Minimize the left-hand navigation menu to free more screen space\n- **Disconnect Wallet** - Log out and disconnect your wallet\n\nThis menu allows easy access to all the key features and controls they would need to manage their digital assets effectively.\n\n## Send UserOperation Flow\n\nAll Actions Issue UserOperations to Generate Transactions\n\n### UserOperation Verification\n\n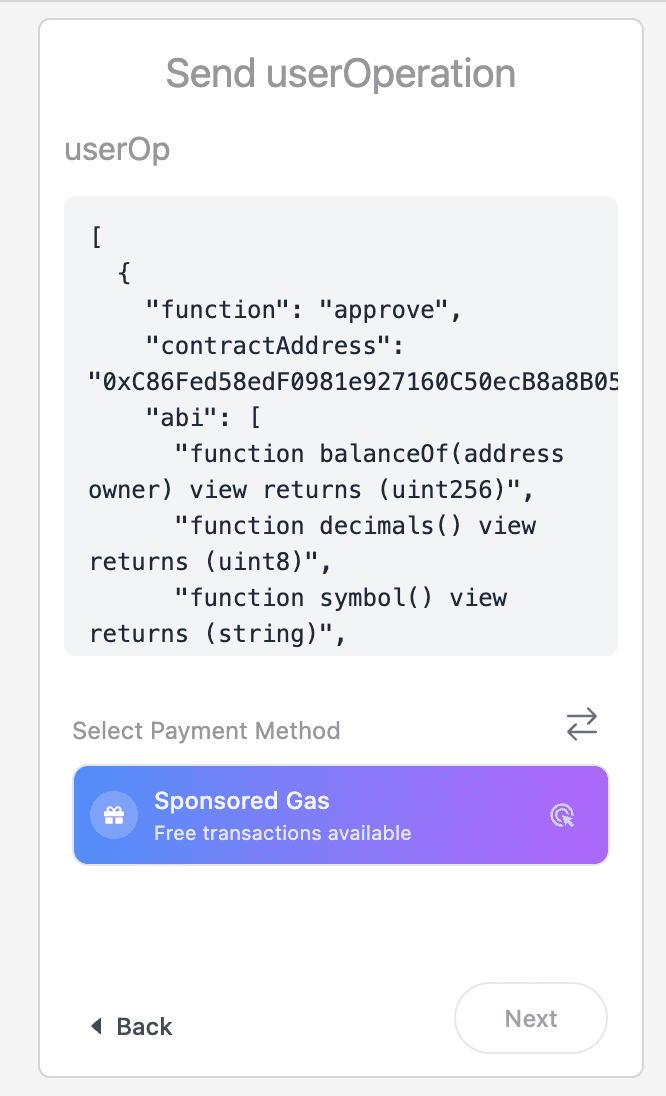\nFigure 6: Send userOperation
\n\nBefore executing any action in the AA Wallet, review the UserOperation details. This screen displays the complete operation data, including:\n\n- Function calls\n- Contract addresses\n- ABI information\n\nThis verification step ensures transparency and allows users to confirm the details of their transaction before proceeding.\n\n### Operation Details Screen\n\n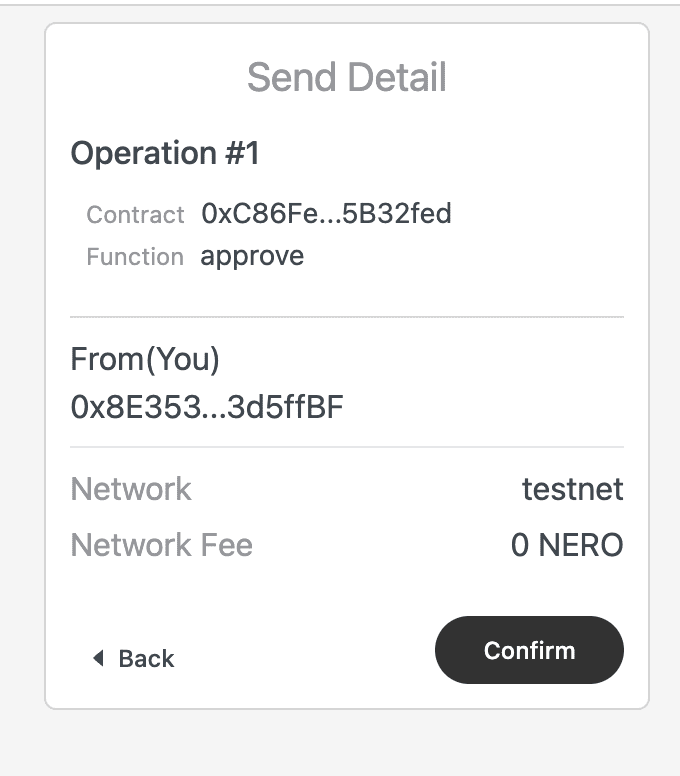\nFigure 7: Send userOperation Detail
\n\nThe detail provides a view of the operation, including:\n\n- Operation number and type\n- Contract address\n- Function being called\n- Sender address (You) and Receive address\n- Network information\n- Network fee\n\n### Confirmation Process\n\n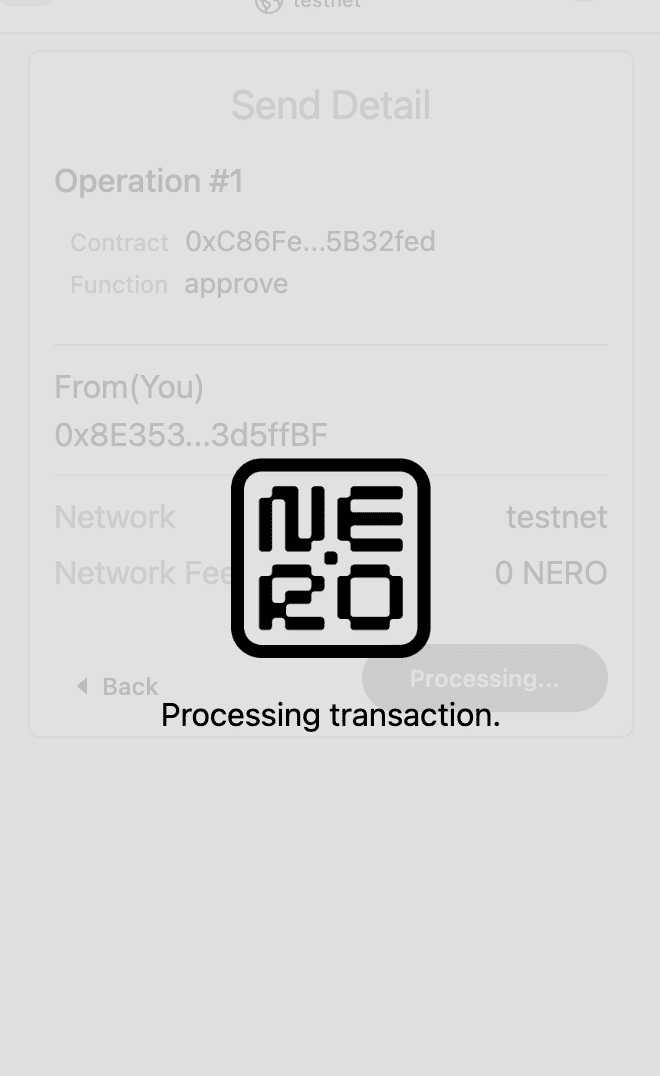\nFigure 8: loading
\n\n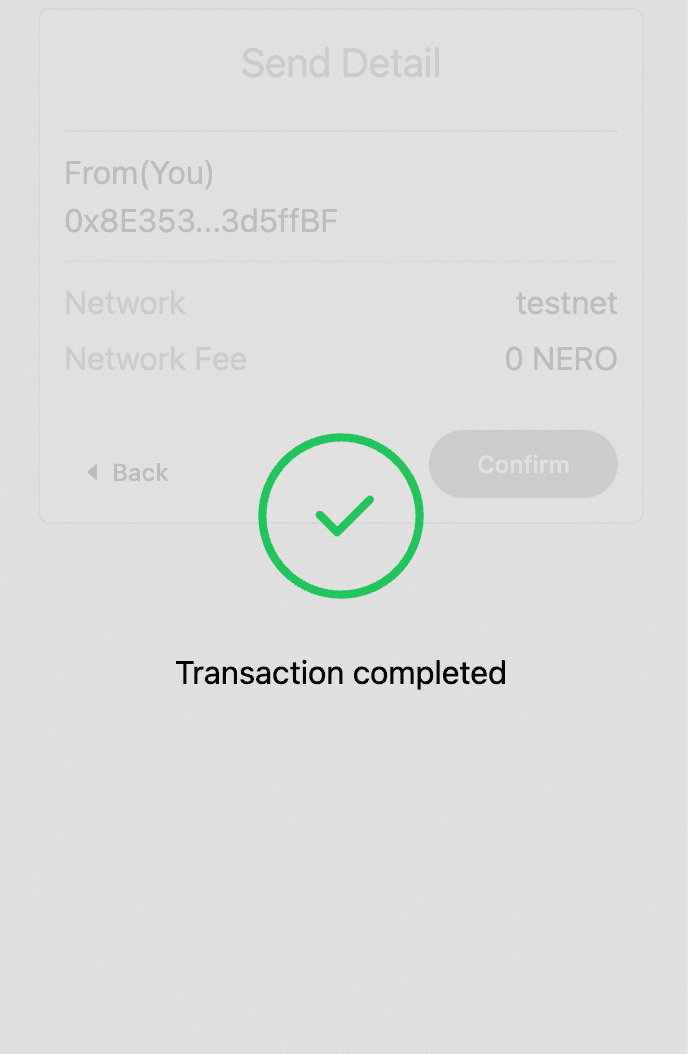\nFigure 9: success
\n\n1. Carefully review all operation detailsClick the “Confirm” button to initiate the UserOperation\n2. Status Updates:\n - Loading: The transaction is being processed\n - Success: The UserOperation has been successfully created and sent to the network. When you see the success message, it confirms the transaction is complete.\n\n## Payment Methods\n\nThe “Select Payment Method” screen offers two options:\n\n### Sponsored Gas\n\n- This payment method allows users to complete transactions without having to pay the gas fees themselves.\n- The gas fees are covered by the project or platform that has integrated the AA Wallet.\n- However, the _Sponsored Gas_ option is only available if the project has enabled and configured this feature on the AA Platform.\n- If it is not enabled, this option will not be selectable.\n\n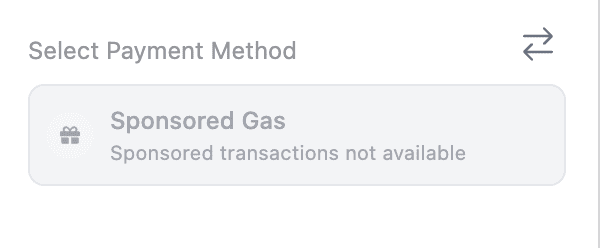\nFigure 10: Sponsored Gas Not Available
\n\n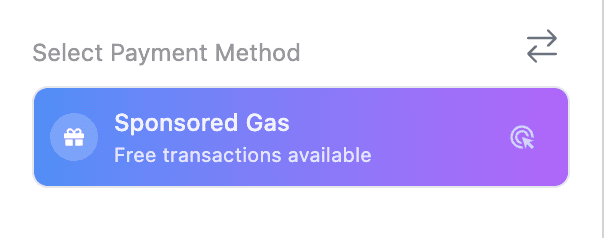\nFigure 11: Sponsored Gas Available
\n\n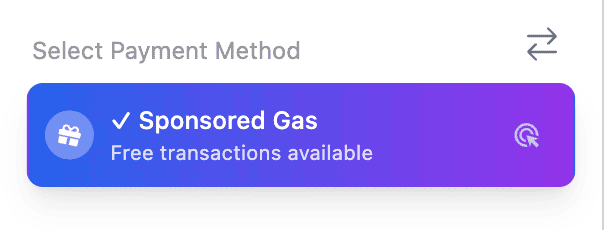\nFigure 12: Clicked Sponsored Gas
\n\n### Pay with Token\n\n- This payment method allows users to pay the gas fees using a specific ERC20 token.\n- The project or platform integrating the AA Wallet can specify which ERC20 token(s) can be used to cover the gas fees.\n- The number of tokens available is displayed to the user (for example, 6 tokens are available).\n\n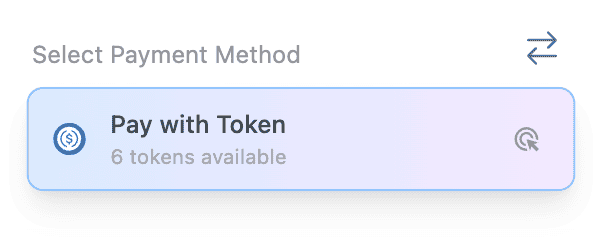\nFigure 13: Pay with Token
\n\n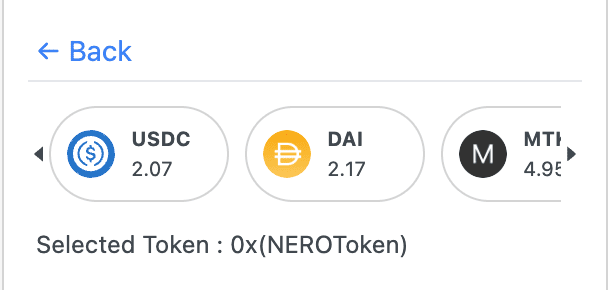\nFigure 14: Pay with Token(select)
\n\n**Note:** The default token is NEROToken(Native Token)\n\n#### Gas fee Display\n\n**Sponsored Gas**\n\n- When the Sponsored Gas option is selected, the gas fee is shown as 0, indicating that the project is covering the full gas fee for the user.\n- This allows users to complete transactions without paying any gas fees.\n 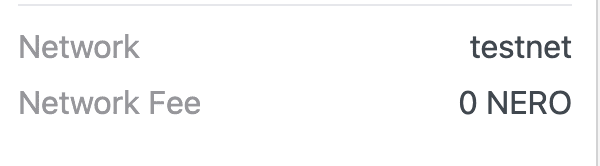\nFigure 15: Sponsor Gas Fee Display
\n\n**Pay with Token**\n\n- When the Pay with Token option is selected, the maximum possible gas fee that the user may need to pay is displayed.\n- This provides transparency regarding the potential gas fee users may incur when using this payment method.\n- The user must ensure they have enough of the project-specified ERC20 token to cover this maximum gas fee.\n 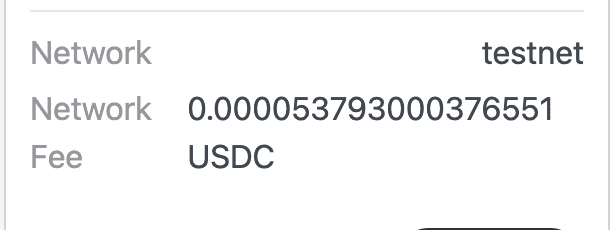\nFigure 16: Erc20 Gas Fee Display
"} {"url":"https://docs.nerochain.io/en/developer-tools/accessEntryPoint","locale":"en","section":"developer-tools","title":"Network Informations","summary":"| Parameter | Value | | :-------------- | :-------------------------------------------------------------------------------------- | | Network Name | NERO Chain Mainnet | | RPC Endpoint | https://rpc.n","headings":["# Network Informations","## NERO Mainnet","### Network Information","### AA URLs","### Contract Addresses","### Free-Mint Tokens addresses","## NERO Testnet","### Network Information","### AA URLs","### Contract Addresses","### Faucet","### Free-Mint Tokens Addresses"],"tokens":1258,"markdown":"## NERO Mainnet\n\n### Network Information\n\n| Parameter | Value |\n| :-------------- | :-------------------------------------------------------------------------------------- |\n| Network Name | NERO Chain Mainnet |\n| RPC Endpoint | https://rpc.nerochain.io |\n| Chain ID | 1689 |\n| Currency symbol | NERO |\n| Explorer | https://neroscan.io |\n| Connect Wallet | [Click here to connect your wallet to NERO Mainnet](https://chainlist.org/?search=Nero) |\n| Node Web Socket | wss://ws.nerochain.io |\n| Subgraph SandBox | https://subgraph.mainnet.nero.metaborong.com/ |\n\n### AA URLs\n\n| Parameter | Value |\n| :------------ | :------------------------------------------------ |\n| Platform | https://aa-platform.nerochain.io/ |\n| Platform API | https://api-aa-platform.nerochain.io/ |\n| Paymaster RPC | https://paymaster-mainnet.nerochain.io |\n| Bundler | https://bundler-mainnet.nerochain.io |\n| PriceService | https://aa-platform.nerochain.io/supported_tokens |\n\n### Contract Addresses\n\n| Parameter | Value |\n| :------------- | :----------------------------------------- |\n| Paymaster | 0xC42E90D29D478ccFeCC28d3B838824E57e51F284 |\n| Entrypoint | 0x5FF137D4b0FDCD49DcA30c7CF57E578a026d2789 |\n| AccountFactory | 0x9406Cc6185a346906296840746125a0E44976454 |\n| MultiCall | 0x1dA998CfaA0C044d7205A17308B20C7de1bdCf74 |\n\n### Free-Mint Tokens addresses\n\n| Parameter | Value |\n| :-------- | :----------------------------------------- |\n| TestToken | 0xC86Fed58edF0981e927160C50ecB8a8B05B32fed |\n\n## NERO Testnet\n\n### Network Information\n\n| Parameter | Value |\n| :-------------- | :---------------------------------------------------------------------------------------------------- |\n| Network Name | NERO Chain Testnet |\n| RPC Endpoint | https://rpc-testnet.nerochain.io |\n| Chain ID | 689 |\n| Currency symbol | NERO |\n| Explorer | https://testnet.neroscan.io |\n| Connect Wallet | [Click here to connect your wallet to NERO Testnet](https://chainlist.org/?search=Nero&testnets=true) |\n| Node Web Socket | wss://ws-testnet.nerochain.io |\n| Subgraph SandBox | https://subgraph.testnet.nero.metaborong.com/ |\n\n### AA URLs\n\n| Parameter | Value |\n| :------------ | :------------------------------------- |\n| Platform | https://aa-platform.nerochain.io/ |\n| Platform API | https://api-aa-platform.nerochain.io/ |\n| Paymaster RPC | https://paymaster-testnet.nerochain.io |\n| Bundler | https://bundler-testnet.nerochain.io/ |\n| PriceService | https://price-service.nerochain.io |\n\n### Contract Addresses\n\n| Parameter | Value |\n| :------------- | :----------------------------------------- |\n| Paymaster | 0x5a6680dFd4a77FEea0A7be291147768EaA2414ad |\n| Entrypoint | 0x5FF137D4b0FDCD49DcA30c7CF57E578a026d2789 |\n| AccountFactory | 0x9406Cc6185a346906296840746125a0E44976454 |\n| MultiCall | 0x343A0DdD8e58bEaf29d69936c82F1516C6677B0E |\n\n### Faucet\n\nMint faucet tokens in : https://app.testnet.nerochain.io/faucet\n\n| Parameter | Value |\n| :-------- | :----------------------------------------- |\n| DAI | 0x5d0E342cCD1aD86a16BfBa26f404486940DBE345 |\n| USDT | 0x1dA998CfaA0C044d7205A17308B20C7de1bdCf74 |\n| USDC | 0xC86Fed58edF0981e927160C50ecB8a8B05B32fed |\n\n### Free-Mint Tokens Addresses\n\n| Parameter | Value |\n| :-------- | :----------------------------------------- |\n| TestToken | 0xA919e465871871F2D1da94BccAF3acaF9609D968 |\n\n> **_NOTE:_** Freely mintable by call function mint(address to, uint256 amount))"} {"url":"https://docs.nerochain.io/en/developer-tools","locale":"en","section":"developer-tools","title":"Developer Tools & Account Abstraction","summary":"Explore NERO's suite of developer tools and learn about our advanced account abstraction capabilities.","headings":["# Developer Tools & Account Abstraction","## Developer Tools"],"tokens":79,"markdown":"Explore NERO's suite of developer tools and learn about our advanced account abstraction capabilities.\n\n## Developer Tools\n\n- UserOpSdk SDK\n- Paymaster API\n- Paymaster Platform\n- NEROWallet (coming soon!)\n\nChoose a topic from the sidebar to learn more about NERO's developer tools and account abstraction features."} {"url":"https://docs.nerochain.io/en/developer-tools/paymaster-api/best-practices","locale":"en","section":"developer-tools","title":"Best Practices","summary":"## 1. Make use of UserOpSDK. The SDK manages much of the complexity involved in interacting with the Paymaster API and UserOperations. Retries and built-in error handling help to greatly simplify inte","headings":["# Best Practices","## 1. Make use of UserOpSDK.","## 2. Cache Tokens Supported","## 3. Apply appropriate error handling.","## 4. Evaluate Token Approvals","## 5. safely save API keys","## 6. Track Consumption","## 7. Establish Appropriate Gas Restraints","## 8. Rate Limitations and Quotas"],"tokens":402,"markdown":"## 1. Make use of UserOpSDK.\nThe SDK manages much of the complexity involved in interacting with the Paymaster API and UserOperations. Retries and built-in error handling help to greatly simplify integration.\n\n## 2. Cache Tokens Supported\nPeriodically update the list of supported tokens to help to prevent frequent API requests. This lightens your servers' burden and enhances performance.\n\n## 3. Apply appropriate error handling.\nDepending on the kind of fault, always catch and treat them suitably. While certain mistakes—like network problems—might be _retryable_, others—like improper parameters—call for human action.\n\n## 4. Evaluate Token Approvals\nVerify users' authorized token spending for Type 1 and 2 payments before forwarding the User Operation. This enhances user experience and helps to eliminate pointless failures.\n\n## 5. safely save API keys\nNever show your API key in code written for a client. Keep it always safe on your backend systems.\n\n## 6. Track Consumption\nTrack your sponsorship use on the AA Platform to prevent unplanned service outages brought on by exceeding quotas.\n\n## 7. Establish Appropriate Gas Restraints\nGet precise gas values for your UserOperations using the gas estimating approach. Appropriate restrictions maximize expenses and aid to minimize transaction failures.\n\n## 8. Rate Limitations and Quotas\nYour use of APIs is limited by the settings found in your AA Platform account:\n\n- Daily gas limits\n- Transaction count limits\n- Token allowlists\n- Gas price caps\n\nYou can monitor and adjust these settings in the [AA Platform](https://aa-platform.nerochain.io)."} {"url":"https://docs.nerochain.io/en/developer-tools/paymaster-api/core-methods","locale":"en","section":"developer-tools","title":"Core JSON-RPC Methods","summary":"The Paymaster API uses JSON-RPC, which is the standard for communicating with Ethereum-compatible nodes. Below are the key methods available:","headings":["# Core JSON-RPC Methods","## pm_supported_tokens","## pm_sponsor_userop","## pm_entrypoints"],"tokens":1134,"markdown":"The Paymaster API uses JSON-RPC, which is the standard for communicating with Ethereum-compatible nodes. Below are the key methods available:\n\n## pm_supported_tokens\n\nRetrieves the list of ERC20 tokens supported by the Paymaster for gas payments along with pricing information.\n\n**Parameters:**\n1. `userOperation` - A minimal UserOperation object with at least the sender field\n2. `apiKey` - Your API key from the AA Platform\n3. `entryPoint` - The EntryPoint contract address (typically `0x5FF137D4b0FDCD49DcA30c7CF57E578a026d2789`)\n\n**Example Request:**\n```json\n{\n \"jsonrpc\": \"2.0\",\n \"id\": 1,\n \"method\": \"pm_supported_tokens\",\n \"params\": [\n {\n \"sender\": \"0xAAWalletAddress\",\n \"nonce\": \"0x0\",\n \"initCode\": \"0x\",\n \"callData\": \"0x\",\n \"callGasLimit\": \"0x0\",\n \"verificationGasLimit\": \"0x0\",\n \"preVerificationGas\": \"0x0\",\n \"maxFeePerGas\": \"0x0\",\n \"maxPriorityFeePerGas\": \"0x0\",\n \"paymasterAndData\": \"0x\",\n \"signature\": \"0x\"\n },\n \"YOUR_API_KEY\",\n \"0x5FF137D4b0FDCD49DcA30c7CF57E578a026d2789\"\n ]\n}\n```\n\n**Example Response:**\n```json\n{\n \"jsonrpc\": \"2.0\",\n \"id\": 1,\n \"result\": {\n \"freeGas\": true,\n \"native\": { \n \"gas\": \"0x337dc\", \n \"price\": 1, \n \"decimals\": 18, \n \"symbol\": \"NERO\" \n },\n \"tokens\": [\n {\n \"type\": \"system\",\n \"token\": \"0xD5a6dcff7AC339A03f6964c315575bF65c3c6cF6\",\n \"symbol\": \"DAI\",\n \"decimals\": 18,\n \"price\": 2.1\n },\n {\n \"type\": \"custom\",\n \"token\": \"0x13DCf97b6B94bDA883492AB46d556E8919445876\",\n \"symbol\": \"TestToken\",\n \"decimals\": 18,\n \"price\": 0.1\n }\n ]\n }\n}\n```\n\nIn this response:\n- `freeGas` indicates whether gas sponsorship (Type 0) is available\n- `native` provides information about the native token (NERO)\n- `tokens` lists all supported ERC20 tokens with their respective price ratios relative to NERO\n\n## pm_sponsor_userop\n\nSigns a UserOperation with the Paymaster, adding the paymasterAndData field necessary for sponsored or token-paid transactions.\n\n**Parameters:**\n1. `userOperation` - The complete UserOperation to be signed\n2. `apiKey` - Your API key from the AA Platform\n3. `entryPoint` - The EntryPoint contract address\n4. `context` - An object containing payment details:\n - `type` - Payment type (0 for sponsored, 1 for prepay, 2 for postpay)\n - `token` - ERC20 token address (required for types 1 and 2)\n\n**Example Request for Free Gas (Type 0):**\n```json\n{\n \"jsonrpc\": \"2.0\",\n \"id\": 1,\n \"method\": \"pm_sponsor_userop\",\n \"params\": [\n {\n \"sender\": \"0xAAWalletAddress\",\n \"nonce\": \"0x0\",\n \"initCode\": \"0x\",\n \"callData\": \"0xCallData\",\n \"callGasLimit\": \"0x88b8\",\n \"verificationGasLimit\": \"0x33450\",\n \"preVerificationGas\": \"0xc350\",\n \"maxFeePerGas\": \"0x9502f900\",\n \"maxPriorityFeePerGas\": \"0x9502f900\",\n \"paymasterAndData\": \"0x\",\n \"signature\": \"0xUserSignature\"\n },\n \"YOUR_API_KEY\",\n \"0x5FF137D4b0FDCD49DcA30c7CF57E578a026d2789\",\n {\n \"type\": 0\n }\n ]\n}\n```\n\n**Example Request for ERC20 Payment (Type 1):**\n```json\n{\n \"jsonrpc\": \"2.0\",\n \"id\": 1,\n \"method\": \"pm_sponsor_userop\",\n \"params\": [\n {\n \"sender\": \"0xAAWalletAddress\",\n \"nonce\": \"0x0\",\n \"initCode\": \"0x\",\n \"callData\": \"0xCallData\",\n \"callGasLimit\": \"0x88b8\",\n \"verificationGasLimit\": \"0x33450\",\n \"preVerificationGas\": \"0xc350\",\n \"maxFeePerGas\": \"0x9502f900\",\n \"maxPriorityFeePerGas\": \"0x9502f900\",\n \"paymasterAndData\": \"0x\",\n \"signature\": \"0xUserSignature\"\n },\n \"YOUR_API_KEY\",\n \"0x5FF137D4b0FDCD49DcA30c7CF57E578a026d2789\",\n {\n \"type\": 1,\n \"token\": \"0xTokenAddress\"\n }\n ]\n}\n```\n\n**Example Response:**\n```json\n{\n \"jsonrpc\": \"2.0\",\n \"id\": 1,\n \"result\": {\n \"sender\": \"0xAAWalletAddress\",\n \"nonce\": \"0x0\",\n \"initCode\": \"0x\",\n \"callData\": \"0xCallData\",\n \"callGasLimit\": \"0x88b8\",\n \"verificationGasLimit\": \"0x33450\",\n \"preVerificationGas\": \"0xc350\",\n \"maxFeePerGas\": \"0x9502f900\",\n \"maxPriorityFeePerGas\": \"0x9502f900\",\n \"paymasterAndData\": \"0xPaymasterAddress+EncodedData+PaymasterSignature\",\n \"signature\": \"0xUserSignature\"\n }\n}\n```\n\n## pm_entrypoints\n\nGet the EntryPoint addresss currently supported. \n\nrequest:\n\n```json\n{\n \"jsonrpc\": \"2.0\",\n \"id\": 1,\n \"method\": \"pm_entrypoints\",\n \"params\": [\n \"entryPoint\"\n ]\n}\n```\n\nresponse:\n\n```json\n{\n \"jsonrpc\": \"2.0\",\n \"id\": 1,\n \"result\": [\n \"0x5FF137D4b0FDCD49DcA30c7CF57E578a026d2789\"\n ]\n}\n```"} {"url":"https://docs.nerochain.io/en/developer-tools/paymaster-api/error-handling","locale":"en","section":"developer-tools","title":"Error Handling","summary":"Proper error handling is essential when integrating with the Paymaster API. This section covers common errors you may encounter and best practices for a robust implementation.","headings":["# Error Handling","## Common Error Codes","## Common Specific Errors"],"tokens":461,"markdown":"Proper error handling is essential when integrating with the Paymaster API. This section covers common errors you may encounter and best practices for a robust implementation.\n\n## Common Error Codes\n\nInteracting with the Paymaster API like sending transactions can return standard JSON-RPC errors in those scenarios. Here are common error codes and their meanings:\n\nMany of these errors will also be accompanied by an additional error message from the EntryPoint.\n\n|Code\t| Description|\n|------------|-------------|\n|-32521\t| Transaction reverted (or will revert) during execution phase.|\n|-32602\t| Invalid UserOperation struct/fields.|\n|-32500\t| Transaction rejected by entryPoint's simulateValidation, during account creation or validation.|\n|-32501\t| Transaction rejected by paymaster's validatePaymasterUserOp.|\n|-32502\t| Transaction rejected because of opcode validation.|\n|-32503\t| UserOperation out of time-range: either account or paymaster returned a time-range, and it is already expired (or will expire soon).|\n|-32504\t| Transaction rejected because paymaster (or signature aggregator) is throttled/banned.|\n|-32505\t| Transaction rejected because paymaster (or signature aggregator) stake or unstake-delay is too low.|\n|-32506\t| Transaction rejected because account specified unsupported signature aggregator.|\n|-32507\t| Either validateUserOp or validatePaymasterUserOp returned an invalid signature check.|\n\n## Common Specific Errors\n\nBundler error codes often are accompanied by an additional AAxx code provided by the EntryPoint to give additional guidance.\n\n- AA1x error codes relate to creating an account\n- AA2x error codes relate to the sender of the user operation\n- AA3x error codes relate to paymasters\n- AA4x error codes relate to verification generally\n- AA5x errors relate to actions after the user operation was executed"} {"url":"https://docs.nerochain.io/en/developer-tools/paymaster-api","locale":"en","section":"developer-tools","title":"Paymaster API","summary":"By letting developers use gas abstraction in their dApps, the NERO Chain Paymaster API lets users pay gas costs using ERC20 tokens or have transactions sponsored totally. This guide addresses recommen","headings":["# Paymaster API","## Introduction","## API Endpoints","### Base URL","### Authentication","## In This Section"],"tokens":378,"markdown":"By letting developers use gas abstraction in their dApps, the NERO Chain Paymaster API lets users pay gas costs using ERC20 tokens or have transactions sponsored totally. This guide addresses recommended practices for integration, request/response forms, and API endpoints.\n## Introduction\n\nThe Paymaster API sits between your dApp and the NERO Chain blockchain, providing services to:\n\n1. Sponsor gas fees for your users.\n2. Allow users to pay for gas with ERC20 tokens.\n3. Validate and sign UserOperations before they're sent to the bundler.\n4. Apply your configured gas strategies to user transactions.\n\n\n \n*Figure 1: Paymaster API integration/usage flow*\n\n## API Endpoints\n\n### Base URL\n\nThe Paymaster API is available at:\n\n```\nhttps://paymaster-testnet.nerochain.io\n```\n\nFor mainnet:\n\n```\nhttps://paymaster-mainnet.nerochain.io\n```\n\n### Authentication\n\nAll API requests require an API key created through the [AA Platform](https://aa-platform.nerochain.io). The API key should be included as a parameter in your RPC calls.\n\n## In This Section\n\n- [Core Methods](./paymaster-api/core-methods) - Detailed API reference for all Paymaster API methods\n- [Payment Types](./paymaster-api/payment-types) - Explanation of different payment types\n- [Error Handling](./paymaster-api/error-handling) - Common errors and troubleshooting\n- [Best Practices](./paymaster-api/best-practices) - What to keep in mind while integrating Paymaster"} {"url":"https://docs.nerochain.io/en/developer-tools/paymaster-api/payment-types","locale":"en","section":"developer-tools","title":"Payment Types","summary":"The Paymaster supports three payment types that provide flexibility in how gas fees are handled. Each type offers different benefits and trade-offs.","headings":["# Payment Types","## Type 0: Free Gas (Sponsored)","## Type 1: Prepay with ERC20","## Type 2: Postpay with ERC20","## Choosing the Right Payment Type"],"tokens":484,"markdown":"The Paymaster supports three payment types that provide flexibility in how gas fees are handled. Each type offers different benefits and trade-offs.\n\n## Type 0: Free Gas (Sponsored)\n\nThe developer fully sponsors gas fees for the user. This is ideal for:\n\n- User onboarding\n- Promotional campaigns\n- Simplifying UX\n- GameFi applications\n\nTo use this type, set `type: 0` in your context object when calling `pm_sponsor_userop`.\n\n## Type 1: Prepay with ERC20\n\nUsers pay for gas with ERC20 tokens before transaction execution:\n\n1. The full estimated amount is collected upfront during the verification phase\n2. Excess is refunded after execution\n3. Requires token approval before transaction\n\nTo use this type:\n- Set `type: 1` in your context object\n- Include the `token` address in your context object\n- Ensure the user has approved the Paymaster contract to spend their tokens\n\n## Type 2: Postpay with ERC20\n\nUsers pay for gas with ERC20 tokens after transaction execution:\n\n1. Only the exact gas cost is collected after the transaction completes\n2. Requires token approval before execution\n3. Better UX as users only pay what's needed\n4. Has a risk of payment failure after execution if the UserOperation depletes tokens\n\nTo use this type:\n- Set `type: 2` in your context object\n- Include the `token` address in your context object\n- Ensure the user has approved the Paymaster contract to spend their tokens\n\n## Choosing the Right Payment Type\n\nWhen deciding which payment type to use, consider these factors:\n\n- **Type 0 (Free)**: Great for new user acquisition, but increases costs for the developer\n- **Type 1 (Prepay)**: More reliable but requires users to have slightly more tokens than needed\n- **Type 2 (Postpay)**: Best user experience but comes with failure risk\n\nMost applications use a combination of payment types - offering free gas for first-time users or specific actions while using token payments for regular operations."} {"url":"https://docs.nerochain.io/en/developer-tools/user-op-sdk/advanced-usage","locale":"en","section":"developer-tools","title":"Advanced Usage","summary":"This section covers advanced customization options for your UserOperations.","headings":["# Advanced Usage","## Custom Gas Parameters","## Custom Nonce Management","## Additional Customization","## Next Steps"],"tokens":322,"markdown":"This section covers advanced customization options for your UserOperations.\n\n## Custom Gas Parameters\n\nYou can customize gas parameters for your UserOperations:\n\n```typescript\n// Set specific gas values\nbuilder.setCallGasLimit(\"0x88b8\");\nbuilder.setVerificationGasLimit(\"0x33450\");\nbuilder.setPreVerificationGas(\"0xc350\");\nbuilder.setMaxFeePerGas(\"0x2162553062\");\nbuilder.setMaxPriorityFeePerGas(\"0x40dbcf36\");\n```\n\n## Custom Nonce Management\n\nIf needed, you can manually set the nonce for your UserOperations:\n\n```typescript\n// Get the current nonce\nconst aaWallet = new ethers.Contract(\n aaWalletAddress,\n ['function getNonce() view returns (uint256)'],\n accountSigner\n);\nconst nonce = await aaWallet.getNonce();\n\n// Set a custom nonce\nbuilder.setNonce(nonce.add(1));\n```\n\n## Additional Customization\n\nBeyond gas parameters and nonce management, you can also:\n\n- Customize the signature mechanism\n- Implement your own account abstraction logic\n- Create custom presets for specific use cases\n\n## Next Steps\n\nAfter learning about advanced customization options, you might want to:\n- [Learn about error handling](https://docs.nerochain.io/en/developer-tools/user-op-sdk/error-handling)\n- [Review best practices](https://docs.nerochain.io/en/developer-tools/user-op-sdk/best-practices)"} {"url":"https://docs.nerochain.io/en/developer-tools/user-op-sdk/basic-usage","locale":"en","section":"developer-tools","title":"Installation and Basic Usage","summary":"You can install the UserOpSDK directly from GitHub:","headings":["# Installation and Basic Usage","## Installation","## Basic Usage","### Importing the SDK","### Configuration Constants","### Initializing the Client","### Creating a SimpleAccount Builder","## Next Steps"],"tokens":436,"markdown":"## Installation\n\nYou can install the UserOpSDK directly from GitHub:\n\n```bash\nnpm install github:nerochain/aa-userop-sdk\n```\n\nOr using yarn:\n\n```bash\nyarn add github:nerochain/aa-userop-sdk\n```\n\n## Basic Usage\n\nThis section covers the essential steps to start using the UserOpSDK.\n\n### Importing the SDK\n\n```typescript\n\n```\n\n### Configuration Constants\n\nSet up your configuration with the necessary contract addresses and service endpoints:\n\n```typescript\n// Chain configuration\nconst NERO_RPC_URL = \"https://rpc-testnet.nerochain.io\";\nconst BUNDLER_URL = \"https://bundler-testnet.nerochain.io/\";\nconst PAYMASTER_URL = \"https://paymaster-testnet.nerochain.io\";\n\n// Contract addresses\nconst ENTRYPOINT_ADDRESS = \"0x5FF137D4b0FDCD49DcA30c7CF57E578a026d2789\";\nconst ACCOUNT_FACTORY_ADDRESS = \"0x9406Cc6185a346906296840746125a0E44976454\";\n```\n\n### Initializing the Client\n\n```typescript\n// Initialize the AA Client\nconst client = await Client.init(NERO_RPC_URL, {\n overrideBundlerRpc: BUNDLER_URL,\n entryPoint: ENTRYPOINT_ADDRESS,\n});\n```\n\n### Creating a SimpleAccount Builder\n\nThe SimpleAccount builder helps you create and configure UserOperations:\n\n```typescript\n// accountSigner is the EOA wallet that will own the AA wallet\nconst builder = await Presets.Builder.SimpleAccount.init(\n accountSigner,\n NERO_RPC_URL,\n {\n overrideBundlerRpc: BUNDLER_URL,\n entryPoint: ENTRYPOINT_ADDRESS,\n factory: ACCOUNT_FACTORY_ADDRESS,\n }\n);\n```\n\n## Next Steps\n\nNow that you've installed, initialized the client and builder, you can:\n- [Work with AA Wallets](https://docs.nerochain.io/en/developer-tools/user-op-sdk/working-with-wallets)\n- [Create UserOperations](https://docs.nerochain.io/en/developer-tools/user-op-sdk/creating-user-operations)"} {"url":"https://docs.nerochain.io/en/developer-tools/user-op-sdk/best-practices","locale":"en","section":"developer-tools","title":"Best Practices","summary":"Follow these best practices to optimize your use of the UserOpSDK in production applications.","headings":["# Best Practices","## 1. Cache AA Wallet Addresses","## 2. Implement Comprehensive Error Handling","## 3. Gas Estimation","## 4. Test on Testnet","## 5. Security","## Additional Resources"],"tokens":532,"markdown":"Follow these best practices to optimize your use of the UserOpSDK in production applications.\n\n## 1. Cache AA Wallet Addresses\n\nCalculate and store AA wallet addresses to avoid redundant computation:\n\n```typescript\n// Calculate once and store in your database or local storage\nconst aaWalletAddress = await builder.getSender();\n```\n\n## 2. Implement Comprehensive Error Handling\n\nHandle all potential errors gracefully to improve user experience:\n\n```typescript\ntry {\n const result = await client.sendUserOperation(builder);\n // Success path\n} catch (error) {\n // Categorize and handle different error types\n if (error.message.includes('AA21')) {\n // Handle insufficient funds\n } else if (error.message.includes('AA31')) {\n // Handle paymaster validation error\n } else {\n // Generic error handling\n }\n}\n```\n\n## 3. Gas Estimation\n\nFor complex operations, use gas estimation functions to ensure sufficient gas:\n\n```typescript\n// Estimate gas before sending\nconst gasEstimation = await client.estimateUserOperationGas(builder);\nbuilder.setCallGasLimit(gasEstimation.callGasLimit);\nbuilder.setVerificationGasLimit(gasEstimation.verificationGasLimit);\nbuilder.setPreVerificationGas(gasEstimation.preVerificationGas);\n```\n\n## 4. Test on Testnet\n\nAlways test your implementation on NERO Chain's testnet before deploying to mainnet:\n\n```typescript\n// Testnet configuration\nconst NERO_TESTNET_RPC_URL = \"https://rpc-testnet.nerochain.io\";\nconst TESTNET_BUNDLER_URL = \"https://bundler-testnet.nerochain.io\";\nconst TESTNET_PAYMASTER_URL = \"https://paymaster-testnet.nerochain.io\";\n```\n\n## 5. Security\n\nNever store private keys or API keys in client-side code:\n\n```typescript\n// BAD: Hardcoded API key\nconst PAYMASTER_API_KEY = \"your-api-key\"; // Don't do this!\n\n// GOOD: Load from environment variables on the server\nconst PAYMASTER_API_KEY = process.env.PAYMASTER_API_KEY;\n```\n\n## Additional Resources\n\nFor more details and advanced use cases, refer to the following resources:\n- [ERC-4337 Specification](https://eips.ethereum.org/EIPS/eip-4337)\n- [UserOpSDK GitHub Repository](https://github.com/nerochain/aa-userop-sdk)"} {"url":"https://docs.nerochain.io/en/developer-tools/user-op-sdk/creating-user-operations","locale":"en","section":"developer-tools","title":"Creating UserOperations","summary":"This part walks over how to use the SDK to produce various kinds of UserOperations.","headings":["# Creating UserOperations","## Understanding Minimal UserOperations","## Simple Token Transfer","## Executing Multiple Transactions","## Next Steps"],"tokens":1037,"markdown":"This part walks over how to use the SDK to produce various kinds of UserOperations.\n\n## Understanding Minimal UserOperations\n\nUser operations have a standard structure, hence it's crucial to know before starting certain transactions. A simple user operation includes all necessary fields even with placeholder values:\n\n```typescript\n// Create a minimal UserOp\nconst minimalUserOp = {\n sender: aaWalletAddress, // The AA wallet address\n nonce: \"0x0\", // Will be filled by the SDK or custom logic\n initCode: \"0x\", // Empty for existing wallets\n callData: \"0x\", // Will be filled with actual transaction data\n callGasLimit: \"0x0\", // Gas estimation\n verificationGasLimit: \"0x0\",\n preVerificationGas: \"0x0\",\n maxFeePerGas: \"0x0\",\n maxPriorityFeePerGas: \"0x0\",\n paymasterAndData: \"0x\", // Will be filled by Paymaster integration\n signature: \"0x\" // Will be filled with EOA signature\n};\n```\n\nThis minimal structure is useful for:\n- Making RPC calls that require a UserOperation structure\n- Initializing a UserOperation before filling in specific details\n- Testing and debugging\n- Interacting with services like the Paymaster API\n\nThe UserOpSDK will handle filling in most of these fields automatically, but understanding this structure is helpful when working with the SDK and developing your own utilities.\n\n## Simple Token Transfer\n\nTo perform a simple ERC-20 token transfer, you'll start with the builder created in the [Basic Usage](https://docs.nerochain.io/en/developer-tools/user-op-sdk/basic-usage) section and add your specific transaction:\n\n```typescript\n// 1. Start with the builder from previous setup\n// const builder = await Presets.Builder.SimpleAccount.init(...);\n\n// 2. Create an ERC-20 contract instance\nconst tokenContract = new ethers.Contract(\n tokenAddress,\n ['function transfer(address to, uint256 amount) returns (bool)'],\n accountSigner\n);\n\n// 3. Prepare the call data for transfer\nconst callData = tokenContract.interface.encodeFunctionData(\n 'transfer',\n [recipientAddress, ethers.utils.parseUnits(amount, decimals)]\n);\n\n// 4. Add the transaction to the builder\n// This will incorporate the transaction into a UserOperation\nbuilder.execute(tokenAddress, 0, callData);\n\n// 5. The builder now contains the UserOperation with your transfer\n// Under the hood, it fills in the parameters of the minimal UserOperation:\n// - sender: from builder.getSender()\n// - nonce: auto-retrieved from the AA wallet\n// - callData: your transfer function call\n// - gas parameters: estimated or set manually\n```\n\nWhen you call `builder.execute()`, the SDK takes care of incorporating your transaction into the UserOperation structure, eliminating the need to manually build each field of the minimal UserOperation.\n\n## Executing Multiple Transactions\n\nYou can bundle multiple actions into a single UserOperation using the same builder pattern:\n\n```typescript\n// 1. Start with the same builder\n// const builder = await Presets.Builder.SimpleAccount.init(...);\n\n// 2. Prepare multiple call data and targets\nconst callData = [\n tokenContract.interface.encodeFunctionData('approve', [spender, amount]),\n tokenContract.interface.encodeFunctionData('transfer', [recipient, amount])\n];\nconst callTo = [tokenAddress, tokenAddress];\n\n// 3. Add batch execution to the builder\n// This bundles multiple transactions into a single UserOperation\nbuilder.executeBatch(callTo, callData);\n\n// 4. The builder now contains a UserOperation with multiple actions\n// The single UserOperation will:\n// - Approve tokens to be spent by another address\n// - Transfer tokens to the recipient\n// All in one atomic transaction\n```\n\nWith the batch execution feature, multiple actions are combined into a single UserOperation's `callData` field, allowing you to perform complex operations efficiently.\n\n## Next Steps\n\nAfter creating UserOperations with the builder:\n- [Integrate with Paymaster](https://docs.nerochain.io/en/developer-tools/user-op-sdk/paymaster-integration) to handle gas payments\n- [Send UserOperations](https://docs.nerochain.io/en/developer-tools/user-op-sdk/sending-user-operations) to the network"} {"url":"https://docs.nerochain.io/en/developer-tools/user-op-sdk/error-handling","locale":"en","section":"developer-tools","title":"Error Handling","summary":"The UserOpSDK may return various errors during operation. This section covers common errors and how to handle them.","headings":["# Error Handling","## Common Error Types","## Error Code Categories","## User-Friendly Error Handling","## Next Steps"],"tokens":562,"markdown":"The UserOpSDK may return various errors during operation. This section covers common errors and how to handle them.\n\n## Common Error Types\n\n```typescript\ntry {\n const result = await client.sendUserOperation(builder);\n // Process result\n} catch (error) {\n if (error.message.includes('AA1')) {\n console.error('error codes relate to creating an account');\n // Handle insufficient funds error\n } else if (error.message.includes('AA2')) {\n console.error('error codes relate to the sender of the user operation');\n // Handle validation error\n } else if (error.message.includes('AA3')) {\n console.error('error codes relate to paymasters');\n // Handle paymaster error\n } else if (error.message.includes('AA4')) {\n console.error('error codes relate to verification generally');\n // Handle paymaster error\n } else if (error.message.includes('AA5')) {\n console.error('errors relate to actions after the user operation was executed');\n // Handle paymaster error\n } else {\n console.error('Unknown error:', error);\n // Handle other errors\n }\n}\n```\n\n## Error Code Categories\n\n- **AA1** - Account creation errors (e.g., insufficient funds for counterfactual deployment)\n- **AA2** - Sender errors (e.g., invalid signature)\n- **AA3** - Paymaster errors (e.g., insufficient deposit, rejected operation)\n- **AA4** - General verification errors\n- **AA5** - Post-execution errors\n\n## User-Friendly Error Handling\n\nWhen building a user interface, translate technical errors into user-friendly messages:\n\n```typescript\nfunction getUserFriendlyErrorMessage(error) {\n if (error.message.includes('AA21')) {\n return \"You don't have enough funds to pay for this transaction.\";\n } else if (error.message.includes('AA23')) {\n return \"The transaction signature is invalid. Please try again.\";\n } else if (error.message.includes('AA25')) {\n return \"The gas payment details are invalid. Please select a different payment option.\";\n } else {\n return \"An error occurred while processing your transaction. Please try again.\";\n }\n}\n```\n\n## Next Steps\n\nAfter implementing error handling, you might want to:\n- [Review best practices](https://docs.nerochain.io/en/developer-tools/user-op-sdk/best-practices) for using the SDK"} {"url":"https://docs.nerochain.io/en/developer-tools/user-op-sdk","locale":"en","section":"developer-tools","title":"UserOpSDK: Account Abstraction SDK","summary":"Designed as a potent JavaScript/TypeScript tool, the UserOpSDK streamlines UserOperations on NERO Chain creation, signing, and transmission. This piece will assist you to use Account Abstraction capab","headings":["# UserOpSDK: Account Abstraction SDK","## What's Inside"],"tokens":479,"markdown":"Designed as a potent JavaScript/TypeScript tool, the UserOpSDK streamlines UserOperations on NERO Chain creation, signing, and transmission. This piece will assist you to use Account Abstraction capabilities in your dApp by using the SDK.\n\nThe UserOpSDK provides access to fundamental Account Abstraction functionality on NERO Chain, with capabilities such as:\n\n- Creating UserOperations for contract calls and transfers\n- Signing UserOperations with Ethereum signers\n- Communicating with bundlers to execute transactions\n- Integrating with Paymasters to sponsor gas or accept ERC-20 tokens\n- Creating and managing smart contract wallets\n\nThis section helps you get started with the SDK and provides examples of common operations.\n\n## What's Inside\n\n- [Installation & Basic Usage](https://docs.nerochain.io/en/developer-tools/user-op-sdk/basic-usage) - How to install the SDK and get started\n- [Working with AA Wallets](https://docs.nerochain.io/en/developer-tools/user-op-sdk/working-with-wallets) - Getting wallet addresses and checking deployment status \n- [Creating UserOperations](https://docs.nerochain.io/en/developer-tools/user-op-sdk/creating-user-operations) - Creating simple and batch operations\n- [Paymaster Integration](https://docs.nerochain.io/en/developer-tools/user-op-sdk/paymaster-integration) - Setting API keys, getting supported tokens, and payment types\n- [Sending UserOperations](https://docs.nerochain.io/en/developer-tools/user-op-sdk/sending-user-operations) - How to submit operations to the network\n- [Advanced Usage](https://docs.nerochain.io/en/developer-tools/user-op-sdk/advanced-usage) - Custom gas parameters and nonce management\n- [Error Handling](https://docs.nerochain.io/en/developer-tools/user-op-sdk/error-handling) - Common errors and how to handle them\n- [Best Practices](https://docs.nerochain.io/en/developer-tools/user-op-sdk/best-practices) - Tips for optimal SDK usage"} {"url":"https://docs.nerochain.io/en/developer-tools/user-op-sdk/paymaster-integration","locale":"en","section":"developer-tools","title":"Paymaster Integration","summary":"The Paymaster service allows for flexible gas payment options for UserOperations.","headings":["# Paymaster Integration","## Setting API Key for Paymaster","## Getting Supported Tokens","## Setting Payment Type","## Next Steps"],"tokens":865,"markdown":"The Paymaster service allows for flexible gas payment options for UserOperations.\n\n## Setting API Key for Paymaster\n\nTo use the Paymaster service, set your API key:\n\n```typescript\nbuilder.setPaymasterOptions({\n apikey: YOUR_API_KEY,\n rpc: PAYMASTER_URL\n});\n```\n\n## Getting Supported Tokens\n\nThe SDK doesn't include a built-in method for retrieving supported tokens. You need to make a direct RPC call to the Paymaster API:\n\n```typescript\n// Create a helper function to get supported tokens\nasync function getSupportedTokens(client, builder) {\n try {\n // Get the wallet address\n const sender = await builder.getSender();\n \n // Create a minimal UserOp for the request\n const minimalUserOp = {\n sender,\n nonce: \"0x0\",\n initCode: \"0x\",\n callData: \"0x\",\n callGasLimit: \"0x0\",\n verificationGasLimit: \"0x0\",\n preVerificationGas: \"0x0\",\n maxFeePerGas: \"0x0\",\n maxPriorityFeePerGas: \"0x0\",\n paymasterAndData: \"0x\",\n signature: \"0x\"\n };\n \n // Setup the provider for the paymaster RPC\n const provider = new ethers.providers.JsonRpcProvider(PAYMASTER_URL);\n \n // Call the pm_supported_tokens method\n const tokensResponse = await provider.send(\"pm_supported_tokens\", [\n minimalUserOp,\n YOUR_API_KEY,\n ENTRYPOINT_ADDRESS\n ]);\n \n // Parse and return the token list\n if (tokensResponse && tokensResponse.tokens) {\n return tokensResponse.tokens.map(token => ({\n address: token.token || token.address,\n decimals: token.decimals,\n symbol: token.symbol,\n type: token.type\n }));\n }\n \n return [];\n } catch (error) {\n console.error(\"Error getting supported tokens:\", error);\n return [];\n }\n}\n\n// Usage\nconst supportedTokens = await getSupportedTokens(client, builder);\nconsole.log(\"Supported tokens:\", supportedTokens);\n```\n\nDifferent Paymaster implementations may return tokens in different formats. A more robust implementation would include handling for various response formats as shown in this example:\n\n```typescript\n// Handle different response formats\nlet tokens = [];\nif (tokensResponse.tokens) {\n tokens = tokensResponse.tokens;\n} else if (Array.isArray(tokensResponse)) {\n tokens = tokensResponse;\n} else if (typeof tokensResponse === 'object') {\n // Try to find tokens in the response object\n const possibleTokensArray = Object.values(tokensResponse).find(val => Array.isArray(val));\n if (possibleTokensArray && Array.isArray(possibleTokensArray)) {\n tokens = possibleTokensArray;\n }\n}\n```\n\n## Setting Payment Type\n\nConfigure how users will pay for gas:\n\n```typescript\n// Type 0: Free gas (developer sponsors)\nbuilder.setPaymasterOptions({ \n type: 0,\n apikey: YOUR_API_KEY,\n rpc: PAYMASTER_URL\n});\n\n// Type 1: Prepay with ERC20 tokens\nbuilder.setPaymasterOptions({ \n type: 1,\n token: TOKEN_ADDRESS, // The ERC20 token address\n apikey: YOUR_API_KEY,\n rpc: PAYMASTER_URL\n});\n\n// Type 2: Postpay with ERC20 tokens\nbuilder.setPaymasterOptions({ \n type: 2,\n token: TOKEN_ADDRESS, // The ERC20 token address\n apikey: YOUR_API_KEY,\n rpc: PAYMASTER_URL\n});\n```\n\n## Next Steps\n\nAfter configuring the Paymaster for your UserOperation, you can:\n- [Send UserOperations](https://docs.nerochain.io/en/developer-tools/user-op-sdk/sending-user-operations) to the network\n- [Explore advanced options](https://docs.nerochain.io/en/developer-tools/user-op-sdk/advanced-usage) for customization"} {"url":"https://docs.nerochain.io/en/developer-tools/user-op-sdk/sending-user-operations","locale":"en","section":"developer-tools","title":"Sending UserOperations","summary":"Once your UserOperation is configured, you can send it to the network. This section covers the process of sending operations and handling the results.","headings":["# Sending UserOperations","## Sending the UserOperation","## Monitoring UserOperation Status","## Next Steps"],"tokens":340,"markdown":"Once your UserOperation is configured, you can send it to the network. This section covers the process of sending operations and handling the results.\n\n## Sending the UserOperation\n\n```typescript\ntry {\n // Send the UserOperation\n const result = await client.sendUserOperation(builder);\n \n // Get the transaction hash\n const userOpHash = result.userOpHash;\n console.log(\"UserOperation hash:\", userOpHash);\n \n // Wait for the transaction to be mined\n const receipt = await result.wait();\n console.log(\"Transaction hash:\", receipt.transactionHash);\n \n return receipt;\n} catch (error) {\n console.error(\"Error sending UserOperation:\", error);\n throw error;\n}\n```\n\n## Monitoring UserOperation Status\n\nAfter sending a UserOperation, you can monitor its status:\n\n1. First, you get the `userOpHash` from the result of `sendUserOperation`.\n2. Then, you can use `wait()` on the result to wait for the operation to be included in a block.\n3. The receipt contains the transaction hash that can be used to look up details on a block explorer.\n\n## Next Steps\n\nAfter sending UserOperations, you might want to:\n- [Explore advanced options](https://docs.nerochain.io/en/developer-tools/user-op-sdk/advanced-usage) for customization\n- [Learn about error handling](https://docs.nerochain.io/en/developer-tools/user-op-sdk/error-handling) for better user experience"} {"url":"https://docs.nerochain.io/en/developer-tools/user-op-sdk/working-with-wallets","locale":"en","section":"developer-tools","title":"Working with AA Wallets","summary":"Account Abstraction wallets are deterministically generated for each EOA wallet. This section covers how to work with these AA wallets.","headings":["# Working with AA Wallets","## Getting the AA Wallet Address","## Checking AA Wallet Deployment Status","## Next Steps"],"tokens":264,"markdown":"Account Abstraction wallets are deterministically generated for each EOA wallet. This section covers how to work with these AA wallets.\n\n## Getting the AA Wallet Address\n\nEach EOA wallet has a corresponding AA wallet address that's deterministically generated:\n\n```typescript\n// Get the AA wallet address (works even if not yet deployed on-chain)\nconst aaWalletAddress = await builder.getSender();\nconsole.log(\"AA Wallet Address:\", aaWalletAddress);\n```\n\n## Checking AA Wallet Deployment Status\n\nYou can check if an AA wallet has already been deployed:\n\n```typescript\nconst provider = new ethers.providers.JsonRpcProvider(NERO_RPC_URL);\nconst code = await provider.getCode(aaWalletAddress);\nconst isDeployed = code !== '0x';\nconsole.log(\"Wallet deployed:\", isDeployed);\n```\n\n## Next Steps\n\nAfter working with AA wallet addresses, you can:\n- [Create UserOperations](https://docs.nerochain.io/en/developer-tools/user-op-sdk/creating-user-operations)\n- [Integrate with Paymaster](https://docs.nerochain.io/en/developer-tools/user-op-sdk/paymaster-integration)"} {"url":"https://docs.nerochain.io/en/faq","locale":"en","section":"faq","title":"Frequently Asked Questions","summary":"This FAQ answers common challenges, pitfalls, and questions that developers may have when building on NERO Chain.","headings":["# Frequently Asked Questions","## Account Abstraction","### What exactly is Account Abstraction?","### Why do my UserOperations keep getting rejected?","### How do I debug AA error codes?","## Paymaster Integration","### Why are my sponsored transactions failing?","### What's the difference between payment strategy types?","### How do I verify which tokens are supported for gas payment?","## Development Environment","### What networks are available for testing?","### How do I get testnet tokens?","## Security Best Practices","### What security measures should I implement?","### How do I protect my Paymaster API key?","## Smart Contract Deployment","### Why is my contract deployment failing?","### What Solidity version should I use?","### Why is my OpenZeppelin proxy contract verification failing?","## Wallet Integration","### Why can't I generate an AA wallet address?","### How do I handle wallet recovery?","## Troubleshooting","### Where can I get help if I'm stuck?","### How do I see if a UserOperation was processed?"],"tokens":1975,"markdown":"This FAQ answers common challenges, pitfalls, and questions that developers may have when building on NERO Chain.\n\n## Account Abstraction\n\n### What exactly is Account Abstraction?\nAccount Abstraction (AA) is a paradigm that allows smart contract wallets to execute transactions without users needing to hold the native token (NERO) for gas fees. Account Abstraction (AA) is a paradigm that allows smart contract wallets to execute transactions without users needing to hold the native token (NERO) for gas fees. It lets features like transaction sponsorship, batch transactions, and complex authorizing methods isolate the account management logic from transaction validation.\n\n### Why do my UserOperations keep getting rejected?\nUserOperations might be rejected for several reasons:\n- **Invalid signature**: Ensure you're using the correct signer for the wallet\n- **Insufficient gas**: Try increasing gas limits or using the SDK's gas estimation functions\n- **Paymaster rejections**: Check if your Paymaster API key is valid and has sufficient funding. Check if the APIKey has enough Remaining Requests. If it runs out of requests, please enter in contact with NERO team.\n- **Nonce issues**: Ensure you're using the correct nonce for the account\n- **Validation failures**: Smart contract wallet might reject operations that don't meet its requirements\n\n### How do I debug AA error codes?\nError codes follow a pattern where:\n- **AA1** codes relate to creating an account (e.g., insufficient funds for deployment)\n- **AA2** codes relate to the sender (e.g., invalid signature)\n- **AA3** codes relate to paymasters (e.g., insufficient deposit)\n- **AA4** codes relate to general verification failures\n- **AA5** codes relate to post-execution issues\n\n## Paymaster Integration\n\n### Why are my sponsored transactions failing?\nCommon reasons for paymaster failures include:\n- **API Key rate limiting**: Check your key's usage patterns and consider increasing limits\n- **Strategy rejection**: Verify your strategy parameters match your application's needs\n- **Insufficient funds**: Ensure your sponsorship account has adequate funds for Type 0 strategies\n- **User payment failure**: For Type 1/2 strategies, ensure users have sufficient token balances and have approved the paymaster contract\n- **Insufficient Remaining Requests**: Check if your API has enought Remaining requests. \n\n### What's the difference between payment strategy types?\n- **Type 0 (Sponsorship)**: Gas fees are fully covered by the developer/application\n- **Type 1 (ERC-20 Prepayment)**: Users pay gas in an ERC-20 token before execution\n- **Type 2 (ERC-20 Postpayment)**: Users pay gas in an ERC-20 token after execution\n\n### How do I verify which tokens are supported for gas payment?\nUse the Paymaster API core functions to verify which ERC-20 tokens can be used for gas payment with the paymaster. This is particularly important for Type 1 and Type 2 payment strategies.\n\n## Development Environment\n\n### What networks are available for testing?\nNERO Chain provides a testnet environment for development and testing:\n- **Testnet RPC**: https://rpc-testnet.nerochain.io\n- **Testnet Bundler**: https://bundler-testnet.nerochain.io/\n- **Testnet Paymaster**: https://paymaster-testnet.nerochain.io\n\nAlways test your implementation thoroughly on testnet before deploying to mainnet.\n\n### How do I get testnet tokens?\nYou can get testnet NERO tokens from the NERO Chain faucet at [app.testnet.nerochain.io/faucet](https://app.testnet.nerochain.io/faucet/).\n\n## Security Best Practices\n\n### What security measures should I implement?\n- **Never store private keys in client-side code**: Use secure key management\n- **Use environment variables for API keys**: Never hardcode API keys in your application\n- **Implement gas limits**: Set appropriate gas limits to prevent excessive costs\n- **Validate user inputs**: Always validate any input that will be used in transactions\n- **Implement proper error handling**: Provide clear feedback to users when operations fail\n\n### How do I protect my Paymaster API key?\nYour Paymaster API key should be treated as a sensitive credential:\n- Store it in environment variables, not in code\n- Implement rate limiting and monitoring to detect abuse\n- Regularly rotate your API keys for enhanced security\n\n## Smart Contract Deployment\n\n### Why is my contract deployment failing?\nCommon reasons for deployment failures:\n- **Incorrect network configuration**: Ensure your Hardhat/Remix settings point to the correct NERO Chain RPC\n- **Insufficient gas**: Try increasing the gas limit for deployment\n- **Contract size limits**: Very large contracts may exceed size limits\n- **Compilation errors**: Ensure your Solidity compiler version is compatible with NERO Chain\n\n### What Solidity version should I use?\nNERO Chain supports all Solidity versions that are compatible with the Ethereum London fork. We recommend using Solidity ^0.8.12 for optimal compatibility and security.\n\n**Important**: For contract verification on Neroscan, please ensure you use Solidity version ≤ 0.8.29. Due to various factors including EVM version dependencies, Neroscan may not support newer Solidity versions in a timely manner.\n\n### Why is my OpenZeppelin proxy contract verification failing?\nOpenZeppelin proxy contracts may encounter specific verification challenges on Neroscan:\n\n**Common Issue**: You receive an \"Invalid compilerVersion\" error when attempting to verify TransparentUpgradeableProxy or ProxyAdmin contracts, even though your implementation contract verifies successfully.\n\n**Root Cause**: The block explorer's verification infrastructure has limitations with OpenZeppelin proxy contract compilation settings and version compatibility.\n\n**Solution**:\n- **Use Solidity ≤ 0.8.29**: The testnet/mainnet block explorer now supports Solidity version up to 0.8.29\n- **OpenZeppelin v5 Support**: The explorer supports OpenZeppelin v5 proxy contracts that use precompiled bytecodes with Solidity 0.8.29\n- **Verification Order**: Always verify your implementation contract first, then attempt proxy contract verification\n\n**Key Points**:\n- Implementation contracts typically verify without issues\n- Proxy contracts (TransparentUpgradeableProxy, ProxyAdmin) require the supported Solidity versions\n- Due to EVM version updates and other factors, Neroscan may not immediately support the latest Solidity versions\n\nIf you continue experiencing verification issues with proxy contracts, ensure your development environment uses Solidity 0.8.29 or earlier for both compilation and deployment.\n\n## Wallet Integration\n\n### Why can't I generate an AA wallet address?\nPotential issues with AA wallet generation:\n- **Incorrect factory address**: Verify you're using the correct account factory address\n- **Salt collisions**: Try using a different salt value for address derivation\n- **Chain ID mismatch**: Ensure you're using the correct chain ID for NERO Chain\n- **Initialization data issues**: Verify your initialization calldata is correctly formatted\n\n### How do I handle wallet recovery?\nFor AA wallets, implement recovery mechanisms like:\n- Social recovery through trusted contacts\n- Multi-signature requirements for certain actions\n- Time-locks for security-critical operations\n- Backup signers that can be activated after a delay\n\n## Troubleshooting\n\n### Where can I get help if I'm stuck?\nIf you encounter persistent issues, contact NERO Chain support through:\n- [Discord Community](https://discord.gg/nerochainofficial)\n- [Support Email](mailto:support@nerochain.io)\n- [GitHub Issues](https://github.com/nerochain)\n\n### How do I see if a UserOperation was processed?\nYou can check the status of a UserOperation using:\n- The `client.getUserOperationReceipt(hash)` method in the UserOpSDK\n- The NERO Chain Explorer at [neroscan.io](https://neroscan.io)\n- The bundler RPC endpoint with the `eth_getUserOperationReceipt` method"} {"url":"https://docs.nerochain.io/en/getting-started/introduction","locale":"en","section":"getting-started","title":"NERO Chain: What, Why, and How for Developers","summary":"Fundamentally scalable, flexible, and with enhanced user experience in mind, NERO Chain is a Layer 1 modular blockchain fit for developers. NERO Chain distinguishes itself by native account abstractio","headings":["# NERO Chain: What, Why, and How for Developers","## What is NERO Chain?","## Why Build on NERO Chain?","### Applications that capture their true value","### Seamless User Experience","## How to Get Started with NERO Chain"],"tokens":988,"markdown":"## What is NERO Chain?\n\nFundamentally scalable, flexible, and with enhanced user experience in mind, NERO Chain is a Layer 1 modular blockchain fit for developers. NERO Chain distinguishes itself by native account abstraction (AA) and Paymaster (with an API platform for easy configuration), which helps developers create new and frictionless experiences for users while having more of their application value generated back for themselves. Developers find NERO Chain attractive due to its essential characteristics.\n\n- **Native Account Abstraction**: Built-in support for ERC-4337 removes the need for any consensus layer modifications.\n- **Paymaster System**: Allows dApps to let users pay with ERC20 tokens or sponsor gas costs entirely, with a Paymaster Platform to configure all of this on the fly.\n- **Blockspace 2.0**: By means of better transaction processing and fee distribution leveraging an effective fee-sharing system, Blockspace 2.0 guarantees effective use of network resources.\n- **Complete EVM Compatibility**: No learning conflict or migration. Using familiar tools such as Solidity, Hardhat, Remix, and other popular programming environments, create and use smart contracts.\n\n## Why Build on NERO Chain?\n\nWith a fresh perspective on blockchain technology, NERO Chain prioritizes applications over infrastructure-level value extraction.\n\n### Applications that capture their true value\n\nGas, the native currency of the chain, ensures that the blockchain reaps the maximum benefit from every transaction. This leads to a system in which apps generate value, with the underlying network extracting the majority of it.\n\nThe NERO Chain introduces an economic framework that allows apps to participate in the network's success, a concept that many find upsetting. Developers may keep and share value in ways that directly benefit their users and ecosystems, therefore negating the need to turn transaction value over to the chain itself.\n\nThrough creating sustainable demand and income for their systems, developers may improve the token value by allowing gas payments using ERC20 tokens. The result means something special: If your project drives activity, so will your tokens, but with significantly more value potential.\n\n\n \n*Figure 1: Simulation of developer token performance compared with other chains.*\n\n### Seamless User Experience\n\nUser interactions' intricacy has been one of the main obstacles to blockchain acceptance. NERO Chain addresses this via:\n\n- **Gasless Transactions**: Depending on how the application developer enables the types of payment, users can interact with dApps without owning the native token or not having tokens at all. \n- **Smart Contract Wallets**: Enhanced security and recovery options compared to EOAs. We can enable social logins and much more through account abstraction.\n- **Bundled Transactions**: A single transaction can execute multiple actions.\n\nThis means your applications have the tools that can onboard users who have never interacted with blockchain before, removing the friction that has historically limited Web3 adoption.\n## How to Get Started with NERO Chain\n\nWith NERO Chain's EVM compatibility and developer-friendly tools, starting with its development is simple.\n\n1. **Set Up Your Environment**: Use known tools like Hardhat, Remix, or Truffle for contract development.\n2. **Access the Testnet**: Connect to NERO Chain's Testnet for development and testing. Access the mainnet to deploy it to production.\n3. **Integrate Account Abstraction**: Use the UserOpSDK to implement AA features and connect with the Paymaster API.\n4. **Leverage the Paymaster**: Enable flexible gas payment options for your users.\n\nWe will explore more in the sections below the main characteristics, architecture, and detailed instructions to let you create your first dApp on NERO Chain."} {"url":"https://docs.nerochain.io/en/getting-started/key-features","locale":"en","section":"getting-started","title":"Key Features for Developers","summary":"This section provides a high-level overview of NERO Chain's key features that make it an ideal platform for developers. Knowing these characteristics will enable you to fully use NERO Chain for develo","headings":["# Key Features for Developers","## Native Account Abstraction","## Paymaster System","## Blockspace 2.0"],"tokens":908,"markdown":"This section provides a high-level overview of NERO Chain's key features that make it an ideal platform for developers. Knowing these characteristics will enable you to fully use NERO Chain for developing your apps.\n\n## Native Account Abstraction\n\nUsing a native ERC-4337 Account Abstraction implementation, NERO Chain provides developers with advanced tools allowing them to construct better user experiences:\n\n#### Smart Contract Wallets\n\nUnlike traditional Externally Owned Accounts (EOAs), smart contract wallets on NERO Chain provide:\n\n- **Programmable Authorization**: Implement any verification logic for transaction approval.\n- **Multi-signature Support**: Require multiple signers for transaction authorization.\n- **Social Recovery**: Enable account recovery through trusted friends or services.\n- **Session Keys**: Implement limited-use keys for specific applications or time periods.\n\n#### UserOperation and Bundlers\n\nAt the core of Account Abstraction is the `UserOperation` object:\n\n- **Flexible Transaction Format**: Completely separates the user's intent from the transaction execution.\n- **Bundlers**: Specialized nodes that package multiple UserOperations into a single transaction.\n- **Mempool Management**: Dedicated mempool for UserOperations enhances predictability.\n\n## Paymaster System\n\nThe Paymaster is a core component that enables flexible gas payment mechanisms. And the AA Platform gives the developer an easy-to-use way to configure everything on the fly. \n\n#### Payment Options\n\n- **Sponsored Transactions (Free)**: Developers can fully cover gas costs for users.\n- **ERC20 Token Payments**: Users can pay gas fees using supported ERC20 tokens instead of NERO.\n- **Pre-fund/Post-fund Models**: Choose between upfront payments or after-execution settlements.\n \n \n\n\n \n*Figure 1: Configuring tokens for gas fees on the AA Platform.*\n\n#### Integration Benefits\n\n- **Token Utility**: Increase your token's utility by enabling it for gas payments.\n- **User Experience**: Remove the need for users to own NERO tokens to interact with your dApp.\n- **Flexible Pricing Models**: Implement subscription models, free trials, or per-action pricing.\n\n## Blockspace 2.0\n\nRegarding fees, conventional blockchain systems handle every transaction the same. With Blockspace 2.0, a breakthrough approach to controlling transaction costs and resources, NERO Chain transforms that, guaranteeing flexibility, efficiency, and justice.\n\n#### Unique UX with Smarter Fees\n\n- **Custom price models**: Developers may create unique price models for their particular demands, therefore matching expenses with those of their consumers.\n- **Fee Sharing**: Should your dApp create transactions, users and developers stand to gain from a split of the network fees.\n- **Stable Pricing**: NERO's approach seeks a more predictable charge structure than wild fluctuations in conventional gas prices.\n\n#### Better Use of Resources \n- Bundled Transactions - Consider it as carpooling for transactions; NERO arranges them to save unwarranted expenses.\n- Like an express lane on a freeway, urgent transactions are handled faster in priority lanes.\n- Effective resource allocation helps developers better estimate the processing power a software requires, therefore lessening surprises.\n\nWith Blockspace 2.0, NERO Chain is creating smarter, more sustainable, and better for everyone rather than only lowering costs.\n\n \n\n \n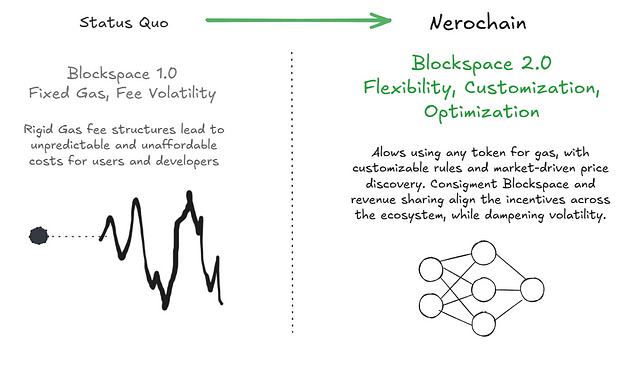\n \n*Figure 2: Blockspace 2.0 Architecture*"} {"url":"https://docs.nerochain.io/en/getting-started/nero-dapp-architecture","locale":"en","section":"getting-started","title":"The Architecture of a dApp","summary":"Understanding NERO Chain's architecture helps us see how its unique features can be leveraged to build innovative applications with new user experiences. This overview explains how the various compone","headings":["# The Architecture of a dApp","## Key Components and Transaction Flow","### User and Authentication Layer","### Application Components","### Backend Infrastructure","## Transaction Flow","### Connection Phase","### UserOperation Construction Phase","### Transaction Submission Phase","### Execution Phase","### Administrative Components","## Paymaster Payment Types and User Experience","### Type 0: Developer-Sponsored Gas (Free)","### Type 1: Prepay with ERC20 Tokens","### Type 2: Postpay with ERC20 Tokens","## Building Advanced Applications"],"tokens":3466,"markdown":"Understanding NERO Chain's architecture helps us see how its unique features can be leveraged to build innovative applications with new user experiences. This overview explains how the various components work together to enable account abstraction, paymaster functionality, and other key capabilities.\n\nMultiple components working cohesively within the distributed application (dApp) architecture ensure robust, secure, and efficient blockchain operations. Each component is explained in detail below.\n\n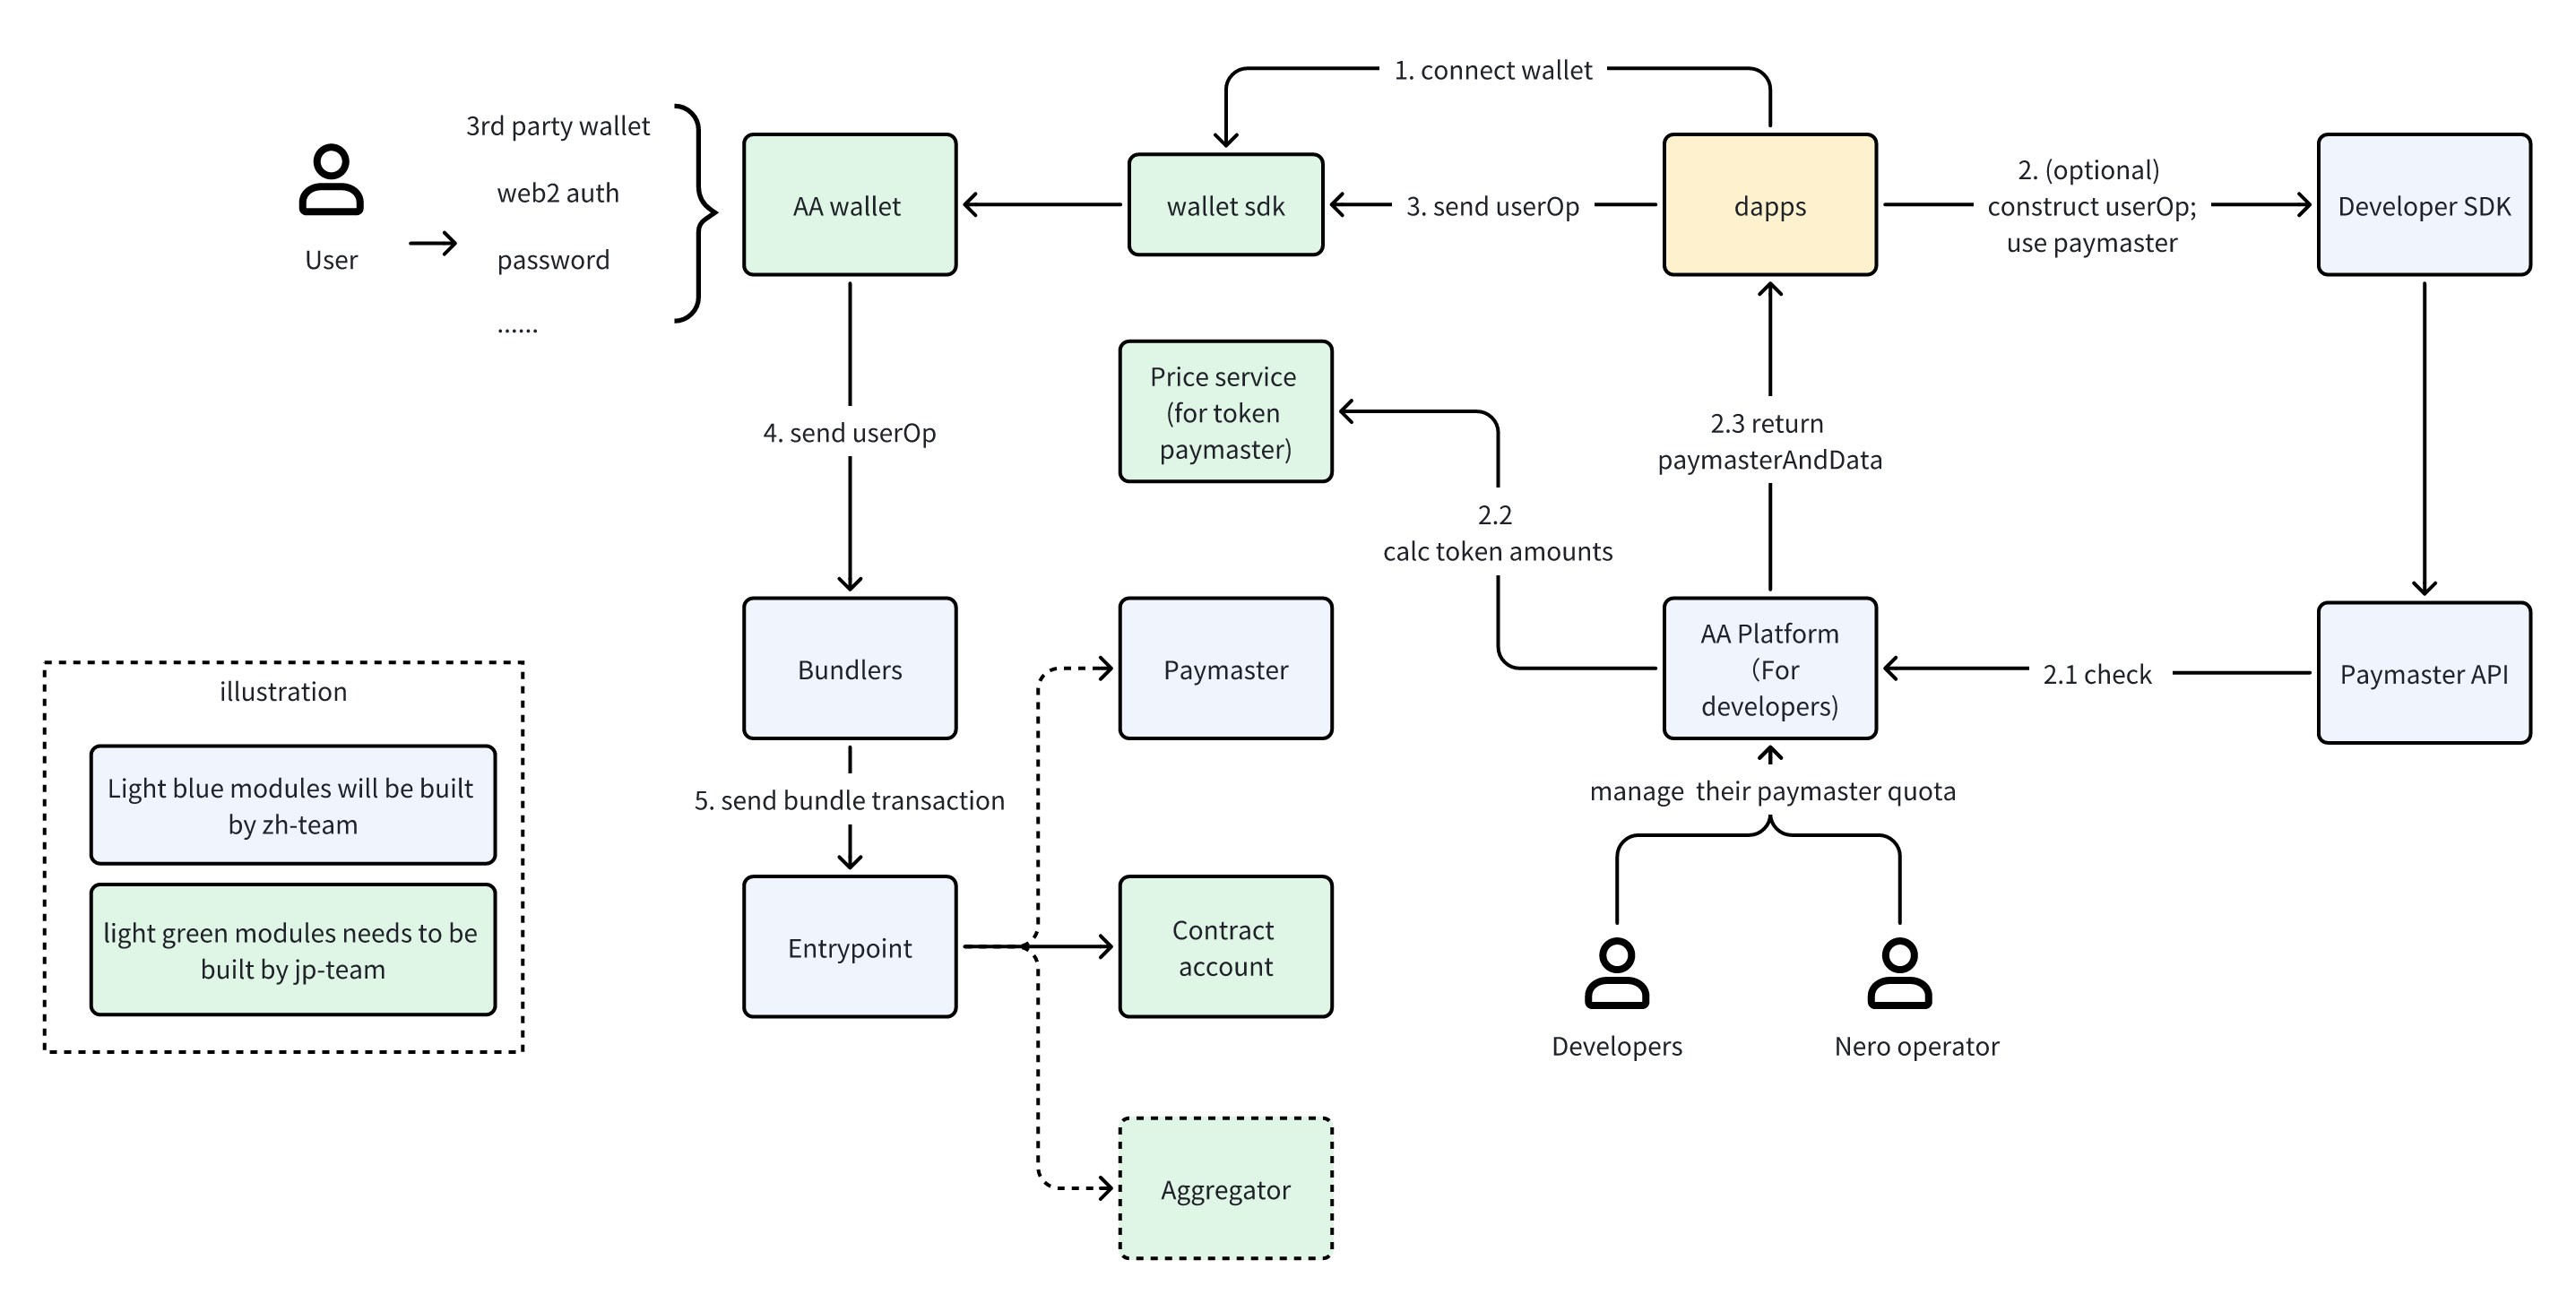\n \n*Figure 1: NERO Chain's dApp Architecture*\n\n## Key Components and Transaction Flow\n\n### User and Authentication Layer\n\nThe basis of NERO Chain's user experience is a flexible authentication mechanism that fits Web3 users as well as beginners alike.\nThrough an **AA Wallet**, a smart contract wallet supporting many simultaneous authentication techniques, the **user** interacts with blockchain functionalities. Unlike conventional wallets that depend only on private keys, NERO Chain's AA wallets may be accessible using recognizable **3rd party wallets like MetaMask**, practical **Web2 authentication** mechanisms such as Google or Twitter login, and even conventional password-based security. While keeping security and optionality for expert users, this adaptability eliminates a major obstacle to entrance for ordinary consumers.\n\n\n \n*Figure 2: Example of a Social Login.*\n\nFor both owning the same on-chain identity and assets, a person may set up an AA wallet on their phone via social login but also connect to MetaMask on their PC.\n\n### Application Components\n\nThe application layer serves as the bridge between users and the blockchain, featuring several integrated components:\n\nThe **Wallet SDK** can be the same used in any other Web3 application. Handling all the difficult chores of transaction building and submission, it serves as the interface between AA wallets and decentralized apps. It will let you get your AA wallet from the AA Wallet Factory deployed in NERO Chain.\n\nDecentralized applications built on NERO Chain can use this architecture to provide seamless front-end interactions. Your application connects with the Wallet SDK to provide consumers with a flawless experience, whether you are developing a DEX, NFT marketplace, or gaming platform.\n\nThe Developer SDK (in our case, our **UserOpSDK**) provides developers with the tools needed to integrate account abstraction features into their applications. It covers techniques for building UserOperations, liaising with the EntryPoint contract, and using Paymasters.\n\nBy letting dApps seek gas sponsorship or alternate payment options, the **Paymaster API** helps to create gas abstraction. Your application may search the Paymaster API when a user starts a transaction to find suitable payment choices and include the required information in the UserOperation.\n\n### Backend Infrastructure\n\nBehind the user-facing components lies a robust infrastructure that powers NERO Chain's unique capabilities:\n\nThe **AA Platform** serves as a control center for developers, providing a dashboard to configure paymaster settings, monitor quotas, and track usage. Through this platform, developers can define which tokens are accepted for gas payment, set spending limits, and configure other parameters that govern how users interact with their dApps.\n\nFor token-based gas payments, the **Price Service** handles the critical function of determining exchange rates between ERC20 tokens and gas costs. This ensures users pay a fair amount when using tokens instead of the native NERO currency for gas.\n\n**Bundlers** are specialized services that collect UserOperations from multiple users and bundle them into standard transactions. By batching operations together, bundlers increase efficiency and reduce costs. These services listen for UserOperations and submit them to the EntryPoint contract.\n\nThe **Paymaster** contract is responsible for the actual gas fee abstraction. It verifies whether a transaction should be sponsored and handles the accounting for token-based payments. The Paymaster interacts directly with the EntryPoint to ensure gas costs are covered appropriately.\n\nThe **EntryPoint** contract (deployed at `0x5FF137D4b0FDCD49DcA30c7CF57E578a026d2789`) serves as the central hub for all UserOperations. This standardized contract processes bundled operations and interacts with both Contract Accounts and Paymasters to execute transactions.\n\nEach user's **Contract Account** is a smart contract wallet deployed using the account factory. These accounts execute the actual transaction logic and can implement additional features like multi-signature requirements, spending limits, or account recovery mechanisms.\n\nFor advanced use cases, the optional **Aggregator** component handles signature aggregation, enabling more efficient processing of multi-signature operations.\n\n## Transaction Flow\n\n### Connection Phase\nThe journey begins when a user connects to a dApp. This initial connection establishes the communication channel between the user's browser and the blockchain. During this phase, the user authenticates using their preferred method (MetaMask, social login, password, etc.), and the dApp identifies their AA wallet address, which may be a counterfactual address if the wallet hasn't been deployed yet.\n\n### UserOperation Construction Phase\nOnce connected, the transaction preparation process begins. When a user initiates an action, such as swapping tokens or minting an NFT, the dApp constructs a UserOperation either directly or through the Developer SDK. Unlike traditional transactions, UserOperations include additional fields necessary for account abstraction.\n\nIf gas abstraction is desired, the Developer SDK communicates with the Paymaster API to determine payment options. For token-based payments, the Price Service calculates the exact token amount needed based on current exchange rates and expected gas consumption. The Paymaster API then returns the paymasterAndData field, which includes all necessary information for gas handling.\n\nThis modular approach allows developers to offer flexible payment options without modifying their core application logic. Users can choose to pay with tokens they already have rather than acquiring the native token specifically for gas fees.\n\n### Transaction Submission Phase\nWith the UserOperation constructed and signed, the submission process begins. The dApp sends the complete UserOperation to the Wallet SDK, which handles the interaction with the user to obtain their signature. This might involve a popup in MetaMask or an in-app signature request, depending on the authentication method.\n\nAfter signing, the AA Wallet forwards the UserOperation to the Bundlers. These specialized services collect operations from multiple users to optimize gas usage and increase efficiency. By batching operations together, Bundlers can reduce the per-operation cost significantly.\n\n### Execution Phase\nThe final stage occurs when the Bundler has collected enough operations or reached a time threshold. The Bundler creates a transaction calling the EntryPoint contract with a batch of UserOperations. The EntryPoint then processes each operation sequentially.\n\nFor each operation, the EntryPoint verifies the signature, checks that gas requirements are met (either through the user's wallet balance or via a Paymaster), and then calls the user's Contract Account to execute the actual transaction logic. If a Paymaster is involved, it handles the gas payment according to the configured strategy.\n\nThis multi-step process happens transparently to the end user, who simply sees their transaction being processed and eventually confirmed, similar to a traditional transaction but with enhanced flexibility and potentially lower costs.\n\n### Administrative Components\nBehind the scenes, developers maintain control over their gas sponsorship policies through the AA Platform. Here, they can configure payment strategies, set daily quotas, and monitor usage patterns. This administrative layer ensures that gas sponsorship remains economically viable for developers while providing a superior user experience.\n\n\n \n*Figure 3: AA-platform policies configuration dashboard.*\n\nNERO operators also have access to platform-level settings, allowing them to manage the overall system health and ensure fair resource allocation.\n\n## Paymaster Payment Types and User Experience\n\nThe Paymaster system is one of NERO Chain's most innovative features, enabling flexible gas payment mechanisms that dramatically improve user experience. Let's explore the different payment types and their implications:\n\n### Type 0: Developer-Sponsored Gas (Free)\n\nWith Type 0 payments, developers fully cover the gas costs for their users. This creates a frictionless experience similar to Web2 applications, where users don't need to think about transaction fees.\n\nThis model is ideal for user onboarding, where requiring new users to acquire a specific token creates unnecessary friction. By sponsoring gas for initial interactions, developers can create a smooth path for users to experience their application's value before requiring token acquisition.\n\nPromotional campaigns also benefit from sponsored gas, allowing temporary removal of transaction costs to drive engagement. Gaming applications and metaverse experiences particularly benefit from hiding blockchain complexity, letting users focus on gameplay rather than gas management.\n\nTo implement Type 0 payments, developers maintain a balance in their AA Platform account, setting daily or per-user limits to control costs. The platform provides analytics to help optimize sponsorship strategies based on user behavior and conversion metrics.\n\n### Type 1: Prepay with ERC20 Tokens\n\nThe Type 1 payment model allows users to pay gas fees using ERC20 tokens they already own, rather than requiring them to hold NERO tokens. This removes a significant adoption barrier, especially for applications with their own token ecosystems.\n\nWhen using Type 1, the full estimated gas amount (converted to the equivalent value in the selected token) is collected from the user before transaction execution. After the transaction completes, any excess tokens are automatically refunded to the user.\n\nThis approach provides certainty for both users and developers: users know the maximum they might spend, and developers know the payment is secured before execution. The model works particularly well for high-value operations where the gas cost is a small fraction of the total transaction value.\n\nImplementation requires users to approve the Paymaster contract to spend their tokens, which is typically handled through the Wallet SDK with appropriate UI guidance.\n\n### Type 2: Postpay with ERC20 Tokens\n\nThe Type 2 payment model also uses ERC20 tokens for gas but collects payment after transaction execution. This optimizes the user experience by only charging for the exact gas consumed rather than requiring an upfront estimate with a later refund.\n\nUsers appreciate paying exactly what's needed, especially for transactions where gas costs might vary significantly based on execution paths in the contract. However, this model introduces a risk of payment failure if the user's token balance or approval is insufficient after the transaction executes.\n\nThis model works best when integrated with applications where users are likely to maintain token balances for other purposes, minimizing the risk of payment failure.\n\n## Building Advanced Applications\n\nThe NERO Chain architecture enables developers to create applications with capabilities that weren't previously possible or practical. Here are some examples of what you can build:\n\n**Token-Centric Ecosystems**: By allowing users to pay gas with your application's token, you can create a closed ecosystem where users never need to leave your token economy. This increases the utility and demand for your token while simplifying the user experience.\n\n**Frictionless Onboarding**: Implement a gradual onboarding process where new users enjoy sponsored transactions initially, then transition to token payments once they're engaged with your platform. This removes the \"crypto complexity\" that often deters mainstream users.\n\n**Bundled Transactions**: Enable users to perform multiple actions in a single operation, such as approving and swapping tokens or minting multiple NFTs. This reduces costs and improves the user experience by minimizing the number of confirmations needed.\n\n**Enhanced Security Features**: Build applications with advanced security features like multi-signature requirements, spending limits, or time locks. The smart contract wallet architecture makes these features much easier to implement than with traditional EOAs.\n\n**Social Recovery Systems**: Implement account recovery mechanisms that don't depend on private key backup, such as social recovery through trusted friends or service providers. This addresses one of the biggest user experience challenges in crypto - fear of losing access to funds.\n\n**Subscription Models**: Create subscription-based services where users authorize recurring payments, similar to traditional subscription apps. The Paymaster can handle gas costs for these pre-approved transactions.\n\nBy understanding and leveraging the full capabilities of NERO Chain's architecture, you can build applications that offer the security and ownership benefits of blockchain without the traditional UX limitations.\n\nIn the following sections, we'll provide detailed guides on implementing each of these components in your application."} {"url":"https://docs.nerochain.io/en","locale":"en","section":"","title":"Welcome to the NERO Chain Docs","summary":"Welcome to the definitive reference for all things NERO Chain technology, ecosystem, and development. Whether you're a developer building applications, an operator running nodes, a researcher explorin","headings":["# Welcome to the NERO Chain Docs","## Builder Journeys","## Quick Start Guides","## Popular Development Guides","## Account Abstraction Technologies","## Essential Tools","## Technical Resources","## About NERO Chain"],"tokens":4575,"markdown":"Welcome to the definitive reference for all things NERO Chain technology, ecosystem, and development. Whether you're a developer building applications, an operator running nodes, a researcher exploring the architecture, or just getting started with blockchain, this documentation will help you understand and leverage NERO Chain's unique features.\n\n## Builder Journeys\n\n\n dApp Developers\nBuild dApps with unique NERO features.
\n \n \n \n \n \n Chain & Node Operators\nDeploy and maintain NERO Chain networks and validator nodes.
\n \n \n \n \n \n Researchers & Developers\nExplore technical architecture, innovations, and protocol details.
\n \n \n \n\n## Quick Start Guides\n\n\n \n Developer Tools\nUnderstand NERO Chain's unique features.
\n \n \n \n \n Developer Cookbook\nPractical recipes for building on NERO Chain.
\n \n \n \n \n FAQ\nCommon challenges and their solutions.
\n \n\n## Popular Development Guides\n\n\n \n Deploy First Contract\nDeploy a smart contract on NERO Chain.
\n \n \n \n \n Build Your First dApp\nCreate a dApp with NEROWallet.
\n \n \n \n \n Low Level Building\nLow-Level Building from scratch.
\n \n\n## Account Abstraction Technologies\n\n\n \n UserOp SDK\nCreate and send UserOperations with our JavaScript SDK.
\n \n \n \n \n AA Wallet Integration\nImplement smart contract wallets in your applications.
\n \n \n \n \n AA Platform\nManage gas sponsorship policies and payment strategies.
\n \n\n## Essential Tools\n\n\n \n NERO Faucet\nGet testnet tokens to start building.
\n \n \n \n \n NERO Explorer\nExplore blocks, transactions, and accounts.
\n \n \n \n \n Access Paymaster\nManage gas fees for your users.
\n \n\n## Technical Resources\n \n\n \n Network Info\nAll Network informations.
\n \n \n \n \n GitHub Repos\nCheck our public codes.
\n \n\n \n \n Support\nContact Us.
\n \n\n## About NERO Chain\n\nBuilt as a modular blockchain, NERO Chain stresses providing value to applications over infrastructure-level value capture. NERO Chain changes traditional blockchain economics by letting dApps gather and share transaction value, therefore ensuring that the success of an application benefits its developers and users instead of just the underlying network. With its complete EVM compatibility and high-performance settling layer, Nero offers amazing scalability and flexibility, including native account abstraction, paymaster-driven gas sponsorship, and current technologies like Blockspace 2.0 which provide developers with a flawless experience."} {"url":"https://docs.nerochain.io/en/node-validators/commandLineOptions","locale":"en","section":"node-validators","title":"Command-line Options","summary":"Geth is primarily controlled using the command line. Geth is started using the geth command. It is stopped by pressing ctrl-c.","headings":["# Command-line Options","## Commands"],"tokens":7561,"markdown":"Geth is primarily controlled using the command line. Geth is started using the geth command. It is stopped by pressing ctrl-c.\n\nYou can configure Geth using command-line options (a.k.a. flags). Geth also has sub-commands, which can be used to invoke functionality such as the console or blockchain import/export.\n\nThe command-line help listing is reproduced below for your convenience. The same information can be obtained at any time from your own Geth instance by running:\n\n```\ngeth --help\n```\n\n## Commands\n\n```shell showLineNumbers{1}\nNAME:\n geth - the go-ethereum command line interface\n\nUSAGE:\n geth [global options] command [command options] [arguments...]\n\nVERSION:\n 1.13.1-stable-3f40e65c\n\nCOMMANDS:\n account Manage accounts\n attach Start an interactive JavaScript environment (connect to node)\n console Start an interactive JavaScript environment\n db Low level database operations\n dump Dump a specific block from storage\n dumpconfig Export configuration values in a TOML format\n dumpgenesis Dumps genesis block JSON configuration to stdout\n export Export blockchain into file\n export-preimages Export the preimage database into an RLP stream\n import-preimages Import the preimage database from an RLP stream\n init Bootstrap and initialize a new genesis block\n js (DEPRECATED) Execute the specified JavaScript files\n license Display license information\n removedb Remove blockchain and state databases\n show-deprecated-flags Show flags that have been deprecated\n snapshot A set of commands based on the snapshot\n verkle A set of experimental verkle tree management commands\n version Print version numbers\n version-check Checks (online) for known Geth security vulnerabilities\n wallet Manage Ethereum presale wallets\n help, h Shows a list of commands or help for one command\n\nGLOBAL OPTIONS:\n\n --log.rotate (default: false) ($GETH_LOG_ROTATE)\n Enables log file rotation\n\n ACCOUNT\n\n --allow-insecure-unlock (default: false) ($GETH_ALLOW_INSECURE_UNLOCK)\n Allow insecure account unlocking when account-related RPCs are exposed by http\n\n --keystore value ($GETH_KEYSTORE)\n Directory for the keystore (default = inside the datadir)\n\n --lightkdf (default: false) ($GETH_LIGHTKDF)\n Reduce key-derivation RAM & CPU usage at some expense of KDF strength\n\n --password value ($GETH_PASSWORD)\n Password file to use for non-interactive password input\n\n --pcscdpath value (default: \"/run/pcscd/pcscd.comm\") ($GETH_PCSCDPATH)\n Path to the smartcard daemon (pcscd) socket file\n\n --signer value ($GETH_SIGNER)\n External signer (url or path to ipc file)\n\n --unlock value ($GETH_UNLOCK)\n Comma separated list of accounts to unlock\n\n --usb (default: false) ($GETH_USB)\n Enable monitoring and management of USB hardware wallets\n\n ALIASED (deprecated)\n\n --cache.trie.journal value ($GETH_CACHE_TRIE_JOURNAL)\n Disk journal directory for trie cache to survive node restarts\n\n --cache.trie.rejournal value (default: 0s) ($GETH_CACHE_TRIE_REJOURNAL)\n Time interval to regenerate the trie cache journal\n\n --nousb (default: false) ($GETH_NOUSB)\n Disables monitoring for and managing USB hardware wallets (deprecated)\n\n --txlookuplimit value (default: 2350000) ($GETH_TXLOOKUPLIMIT)\n Number of recent blocks to maintain transactions index for (default = about one\n year, 0 = entire chain) (deprecated, use history.transactions instead)\n\n --v5disc (default: false) ($GETH_V5DISC)\n Enables the experimental RLPx V5 (Topic Discovery) mechanism (deprecated, use\n --discv5 instead)\n\n --whitelist value ($GETH_WHITELIST)\n Comma separated block number-to-hash mappings to enforce (Figure 1: npx hardhat
\n\n## Creating a Smart Contract\n\nCreate a contracts directory (if not already created) and add your smart contract file:\n\n```bash\nmkdir -p contracts\n```\n\nYou can create your own smart contract or use templates like the [Openzeppelin token smart contract](https://github.com/OpenZeppelin/openzeppelin-contracts/blob/master/contracts/token/ERC20/ERC20.sol).\n\nHere's a simple example contract you can use:\n\n```solidity\n// SPDX-License-Identifier: MIT\npragma solidity ^0.8.17;\n\ncontract HelloWorld {\n string private greeting = \"Hello, NERO Chain!\";\n\n function setGreeting(string calldata _greet) public {\n greeting = _greet;\n }\n\n function getGreeting() public view returns (string memory) {\n return greeting;\n }\n}\n```\n\n## Configuring Hardhat for NERO Chain\n\nCreate a `.env` file in your project root with the following variables:\n\n```\nNERO_TESTNET_PROVIDER_URL=https://rpc-testnet.nerochain.io\nPRIVATE_KEY=your_private_key_here\nAPI_KEY=dummy\n```\n\nThen, update your Hardhat configuration file:\n\n```javascript\nrequire(\"@nomicfoundation/hardhat-toolbox\");\nrequire(\"dotenv\").config();\n\nmodule.exports = {\n defaultNetwork: \"nero\",\n networks: {\n nero: {\n url: \"https://rpc-testnet.nerochain.io\",\n chainId: 689,\n accounts: [process.env.PRIVATE_KEY]\n },\n },\n solidity: \"0.8.17\",\n etherscan: {\n apiKey: \"dummy\", \n customChains: [\n {\n network: \"nero\",\n chainId: 689,\n urls: {\n apiURL: \"https://api-testnet.neroscan.io/api\",\n browserURL: \"https://testnet.neroscan.io/\"\n }\n }\n ]\n }\n};\n\n```\n\n## Deploying Smart Contracts\n\nYou can deploy your contract using either a deployment script or Hardhat Ignition.\n\n### Option 1: Using a Deployment Script\n\nCreate a scripts directory and add a deployment script:\n\n```bash\nmkdir -p scripts\n```\n\nCreate a file `scripts/deploy.js` with:\n\n```javascript\nasync function main() {\n const HelloWorld = await ethers.getContractFactory(\"HelloWorld\");\n const contract = await HelloWorld.deploy();\n await contract.waitForDeployment();\n console.log(\"HelloWorld deployed to:\", await contract.getAddress());\n}\n\nmain().catch((error) => {\n console.error(error);\n process.exitCode = 1;\n});\n```\n\nThen deploy by running:\n\n```bash\nnpx hardhat run scripts/deploy.js --network nero_testnet\n```\n\n### Option 2: Using Hardhat Ignition\n\nFor more complex deployments, you can use Hardhat Ignition:\n\n1. Create an ignition module directory:\n```bash\nmkdir -p ignition/modules\n```\n\n2. Create a deployment module file (e.g., `ignition/modules/deploy-hello-world.js`):\n\n```javascript\nconst { buildModule } = require(\"@nomicfoundation/hardhat-ignition/modules\");\n\nmodule.exports = buildModule(\"HelloWorldModule\", (m) => {\n const helloWorld = m.contract(\"HelloWorld\");\n return { helloWorld };\n});\n```\n\n3. Deploy with Ignition:\n```bash\nnpx hardhat ignition deploy ./ignition/modules/deploy-hello-world.js --network nero_testnet\n```\n\n4. Save the deployed contract address from the output.\n\n## Verifying Smart Contracts\n\nAfter deploying your contract, you should verify it to make its source code public on the NERO Chain explorer:\n\n```bash\nnpx hardhat verify --network nero_testnet DEPLOYED_CONTRACT_ADDRESS\n```\n\nReplace `DEPLOYED_CONTRACT_ADDRESS` with your actual deployed contract address.\n\n### Troubleshooting Verification\n\n1. If verification fails, ensure your Solidity compiler version matches exactly\n2. Check that your contract doesn't use libraries or dependencies not included in the flattened file\n3. If using constructor arguments, make sure they're correctly provided in the verify command:\n ```bash\n npx hardhat verify --network nero_testnet DEPLOYED_CONTRACT_ADDRESS \"constructor argument 1\" \"constructor argument 2\"\n ```\n\n## Conclusion\n\nOnce deployed and verified, you can view your contract on the [Testnet Explorer](https://testnet.neroscan.io/).\n\n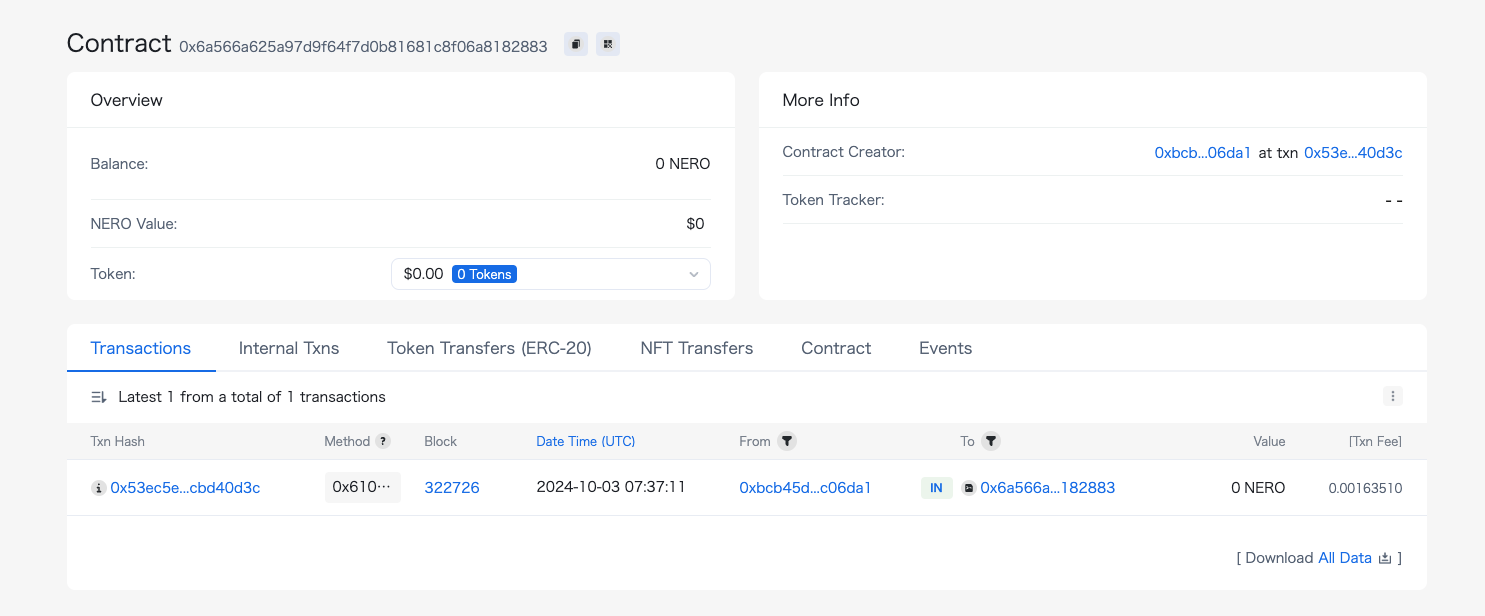\nFigure 2: NERO testnet scan
\n\nCongratulations! You have successfully deployed and verified your smart contract. Although this tutorial used the testnet, you can follow the same process for the mainnet by updating the RPC endpoints and network configuration."} {"url":"https://docs.nerochain.io/en/tutorials/first-contract/using-remix","locale":"en","section":"tutorials","title":"Deploying Your First Contract on NERO Chain Using Remix","summary":"This tutorial will guide you through the process of creating and deploying a smart contract on NERO Chain using the Remix IDE. Remix is a popular, browser-based development environment that requires n","headings":["# Deploying Your First Contract on NERO Chain Using Remix","## Prerequisites","## Setting Up Your Environment","### 1. Connect Your Wallet to NERO Chain","### 2. Open Remix IDE","## Creating a Simple Smart Contract","### 1. Create a New File","### 2. Write Your Smart Contract","## Compiling Your Contract","### 1. Navigate to the Compiler Tab","### 2. Select Compiler Version","### 3. Compile the Contract","## Deploying Your Contract","### 1. Navigate to the Deploy Tab","### 2. Configure Environment","### 3. Deploy the Contract","## Interacting with Your Deployed Contract","### Reading the Greeting","### Updating the Greeting","## Verifying Your Contract on the Block Explorer","## Troubleshooting Common Issues","### Transaction Failing","### High Gas Fees","### Compiler Errors","## Advanced Tips","### Using Libraries","### Constructor Arguments","### Contract Size Limits","## Next Steps","## Conclusion"],"tokens":1818,"markdown":"This tutorial will guide you through the process of creating and deploying a smart contract on NERO Chain using the Remix IDE. Remix is a popular, browser-based development environment that requires no setup, making it perfect for beginners.\n\n## Prerequisites\n\n- A Web3 wallet (like MetaMask) installed in your browser\n- Basic knowledge of Solidity programming language\n- Some NERO testnet tokens for gas fees (get them from the [NERO Faucet](https://app.testnet.nerochain.io/))\n\n## Setting Up Your Environment\n\n### 1. Connect Your Wallet to NERO Chain\n\nBefore we start, you need to add NERO Chain to your MetaMask wallet:\n\n1. Open MetaMask and click on the network dropdown at the top\n2. Select \"Add Network\" \n3. For the NERO Testnet, use these settings:\n - Network Name: `NERO Testnet`\n - RPC URL: `https://rpc-testnet.nerochain.io`\n - Chain ID: `689`\n - Currency Symbol: `NERO`\n - Block Explorer URL: `https://testnet.neroscan.io`\n\n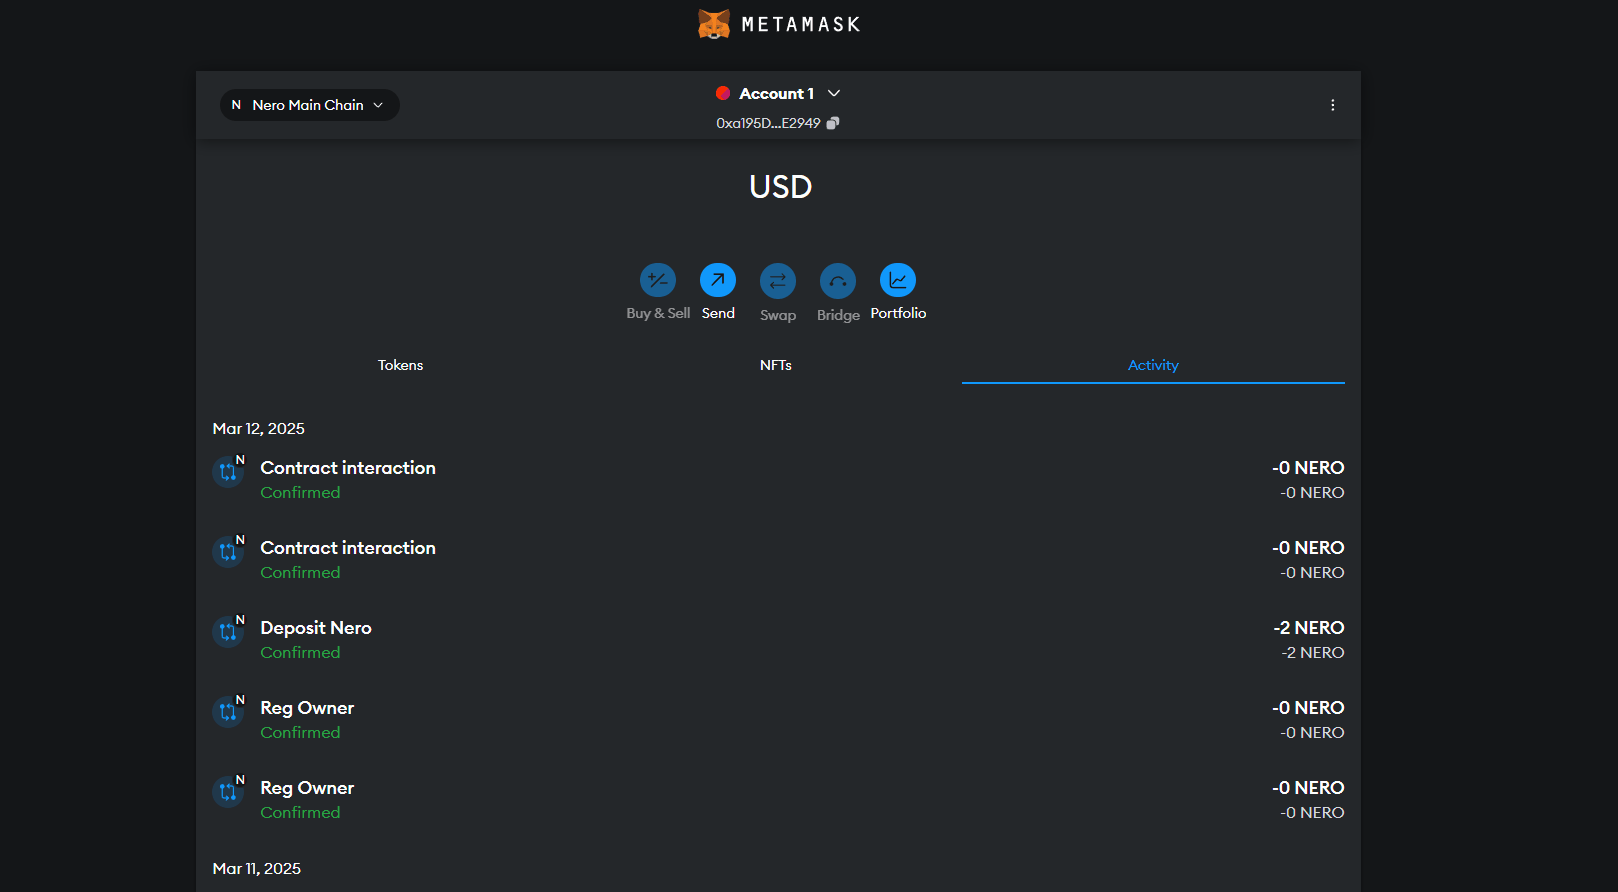\n\n### 2. Open Remix IDE\n\nNavigate to [Remix IDE](https://remix.ethereum.org/) in your browser.\n\n## Creating a Simple Smart Contract\n\nLet's create a simple \"Hello World\" contract with storage functionality.\n\n### 1. Create a New File\n\nIn Remix:\n1. Click on the \"File explorers\" icon in the left sidebar\n2. Click the \"+\" icon to create a new file\n3. Name it `HelloWorld.sol`\n\n### 2. Write Your Smart Contract\n\nCopy and paste the following code into your new file:\n\n```solidity\n// SPDX-License-Identifier: MIT\npragma solidity ^0.8.17;\n\ncontract HelloWorld {\n string private greeting;\n \n constructor() {\n greeting = \"Hello, NERO Chain!\";\n }\n \n function setGreeting(string memory _greeting) public {\n greeting = _greeting;\n }\n \n function getGreeting() public view returns (string memory) {\n return greeting;\n }\n}\n```\n\nThis simple contract:\n- Stores a greeting message\n- Allows anyone to update the greeting\n- Provides a function to retrieve the current greeting\n\n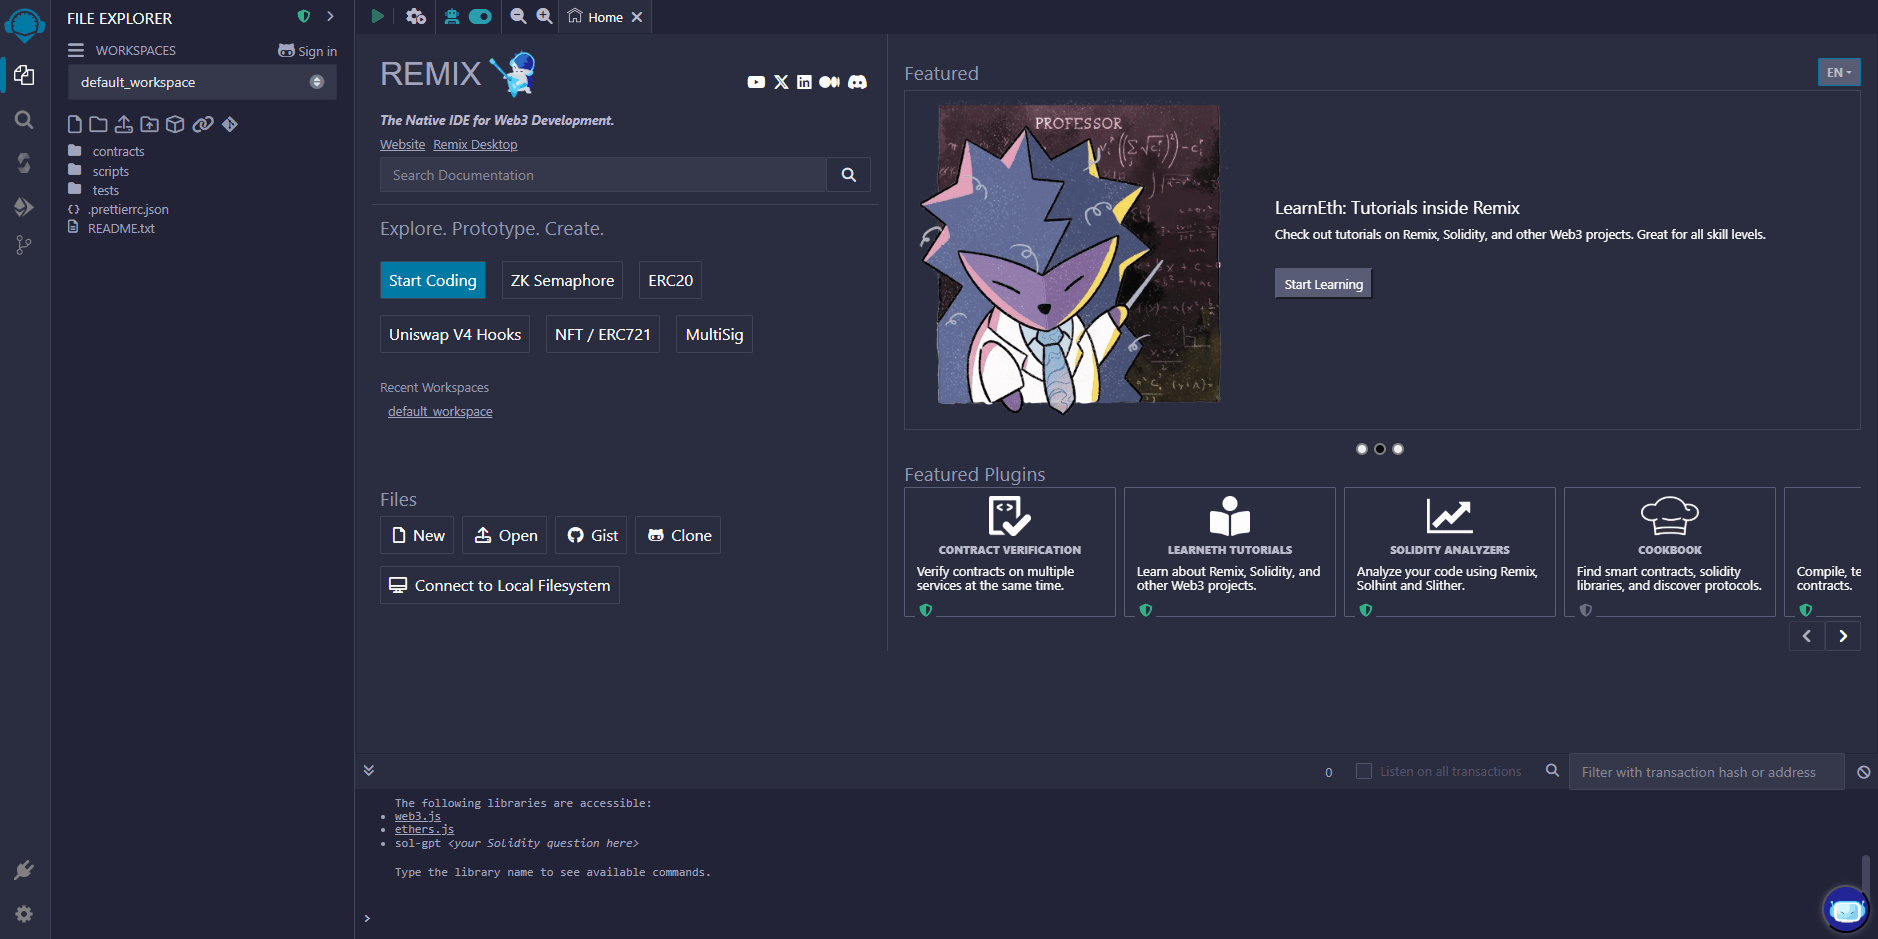\n\n## Compiling Your Contract\n\n### 1. Navigate to the Compiler Tab\n\nClick on the \"Solidity compiler\" icon in the left sidebar (the second icon).\n\n### 2. Select Compiler Version\n\nChoose a compiler version that matches your pragma statement (in our case, 0.8.17 or higher).\n\n### 3. Compile the Contract\n\nClick the \"Compile HelloWorld.sol\" button. If successful, you'll see a green checkmark.\n\n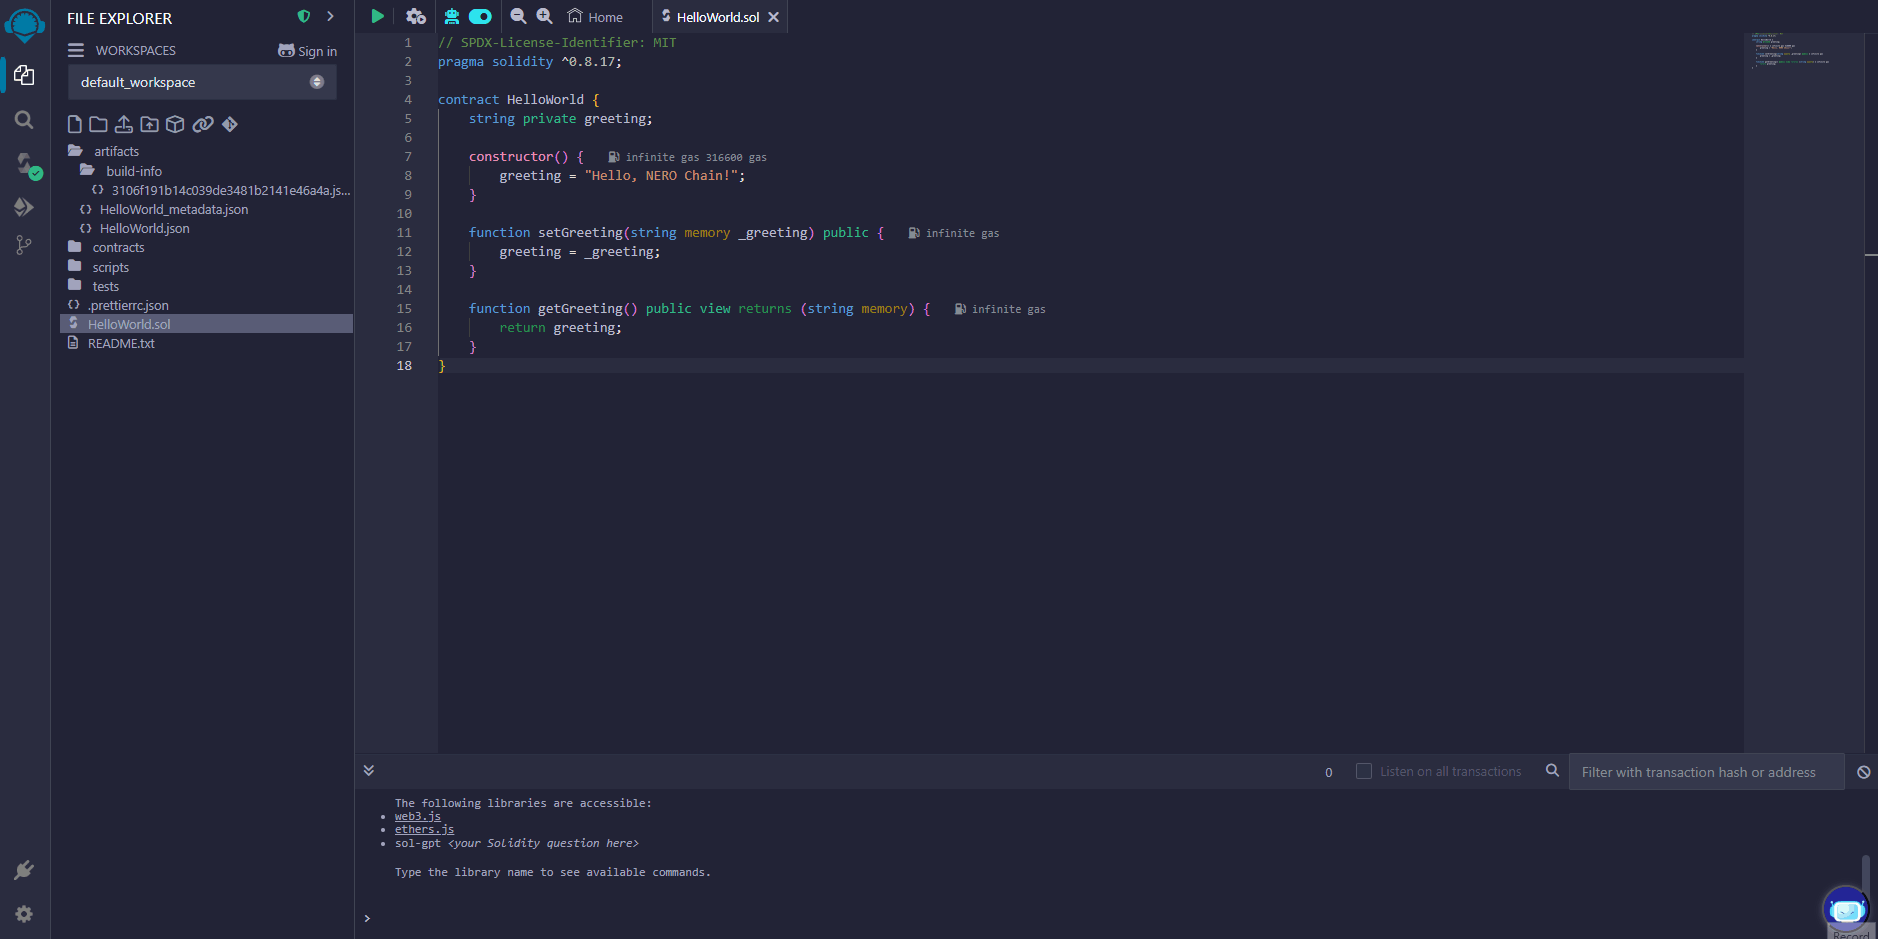\n\n## Deploying Your Contract\n\n### 1. Navigate to the Deploy Tab\n\nClick on the \"Deploy & run transactions\" icon in the left sidebar (the third icon).\n\n### 2. Configure Environment\n\n1. From the \"ENVIRONMENT\" dropdown, select \"Injected Provider - MetaMask\"\n2. MetaMask will prompt you to connect - make sure you're connected to NERO Testnet\n3. Confirm that the \"ACCOUNT\" field shows your wallet address\n\n### 3. Deploy the Contract\n\n1. Ensure \"HelloWorld\" is selected in the \"CONTRACT\" dropdown\n2. Click the \"Deploy\" button\n3. MetaMask will prompt you to confirm the transaction - review the gas fees and click \"Confirm\"\n4. Wait for the transaction to be mined (this usually takes a few seconds on NERO Chain)\n\n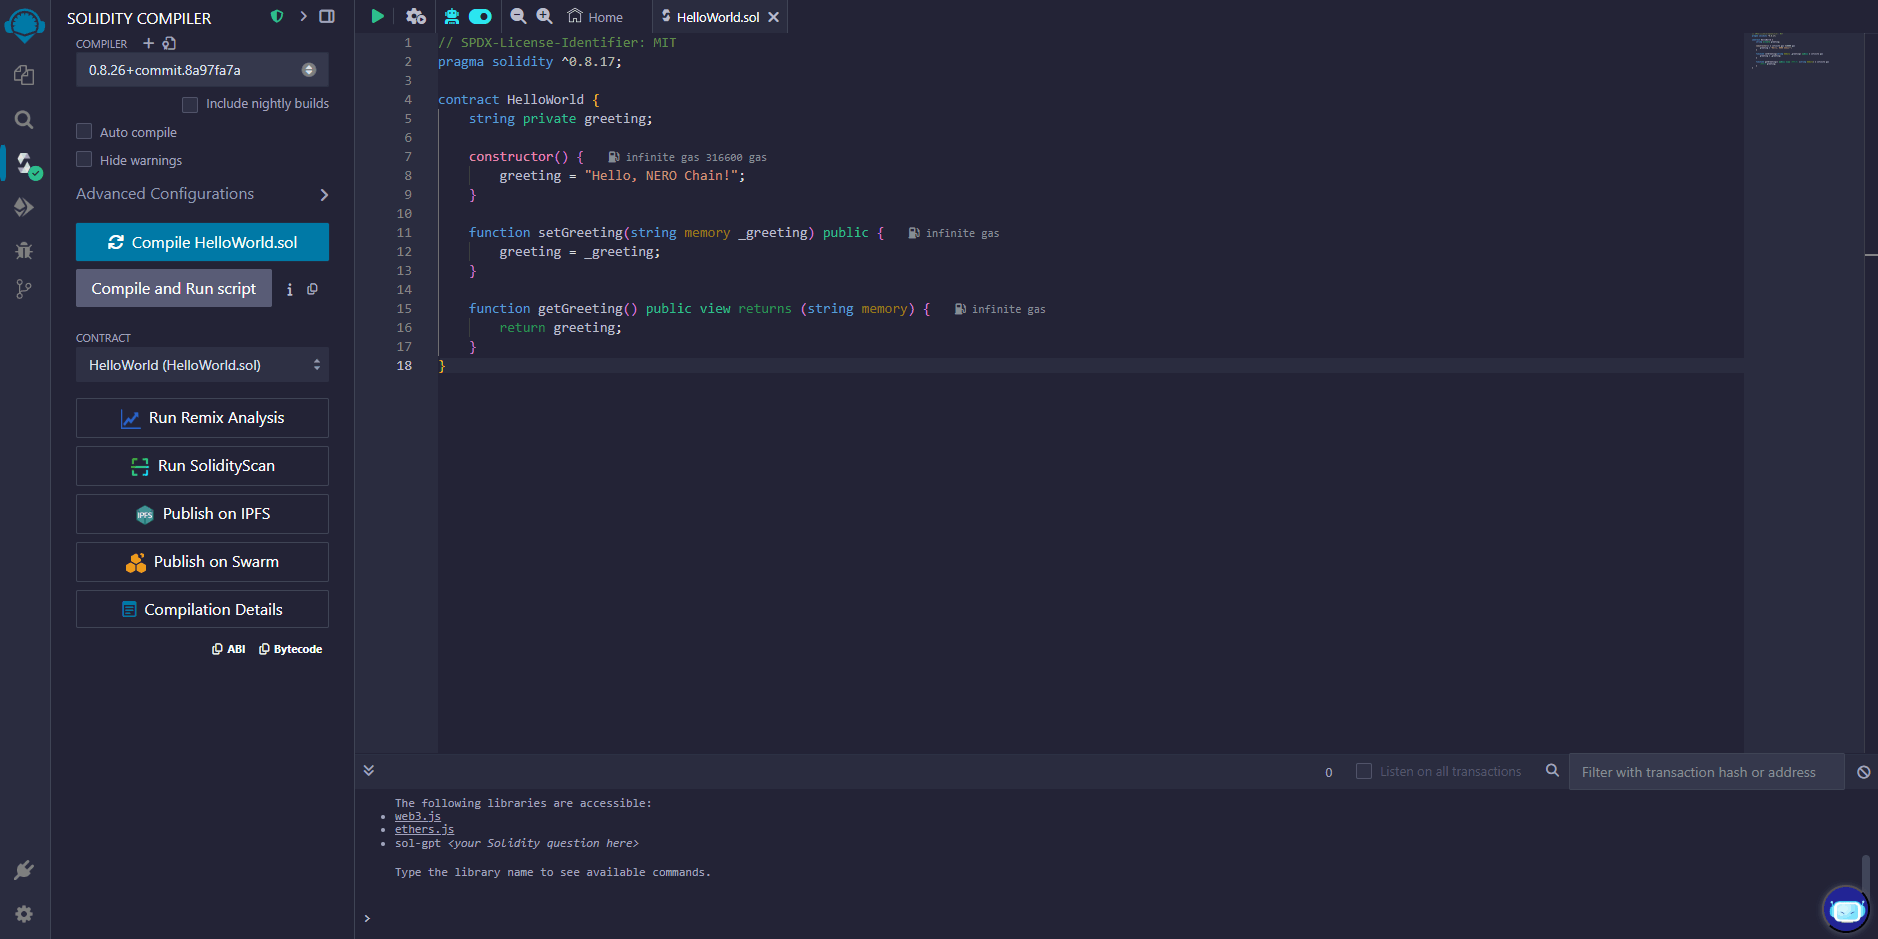\n\n## Interacting with Your Deployed Contract\n\nOnce deployed, your contract will appear under the \"Deployed Contracts\" section.\n\n### Reading the Greeting\n\n1. Expand your contract in the \"Deployed Contracts\" section\n2. Find the \"getGreeting\" function (blue button, indicating it's a read-only function)\n3. Click it to retrieve the stored greeting\n\n### Updating the Greeting\n\n1. Find the \"setGreeting\" function (orange button, indicating it changes state)\n2. Enter a new greeting message in the input field\n3. Click the \"setGreeting\" button\n4. Confirm the transaction in MetaMask\n5. After the transaction is mined, you can call \"getGreeting\" again to verify the update\n\n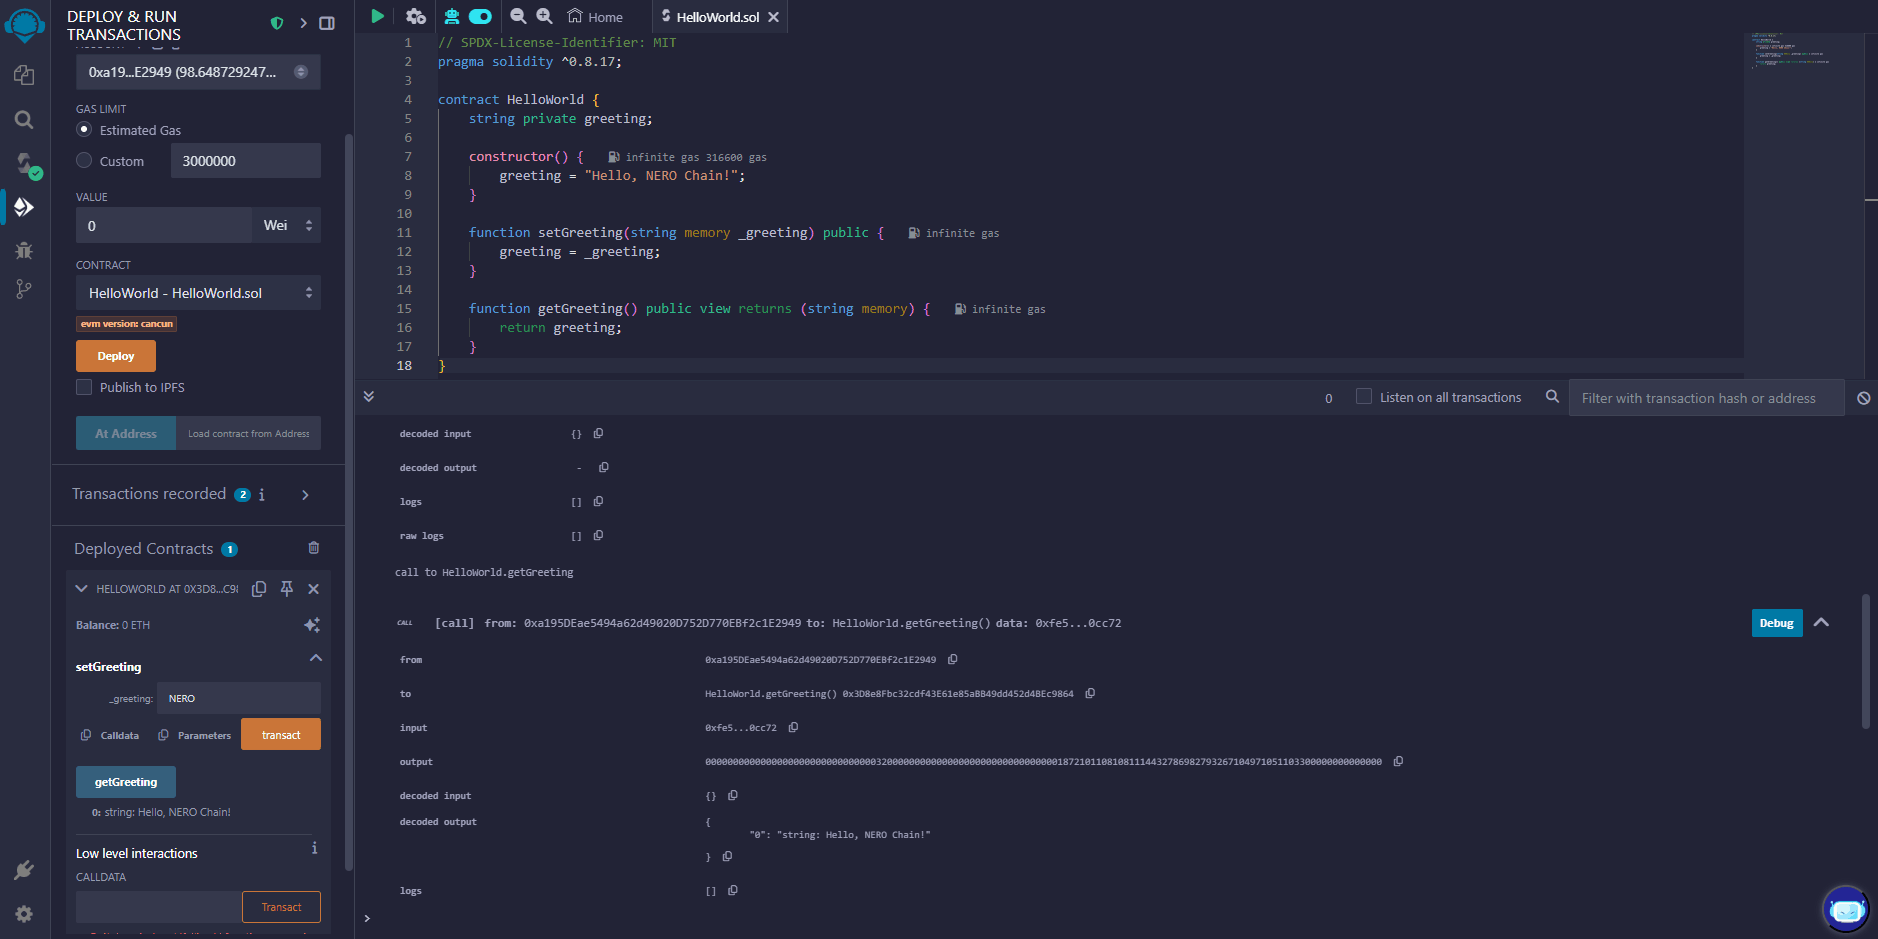\n\n## Verifying Your Contract on the Block Explorer\n\nFor others to interact with your contract and view its code, you should verify it on the block explorer:\n\n1. Copy your contract address from the \"Deployed Contracts\" section in Remix\n2. Visit the [NERO Chain Explorer](https://testnet.neroscan.io)\n3. Paste your contract address in the search bar\n4. Click on the \"Contract\" tab\n5. Click \"Verify and Publish\"\n6. Fill in the required information:\n - Contract Name: `HelloWorld`\n - Compiler Version: The version you used (e.g., `v0.8.17+commit.8df45f5f`)\n - Open Source License Type: `MIT License (MIT)`\n7. In the \"Enter the Solidity Contract Code\" field, paste your entire contract code\n8. Click \"Verify and Publish\"\n\nOnce verified, users can read your contract's code and interact with it directly from the explorer.\n\n## Troubleshooting Common Issues\n\n### Transaction Failing\n\nIf your deployment transaction fails, check:\n- Do you have enough NERO tokens for gas?\n- Is your MetaMask connected to NERO Chain?\n- Is there an error in your contract code?\n\n### High Gas Fees\n\nNERO Chain has relatively low gas fees, but if they seem high:\n- Check if you're connected to the right network\n- Try during a less busy time\n\n### Compiler Errors\n\nIf you encounter compiler errors:\n- Make sure your Solidity version is compatible (0.8.0 or higher is recommended)\n- Check for syntax errors\n- Look for references to Ethereum-specific functions that might not be available on NERO Chain\n\n## Advanced Tips\n\n### Using Libraries\n\nIf you're using external libraries:\n1. Import them using the import statement\n2. Make sure they're compatible with NERO Chain\n\n```solidity\n// Example of importing OpenZeppelin's ERC20 contract\n\n```\n\n### Constructor Arguments\n\nIf your contract requires constructor arguments:\n1. Enter them in the field next to the \"Deploy\" button\n2. Separate multiple arguments with commas\n\n### Contract Size Limits\n\nNERO Chain, like Ethereum, has a maximum contract size limit. If your contract is too large:\n- Split it into multiple contracts\n- Optimize your code\n- Use libraries to reuse code\n\n## Next Steps\n\nNow that you've deployed your first contract, you might want to:\n\n1. Learn about [Account Abstraction on NERO Chain](https://docs.nerochain.io/en/tutorials/low-level/aa-wallet-integration)\n2. Explore [Paymaster integration](https://docs.nerochain.io/en/tutorials/low-level/paymaster-integration) for gasless transactions\n3. Build a complete [dApp with React](https://docs.nerochain.io/en/tutorials/low-level/create-first-dapp)\n4. Try deploying using [Hardhat](https://docs.nerochain.io/en/tutorials/first-contract/using-hardhat) for more complex projects\n5. Try the high-level template for [quick building](https://docs.nerochain.io/en/tutorials/high-level/building-blocks) \n\n## Conclusion\n\nCongratulations! You've successfully deployed a smart contract on NERO Chain using Remix. This basic workflow—writing, compiling, deploying, and interacting with contracts—remains the same for more complex projects.\n\nNERO Chain's compatibility with Ethereum tools makes it easy to migrate existing projects or start new ones using familiar tools like Remix."} {"url":"https://docs.nerochain.io/en/tutorials/first-contract/verifyExplorer","locale":"en","section":"tutorials","title":"Verifying Smart Contracts through the NERO Explorer","summary":"This guide walks you through the process of verifying your smart contract on the NERO Chain Testnet using the block explorer interface. Contract verification makes your source code publicly viewable a","headings":["# Verifying Smart Contracts through the NERO Explorer","## Prerequisites","## Step 1: Access the NERO Chain Explorer","## Step 2: Locate Your Contract","## Step 3: Access the Verification Page","## Step 4: Enter Contract Information","## Step 5: Complete the Verification","## What's Next?"],"tokens":619,"markdown":"This guide walks you through the process of verifying your smart contract on the NERO Chain Testnet using the block explorer interface. Contract verification makes your source code publicly viewable and allows users to interact with your contract directly through the explorer.\n\n## Prerequisites\n\n- A deployed smart contract on NERO Chain\n- The contract's source code\n- The contract's deployment address\n- Deployment parameters (compiler version, optimization settings, etc.)\n\n## Step 1: Access the NERO Chain Explorer\n\nNavigate to the [NERO Testnet Explorer](https://testnet.neroscan.io/) in your web browser.\n\n## Step 2: Locate Your Contract\n\nEnter your contract's deployment address in the search box at the top of the explorer page.\n\n\nFigure 3: Searching for your contract by address
\n\n## Step 3: Access the Verification Page\n\nOn the contract details page, locate and click the \"Verify and Publish\" button.\n\n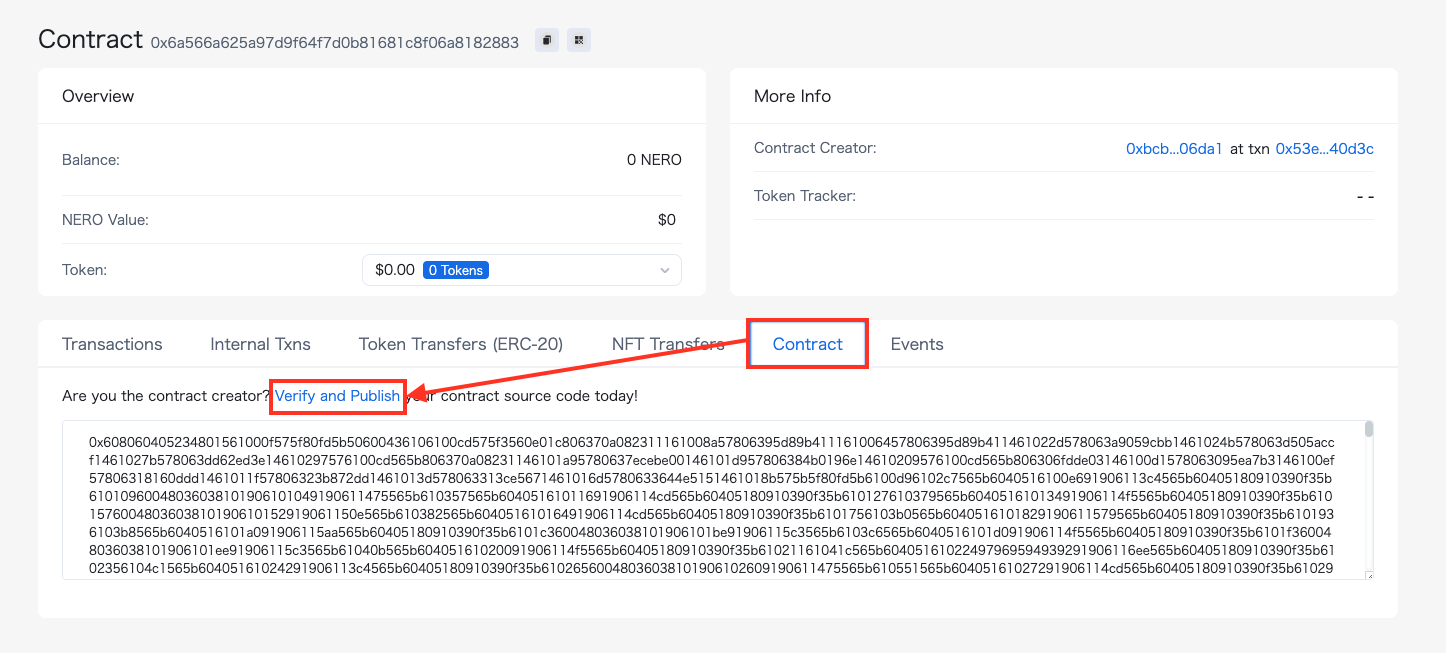\nFigure 4: Contract details page with verification option
\n\n## Step 4: Enter Contract Information\n\nComplete the verification form with your contract details:\n\n1. **Contract Name**: Enter the exact name of your contract\n2. **Compiler Version**: Select the same version used during deployment\n3. **Optimization**: Match your deployment settings\n4. **Source Code**: Paste your complete contract source code\n5. **Constructor Arguments**: Enter ABI-encoded constructor arguments (if applicable)\n\n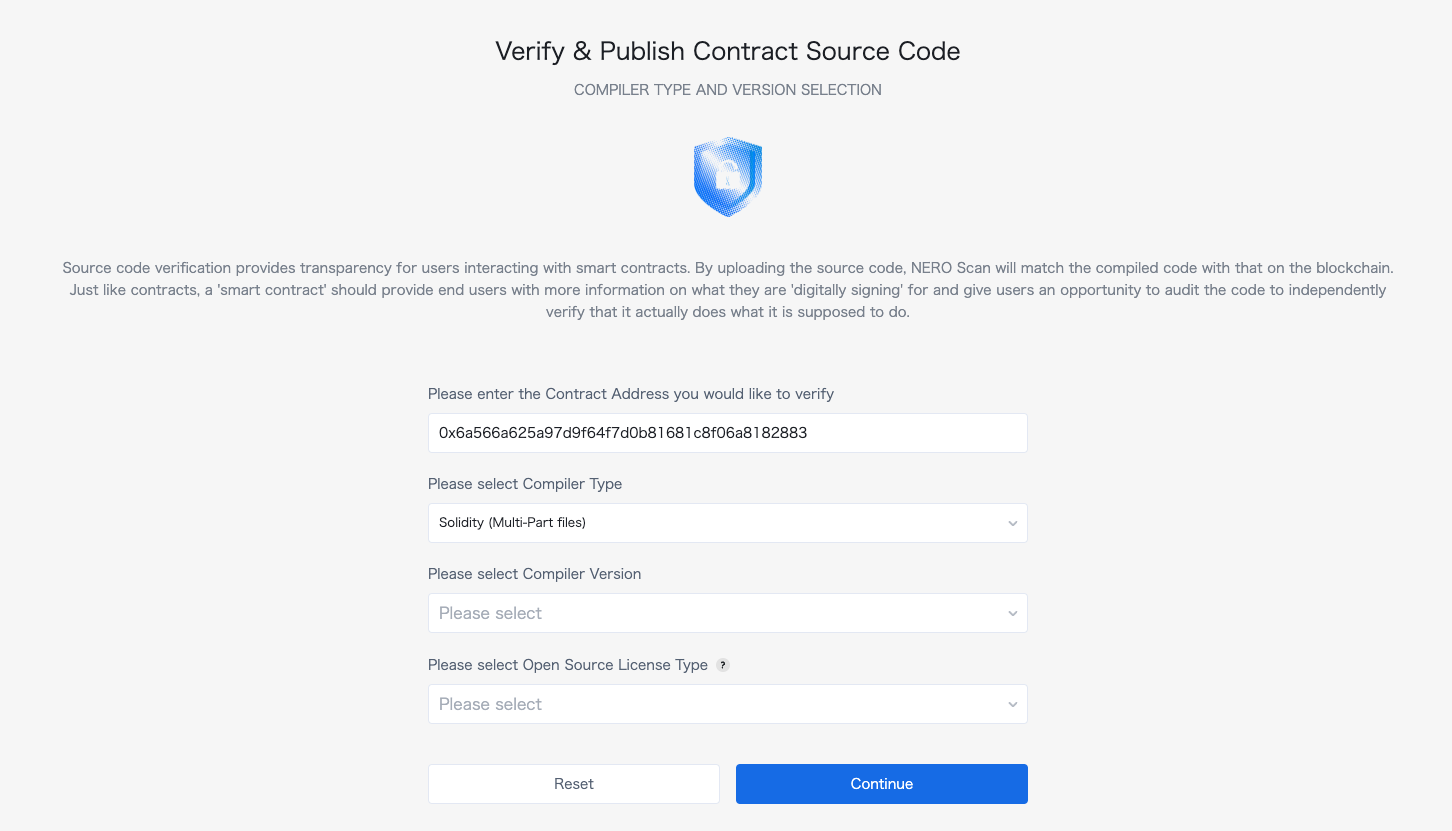\nFigure 5: Contract verification form
\n\n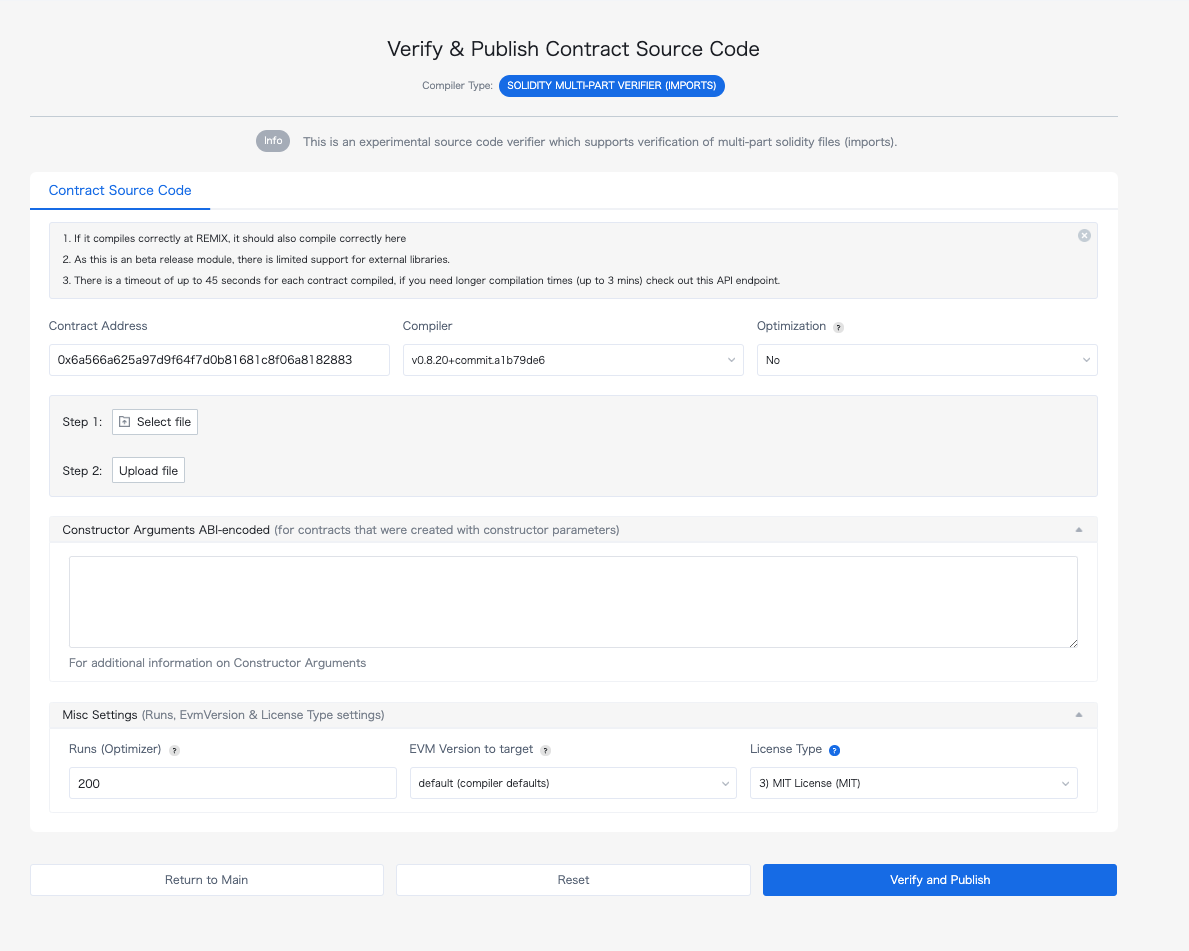\nFigure 6: Detailed contract verification settings
\n\n## Step 5: Complete the Verification\n\nClick the \"Verify and Publish\" button to submit your information. If successful, your contract's source code will be publicly viewable on the explorer.\n\n## What's Next?\n\nOnce verified, users can:\n- Read your contract's source code\n- Interact with your contract directly through the explorer interface\n- Have greater confidence in your contract's security and functionality\n\nFor programmatic verification options, see our [Hardhat verification guide](https://docs.nerochain.io/en/tutorials/first-contract/using-hardhat)."} {"url":"https://docs.nerochain.io/en/tutorials/high-level/building-blocks","locale":"en","section":"tutorials","title":"Quick Building Blocks","summary":"This guide explains the design choices and implementation details behind our NERO Wallet dApp enhancements om the next section. It serves as both a tutorial and an explanation of account abstraction c","headings":["# Quick Building Blocks","## What is Account Abstraction?","## Understanding User Operations (UserOps)","## Using UserOps for Write Operations","## Direct RPC for Read Operations For Read Operations","## The NERO Wallet Configuration","### 1. Web3Auth Integration","### 2. Configuration Context","### 3. Smart Contract Interaction","## Making the Most of NERO Wallet's Account Abstraction Features","### 1. Gas Sponsorship","### 2. Social Login","### 3. Transaction Batching","## Best Practices for NERO Wallet Development","## Further Expansion Possibilities","## Conclusion"],"tokens":1615,"markdown":"This guide explains the design choices and implementation details behind our NERO Wallet dApp enhancements om the next section. It serves as both a tutorial and an explanation of account abstraction concepts.\n\n## What is Account Abstraction?\n\nAccount abstraction (AA) enables smart contract wallets to act like regular user accounts but with advanced features. Unlike traditional EOA (Externally Owned Account) wallets that rely on private keys, AA wallets use smart contracts to process transactions, enabling features like:\n\n- Multi-signature authentication\n- Gas sponsorship (no need for users to hold gas tokens)\n- Transaction batching\n- Account recovery mechanisms\n- Programmable security rules\n\n## Understanding User Operations (UserOps)\n\nIn the NERO Wallet implementation, we use the ERC-4337 standard which introduces the concept of User Operations (UserOps). These differ from regular transactions:\n\n1. **Regular Transaction**: Directly submitted to the blockchain, requiring gas fees paid by the sender.\n2. **User Operation**: Submitted to a separate mempool and processed by special infrastructure called bundlers and paymasters.\n\nThat said, an UserOp structure flow goes as follows:\n\n```\nUser → UserOp → Bundler → EntryPoint Contract → Smart Contract Wallet (AA) → Target Contract\n```\n\nWhere:\n\n- **Bundler**: Collects UserOps and submits them to the blockchain\n- **Paymaster**: Sponsors gas fees on behalf of users.\n- **EntryPoint Contract**: Central contract that validates and executes UserOps\n\n## Using UserOps for Write Operations \n\nThe example below shows how For write Operations, using the useSendUserOp from the high-level template:\n\n```js\nawait execute({\n function: 'mint',\n contractAddress: FREE_NFT_ADDRESS,\n abi: NERO_NFT_ABI,\n params: [AAaddress, nftImageUrl],\n value: 0,\n});\n```\n\n**Benefits of UserOps for Writing**:\n\n1. **Gas Abstraction**: Users don't need to hold native tokens to pay for gas\n2. **Batching**: Multiple operations can be combined (though we didn't implement this)\n3. **Signature Abstraction**: Users can authenticate with social logins instead of private keys\n4. **Better UX**: Simplifies the interaction flow for users\n\n## Direct RPC for Read Operations For Read Operations\n\nWe can go \"vanilla style\" for reading information from the chain. \n\n```js\nconst provider = new ethers.providers.JsonRpcProvider(config.rpcUrl);\nconst nftContract = new ethers.Contract(FREE_NFT_ADDRESS, NERO_NFT_ABI, provider);\nconst balance = await nftContract.balanceOf(AAaddress);\n```\n\n**Benefits of Direct RPC for Reading**:\n\n1. **Efficiency**: No need to create UserOps for read-only operations\n2. **Cost**: Read operations are free and don't require gas\n3. **Speed**: Direct RPC calls are faster as they bypass the bundler/paymaster infrastructure\n4. **Simplicity**: Easier to implement and debug\n\n## The NERO Wallet Configuration\n\nThe NERO Wallet leverages several key components for configuration:\n\n### 1. Web3Auth Integration\n\nThe wallet uses Web3Auth for social login capabilities, enabling users to log in with their Google/Facebook accounts instead of managing private keys.\n\n```js\n// From nerowallet.config.ts\nweb3auth: {\n clientId: import.meta.env.VITE_TESTNET_WEB3AUTH_ID ?? '',\n network: 'testnet',\n uiConfig: {\n appName: 'NERO',\n // ... other config\n },\n loginConfig: {\n google: {\n // ... google config\n },\n facebook: {\n // ... facebook config\n }\n }\n}\n```\n\n### 2. Configuration Context\n\nThe wallet uses a configuration context to manage chain details, RPC URLs, and contract addresses. This allows the dApp to work across different networks (testnet/mainnet):\n\n```js\nconst config = useConfig(); // Access RPC URL, chain info, etc.\n```\n\n### 3. Smart Contract Interaction\n\nThe wallet interacts with smart contracts in two ways:\n\n**For Write Operations (via useSendUserOp hook)**:\n```js\nconst { execute, waitForUserOpResult } = useSendUserOp();\nawait execute({/* operation details */});\nconst result = await waitForUserOpResult();\n```\n\n**For Read Operations (via ethers.js)**:\n```js\nconst provider = new ethers.providers.JsonRpcProvider(config.rpcUrl);\nconst contract = new ethers.Contract(address, abi, provider);\nconst data = await contract.someReadFunction();\n```\n\n## Making the Most of NERO Wallet's Account Abstraction Features\n\n### 1. Gas Sponsorship\n\nThe NERO Wallet configuration includes a paymaster that can sponsor gas fees:\n\n```js\naa: {\n bundler: 'https://bundler-testnet.nerochain.io/',\n paymaster: 'https://paymaster-testnet.nerochain.io',\n paymasterAPIKey: 'YOUR_API_KEY_HERE',\n},\n```\n\nThis allows users to perform transactions without holding NERO tokens.\n\n### 2. Social Login\n\nThe Web3Auth integration enables social login without private keys:\n\n```js\nloginConfig: {\n google: {\n name: 'google',\n verifier: 'NeroTest-Google-Maintest',\n typeOfLogin: 'google',\n clientId: import.meta.env.VITE_GOOGLE_CLIENT_ID,\n },\n // ...other login methods\n}\n```\n\n### 3. Transaction Batching\n\nThough not implemented in our example, the NERO Wallet supports transaction batching, allowing multiple operations to be executed in a single transaction.\n\n## Best Practices for NERO Wallet Development\n\n1. **Use UserOps for Write Operations**: Any operation that changes state should use UserOps\n2. **Use Direct RPC for Read Operations**: Reading data should bypass UserOps for efficiency\n3. **Handle Errors Gracefully**: Provide fallbacks and clear error messages\n4. **Optimize UI for Mobile**: Many users will access the wallet from mobile devices\n5. **Secure User Data**: Don't store sensitive data in local storage\n6. **Test on Multiple Networks**: Ensure your dApp works on both testnet and mainnet\n\n## Further Expansion Possibilities\n\n1. **Multi-send Feature**: Allow users to send tokens to multiple recipients in one transaction\n2. **NFT Metadata Storage**: Store NFT metadata on IPFS for proper decentralization\n3. **Batch Minting**: Allow users to mint multiple NFTs in a single operation\n4. **Wallet Connect Integration**: Add support for connecting hardware wallets\n5. **Transaction History**: Show users their past transactions\n6. **Token Swapping**: Integrate DEX functionality for token swapping\n\n## Conclusion\n\nBy understanding the concepts and implementation details behind the NERO Wallet, developers can build powerful dApps with account abstraction features. Understanding this you can jump to the next section and understand each step done in the process."} {"url":"https://docs.nerochain.io/en/tutorials/high-level/high-level-quickstart","locale":"en","section":"tutorials","title":"From Template to dApp: Adding NFT & Token Features to NERO Wallet Template","summary":"This tutorial will guide you through the process of enhancing the NERO Wallet template with NFT minting, token creation, and an NFT gallery. At the end of it, you should have a similar result like bel","headings":["# From Template to dApp: Adding NFT & Token Features to NERO Wallet Template","## Requirements","## Step 1: Understanding the Project Structure","## Step 2: Create the HomePage Component","## Step 3: Define the NERONFT ABI","## Step 4: Set Up React State and Hooks","## Step 5: Implement Tab Handling","## Step 6: Implement Token Minting","## Step 7: Implement NFT Minting","## Step 8: Implement NFT Gallery with Direct RPC Calls","## Step 9: Create the UI for Tabs and Content","## Step 10: Add Content for Each Tab","### NFT Minting Tab","### Token Creation Tab","### NFT Tab","## Step 11: Add Transaction Status Section","## Step 12: Complete the Component","## Step 13: Update main.tsx","## Step 14: Update nerowallet.config.ts","## Step 15: Test Your Application","## Key Points to Remember"],"tokens":4241,"markdown":"This tutorial will guide you through the process of enhancing the NERO Wallet template with NFT minting, token creation, and an NFT gallery. At the end of it, you should have a similar result like below:\n\n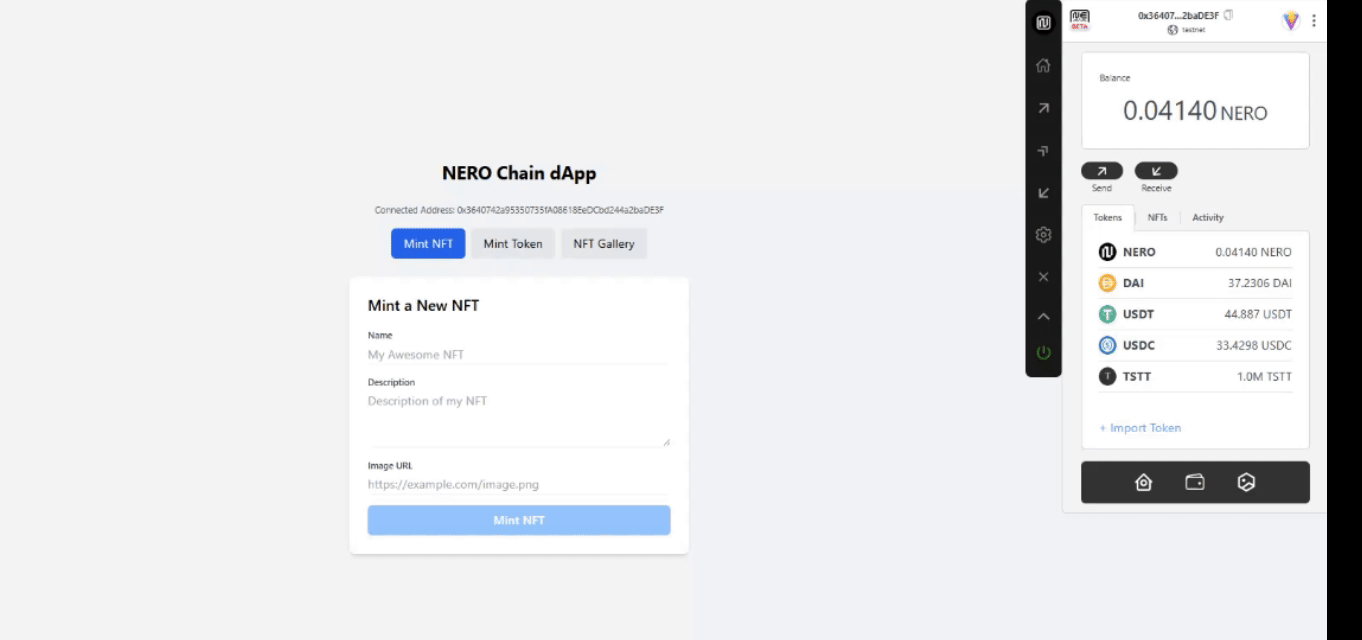\n \n \n*Figure 1: Application with a NERO Wallet*\n\n## Requirements\n\n1. Create a project using our nero-aa-wallet template with:\n```js\ngit clone https://github.com/nerochain/nero-aa-wallet\n```\n2. Have an AA-platform API Key. See how to [here](https://docs.nerochain.io/en/developer-tools/aa-platform/getting-started):\n\n>__**Note**__: You can enable social logins in this example. Go to the web3auth website and generate a clientId with your desired social provider (Google, Facebook, etc.). \n\n## Step 1: Understanding the Project Structure\n\nFirst, familiarize yourself with the project structure:\n\n```js\n├── nerowallet.config.ts # Wallet configuration with chain and API details\n├── src/\n│ ├── App.tsx # Main application component\n│ ├── Sample.tsx # Sample implementation with a single button\n│ ├── index.tsx # Entry point for React\n│ ├── main.tsx # Main rendering\n│ ├── abis/ # Contract ABIs\n│ ├── components/ # UI components\n│ ├── hooks/ # React hooks\n│ └── constants/ # Constants like ABIs\n```\n## Step 2: Create the HomePage Component\n\n1. Create a new file src/HomePage.tsx . We will code it with three tabs: NFT Minting, Token Creation, and NFT Gallery.\n\n2. Copy this starting imports for the on the HomePage.tsx:\n\n```js\n\n// Import ABIs\n\n// Define contract addresses\nconst TOKEN_FACTORY_ADDRESS = '0x00ef47f5316A311870fe3F3431aA510C5c2c5a90';\nconst FREE_NFT_ADDRESS = '0x63f1f7c6a24294a874d7c8ea289e4624f84b48cb';\n```\n\n## Step 3: Define the NERONFT ABI\n\nAdd the specific NERONFT ABI to include the mint function:\n\n```js\n// Define NERONFT ABI with the mint function\nconst NERO_NFT_ABI = [\n // Basic ERC721 functions from the standard ABI\n ...ERC721_ABI,\n // Add the mint function that exists in the NERONFT contract\n 'function mint(address to, string memory uri) returns (uint256)',\n 'function tokenURI(uint256 tokenId) view returns (string memory)',\n];\n```\n\n## Step 4: Set Up React State and Hooks\n\nThe project comes with implemented wallet hooks and states. Add these state variables and hooks to manage the functionality:\n```js\nconst HomePage = () => {\n const [activeTab, setActiveTab] = useState('mint-nft');\n const { AAaddress, isConnected } = useSignature();\n const { execute, waitForUserOpResult } = useSendUserOp();\n const config = useConfig();\n const [isLoading, setIsLoading] = useState(false);\n const [userOpHash, setUserOpHash] = useState(null);\n const [txStatus, setTxStatus] = useState('');\n const [isPolling, setIsPolling] = useState(false);\n const [nfts, setNfts] = useState([]);\n \n // Form state\n const [tokenName, setTokenName] = useState('');\n const [tokenSymbol, setTokenSymbol] = useState('');\n const [tokenSupply, setTokenSupply] = useState('100000');\n const [nftName, setNftName] = useState('');\n const [nftDescription, setNftDescription] = useState('');\n const [nftImageUrl, setNftImageUrl] = useState('');\n```\n\n## Step 5: Implement Tab Handling\n\nAdd a function to handle tab switching:\n\n```js\n\n// Handle tab change\nconst handleTabChange = (tab) => {\n setActiveTab(tab);\n setTxStatus('');\n setUserOpHash(null);\n \n // If switching to NFT gallery, fetch the NFTs\n if (tab === 'nft-gallery' && isConnected) {\n fetchNFTs();\n }\n};\n```\n\n## Step 6: Implement Token Minting\n\nLet's start adding the function to create ERC20 tokens. The fuction should call the createToken function from the token factory using execute function from useSendUserOp. \n\n```js\n\n// Mint ERC20 token\nconst handleMintToken = async () => {\n if (!isConnected) {\n alert('Please connect your wallet first');\n return;\n }\n\n setIsLoading(true);\n setUserOpHash(null);\n setTxStatus('');\n\n try {\n // Call the createToken function on the token factory contract\n await execute({\n function: 'createToken',\n contractAddress: TOKEN_FACTORY_ADDRESS,\n abi: CreateTokenFactory.abi,\n params: [tokenName, tokenSymbol, tokenSupply],\n value: 0,\n });\n\n const result = await waitForUserOpResult();\n setUserOpHash(result.userOpHash);\n setIsPolling(true);\n\n if (result.result === true) {\n setTxStatus('Success!');\n setIsPolling(false);\n } else if (result.transactionHash) {\n setTxStatus('Transaction hash: ' + result.transactionHash);\n }\n } catch (error) {\n console.error('Error:', error);\n setTxStatus('An error occurred');\n } finally {\n setIsLoading(false);\n }\n};\n\n```\n\n## Step 7: Implement NFT Minting\n\nAnd similar goes for the NFT Mint functionality, expect that a different contract is being called here.\n```js\n// Mint NFT\nconst handleMintNFT = async () => {\n if (!isConnected) {\n alert('Please connect your wallet first');\n return;\n }\n\n if (!nftName || !nftImageUrl) {\n alert('Please provide a name and image URL for your NFT');\n return;\n }\n\n setIsLoading(true);\n setUserOpHash(null);\n setTxStatus('');\n\n try {\n // Create metadata JSON\n const metadataJson = JSON.stringify({\n name: nftName,\n description: nftDescription,\n image: nftImageUrl,\n attributes: []\n });\n\n // For this demo, we'll just use the image URL directly\n await execute({\n function: 'mint',\n contractAddress: FREE_NFT_ADDRESS,\n abi: NERO_NFT_ABI,\n params: [AAaddress, nftImageUrl],\n value: 0,\n });\n\n const result = await waitForUserOpResult();\n setUserOpHash(result.userOpHash);\n setIsPolling(true);\n\n if (result.result === true) {\n setTxStatus(`Success! NFT \"${nftName}\" minted!`);\n setIsPolling(false);\n // Reset form\n setNftName('');\n setNftDescription('');\n setNftImageUrl('');\n // Refresh NFT gallery after successful mint\n fetchNFTs();\n } else if (result.transactionHash) {\n setTxStatus('Transaction hash: ' + result.transactionHash);\n }\n } catch (error) {\n console.error('Error:', error);\n setTxStatus('An error occurred');\n } finally {\n setIsLoading(false);\n }\n};\n```\n\n## Step 8: Implement NFT Gallery with Direct RPC Calls\n\nSince we are minting NFT's , we will add the function to fetch NFTs directly from the blockchain. This can be in the \"vanilla\" style. \n\n```js\n// Fetch NFTs for the gallery using direct RPC calls\nconst fetchNFTs = async () => {\n if (!isConnected || !AAaddress) return;\n\n try {\n setIsLoading(true);\n setNfts([]); // Clear existing NFTs while loading\n \n // Create a provider using the RPC URL from config\n const provider = new ethers.providers.JsonRpcProvider(config.rpcUrl);\n \n // Create a contract instance for the NFT contract\n const nftContract = new ethers.Contract(FREE_NFT_ADDRESS, NERO_NFT_ABI, provider);\n \n // Get the balance of NFTs for the user\n const balance = await nftContract.balanceOf(AAaddress);\n const balanceNumber = parseInt(balance.toString());\n \n if (balanceNumber > 0) {\n const fetchedNfts = [];\n \n // Fetch each NFT the user owns\n for (let i = 0; i < Math.min(balanceNumber, 10); i++) {\n try {\n // This is a simplified approach - in a real app, you'd need to get tokenIds owned by the address\n const tokenId = i;\n \n // Try to get the token URI\n const tokenURI = await nftContract.tokenURI(tokenId);\n \n // Add to our NFTs array\n fetchedNfts.push({\n tokenId: tokenId.toString(),\n tokenURI: tokenURI,\n name: `NERO NFT #${tokenId}`,\n });\n } catch (error) {\n console.error(`Error fetching NFT #${i}:`, error);\n }\n }\n \n if (fetchedNfts.length > 0) {\n setNfts(fetchedNfts);\n setTxStatus(`Found ${fetchedNfts.length} NFTs`);\n } else {\n // Fallback to sample NFTs\n setNfts([\n {\n tokenId: '1',\n tokenURI: 'https://bafybeigxmkl4vto4zqs7yk6wkhpwjqwaay7jkhjzov6qe2667y4qw26tde.ipfs.nftstorage.link/',\n name: 'NERO Sample NFT #1',\n },\n {\n tokenId: '2',\n tokenURI: 'https://bafybeic6ru2bkkridp2ewhhcmkbh563xtq3a7kl5g5k7obcwgxupx2yfxy.ipfs.nftstorage.link/',\n name: 'NERO Sample NFT #2',\n }\n ]);\n setTxStatus('Using sample NFTs for display');\n }\n } else {\n setTxStatus('No NFTs found for this address');\n }\n } catch (error) {\n console.error('Error fetching NFTs:', error);\n setTxStatus('Error fetching NFTs');\n \n // Fallback to sample NFTs\n setNfts([/* Sample NFTs */]);\n } finally {\n setIsLoading(false);\n }\n};\n```\n\n## Step 9: Create the UI for Tabs and Content\n\nLet's add the JSX for the UI components:\n\n```js\nreturn (\n\n Connected Address: {AAaddress}\n
\n )}\n \n {/* Tabs */}\nLoading your NFTs...
\n ) : nfts.length > 0 ? (\n nfts.map((nft, index) => (\nToken ID: {nft.tokenId}
\n \n View Original\n \n ))\n ) : (\nNo NFTs found. Mint some NFTs first!
\n\n Status: {txStatus}\n
\n {userOpHash && (\n\n UserOpHash: {userOpHash}\n
\n )}\n)}\n```\n\n## Step 12: Complete the Component\n\nFinish by exporting the component:\n```js\nexport default HomePage;\n```\n## Step 13: Update main.tsx\n\nReplace the Sample component with your new HomePage component:\n\n1. Open src/main.tsx\n\n2. Update the imports\n\n```js\n```\n3. Replace\n```js\nReactDOM.createRoot(document.getElementById('root')!).render(\nLaunch your first contract using the Remix IDE.
\n \n \n \nDeploy contracts using Hardhat's development environment.
\n \n\n \nComing soon!
\n \n\n## Low-Level Recipes\n\n\nAdd smart contract wallets to your React application for seamless UX.
\n \n\n \nExecute transactions with sponsored gas through Account Abstraction.
\n \n\n \nImplement different gas payment options in your dApp.
\n \n\n \nQuery and display tokens supported by the NERO Chain Paymaster.
\n \n\n \nBuild a complete NFT minting application with gasless transactions.
\n \n\n## High-Level Recipes\n\n\nUndestand how to implement features on top of the high-level template.
\n \n\n \nUsing our NERO Wallet Template.
\n "} {"url":"https://docs.nerochain.io/en/tutorials/low-level/aa-wallet-integration","locale":"en","section":"tutorials","title":"Integrating Account Abstraction Wallets in React","summary":"This tutorial shows how to integrate Account Abstraction (AA) wallet creation and management into a React application using the NERO Chain AA platform.","headings":["# Integrating Account Abstraction Wallets in React","## What You'll Learn","## Prerequisites","## Understanding Account Abstraction Wallets","## Pre-requisites","## Step 1: Setting Up the Configuration","## Step 2: Creating Utility Functions","## Step 3: Create a types.d.ts file","## Step 4: Creating a React Component","## How AA Wallets Work","## Testing Your Integration","## Important Notes","## Next Steps"],"tokens":1830,"markdown":"This tutorial shows how to integrate Account Abstraction (AA) wallet creation and management into a React application using the NERO Chain AA platform.\n\n## What You'll Learn\n- What Account Abstraction wallets are and how they improve user experience\n- How to set up the configuration for NERO Chain AA platform\n- How to create utility functions for AA wallet integration\n- How to build a React component for wallet connection and AA address display\n- How counterfactual deployment works for AA wallets\n\n## Prerequisites\n- Basic knowledge of React and TypeScript\n- Completed the [Deploying your first contract in NERO Chain](https://docs.nerochain.io/en/tutorials/first-contract) tutorial (recommended)\n- Access to the NERO Chain Testnet\n\n## Understanding Account Abstraction Wallets\n\nIn the traditional Ethereum model, users need to own ETH to pay for gas fees. With Account Abstraction (AA), users can:\n\n- Execute transactions without holding the native token for gas\n- Use smart contract wallets with advanced features\n- Have transactions sponsored by a third party (Paymaster)\n\n## Pre-requisites\n\nYou can either create a new react project with typescript or use our simple template repository to follow along. If you create a new project, be sure to install the below dependencies:\n\n```bash\nnpm install github:nerochain/aa-userop-sdk\n```\n\nand \n\n```bash\nnpm install ethers@5.7.2\n```\n\nIf you want to follow this using our template, use the below:\n\n```\ngit clone https://github.com/nerochain/application-templates-nero.git my-application\ncd my-application\ncd react-ts\nnpm install\n```\n> **_NOTE_**: More components will be available in the template folder.\n\n## Step 1: Setting Up the Configuration\n\nFirst, create a configuration file that contains your chain information and AA contract addresses:\n\n```typescript\n// src/config.ts\nexport const NERO_CHAIN_CONFIG = {\n chainId: 689,\n chainName: \"NERO Chain Testnet\",\n rpcUrl: \"https://rpc-testnet.nerochain.io\",\n currency: \"NERO\",\n explorer: \"https://testnet.neroscan.io\"\n};\n\nexport const AA_PLATFORM_CONFIG = {\n bundlerRpc: \"https://bundler-testnet.nerochain.io/\",\n paymasterRpc: \"https://paymaster-testnet.nerochain.io\",\n};\n\nexport const CONTRACT_ADDRESSES = {\n entryPoint: \"0x5FF137D4b0FDCD49DcA30c7CF57E578a026d2789\",\n accountFactory: \"0x9406Cc6185a346906296840746125a0E44976454\",\n};\n```\n\n## Step 2: Creating Utility Functions\n\nCreate utility functions to interact with the AA wallet:\n\n```typescript\n// src/utils/aaUtils.ts\n\n// Get Ethereum provider\nexport const getProvider = () => {\n return new ethers.providers.JsonRpcProvider(NERO_CHAIN_CONFIG.rpcUrl);\n};\n\n// Get signer from browser wallet\nexport const getSigner = async () => {\n if (!window.ethereum) {\n throw new Error(\"No crypto wallet found. Please install Metamask.\");\n }\n \n await window.ethereum.request({ method: 'eth_requestAccounts' });\n const provider = new ethers.providers.Web3Provider(window.ethereum);\n return provider.getSigner();\n};\n\n// Initialize AA Client\nexport const initAAClient = async (accountSigner: ethers.Signer) => {\n return await Client.init(NERO_CHAIN_CONFIG.rpcUrl, {\n overrideBundlerRpc: AA_PLATFORM_CONFIG.bundlerRpc,\n entryPoint: CONTRACT_ADDRESSES.entryPoint,\n });\n};\n\n// Get AA wallet address for a signer\nexport const getAAWalletAddress = async (accountSigner: ethers.Signer, apiKey?: string) => {\n try {\n // Initialize the SimpleAccount builder\n const simpleAccount = await Presets.Builder.SimpleAccount.init(\n accountSigner,\n NERO_CHAIN_CONFIG.rpcUrl,\n {\n overrideBundlerRpc: AA_PLATFORM_CONFIG.bundlerRpc,\n entryPoint: CONTRACT_ADDRESSES.entryPoint,\n factory: CONTRACT_ADDRESSES.accountFactory,\n }\n );\n \n // Get the counterfactual address of the AA wallet\n const address = await simpleAccount.getSender();\n console.log(\"AA wallet address:\", address);\n \n return address;\n } catch (error) {\n console.error(\"Error getting AA wallet address:\", error);\n throw error;\n }\n};\n```\n\n## Step 3: Create a types.d.ts file\n\n```\ninterface Window {\n ethereum?: {\n isMetaMask?: boolean;\n request: (request: { method: string; params?: any[] }) => Promise\n This AA wallet is counterfactual and will be deployed on your first transaction.\n
\n )}\n );\n};\n\nexport default AAWalletConnect;\n```\n\n## How AA Wallets Work\n\n1. **Counterfactual Deployment**: The AA wallet address is calculated before it's deployed on-chain\n2. **Lazy Deployment**: The wallet contract is deployed automatically on the first transaction\n3. **Deterministic Address**: The same EOA (user wallet) will always get the same AA wallet address\n\n## Testing Your Integration\n\n1. Add your `AAWalletConnect` component to your main App component\n2. Run your React application\n3. Click \"Connect Wallet\" and approve the connection in your browser wallet\n4. You should see both your EOA address and your AA wallet address displayed\n\n## Important Notes\n\n- AA wallets are unique per chain, so the same EOA will have different AA addresses on different chains\n- The wallet address is derived from the factory address, EOA address, and a salt value\n- The AA wallet is only deployed on the first transaction to save gas costs\n\n## Next Steps\nNow that you've set up your AA wallet integration, you're ready to learn how to send operations through these wallets. Continue to the next tutorial: [Sending UserOperations](https://docs.nerochain.io/en/tutorials/low-level/sending-ops) to learn how to execute transactions using your AA wallet."} {"url":"https://docs.nerochain.io/en/tutorials/low-level/checking-sup-tokens","locale":"en","section":"tutorials","title":"Simple Token Selection for NERO Chain Transactions","summary":"This tutorial explains how to implement a simple token selection UI for NERO Chain transactions, using NFT minting as our example operation.","headings":["# Simple Token Selection for NERO Chain Transactions","## What You'll Learn","## Prerequisites","## Overview","## Step 1: Creating a Payment-First NFT Minting Component","## Step 2: Integrating in App.tsx","## How It Works","## Next Steps"],"tokens":2304,"markdown":"This tutorial explains how to implement a simple token selection UI for NERO Chain transactions, using NFT minting as our example operation.\n\n## What You'll Learn\n- How to retrieve supported tokens from the NERO Chain Paymaster\n- How to create a payment type selection workflow\n- How to select tokens for different payment methods\n- How to execute NFT minting transactions with your chosen payment approach\n\n## Prerequisites\n- Completed the [AA Wallet Integration](https://docs.nerochain.io/en/tutorials/low-level/aa-wallet-integration) tutorial\n- Completed the [Sending UserOperations](https://docs.nerochain.io/en/tutorials/low-level/sending-ops) tutorial\n- Completed the [Payment Methods](https://docs.nerochain.io/en/tutorials/low-level/types-payments) tutorial\n\n## Overview\n\nIn this tutorial, we'll create a simple interface where users first select a payment type (prepay or postpay), then choose from available tokens. This workflow helps users understand the payment flow before selecting a specific token. We'll use NFT minting as our practical example.\n\n## Step 1: Creating a Payment-First NFT Minting Component\n\nLet's create a component that first asks for payment type, then shows available tokens:\n\n```typescript\n// src/components/NFTMintWithPaymentSelector.tsx\n\n getSigner, \n getSupportedTokens, \n executeOperation \n} from '../utils/aaUtils';\n\ninterface Token {\n address: string;\n symbol: string;\n type?: number; // Optional as we don't use it for filtering\n}\n\nconst NFTMintWithPaymentSelector: React.FC = () => {\n const [tokens, setTokens] = useStateLoading tokens...
;\n }\n \n if (tokens.length === 0) {\n returnNo supported tokens found.
;\n }\n \n // Determine if mint button should be enabled\n const canMint = paymentType > 0 && selectedToken !== '';\n\n return (\nNFT Minted Successfully!
\n {tokenId &&Token ID: {tokenId}
}\n \n View on Explorer\n \n )}\n );\n};\n\nexport default NFTMintWithPaymentSelector;\n```\n\n## Step 2: Integrating in App.tsx\n\nNow, let's integrate this component into our application:\n\n```typescript\n// src/App.tsx\n\nconst App: React.FC = () => {\n const [isConnected, setIsConnected] = useState(false);\n const [isLoading, setIsLoading] = useState(false);\n \n // Simple connect wallet function\n const connectWallet = async () => {\n try {\n setIsLoading(true);\n \n const signer = await getSigner();\n await getAAWalletAddress(signer); // Initialize AA wallet\n \n setIsConnected(true);\n } catch (error) {\n console.error(\"Error connecting wallet:\", error);\n alert(\"Failed to connect wallet\");\n } finally {\n setIsLoading(false);\n }\n };\n \n return (\nPlease connect your wallet to continue
\n )}\nTransaction successful!
\n \n View on Explorer\n \n )}\n );\n};\n\nexport default NFTMinterButton;\n```\n\n## Testing\n\nThe same as before, add the component to your App.tsx file and run it. \n\n## Understanding the Paymaster Flow\n\n1. **Builder Creation**: Initialize the SimpleAccount builder with your signer\n2. **Paymaster Configuration**: Set the API key and payment type (0 for free/sponsored)\n3. **Operation Preparation**: Create the contract call data for your function\n4. **UserOp Creation**: Build the UserOperation with the builder\n5. **UserOp Submission**: Send the operation to the bundler via the client\n6. **Transaction Tracking**: Wait for the receipt and track the result\n\n## Best Practices for Sponsored Transactions\n\n1. **Error Handling**: Always implement proper error handling and provide user feedback\n2. **Gas Parameters**: Adjust gas parameters based on your operation's complexity\n3. **API Key Security**: Protect your API key by using environment variables and backend proxies in production\n4. **Cost Monitoring**: Track your sponsored transaction usage through the NERO Chain AA Platform dashboard\n5. **User Feedback**: Show loading states and transaction results clearly to improve user experience\n\n## Key Considerations for Paymaster Usage\n\n1. **API Key Security**: Never expose your Paymaster API key in client-side code in production. Consider using a backend proxy.\n2. **Gas Limits**: The gas parameters should be adjusted based on the complexity of your transactions.\n3. **Error Handling**: Implement robust error handling for Paymaster-related failures.\n4. **Rate Limiting**: Be aware that sponsored transactions may have usage limits based on your account.\n\n## Next Steps\nNow that you've learned how to send sponsored UserOperations with your AA wallet, you might want to explore alternative payment methods. Continue to the [Payment Methods](https://docs.nerochain.io/en/tutorials/low-level/types-payments) tutorial to learn how to implement prepaid and postpaid transactions using ERC20 tokens."} {"url":"https://docs.nerochain.io/en/tutorials/low-level/types-payments","locale":"en","section":"tutorials","title":"Payment Methods for NERO Chain Transactions","summary":"This tutorial explains how to implement different payment methods for transaction gas fees using the NERO Chain Paymaster, focusing on ERC20 token payments as alternatives to sponsored transactions.","headings":["# Payment Methods for NERO Chain Transactions","## What You'll Learn","## Prerequisites","## Understanding Paymaster Payment Types","## Step 1: Fetching Supported Tokens","## Step 2: Handling ERC20 Token Approvals","## Step 3: Implementing a Unified Transaction Function","## Step 4: Using the Unified Function for NFT Minting","## Step 5: Creating a Payment Type Selector","## Step 6: Using the Payment Selector in an NFT Minting Component","## Comparing Payment Types","## Best Practices","## When to Use Each Payment Type","## Next Steps"],"tokens":5399,"markdown":"This tutorial explains how to implement different payment methods for transaction gas fees using the NERO Chain Paymaster, focusing on ERC20 token payments as alternatives to sponsored transactions.\n\n## What You'll Learn\n- How to fetch the list of tokens supported by the NERO Chain Paymaster\n- How to implement different payment types for transactions (sponsored, prepay, and postpay)\n- How to handle token approvals for Paymaster interactions\n- How to build a payment selector interface for your application\n\n## Prerequisites\n- Completed the [AA Wallet Integration](https://docs.nerochain.io/en/tutorials/low-level/aa-wallet-integration) tutorial\n- Completed the [Sending UserOperations](https://docs.nerochain.io/en/tutorials/low-level/sending-ops) tutorial (with sponsored transactions)\n- An API key from the [NERO Chain AA Platform](https://aa-platform.nerochain.io)\n\n## Understanding Paymaster Payment Types\n\nIn the previous tutorial, you learned how to use sponsored transactions (Type 0) where the developer covers all gas costs. The NERO Chain Paymaster also supports two additional payment types:\n\n1. **Prepay ERC20 (Type 1)**: Users pay gas costs upfront with ERC20 tokens\n2. **Postpay ERC20 (Type 2)**: Users pay gas costs after transaction execution with ERC20 tokens\n\nBefore implementing these payment types, we first need to fetch the supported tokens from the Paymaster API.\n\n## Step 1: Fetching Supported Tokens\n\nLet's create a utility function to query the supported tokens:\n\n```typescript\n// src/utils/aaUtils.ts\n\n NERO_CHAIN_CONFIG, \n AA_PLATFORM_CONFIG, \n CONTRACT_ADDRESSES,\n API_KEY \n} from '../config';\n\n// Cache to avoid excessive API calls\nlet tokenCache: any[] = [];\nlet lastFetchTime: number = 0;\nconst CACHE_DURATION = 5 * 60 * 1000; // 5 minutes\n\n// Transform token response data\nconst transformTokensResponse = (response: any) => {\n if (!response || !response.tokens) return [];\n \n return response.tokens.map((token: any) => ({\n address: token.token,\n decimal: parseInt(token.decimal),\n symbol: token.symbol,\n type: parseInt(token.type),\n price: token.price ? parseFloat(token.price) : undefined\n }));\n};\n\n// Get supported tokens from Paymaster API\nexport const getSupportedTokens = async (accountSigner: ethers.Signer) => {\n // Check cache first\n const now = Date.now();\n if (tokenCache.length > 0 && now - lastFetchTime < CACHE_DURATION) {\n console.log(\"Using cached token list\");\n return tokenCache;\n }\n \n try {\n // Initialize the SimpleAccount builder\n const builder = await Presets.Builder.SimpleAccount.init(\n accountSigner,\n NERO_CHAIN_CONFIG.rpcUrl,\n {\n overrideBundlerRpc: AA_PLATFORM_CONFIG.bundlerRpc,\n entryPoint: CONTRACT_ADDRESSES.entryPoint,\n factory: CONTRACT_ADDRESSES.accountFactory,\n }\n );\n \n // Get the AA wallet address\n const sender = await builder.getSender();\n \n // Create a minimal UserOp for querying tokens\n const minimalUserOp = {\n sender,\n nonce: \"0x0\",\n initCode: \"0x\",\n callData: \"0x\",\n callGasLimit: \"0x88b8\",\n verificationGasLimit: \"0x33450\",\n preVerificationGas: \"0xc350\",\n maxFeePerGas: \"0x2162553062\",\n maxPriorityFeePerGas: \"0x40dbcf36\",\n paymasterAndData: \"0x\",\n signature: \"0x\"\n };\n \n // Setup provider for paymaster API call\n const provider = new ethers.providers.JsonRpcProvider(AA_PLATFORM_CONFIG.paymasterRpc);\n \n // Query supported tokens from paymaster API\n const tokensResponse = await provider.send(\"pm_supported_tokens\", [\n minimalUserOp,\n API_KEY,\n CONTRACT_ADDRESSES.entryPoint\n ]);\n \n // Transform and cache the results\n const tokens = transformTokensResponse(tokensResponse);\n tokenCache = tokens;\n lastFetchTime = now;\n \n console.log(`Found ${tokens.length} supported tokens`);\n return tokens;\n } catch (error) {\n console.error(\"Error fetching supported tokens:\", error);\n \n // Return cached data if available, otherwise empty array\n return tokenCache.length > 0 ? tokenCache : [];\n }\n};\n```\n\n## Step 2: Handling ERC20 Token Approvals\n\nWhen using ERC20 tokens for gas (payment types 1 and 2), the user's AA wallet must first approve the token paymaster contract:\n\n```typescript\n// src/utils/aaUtils.ts\n// Add this to your existing utility functions\n\n// Handle token approval for paymaster\nexport const approveTokenForPaymaster = async (\n accountSigner: ethers.Signer,\n tokenAddress: string,\n amount: string = ethers.constants.MaxUint256.toString()\n) => {\n try {\n // Initialize client\n const client = await Client.init(NERO_CHAIN_CONFIG.rpcUrl, {\n overrideBundlerRpc: AA_PLATFORM_CONFIG.bundlerRpc,\n entryPoint: CONTRACT_ADDRESSES.entryPoint,\n });\n \n // Initialize builder\n const builder = await Presets.Builder.SimpleAccount.init(\n accountSigner,\n NERO_CHAIN_CONFIG.rpcUrl,\n {\n overrideBundlerRpc: AA_PLATFORM_CONFIG.bundlerRpc,\n entryPoint: CONTRACT_ADDRESSES.entryPoint,\n factory: CONTRACT_ADDRESSES.accountFactory,\n }\n );\n \n // Get the AA wallet address\n const aaWalletAddress = await builder.getSender();\n \n // Create token contract interface\n const erc20Interface = new ethers.utils.Interface([\n 'function approve(address spender, uint256 amount) returns (bool)',\n 'function allowance(address owner, address spender) view returns (uint256)'\n ]);\n \n // Check current allowance\n const provider = new ethers.providers.JsonRpcProvider(NERO_CHAIN_CONFIG.rpcUrl);\n const tokenContract = new ethers.Contract(\n tokenAddress,\n [\n 'function allowance(address owner, address spender) view returns (uint256)'\n ],\n provider\n );\n \n const currentAllowance = await tokenContract.allowance(\n aaWalletAddress,\n CONTRACT_ADDRESSES.tokenPaymaster\n );\n \n // If allowance is sufficient, return early\n if (!currentAllowance.lt(ethers.utils.parseUnits(\"100\", 18))) {\n console.log(\"Token already approved\");\n return true;\n }\n \n console.log(\"Approving tokens for paymaster...\");\n \n // Create the approval call data\n const approveCallData = erc20Interface.encodeFunctionData(\n 'approve',\n [CONTRACT_ADDRESSES.tokenPaymaster, amount]\n );\n \n // Configure paymaster for free gas (for the approval transaction)\n builder.setPaymasterOptions({\n apikey: API_KEY,\n rpc: AA_PLATFORM_CONFIG.paymasterRpc,\n type: \"0\" // Use free for the approval\n });\n \n // Set gas parameters\n const gasParams = {\n callGasLimit: \"0x88b8\",\n verificationGasLimit: \"0x33450\",\n preVerificationGas: \"0xc350\",\n maxFeePerGas: \"0x2162553062\",\n maxPriorityFeePerGas: \"0x40dbcf36\",\n };\n \n builder.setCallGasLimit(gasParams.callGasLimit);\n builder.setVerificationGasLimit(gasParams.verificationGasLimit);\n builder.setPreVerificationGas(gasParams.preVerificationGas);\n builder.setMaxFeePerGas(gasParams.maxFeePerGas);\n builder.setMaxPriorityFeePerGas(gasParams.maxPriorityFeePerGas);\n \n // Create a UserOperation for the approval\n const userOp = await builder.execute(tokenAddress, 0, approveCallData);\n \n // Send the approval UserOperation\n console.log(\"Sending approval transaction...\");\n const res = await client.sendUserOperation(userOp);\n console.log(\"Approval transaction sent with hash:\", res.userOpHash);\n \n // Wait for the approval to be mined\n const receipt = await res.wait();\n if (!receipt) {\n throw new Error(\"Transaction receipt is null\");\n }\n console.log(\"Token approval confirmed in block:\", receipt.blockNumber);\n \n return true;\n } catch (error) {\n console.error(\"Error approving token for paymaster:\", error);\n throw error;\n }\n};\n```\n\n## Step 3: Implementing a Unified Transaction Function\n\nInstead of creating separate functions for each payment type, let's create a single function that can handle all types:\n\n```typescript\n// src/utils/aaUtils.ts\n/**\n * Execute an operation with configurable payment type\n * @param accountSigner The user's signer\n * @param contractAddress The target contract address\n * @param contractAbi The contract ABI\n * @param functionName The function to call\n * @param functionParams Parameters for the function\n * @param paymentType 0 = sponsored, 1 = prepay, 2 = postpay\n * @param tokenAddress Required for payment types 1 and 2\n * @param options Additional options\n */\nexport const executeOperation = async (\n accountSigner: ethers.Signer,\n contractAddress: string,\n contractAbi: any,\n functionName: string,\n functionParams: any[],\n paymentType: number = 0,\n tokenAddress?: string,\n options?: {\n apiKey?: string;\n gasMultiplier?: number;\n }\n) => {\n try {\n // For token payments, first approve the token if needed\n if ((paymentType === 1 || paymentType === 2) && tokenAddress) {\n await approveTokenForPaymaster(accountSigner, tokenAddress);\n } else if ((paymentType === 1 || paymentType === 2) && !tokenAddress) {\n throw new Error(`Token address is required for payment type ${paymentType}`);\n }\n \n // Initialize AA client\n const client = await Client.init(NERO_CHAIN_CONFIG.rpcUrl, {\n overrideBundlerRpc: AA_PLATFORM_CONFIG.bundlerRpc,\n entryPoint: CONTRACT_ADDRESSES.entryPoint,\n });\n \n // Initialize AA builder\n const builder = await Presets.Builder.SimpleAccount.init(\n accountSigner,\n NERO_CHAIN_CONFIG.rpcUrl,\n {\n overrideBundlerRpc: AA_PLATFORM_CONFIG.bundlerRpc,\n entryPoint: CONTRACT_ADDRESSES.entryPoint,\n factory: CONTRACT_ADDRESSES.accountFactory,\n }\n );\n \n // Configure gas parameters\n const gasParams = {\n callGasLimit: \"0x88b8\",\n verificationGasLimit: \"0x33450\",\n preVerificationGas: \"0xc350\",\n maxFeePerGas: \"0x2162553062\",\n maxPriorityFeePerGas: \"0x40dbcf36\",\n };\n \n // Set gas parameters\n builder.setCallGasLimit(gasParams.callGasLimit);\n builder.setVerificationGasLimit(gasParams.verificationGasLimit);\n builder.setPreVerificationGas(gasParams.preVerificationGas);\n builder.setMaxFeePerGas(gasParams.maxFeePerGas);\n builder.setMaxPriorityFeePerGas(gasParams.maxPriorityFeePerGas);\n \n // Configure paymaster based on payment type\n const paymasterOptions: any = {\n apikey: options?.apiKey || API_KEY,\n rpc: AA_PLATFORM_CONFIG.paymasterRpc,\n type: paymentType.toString()\n };\n \n // Add token address for token payments\n if ((paymentType === 1 || paymentType === 2) && tokenAddress) {\n paymasterOptions.token = tokenAddress;\n }\n \n // Set paymaster options\n builder.setPaymasterOptions(paymasterOptions);\n \n // Create contract instance\n const contract = new ethers.Contract(\n contractAddress,\n contractAbi,\n ethers.getDefaultProvider()\n );\n \n // Encode function call\n const callData = contract.interface.encodeFunctionData(\n functionName,\n functionParams\n );\n \n // Payment type in human-readable form for logging\n const paymentTypeNames = [\"Sponsored\", \"Prepay\", \"Postpay\"];\n console.log(`Sending UserOperation with ${paymentTypeNames[paymentType]} payment...`);\n \n // Create the UserOperation\n const userOp = await builder.execute(contractAddress, 0, callData);\n \n // Send the UserOperation\n const res = await client.sendUserOperation(userOp);\n console.log(\"UserOperation sent with hash:\", res.userOpHash);\n \n // Wait for the transaction to be included\n const receipt = await res.wait();\n if (!receipt) {\n throw new Error(\"Transaction receipt is null\");\n }\n console.log(\"Transaction mined in block:\", receipt.blockNumber);\n\n return {\n userOpHash: res.userOpHash,\n transactionHash: receipt.transactionHash,\n receipt: receipt\n };\n } catch (error) {\n console.error(`Error executing operation with payment type ${paymentType}:`, error);\n throw error;\n }\n};\n```\n\n## Step 4: Using the Unified Function for NFT Minting\n\nLet's update our NFT minting function to use the unified operation executor:\n\n```typescript\n// src/utils/aaUtils.ts\n\n// Add a generic NFT ABI\nconst NFT_ABI = [\n \"function mint(address to, string memory uri) external\",\n \"function tokenURI(uint256 tokenId) external view returns (string memory)\",\n \"function balanceOf(address owner) external view returns (uint256)\"\n];\n\nexport const mintNFT = async (\n accountSigner: ethers.Signer,\n recipientAddress: string,\n metadataUri: string,\n paymentType: number = 0,\n tokenAddress?: string,\n options?: {\n apiKey?: string;\n gasMultiplier?: number;\n }\n) => {\n try {\n // Execute the mint function with the specified payment type\n return await executeOperation(\n accountSigner,\n CONTRACT_ADDRESSES.nftContract,\n NFT_ABI,\n 'mint',\n [recipientAddress, metadataUri],\n paymentType,\n tokenAddress,\n options\n );\n } catch (error) {\n console.error(\"Error minting NFT:\", error);\n throw error;\n }\n};\n```\n\n## Step 5: Creating a Payment Type Selector\n\nTo allow users to choose their preferred payment method, let's create a component for selecting payment types and tokens:\n\n```typescript\n// src/components/PaymentTypeSelector.tsx\n\ninterface Token {\n address: string;\n symbol: string;\n type: number;\n decimal: number;\n}\n\ninterface PaymentTypeSelectorProps {\n onPaymentTypeChange: (type: number, token?: string) => void;\n disabled?: boolean;\n}\n\nconst PaymentTypeSelector: React.FC\n {paymentType === 0 \n ? \"Gas fees are sponsored by the application.\" \n : paymentType === 1 \n ? \"Pay for gas upfront with ERC20 tokens. Excess will be refunded.\" \n : \"Pay for exact gas costs after transaction execution.\"}\n
\n \n {paymentType > 0 && (\n \n {isLoading ? (\nLoading supported tokens...
\n ) : error ? (\n{error}
\n ) : availableTokens.length === 0 ? (\nNo tokens available for this payment type.
\n ) : (\nTransaction successful!
\n図1:NEROアーキテクチャ図
\n\n* アクセスレイヤー:さまざまなユーザー操作を受け入れ、それらをチェーンに転送してコミットする役割を担います。\n{/* * 実行レイヤー:ほぼすべてのコントラクトベースのトランザクションの実行を担当し、分散型アプリケーションをサポートします。これはZK Rollupの応用であり、実行結果は決済レイヤーに提出され、決済レイヤーは否定できないセキュリティと客観的な確定性を確立します。 */}\n* 決済レイヤー:実行レイヤーの実行結果を検証して決済する役割を担い、また資産レイヤーとしてチェーン上の資産の管理と決済も担当します。\n* データ可用性レイヤー:実行データに焦点を当て、データシャーディングとデータサンプリング技術に基づいてネットワーク内のデータ可用性を確保します。"} {"url":"https://docs.nerochain.io/ja/core-concepts/architecture/dataAvailabilityLayer","locale":"ja","section":"core-concepts","title":"データ可用性レイヤー:ストレージスケーラビリティ","summary":"決済レイヤー内の貴重なストレージ容量を節約するために、NEROはロールアップのための信頼性の高いオンチェーンストレージを提供するデータ可用性レイヤーを設計しました。これにより、ロールアップに関連する元のトランザクションデータのための外部ストレージプロトコルへの依存が排除され、NERO Chain内で問題が完全に解決されます。さらに、NEROはより多くのノードを参加させるためにシャーディングアーキテ","headings":["# データ可用性レイヤー:ストレージスケーラビリティ"],"tokens":117,"markdown":"決済レイヤー内の貴重なストレージ容量を節約するために、NEROはロールアップのための信頼性の高いオンチェーンストレージを提供するデータ可用性レイヤーを設計しました。これにより、ロールアップに関連する元のトランザクションデータのための外部ストレージプロトコルへの依存が排除され、NERO Chain内で問題が完全に解決されます。さらに、NEROはより多くのノードを参加させるためにシャーディングアーキテクチャを持つデータ可用性レイヤーを設計し、分散化とスケーラビリティを向上させました。この構造により、各ノードはデータの一部(シャード)のみを保存し、複数のノードがデータのアクセシビリティを確保します。独立したストレージレイヤーとして、NEROのデータ可用性レイヤーは従来のブロックチェーンと比較していくつかの重要な特徴を持っています:\n\n* チェーン上でのデータストレージのみが必要で、トランザクション実行はなく、ワールドステートも存在しません。\n* ブロック検証は過去のデータに依存しません。\n* 決済レイヤーのみが統一管理を行います。"} {"url":"https://docs.nerochain.io/ja/core-concepts/architecture/settlementLayer","locale":"ja","section":"core-concepts","title":"決済レイヤー:高性能EVM互換チェーン","summary":"実行レイヤーはNEROのスケーラビリティの鍵です。NEROは、リソースを大量に消費するトランザクション処理をオンチェーン環境からオフチェーンに移行させることで最適化され、オンチェーンは結果の検証に集中します。トランザクションプロセスを2つのフェーズに分割します。最初に、多数のトランザクションがオフチェーンで実行され、その後まとめられます。次に、それらはまとめてメインチェーンに提出され、検証されます","headings":["# 決済レイヤー:高性能EVM互換チェーン","## イーサリアムとの完全な互換性"],"tokens":181,"markdown":"実行レイヤーはNEROのスケーラビリティの鍵です。NEROは、リソースを大量に消費するトランザクション処理をオンチェーン環境からオフチェーンに移行させることで最適化され、オンチェーンは結果の検証に集中します。トランザクションプロセスを2つのフェーズに分割します。最初に、多数のトランザクションがオフチェーンで実行され、その後まとめられます。次に、それらはまとめてメインチェーンに提出され、検証されます。元のトランザクションデータは圧縮されてオンチェーンに保存されます。このアプローチにより、メインチェーンに送信されるデータの量が最小限に抑えられ、より高速で費用対効果の高いトランザクションが可能になります。\n\n## イーサリアムとの完全な互換性\n\nNEROは、イーサリアムがブロックチェーンアプリケーション開発の業界標準であると考えています。より多くの高品質なdAppsプロジェクトと開発者をNEROエコシステムに引き付けるために、NEROは決済レイヤーで完全なイーサリアムプロトコルを実装しています。NEROはEVMとの完全な互換性を持つだけでなく、最新のEIPにも対応しているため、開発者はイーサリアム上の既存のDAppsをNEROに直接デプロイすることができます。一方、Wallet、Solidity、Remix、Truffle、Hardhatなど、イーサリアム上で開発されたすべての開発ツールもNEROチェーン上で直接使用できます。さらに、NEROはイーサリアムのほぼすべてのRPCインターフェースとも互換性があるため、開発者はコストをかけずにNEROのアプリケーション開発に移行し、NEROのエコシステム開発の報酬を得ることができます。"} {"url":"https://docs.nerochain.io/ja/core-concepts/consensus-mechanism/overview","locale":"ja","section":"core-concepts","title":"コンセンサス","summary":"コンセンサスはブロックチェーンの中核コンポーネントであり、NEROはハイブリッドランダム化DPoSA(委任ステーク権限証明)プロトコルを採用しています。このコンセンサスプロトコルはDPoSAコンセンサスを基盤とし、ノードのランダム選択メカニズムを統合することで、参加範囲を広げ、システムの分散化を強化しています。コンセンサスノード内では、BFT(ビザンチン障害耐性)コンセンサスメカニズムが迅速なトラ","headings":["# コンセンサス"],"tokens":149,"markdown":"コンセンサスはブロックチェーンの中核コンポーネントであり、NEROはハイブリッドランダム化DPoSA(委任ステーク権限証明)プロトコルを採用しています。このコンセンサスプロトコルはDPoSAコンセンサスを基盤とし、ノードのランダム選択メカニズムを統合することで、参加範囲を広げ、システムの分散化を強化しています。コンセンサスノード内では、BFT(ビザンチン障害耐性)コンセンサスメカニズムが迅速なトランザクション確認を保証します。さらに、従来のコンセンサスワークフローはトランザクション配布フェーズ、実行プロセスフェーズ、実行結果拡散フェーズに分割されています。このアプローチにより、トランザクション処理のためのパイプラインメカニズムが確立され、システムのスループットが大幅に向上します。\n\n> ⚠️ **注意:** DPoSAプロトコルのランダム化選択の側面は将来の実装のために計画されています。現在、バリデータ選択は決定論的なプロセスに従っています。\n\nNEROのコンセンサスプロトコルは、ブロックを提案し検証するノードのセットを選択します。これは、より多くのノードをシステムに導入してコンセンサスプロセスに参加させるための重要なメカニズムです。コンセンサスプロセスは固定数のブロックに従って異なるエポックに分割され、各エポックではブロックの提案と検証に同じバリデータセットが使用されます。"} {"url":"https://docs.nerochain.io/ja/core-concepts/consensus-mechanism/pipelinedConsensus","locale":"ja","section":"core-concepts","title":"パイプラインコンセンサス","summary":"イーサリアムなどの従来のブロックチェーンシステムでは、ブロック生成プロセスはいくつかのステップで構成されています:","headings":["# パイプラインコンセンサス"],"tokens":205,"markdown":"イーサリアムなどの従来のブロックチェーンシステムでは、ブロック生成プロセスはいくつかのステップで構成されています:\n\n- マイナー(ブロック提案者)がトランザクションをパッケージ化して実行します。\n- マイナーは実行結果をブロックヘッダーに設定します。\n- ブロックの伝播。\n- 他のノードがブロック内のトランザクションを実行します。\n- そしてブロックの実行結果を検証します。\n\nトランザクションがパッケージ化されてからネットワーク全体のコンセンサスに達するまでに、2回の直列実行と直列伝播プロセスを経ることがわかります。これには多くの最適化の余地があります。ブロックの構造をより詳しく見ると、一連のトランザクションと実行結果に関連するさまざまなマークルルートが含まれています。トランザクションリストは主にトランザクション実行の順序を表し、ブロックヘッダーはブロック実行の結果と見なすことができます。これら2つのコンセンサスをトランザクションシーケンスコンセンサスと実行結果コンセンサスに分離することを検討できます。\n\n図4に示すように、コンセンサス中のブロックをブロックNとすると、BFTプロセスはブロックNの全内容に同意するのではなく、ブロックNのトランザクションリストと特定のメタデータ、およびブロックN-2のブロックハッシュに同意します。BFTプロセスが完了すると、ブロックN+1のコンセンサスが進行し、同時にブロックNが実行されます。さらに、ブロックNにはブロックN-2のハッシュが含まれているため、ブロックNのコンセンサスの完了は、ブロックN-2の確認も意味します。\n\n\n図4:BFT、実行、検証のパイプライン処理。
"} {"url":"https://docs.nerochain.io/ja/core-concepts/consensus-mechanism/randomNumberGeneration","locale":"ja","section":"core-concepts","title":"乱数生成","summary":"> ⚠️ **注意:** この機能は計画されていますが、現在は実装されていません。バリデータ選択は決定論的です。","headings":["# 乱数生成"],"tokens":215,"markdown":"> ⚠️ **注意:** この機能は計画されていますが、現在は実装されていません。バリデータ選択は決定論的です。\n\n上記のランダム選択のセキュリティを考慮すると、乱数の生成は分散型のスキームを通じて行われる必要があります。さらに、生成された乱数が検証可能であり、すべてのノード間で一貫性が確保されることが不可欠です。また、乱数生成プロセス中に、単一のノードが結果に影響を与えたり操作したりする能力を持つべきではありません。\n\nNEROの乱数はMPC(マルチパーティ計算)アプローチを通じて生成されます。各参加ノードは最初に独自の乱数をローカルで生成します。その後、システムは特定の操作を使用して、すべてのノードの貢献から派生した公開乱数を生成します。他のノードが自身の乱数を生成する前に他のノードの乱数にアクセスすることを防ぐために、NEROは乱数生成プロセス中にシャミア秘密共有に基づく暗号化PVSS(公開検証可能な秘密共有)スキームを採用しています。このスキームにより、現在のバリデータセットが協力して乱数を生成し、暗号技術を使用してプロセスの操作から保護することができます。プロセスは次のとおりです:\n\n* バリデータ $D$ は、閾値 $t$ に基づいて秘密 $S$ を $n$ 個の断片 $(S1,...,Sn)$ に分割します。次に、$n$ 人の参加者の公開鍵 $(Px,...,PN)$ を使用して各断片を暗号化し、対応するコミットメント(ゼロ知識証明による)を生成し、これらすべての情報を共有します。\n* 追加情報を取得せずに、バリデータ $D$ からの $n$ 個の値がすべて有効であることを検証できます。\n* 必要に応じて、参加者は自分の秘密鍵で共有を復号化し、それを他の人と共有することができます。\n* $≥ t$ 個の復号化された共有を取得した後、誰でも秘密 $S$ を再構築できます。\n\n最後に、共有乱数の生成は各エポックで発生します。現在のエポックは、前のエポックで生成された乱数を使用します。"} {"url":"https://docs.nerochain.io/ja/core-concepts/data-availability/dataAvailabilityVerification/fraudProof","locale":"ja","section":"core-concepts","title":"不正証明","summary":"上記のランダムサンプリング方法は、対応するブロックを復元するのに十分な断片がネットワーク内に存在することを保証し、データ可用性を確保します。しかし、これらの断片内のすべてのデータの有効性を保証するものではありません。したがって、不正証明メカニズムを通じてこの問題に対処する必要があります。","headings":["# 不正証明"],"tokens":120,"markdown":"上記のランダムサンプリング方法は、対応するブロックを復元するのに十分な断片がネットワーク内に存在することを保証し、データ可用性を確保します。しかし、これらの断片内のすべてのデータの有効性を保証するものではありません。したがって、不正証明メカニズムを通じてこの問題に対処する必要があります。\n\n不正証明は、無効なトランザクションの証明と無効なデータエンコーディングの証明に分類できます。DAチェーンでは、後者に焦点が当てられています。不正証明の生成は、2Dエンコーディングの各行と列内のRSコードが元のデータを正確に再構築する能力に依存しています。したがって、証明を生成するには1つの行または列のデータのみが必要であり、証明のサイズはすべてのデータのサイズに比例し、nと表記されます。\n\nノードが十分な断片を収集したが正しく復号できない状況では、これらの断片とそのマークル証明をブロードキャストする必要があります。これらの証明は不正証明として機能し、他のノードがその信頼性を検証できるようにします。最初に不正証明を提出したノードは、それに応じて報酬を受け取ります。"} {"url":"https://docs.nerochain.io/ja/core-concepts/data-availability/dataAvailabilityVerification/overview","locale":"ja","section":"core-concepts","title":"データ可用性検証","summary":"検証に関して、NEROのDAレイヤーにおけるDAノードの役割を以下のように定義します: * **一般DAノード。** 一般DAノードは、フルノードのように自分のシャーディングDAチェーンの全ブロックを保存し、サンプリングされたブロックデータを他に提供します。また、無効なブロックが見つかった場合には不正証明をブロードキャストすることもできます。 * **メンテナーDAノード。** 通常のDAノードは","headings":["# データ可用性検証"],"tokens":183,"markdown":"検証に関して、NEROのDAレイヤーにおけるDAノードの役割を以下のように定義します:\n* **一般DAノード。** 一般DAノードは、フルノードのように自分のシャーディングDAチェーンの全ブロックを保存し、サンプリングされたブロックデータを他に提供します。また、無効なブロックが見つかった場合には不正証明をブロードキャストすることもできます。\n* **メンテナーDAノード。** 通常のDAノードは、決済レイヤーにトークンをステークすることで、それぞれのシャーディングチェーン内の候補メンテナーDAノードとして資格を得ることができます。ステーク額が最も高い上位NノードがメンテナーDAノードの役割を担います。これらのノードはDA機能の提供から生じる手数料を共有する権利を持ち、同時にブロックサンプリングデータを提出する義務も負います。\n\nデータ可用性検証は決済レイヤー内のバリデータによって行われます。ブロック生産者でもある決済レイヤーのバリデータがDAチェーンでブロックを提案すると、DAブロックのハッシュが決済レイヤーに送信されます。その後、決済レイヤー内の他のバリデータはランダムサンプリングを通じてDAブロックのデータ可用性を検証します。検証に成功すると、決済レイヤーのバリデータはDAブロックハッシュの署名をブロードキャストし、検証を示します。これらのバリデータの2/3からの署名が得られると、それらは確認証明として決済レイヤーに提出されます。\n\n次の決済ブロックで決済レイヤーの検証に合格し、DAブロックが提案されてから不正証明が発行されていない場合、DAブロックは決済レイヤー内で確認済みとしてマークされます。同時に、次のDAブロックが提案されます。"} {"url":"https://docs.nerochain.io/ja/core-concepts/data-availability/dataAvailabilityVerification/randomSampling","locale":"ja","section":"core-concepts","title":"ランダムサンプリング","summary":"DAブロックはヘッダーと本体で構成されています。ヘッダーは比較的小さく、直接ダウンロードして確認できますが、本体ははるかに大きく、データ可用性を検証するためにランダムにサンプリングする必要があります。ブロックが生成されると、サイズによって $k * k$ の断片にスライスされ、2次元RS(Reed-Solomon)コードを適用することで $2k * 2k$ の断片が生成されます。次に、各断片の各行","headings":["# ランダムサンプリング"],"tokens":487,"markdown":"DAブロックはヘッダーと本体で構成されています。ヘッダーは比較的小さく、直接ダウンロードして確認できますが、本体ははるかに大きく、データ可用性を検証するためにランダムにサンプリングする必要があります。ブロックが生成されると、サイズによって $k * k$ の断片にスライスされ、2次元RS(Reed-Solomon)コードを適用することで $2k * 2k$ の断片が生成されます。次に、各断片の各行と列に対してマークルツリーが作成されるため、$2k + 2k = 4k$ のマークルツリーが存在します。\n\n図5:データ可用性レイヤーのブロックスライシングとエンコーディング
\n\nこれらの $4k$ のマークルルートは最終的に1つのマークルツリーを形成し、そのツリーのルートがブロック全体のルートとして使用されます。そして、ルートと他のメタデータをヘッダーに組み合わせます。その後、ヘッダーと元の本体がP2Pネットワークを通じてブロードキャストされます。他のDAノードがブロックを受信すると、上記と同じ方法で2次元RSエンコーディングを繰り返し、ルートを計算し、ヘッダー内のものと同じであれば受け入れます。\n\n決済レイヤーのバリデータはDAブロック提案者からヘッダーを受け取り、少なくとも1つのDAノードに接続します。これらのバリデータはランダムに断片のsとそれらのブロックルートへのマークルパスをダウンロードします。それらの断片がすべて正常に取得できれば、サンプリングバリデータは非常に高い可能性でDAブロックの可用性を確認できます。\n\n次に、ランダムサンプリングのこのようなメカニズムの下で、利用不可能なDAブロックが利用可能と認識される確率を計算します。上述のように、DAブロックは $2k * 2k$ 断片のRSコードにエンコードされ、各行または列の任意のk断片でその行または列を復元できるため、敵対者はブロック全体を利用不可能にするために少なくとも断片を保留する必要があります。\n\n1つのバリデータがDAブロックからランダムに断片をサンプリングすると仮定すると、DAブロックが最小限の利用不可能な部分を持つ場合、単一のバリデータによって実行される少なくとも1つの利用不可能な断片をサンプリングする確率は以下のように示されます。\n\n$$ P_{single}=1-\\frac{C_S^{2k ⋅ 2k-(k+1)^2}}{C_S^{2k ⋅ 2k}}=1-\\prod_{i=0}^{S-1}(1-\\frac{(k+1)^2}{4k^2-i}) $$\n\nこれは、利用不可能なDAブロックを正しく認識できる最小確率でもあります。そして、決済レイヤーの委員会にN個のアクティブなバリデータがあり、そのうち最大でfが悪意のあるものであり、これはN/3未満です。また、DAブロックを確認するためにはN - f票を集める必要があります。したがって、無効なDAブロックを確認しないためには、N - f個の誠実なバリデータのうち少なくともf+1個のバリデータが利用不可能性を発見する必要があります。したがって、利用不可能なDAブロックは以下の確率でネットワークによって認識されます:\n\n$$ P_{network}=1-\\sum_{i=0}^f C_i^{N-f} ⋅ P_{single} ⋅ (1-P_{single})^{N-f-i} $$\n\nNEROでは、N = 21、f = 6なので、異なるkとSの下での確率は以下のように計算できます\n\n$$ k=64, S=5 ⇒ P_{single}=77.94\\%, P_{network}=99.81\\% $$\n\n$$ k=64, S=10 ⇒ P_{single}=94.94\\%, P_{network}=99.9999917\\% $$\n\n$$ k=128, S=10 ⇒ P_{single}=94.66\\%, P_{network}=99.9999987\\% $$\n\n$$ k=128, S=15 ⇒ P_{single}=98.77\\%, P_{network}=99.9999999999969\\% $$\n\n$k = 128$ かつ $S = 15$ の場合、利用不可能なDAブロックはほぼ100%の確率で明らかになり、サンプリングバリデータはこのような条件下で元のデータのわずか0.09%をダウンロードするだけで済むことがわかります。"} {"url":"https://docs.nerochain.io/ja/core-concepts/data-availability/modelAndAssumptions","locale":"ja","section":"core-concepts","title":"モデルと前提条件","summary":"* **トポロジー:** ノードはP2Pネットワークを介して相互接続されています。 * **最大ネットワーク遅延:** ネットワークの最大遅延は $D$ と表記されます。誠実なノードがネットワーク内の特定のデータを時間 $T$ に受信した場合、他の誠実なノードは時間 $T + D$ より前に同じデータを取得できます。","headings":["# モデルと前提条件"],"tokens":78,"markdown":"まず、ネットワークモデルを確立します:\n\n* **トポロジー:** ノードはP2Pネットワークを介して相互接続されています。\n* **最大ネットワーク遅延:** ネットワークの最大遅延は $D$ と表記されます。誠実なノードがネットワーク内の特定のデータを時間 $T$ に受信した場合、他の誠実なノードは時間 $T + D$ より前に同じデータを取得できます。\n\n次に、セキュリティモデルは次のように概説されます:\n\n* 無効なブロックの検出は保証されています。ネットワーク内の少なくとも1つの誠実なノードがそれを発見して拡散するからです。\n* 各誠実なノードは、少なくとも1つの他の誠実なノードとの接続を維持しています。"} {"url":"https://docs.nerochain.io/ja/core-concepts/data-availability/overview","locale":"ja","section":"core-concepts","title":"データ可用性","summary":"データ可用性もNEROの重要なコンポーネントであり、ロールアップにとって非常に重要です。NEROでは、データ可用性(DA)レイヤーとして知られる独立したレイヤーとして、特にデータ可用性のための新しいタイプのチェーンとトランザクションを設計しました。DAレイヤーは決済レイヤーの管理下にあり、決済レイヤーにトークンをステークしているノードのグループ(DAノード)によって維持されています。決済レイヤーの","headings":["# データ可用性"],"tokens":99,"markdown":"データ可用性もNEROの重要なコンポーネントであり、ロールアップにとって非常に重要です。NEROでは、データ可用性(DA)レイヤーとして知られる独立したレイヤーとして、特にデータ可用性のための新しいタイプのチェーンとトランザクションを設計しました。DAレイヤーは決済レイヤーの管理下にあり、決済レイヤーにトークンをステークしているノードのグループ(DAノード)によって維持されています。決済レイヤーのバリデータは、ランダムサンプリングと不正証明を通じてDAブロックの可用性を確認し、DAチェーンを確認することができます。\nさらに、DAノードの範囲を複数のグループに拡大し、各グループが異なるDAチェーンを維持することができます。このアプローチにより、シャーディングシステムを確立し、多様なストレージ需要に対応することができます。全体的なシステムアーキテクチャは以下のように示されています。"} {"url":"https://docs.nerochain.io/ja/core-concepts/data-availability/transactionFeesAndIncentives","locale":"ja","section":"core-concepts","title":"トランザクション手数料とインセンティブ","summary":"データ可用性検証が通過すると、DAトランザクションのヘッダーもDAブロックハッシュとともに決済レイヤーにコミットされます。その後、トランザクション手数料が送信者のアカウントから差し引かれ、DAブロック提案者、DAブロック確認提案者、およびこのシャードの関連するすべてのDAメンテナーノードに報酬として分配されます。","headings":["# トランザクション手数料とインセンティブ"],"tokens":72,"markdown":"\n図6:データ可用性レイヤーのトランザクション形式
\n\nデータ可用性検証が通過すると、DAトランザクションのヘッダーもDAブロックハッシュとともに決済レイヤーにコミットされます。その後、トランザクション手数料が送信者のアカウントから差し引かれ、DAブロック提案者、DAブロック確認提案者、およびこのシャードの関連するすべてのDAメンテナーノードに報酬として分配されます。"} {"url":"https://docs.nerochain.io/ja/core-concepts/fee-sharing/Overview","locale":"ja","section":"core-concepts","title":"エコシステムにおける手数料共有メカニズム","summary":"> ⚠️ **注意:** ここで説明されている自動手数料共有メカニズムは将来の機能であり、現在のメインネット/テストネットではまだアクティブではありません。現時点では、NERO Foundationとの契約に基づいたオフチェーンでの手数料共有メカニズムが運用されています。","headings":["# エコシステムにおける手数料共有メカニズム"],"tokens":253,"markdown":"> ⚠️ **注意:** ここで説明されている自動手数料共有メカニズムは将来の機能であり、現在のメインネット/テストネットではまだアクティブではありません。現時点では、NERO Foundationとの契約に基づいたオフチェーンでの手数料共有メカニズムが運用されています。\n\nNEROのアプリケーション手数料共有メカニズムは、ネットワークへの貢献に対してエコシステム参加者にインセンティブを与え、報酬を与えるように設計されています。このメカニズムにより、dAppsによって生成されるトランザクション手数料が広く使用されているアプリケーション間で再分配され、持続可能で協調的な経済的整合性が促進されます。\n\n**貢献ベースの報酬:** NEROの手数料共有メカニズムは、ネットワーク内の様々なアプリケーションによる貢献に基づいてトランザクション手数料を割り当てます。これには、dAppsを作成してデプロイする開発者や、ブロックチェーン上のトランザクションを保護および検証するバリデータが含まれます。各dAppの貢献は測定され定量化され、それらによって生成されるトランザクション手数料の一部が報酬として与えられます。\n\n**カスタマイズ可能なパラメータ:** NEROの手数料共有メカニズムは、エコシステム参加者の多様なニーズと好みに対応する柔軟性とカスタマイズオプションを提供します。開発者はdApp内での手数料共有の取り決めを管理する特定のルールとパラメータを定義する能力を持ち、独自のビジネスモデルと手数料共有契約に従ってトランザクション手数料の分配を調整できます。\n\n**経済的整合性:** アプリケーション間でトランザクション手数料を分配することで、NEROの手数料共有メカニズムは経済的インセンティブを整合させ、エコシステム内での協力と利益の一致を促進します。開発者はユーザーを引き付け、トランザクションボリュームを生成する高品質なdAppsを作成するインセンティブを与えられます。この経済的整合性は、時間の経過とともにNEROエコシステムの成長と持続可能性を促進します。\n\n\n図10:手数料共有メカニズム
"} {"url":"https://docs.nerochain.io/ja/core-concepts","locale":"ja","section":"core-concepts","title":"概要","summary":"ビットコインの登場以来、ブロックチェーン技術と分散化の概念は徐々に人気を集めてきました。イーサリアムのスマートコントラクトによって、分散型台帳技術の可能性はほぼ無限に広がりました。初期のブロックチェーン技術は主にセキュリティと分散化の問題に取り組み、信頼の課題を解決することに重点を置いていました。しかし、トランザクション処理能力の需要が急増するにつれて、Solanaをはじめとするパーミッションレス","headings":["# 概要"],"tokens":453,"markdown":"ビットコインの登場以来、ブロックチェーン技術と分散化の概念は徐々に人気を集めてきました。イーサリアムのスマートコントラクトによって、分散型台帳技術の可能性はほぼ無限に広がりました。初期のブロックチェーン技術は主にセキュリティと分散化の問題に取り組み、信頼の課題を解決することに重点を置いていました。しかし、トランザクション処理能力の需要が急増するにつれて、Solanaをはじめとするパーミッションレス・ブロックチェーンは、TPS(1秒あたりのトランザクション数)を数万規模にスケールさせるためのソリューションを提案しました。\n\nそれにもかかわらず、DeFi、GameFi、NFTなどの分散型アプリケーションが爆発的に成長する中で、現在の最大の課題は、ユーザーと開発者の体験を向上させることにあります。たとえば、ユーザーは各ブロックチェーンが提供する暗号化手段に依存せざるを得ず、秘密鍵を紛失してしまった場合には救済措置がありません。また、dAppは多くのトランザクション量を生み出していても、トランザクション手数料を共有することはできません。これはエコシステムの形成を妨げる要因となっています。ユーザー操作の柔軟性の欠如や手数料の仕組みが、分散型経済の発展を阻害しているのです。\n\nイーサリアム・コミュニティのアカウント抽象化(Account Abstraction)ソリューションは、これらの問題をある程度緩和しましたが、根本的かつネイティブな解決策とは言い難いのが現状です。さらに、分散型コミュニティで一般的に採用されている手数料分配メカニズムが欠如しており、dAppsをエコシステムに誘致し、経済的なインセンティブを提供する仕組みも不足しています。\n\nこれらの問題を解決するためには、ブロックチェーンの柔軟性を向上させる必要があります。そのため、私たちはNEROを提案します。NEROは、ネイティブなアカウント抽象化機構を備えた次世代のモジュラー・ブロックチェーンであり、安全性、スケーラビリティ、そして何よりも柔軟性を重視しています。NEROは、統合型のスマートコントラクト、ユーザー操作プール(User Operation Pool)、Paymasterなどを含む、より構造化されたネイティブなアカウント抽象化のメカニズムを導入します。これにより、ユーザーはWeb2のような使い勝手でWeb3の世界を活用できるようになります。\n\nさらに、NEROはガス料金の経済モデルを策定し、貢献度に応じてガス料金をdAppsと共有することで、dAppsが最適化に努めるインセンティブを提供します。加えて、NEROは高性能なトランザクション処理を保証するためにモジュラー設計を採用しています。全体のプロセスは、実行(Execution)、決済(Settlement)、データ可用性(Data Availability)という3つの層に垂直分割されます。また、EVMおよびイーサリアム・プロトコルと完全互換の決済チェーンを備え、大規模なノード参加を可能にするコンセンサスを採用しています。データ可用性については、現在最も効率的なデータサンプリング検証方式を採用しています。\n\nNEROは、エコシステム内のdAppの発展を支援し、協力し合うことを目的としています。高性能なパーミッションレス・ブロックチェーンを基盤とし、段階的に柔軟性を向上させることで、新しい基盤を確立します。NEROは革新的なコンセプトを通じてWeb3の発展を積極的に支援し、誰もが参加できる完全な基盤を備えたパーミッションレス・ブロックチェーンを形成します。他のパーミッションレス・ブロックチェーンと比較して、NEROは柔軟性の向上とトランザクションのスケーリングに重点を置き、以下の5つのコア技術を採用しています。\n\n- ネイティブアカウント抽象化を活用し、Web2のようなユーザー体験を提供\n- Blockspace 2.0:トランザクション手数料をエコシステムのdAppに再分配する多次元的なガス料金経済モデルを実装\n- パイプライン最適化型BFTコンセンサスメカニズムを採用し、高スループット、分散性、安全性、迅速なトランザクション確定を実現\n- イーサリアム・プロトコルとEVMに完全互換で、エコシステム内のアプリケーション移行をシームレスに実現"} {"url":"https://docs.nerochain.io/ja/core-concepts/native-account-abstraction/MpcTssTechnologyIntegration","locale":"ja","section":"core-concepts","title":"MPC-TSS技術の統合","summary":"NEROは、EOA(外部所有アカウント)のセキュリティと制御を強化するために、MPC-TSS(閾値秘密共有を伴うマルチパーティ計算)として知られる最先端技術を採用しています。MPC-TSSは、複数の関係者間で安全かつ分散された計算を可能にする高度な暗号技術であり、単一のエンティティが機密情報全体にアクセスすることができないようにします。","headings":["# MPC-TSS技術の統合"],"tokens":186,"markdown":"NEROは、EOA(外部所有アカウント)のセキュリティと制御を強化するために、MPC-TSS(閾値秘密共有を伴うマルチパーティ計算)として知られる最先端技術を採用しています。MPC-TSSは、複数の関係者間で安全かつ分散された計算を可能にする高度な暗号技術であり、単一のエンティティが機密情報全体にアクセスすることができないようにします。\n\nMPC-TSSを使用することで、NEROエコシステム内のEOAの制御は分散化され、潜在的なセキュリティ脅威から保護されます。EOAを管理・制御するために単一のエンティティや中央集権的な権限に依存する代わりに、MPC-TSSはEOAにアクセスするために必要な暗号鍵の共有部分を各自が保持する複数の関係者間で制御を分散させます。この制御の分散により、MPC-TSSプロトコルに関与する他の関係者の協力なしに、単一の関係者がEOAの資産にアクセスしたり、不正なトランザクションを実行したりすることができないようになります。\n\nさらに、MPC-TSSは閾値メカニズムを実装することでEOA制御の耐性を高めます。この閾値メカニズムは、暗号鍵を協力して再構築しEOAにアクセスするために必要な最小限の関係者数を指定します。この閾値ベースのアプローチにより、セキュリティの追加層が追加され、一部の関係者が侵害されたり利用できなくなったりしても、閾値要件が侵害されない限りEOAは保護されたままになります。\n\n\n図9:MPC-TSSによるアカウント抽象化
"} {"url":"https://docs.nerochain.io/ja/core-concepts/native-account-abstraction/flexibleGasMechanism","locale":"ja","section":"core-concepts","title":"柔軟なガスメカニズム","summary":"NEROは、ブロックチェーン上のユーザーオペレーションに関連するトランザクション手数料の支払いを管理する役割を担うPaymasterと呼ばれるモジュールを開発しました。アカウント抽象化モデルの一部として、ペイマスターはトランザクション手数料の処理をユーザーから中央集権的なコントラクトエンティティに抽象化し、手数料支払いプロセスを合理化し、ユーザーエクスペリエンスを向上させる役割を果たします。","headings":["# 柔軟なガスメカニズム"],"tokens":220,"markdown":"NEROは、ブロックチェーン上のユーザーオペレーションに関連するトランザクション手数料の支払いを管理する役割を担うPaymasterと呼ばれるモジュールを開発しました。アカウント抽象化モデルの一部として、ペイマスターはトランザクション手数料の処理をユーザーから中央集権的なコントラクトエンティティに抽象化し、手数料支払いプロセスを合理化し、ユーザーエクスペリエンスを向上させる役割を果たします。\n\nペイマスターの主な機能は、ユーザーがブロックチェーンとやり取りする際に発生するトランザクション手数料の支払いを容易にすることです。従来のブロックチェーンシステムでは、ユーザーはネットワークに送信する各トランザクションに手数料を手動で含める必要がありました。しかし、アカウント抽象化では、この責任はペイマスターコントラクトに移行され、ユーザーは直接トランザクション手数料を管理する負担から解放されます。ユーザーがトランザクションを開始したり、手数料が発生する他の操作を実行したりすると、対応する操作はペイマスターコントラクトを通じて処理されます。ペイマスターは、操作の複雑さや現在のネットワーク状況などの要因に基づいて適切な手数料を計算します。その後、ユーザーのアカウント残高から手数料を差し引くか、別のメカニズムを通じて手数料の支払いを承認するようユーザーに促します。\n\nさらに、ペイマスターはその機能を強化するために追加の特性と機能を組み込むことができます。例えば、ネットワークの混雑レベルやユーザーの好みに基づいて手数料の価格設定を最適化するための動的な手数料調整アルゴリズムを実装することがあります。また、多様なユーザーのニーズと好みに対応するために、様々な支払い方法と手数料構造をサポートすることもあります。\n\n\n図8:柔軟なガス手数料メカニズム
"} {"url":"https://docs.nerochain.io/ja/core-concepts/native-account-abstraction/keyComponents","locale":"ja","section":"core-concepts","title":"主要コンポーネント","summary":"アカウント抽象化は、ブロックチェーン上でのユーザーアカウントの管理と対話の方法を再定義します。アカウント管理をスマートコントラクトに抽象化することで、アカウント抽象化はDAppsにおいてより大きな柔軟性、セキュリティ、効率性を可能にします。NEROは独自のフレームワーク内にアカウント抽象化の主要コンポーネントをすべて構築しており、ユーザーオペレーションメモリプール、バンドラー、エントリーポイントコ","headings":["# 主要コンポーネント"],"tokens":282,"markdown":"アカウント抽象化は、ブロックチェーン上でのユーザーアカウントの管理と対話の方法を再定義します。アカウント管理をスマートコントラクトに抽象化することで、アカウント抽象化はDAppsにおいてより大きな柔軟性、セキュリティ、効率性を可能にします。NEROは独自のフレームワーク内にアカウント抽象化の主要コンポーネントをすべて構築しており、ユーザーオペレーションメモリプール、バンドラー、エントリーポイントコントラクトが含まれています:\n\n**ユーザーオペレーションメモリプール:** ユーザーオペレーションメモリプールは、ブロックチェーン上での実行を待機中の保留中のユーザーオペレーションの保管場所として機能します。従来のトランザクションメモリプールと同様に機能しますが、アカウント抽象化のコンテキスト内でユーザーオペレーションを処理するために特別に設計されています。ユーザーが資金の送金やスマートコントラクトとの対話などのアカウント関連の操作を開始すると、これらの操作はブロックチェーンによって処理されるまで一時的にユーザーオペレーションメモリプールに格納されます。\n\n**バンドラー:** バンドラーは、ユーザーオペレーションメモリプールからユーザーオペレーションをパッケージ化し、ブロックチェーン上での実行のためにアトミックなバンドルにまとめる役割を担います。複数のユーザーオペレーションを単一のトランザクションバンドルに集約し、ブロックチェーンリソースの使用を最適化し、トランザクションのオーバーヘッドを削減します。バンドラーは、バンドル内のオペレーションがアトミックに実行されることを保証します。つまり、バンドル内のすべてのオペレーションが正常に実行されるか、まったく実行されないかのいずれかであり、ブロックチェーン全体での一貫性と整合性を確保します。\n\n**エントリーポイントコントラクト:** エントリーポイントコントラクトは、ユーザーがブロックチェーン上の抽象アカウントとやり取りするためのインターフェースとして機能します。これはブロックチェーンにデプロイされたスマートコントラクトであり、特定の抽象アカウントに関連するすべてのユーザーオペレーションのエントリーポイントとして機能します。エントリーポイントコントラクトには、資金の入金、出金、カスタムアカウント機能の呼び出しなど、受信するユーザーオペレーションを処理するために必要なロジックが含まれています。ユーザーはエントリーポイントコントラクトにトランザクションを送信し、それが実行のために適切なアカウントコントラクトにオペレーションをルーティングすることで、抽象アカウントとやり取りします。"} {"url":"https://docs.nerochain.io/ja/core-concepts/native-account-abstraction/nativeAccountAbstractionSupport","locale":"ja","section":"core-concepts","title":"ネイティブアカウント抽象化サポート","summary":"アカウント抽象化は、ブロックチェーン技術内の概念であり、スマートコントラクトに基づくユーザーアカウントの柔軟な管理を提供することを目的としています。従来、ブロックチェーンネットワークでは、ユーザーアカウントはブロックチェーンのネイティブアカウントシステムを通じて直接管理され、各アカウントはアドレスと秘密鍵を持っています。これらのアカウントは暗号通貨の送受信やブロックチェーンにデプロイされたスマート","headings":["# ネイティブアカウント抽象化サポート"],"tokens":315,"markdown":"アカウント抽象化は、ブロックチェーン技術内の概念であり、スマートコントラクトに基づくユーザーアカウントの柔軟な管理を提供することを目的としています。従来、ブロックチェーンネットワークでは、ユーザーアカウントはブロックチェーンのネイティブアカウントシステムを通じて直接管理され、各アカウントはアドレスと秘密鍵を持っています。これらのアカウントは暗号通貨の送受信やブロックチェーンにデプロイされたスマートコントラクトとの対話に使用されます。しかし、アカウント抽象化では、ユーザーアカウントの管理責任がブロックチェーンのネイティブアカウントシステムから離れ、スマートコントラクト自体の領域に移行します。このモデルでは、ユーザーアカウントはスマートコントラクトとして表現され、管理モジュールにはトランザクションを処理し、残高を管理するための必要なロジックが含まれています。ユーザーは、ブロックチェーンのアカウントシステムと直接やり取りするのではなく、これらのスマートコントラクト表現のメソッドを呼び出すことでアカウントとやり取りします。\n\nNEROはアカウント抽象化モデルを深く統合し、抽象アカウントの様々な機能をネイティブにサポートし、以下の側面でユーザーの対話を体系的に強化します:\n\n* **拡張された柔軟性:** アカウント管理をスマートコントラクトに抽象化することで、ユーザーはアカウントに対するより大きな柔軟性と制御を獲得します。ブロックチェーンのネイティブアカウントシステムの制約に限定されるのではなく、特定のニーズに合わせてカスタムアカウント構造と挙動を定義できます。\n* **向上したプライバシー:** アカウント抽象化は、ユーザーがアカウントコントラクト内に洗練されたプライバシー強化技術を実装することで、プライバシーを向上させることができます。例えば、ユーザーはゼロ知識証明やリング署名などのプライバシー保護トランザクションプロトコルをアカウントコントラクト内に直接実装し、トランザクションの機密性を高めることができます。\n* **ガスコストの削減:** アカウント抽象化は、より効率的なトランザクション処理を可能にすることで、ユーザーのガスコストを潜在的に削減できます。アカウントコントラクトは特定のユースケースに合わせてカスタムトランザクションロジックを実装できるため、ガス消費を最小化するためにトランザクション実行を最適化できます。これにより、特に複雑または頻繁なトランザクションに対して、ユーザーのコスト削減につながります。\n* **強化されたセキュリティ:** アカウント管理をスマートコントラクトに抽象化することで、アカウント抽象化はブロックチェーンのネイティブアカウントシステムの攻撃面を減らし、セキュリティを強化できます。スマートコントラクトは、マルチシグネチャ認証やタイムロックトランザクションなどの堅牢なセキュリティ対策を実装して、ユーザーの資金を保護し、不正アクセスを防止できます。"} {"url":"https://docs.nerochain.io/ja/core-concepts/references","locale":"ja","section":"core-concepts","title":"参考文献","summary":"1. M. Al-Bassam, A. Sonnino, and V. Buterin, \"Fraud proofs: Maximising light client security and scaling blockchains with dishonest majorities,\" *CoRR*, vol. abs/1809.09044, 2018.","headings":["# 参考文献"],"tokens":788,"markdown":"1. M. Al-Bassam, A. Sonnino, and V. Buterin, \"Fraud proofs: Maximising light client security and scaling blockchains with dishonest majorities,\" *CoRR*, vol. abs/1809.09044, 2018.\n\n2. E. Syta, P. Jovanovic, E. Kokoris-Kogias, N. Gailly, L. Gasser, I. Khoffi, M. J. Fischer, and B. Ford, \"Scalable Bias-Resistant Distributed Randomness,\" In *38th IEEE Symposium on Security and Privacy*, May 2017.\n\n3. The Ethereum Team, \"A note on data availability and erasure coding,\" [https://github.com/ethereum/research/wiki/A-note-on-data-availability-and-erasure-coding](https://github.com/ethereum/research/wiki/A-note-on-data-availability-and-erasure-coding)\n\n4. Satoshi Nakamoto, \"Bitcoin: A peer-to-peer electronic cash system,\" 2008. [https://bitcoin.org/bitcoin.pdf](https://bitcoin.org/bitcoin.pdf)\n\n5. The Ethereum Foundation, \"Ethereum Whitepaper.\" [https://github.com/ethereum/wiki/wiki/White-Paper](https://github.com/ethereum/wiki/wiki/White-Paper)\n\n6. E. Kokoris-Kogias, P. Jovanovic, L. Gasser, N. Gailly, E. Syta, and B. Ford, \"Omniledger: A secure, scale-out, decentralized ledger via sharding,\" in *2018 IEEE Symposium on Security and Privacy (SP)*, pp. 19–34, 2018.\n\n7. A. Kiayias, I. Konstantinou, A. Russell, B. David, and R. Oliynykov, \"Ouroboros: A provably secure proof-of-stake blockchain protocol,\" *Cryptology ePrint Archive*, Report 2016/889, 2016. [http://eprint.iacr.org/](http://eprint.iacr.org/)\n\n8. George Danezis and Sarah Meiklejohn, \"Centrally banked cryptocurrencies,\" In *23rd Annual Network and Distributed System Security Symposium, NDSS*, 2016.\n\n9. P. Daian, R. Pass and E. Shi, \"Snow White: Robustly reconfigurable consensus and applications to provably secure proofs of stake,\" *Cryptology ePrint Archive*, Report 2016/919, 2017.\n\n10. M. Zamani, M. Movahedi, and M. Raykova, \"RapidChain: A Fast Blockchain Protocol via Full Sharding,\" *Cryptology ePrint Archive*, Report 2018/460, 2018. [https://eprint.iacr.org/2018/460](https://eprint.iacr.org/2018/460)\n\n11. P. Vasin, \"Blackcoin's Proof-of-Stake Protocol v2,\" 2014. [https://blackcoin.co/blackcoin-pos-protocol-v2-whitepaper.pdf](https://blackcoin.co/blackcoin-pos-protocol-v2-whitepaper.pdf)\n\n12. Loi Luu, Viswesh Narayanan, Chaodong Zheng, Kunal Baweja, Seth Gilbert, and Prateek Saxena, \"A secure sharding protocol for open blockchains,\" In *Proceedings of the 2016 ACM SIGSAC Conference on Computer and Communications Security*, CCS '16, pages 17–30, 2016.\n\n13. Rafael Pass and Elaine Shi, \"Thunderella: Blockchains with optimistic instant confirmation.\" [https://eprint.iacr.org/2017/913.pdf](https://eprint.iacr.org/2017/913.pdf)\n\n14. Joseph Poon, Vitalik Buterin, \"Plasma: Scalable Autonomous Smart Contracts.\" [http://plasma.io/plasma-deprecated.pdf](http://plasma.io/plasma-deprecated.pdf)\n\n15. Vitalik Buterin, \"An Incomplete Guide to Rollups,\" [https://vitalik.ca/general/2021/01/05/rollup.html](https://vitalik.ca/general/2021/01/05/rollup.html)\n\n16. S. Dziembowski, S. Faust, and K. Hostakova, \"Foundations of state channel networks,\" *Cryptology ePrint Archive*, Report 2018/320, 2018. [https://eprint.iacr.org/2018/320](https://eprint.iacr.org/2018/320)"} {"url":"https://docs.nerochain.io/ja/developer-tools/aa-platform/configuring-policies","locale":"ja","section":"developer-tools","title":"ポリシーの設定","summary":"ポリシーは、アプリケーションがユーザーのトランザクション手数料をどのように処理するかを決定します。考慮すべき4つの主要な設定があります:","headings":["# ポリシーの設定","## ERC20決済の有効化","### ガス支払いをサポートするトークンの選択","### 戦略タイプの説明","## アドレスごとの割引の設定","## すべてのアドレスに対するオファー","## コールバックの指定","## 次のステップ"],"tokens":559,"markdown":"ポリシーは、アプリケーションがユーザーのトランザクション手数料をどのように処理するかを決定します。考慮すべき4つの主要な設定があります:\n\n- ERC20決済の有効化\n- アドレスごとの割引\n- すべてのアドレスに対するオファー\n- コールバックの指定\n\n## ERC20決済の有効化\n\n1. 「API Keys」タブに移動し、設定したいAPIKeyを選択します\n2. 「Policies」タブをクリックします\n3. ERC-20 Paymentトグルをクリックします\n4. 支払いモードを選択します:事前支払いと事後支払い、または事前支払いのみ\n\n\n \n \n*図1:ガスポリシーの設定*\n\n### ガス支払いをサポートするトークンの選択\nここでは、ガス代の支払いとして受け取りたいERC20トークンを選択できます。\n\n1. 「Select」ボタンをクリックします\n2. リスト上のトークンを選択するか、テキストフィールドにトークンコントラクトを入力してリストに表示させます\n3. 選択を「Confirm」します\n4. ガス支払い変動レートを設定します\n5. ダッシュボードの最後にある「Save」ボタンをクリックします\n\n\n \n \n*図2:ガスサポート用トークンの選択*\n\n### 戦略タイプの説明\n\n#### 無料ガス(タイプ0)\n\nこの戦略では、ユーザーのガスコストを完全に負担します。以下の場合に最適です:\n- 暗号資産を所有していない新規ユーザーのオンボーディング\n- プロモーションキャンペーン\n- すべての摩擦を取り除きたいアプリケーション\n- ブロックチェーンの複雑さを隠したいGameFiアプリケーション\n\n#### ERC20事前支払い(タイプ1)\n\nユーザーはトランザクションが実行される前にERC20トークンを使用してガスを支払います:\n- 予想される全額が前もって収集されます\n- 実行後に余剰分は返金されます\n- 支払いが保証されるため、開発者にとってより安全です\n- 高額な操作に適しています\n\n#### ERC20事後支払い(タイプ2)\n\nユーザーはトランザクションが実行された後にERC20トークンを使用してガスを支払います:\n- 正確なガスコストのみが収集されます\n- 実行前にトークン承認が必要です\n- ユーザーは必要な分だけ支払うためUXがやや向上します\n- 実行後の支払い失敗のリスクがあります\n\n## アドレスごとの割引の設定\n\nアドレスごとにスポンサーする意思のあるUSDまたはネイティブトークンの合計を設定できます。\n\n1. ポリシータブで、「Discount per address」オプションをトグルします\n2. アドレスごとの回数を日、週、または月モードで設定します\n3. 新しいアドレスごとの最大無料金額:アドレスごとにスポンサーできる合計制限を設定できます\n4. アドレスがスポンサーされる無料回数の合計も設定できます\n5. 「Save」ボタンをクリックします\n\n\n \n \n*図3:割引の設定*\n\n## すべてのアドレスに対するオファー\n\n同様の設定をすべてのアドレスに同時に設定することもできます。\n\n1. ポリシータブで、「All Addresses offer」オプションをトグルします\n2. アドレスごとの回数を日、週、または月モードで設定します\n3. 新しいアドレスごとの最大無料金額:アドレスごとにスポンサーできる合計制限を設定できます\n4. アドレスがスポンサーされる無料回数の合計も設定できます\n5. 「Save」ボタンをクリックします\n\n\n \n \n*図4:すべてのアドレスに対する割引の設定*\n\n## コールバックの指定\n\nユーザー操作をスポンサーするかどうかを指定する特定のアドレスを設定できます。\n\n1. 「Specify Callback」オプションをトグルします\n2. アドレスを設定します\n3. 保存します\n\n## 次のステップ\n\nポリシーを設定した後は、以下を行う必要があります:\n- [支払いを管理する](https://docs.nerochain.io/ja/developer-tools/aa-platform/payment-management)で戦略に十分な資金があることを確認します\n- [アプリケーションと統合する](https://docs.nerochain.io/ja/developer-tools/aa-platform/integration-and-best-practices)で設定したポリシーの使用を開始します"} {"url":"https://docs.nerochain.io/ja/developer-tools/aa-platform/entrypoint-error-codes","locale":"ja","section":"developer-tools","title":"EntryPoint エラーコード ドキュメント","summary":"このドキュメントは、EntryPointコントラクトで使用されるすべてのエラーコードの包括的なリファレンスを提供します。エラーコードは `AAmn` というパターンに従います。ここで:","headings":["# EntryPoint エラーコード ドキュメント","## エラーコード リファレンス表","## 注意事項","## カテゴリ別クイックリファレンス","### Factory/InitCodeエラー (AA1x)","### アカウントエラー (AA2x)","### Paymasterエラー (AA3x)","### ガス/検証エラー (AA4x)","### PostOpエラー (AA5x)","### その他/内部エラー (AA9x)"],"tokens":1632,"markdown":"このドキュメントは、EntryPointコントラクトで使用されるすべてのエラーコードの包括的なリファレンスを提供します。エラーコードは `AAmn` というパターンに従います。ここで:\n\n- `m` はカテゴリを示します:\n\n - `1` = Factory/InitCodeの問題\n\n - `2` = アカウントの問題\n\n - `3` = Paymasterの問題\n\n - `4` = ガス/検証の問題\n\n - `5` = PostOpの問題\n\n - `9` = その他/内部の問題\n\n- `n` はそのカテゴリ内の特定のエラー番号です\n\n## エラーコード リファレンス表\n\n| コード | カテゴリ | エラーメッセージ | 説明 | 場所 | 一般的な原因 | 解決方法 |\n|------|----------|---------------|-------------|-----------|----------------|------------|\n| **AA10** | Factory | `\"AA10 sender already constructed\"` | 指定されたアドレスに送信者アカウントコントラクトが既に存在 | `_createSenderIfNeeded()` | UserOperationに`initCode`が含まれているが、アカウントが既にデプロイ済み | `initCode`を削除するか、異なる送信者アドレスを使用 |\n| **AA13** | Factory | `\"AA13 initCode failed or OOG\"` | `initCode`によるアカウント作成が失敗 | `_createSenderIfNeeded()` | Factoryがリバート、ガス不足、または`address(0)`を返す | Factoryコントラクトを確認し、十分な`verificationGasLimit`を確保 |\n| **AA14** | Factory | `\"AA14 initCode must return sender\"` | Factoryが返したアドレスが期待される送信者と一致しない | `_createSenderIfNeeded()` | Factoryが計算されたものとは異なるアドレスを返す | Factoryが正しいアドレス計算方法を使用していることを確認 |\n| **AA15** | Factory | `\"AA15 initCode must create sender\"` | `initCode`実行後、送信者アドレスにコードがデプロイされていない | `_createSenderIfNeeded()` | Factory実行は完了したが、コントラクトコードが存在しない | Factoryがアカウントコントラクトを適切にデプロイしていることを確認 |\n| **AA20** | Account | `\"AA20 account not deployed\"` | アカウントコントラクトが存在せず、`initCode`も提供されていない | `_validateSenderAndPaymaster()` (シミュレーションのみ) | アカウントがデプロイされておらず、`initCode`がない | `initCode`を提供するか、アカウントがデプロイされていることを確認 |\n| **AA21** | Account | `\"AA21 didn't pay prefund\"` | アカウントのデポジットが必要なprefundをカバーするのに不十分 | `_validateAccountPrepayment()` | アカウントのデポジット < 必要なprefund | EntryPointにアカウント用の十分な資金をデポジット |\n| **AA22** | Account | `\"AA22 expired or not due\"` | UserOperationが有効な時間範囲外 | `_validateAccountAndPaymasterValidationData()` | ブロックタイムスタンプが`validUntil`より後、または`validAfter`より前 | 有効な時間ウィンドウ内で送信 |\n| **AA23** | Account | `\"AA23 reverted:Figure 12: spacify callback
\n\n### 2. API 呼び出し\n\n```bash\nPOST /v1/apiKey/policy/saveOrUpdate\n{\n \"projectId\": 123,\n \"policy\": {\n \"isCallback\": true,\n \"callbackUrl\": \"https://your-domain.com/paymaster/callback\"\n }\n}\n```\n\n## コールバックプロトコル\n\n### リクエスト仕様\n\n- URL: プロジェクト設定で指定したコールバック URL\n- メソッド: POST\n- Content-Type: application/json\n- タイムアウト: 2 秒\n\n### ヘッダー\n\n```\nAPI-SIGNATURE: MD5ハッシュ署名\nContent-Type: application/json\n```\n\n### リクエストボディ\n\n```json\n{\n \"sender\": \"0x1234...\",\n \"nonce\": \"0x1\",\n \"initCode\": \"0x\",\n \"callData\": \"0x...\",\n \"callGasLimit\": \"0x5208\",\n \"verificationGasLimit\": \"0x5208\",\n \"preVerificationGas\": \"0x5208\",\n \"maxFeePerGas\": \"0x3b9aca00\",\n \"maxPriorityFeePerGas\": \"0x3b9aca00\",\n \"paymasterAndData\": \"0x\",\n \"signature\": \"0x...\"\n}\n```\n\n### 署名検証\n\n署名は以下の手順で生成されます。\n\n1. リクエストボディのキーを辞書順でソート\n2. `key + value` の形式で連結\n3. 末尾にプロジェクトの `callbackKey` を追加\n4. MD5 ハッシュを計算\n\n### レスポンス仕様\n\n```json\n{\n \"status\": 1 // 1: PASS, 2: NOT_PASS, 3: LIMITED\n}\n```\n\n### ステータス値\n\n| ステータス | 値 | 意味 | 動作 |\n| ---------- | --- | ---- | -------------------- |\n| PASS | 1 | 承認 | ガス代無料支援を提供 |\n| NOT_PASS | 2 | 拒否 | ガス代無料支援を拒否 |\n| LIMITED | 3 | 制限 | 制限状態としてマーク |\n\n## サンプル実装\n\n以下は コールバックサーバーの実装例です。\n\n```tsx\n\ninterface PaymasterSupportedToken {\n sender: string;\n nonce: string;\n initCode: string;\n callData: string;\n callGasLimit: string;\n verificationGasLimit: string;\n preVerificationGas: string;\n maxFeePerGas: string;\n maxPriorityFeePerGas: string;\n paymasterAndData: string;\n signature: string;\n}\n\ninterface PaymasterRule {\n is_sponsored: boolean;\n is_blocked: boolean;\n}\n\nconst paymasterRules: Map図1: ログイン1
\n\n1. まず、デバイスの電源ボタンを見つけてクリックし、デバイスの電源を入れます。これにより、メインのウォレット接続画面が表示されます。\n\n\n図2: ログイン2
\n\n2. 「ウォレットを接続」画面では、インストール済みおよび推奨されるウォレットオプションのリストが表示されます。下にスクロールして、推奨セクションから「NEROウォレット」を選択します。\n\n\n図3: ログイン3
\n\n3. NEROウォレットを選択すると、ウォレットを設定するためのアカウント情報の入力を求められます。ウォレットに関連付けたいSNSアカウント、メールアドレス、または電話番号を入力できます。\n4. 入力した情報が正しいことを確認し、画面下部の「続行」ボタンをクリックします。\n5. セットアップが完了すると、メインのNEROウォレットインターフェースが読み込まれ、セットアッププロセスが完了したことを示します。\n\n**注意:** **Bitget Wallet**や**Gate Wallet**などの他のウォレットでログインしても、AAウォレットとしてログインされます。\n\n## ウォレットホーム\n\n\n図4: ホーム
\n\nホーム画面では、ユーザーが合計NERO残高を確認できるクリーンで直感的なインターフェースを提供します。その下には、送金を開始するための「送信」と、送金を受け取るためのウォレットアドレスを取得するための「受信」という2つのメインアクションボタンがあります。\n\nまた、下部には異なる機能のための3つのタブがあります。\n\n#### 1. トークン:\n\n_トークン_では、以下を含むデフォルトトークンとその残高のリストが表示されます:\n\n- NERO(ネイティブトークン)\n- DAI\n- USDT\n- USDC\n\n#### 2. NFT:\n\nNFTタブではNFTコレクションが表示されます\n\n#### 3. アクティビティ:\n\nアクティビティタブでは取引履歴が表示されます。\n\nユーザーは任意のトークンをタップして詳細を確認できます。インターフェースはシンプルで使いやすく設計されており、必要なウォレット機能に簡単にアクセスし、トークン残高を一目で確認できます。\n\n注意: これらのデフォルトトークンは便宜上事前設定されており、「+ トークンをインポート」機能を使用して追加のトークンを追加できます。\n\n## サイドバー機能\n\n\n図5: サイドバー機能
\n\nサイドバーはAAウォレットアプリケーションのメインナビゲーションメニューです。メニュー項目を使用すると、デジタルウォレットの主要機能と設定にアクセスできます。\n\n- **ロゴ** - メインホームページまたはダッシュボードに移動します\n- **ホーム** - ウォレットのメインダッシュボードまたはホーム画面に移動します\n- **送信** - トランザクションを開始できます\n- **マルチ送信** - 1回のトランザクションで複数のアドレスに資産を送信します\n- **受信** - 資産を受け取るためのQRコードとウォレットアドレスを提供します\n- **設定** - ウォレットの設定と構成オプションを調整します\n- **ウォレットを隠す** - プライバシーやセキュリティのためにメインウォレットインターフェースを隠します\n- **サイドバーを隠す** - 左側のナビゲーションメニューを最小化して画面スペースを確保します\n- **ウォレットを切断** - ログアウトしてウォレットを切断します\n\nこのメニューにより、デジタル資産を効果的に管理するために必要なすべての主要機能とコントロールに簡単にアクセスできます。\n\n## UserOperation送信フロー\n\nすべてのアクションはトランザクションを生成するためにUserOperationを発行します\n\n### UserOperation検証\n\n\n図6: UserOperation送信
\n\nAAウォレットで任意のアクションを実行する前に、UserOperationの詳細を確認します。この画面には、以下を含む完全な操作データが表示されます:\n\n- 関数呼び出し\n- コントラクトアドレス\n- ABI情報\n\nこの検証ステップにより透明性が確保され、ユーザーは進行する前にトランザクションの詳細を確認できます。\n\n### 操作詳細画面\n\n\n図7: UserOperation詳細
\n\n詳細には、以下を含む操作の表示が提供されます:\n\n- 操作番号とタイプ\n- コントラクトアドレス\n- 呼び出される関数\n- 送信者アドレス(あなた)と受信者アドレス\n- ネットワーク情報\n- ネットワーク手数料\n\n### 確認プロセス\n\n\n図8: 読み込み中
\n\n\n図9: 成功
\n\n1. すべての操作詳細を注意深く確認し、「確認」ボタンをクリックしてUserOperationを開始します\n2. ステータス更新:\n - 読み込み中:トランザクションが処理中です\n - 成功:UserOperationが正常に作成され、ネットワークに送信されました。成功メッセージが表示されると、トランザクションが完了したことが確認されます。\n\n## 支払い方法\n\n「支払い方法を選択」画面には2つのオプションがあります:\n\n### スポンサードガス\n\n- この支払い方法により、ユーザーはガス料金を自分で支払うことなくトランザクションを完了できます。\n- ガス料金はAAウォレットを統合したプロジェクトまたはプラットフォームによってカバーされます。\n- ただし、_スポンサードガス_オプションは、プロジェクトがAAプラットフォームでこの機能を有効化および設定している場合にのみ利用可能です。\n- 有効になっていない場合、このオプションは選択できません。\n\n\n図10: スポンサードガス利用不可
\n\n\n図11: スポンサードガス利用可能
\n\n\n図12: スポンサードガスをクリック
\n\n### トークンで支払う\n\n- この支払い方法により、ユーザーは特定のERC20トークンを使用してガス料金を支払うことができます。\n- AAウォレットを統合するプロジェクトまたはプラットフォームは、ガス料金をカバーするために使用できるERC20トークンを指定できます。\n- 利用可能なトークンの数がユーザーに表示されます(例えば、6つのトークンが利用可能)。\n\n\n図13: トークンで支払う
\n\n\n図14: トークンで支払う(選択)
\n\n**注意:** デフォルトトークンはNEROToken(ネイティブトークン)です \n\n#### ガス料金の表示\n\n**スポンサー付きガス**\n\n- スポンサー付きガスオプションが選択されると、ガス料金は0として表示され、プロジェクトがユーザーのガス料金を全額負担していることを示します。\n- これにより、ユーザーはガス料金を支払うことなくトランザクションを完了できます。\n \n図15:スポンサー付きガス料金の表示
\n\n**トークンで支払う**\n\n- 「トークンで支払う」オプションが選択されると、ユーザーが支払う可能性のある最大のガス料金が表示されます。\n- これにより、この支払い方法を使用する際に発生する可能性のあるガス料金が明確になります。\n- ユーザーは、プロジェクトが指定したERC20トークンを十分に保有し、最大ガス料金をカバーできるようにする必要があります。\n \n図16:ERC20ガス料金の表示
"} {"url":"https://docs.nerochain.io/ja/developer-tools/accessEntryPoint","locale":"ja","section":"developer-tools","title":"ネットワーク情報","summary":"| パラメータ | 値 | | :-------------- | :-------------------------------------------------------------------------------------- | | ネットワーク名 | NERO Chain メインネット | | RPCエンドポイント | https://rpc.nerochain.io | | ","headings":["# ネットワーク情報","## NERO メインネット","### ネットワーク情報","### AA URL","### コントラクトアドレス","### フリーミントトークンアドレス","## NERO テストネット","### ネットワーク情報","### AA URL","### コントラクトアドレス","### フォーセット","### フリーミントトークンアドレス"],"tokens":1176,"markdown":"## NERO メインネット\n\n### ネットワーク情報\n\n| パラメータ | 値 |\n| :-------------- | :-------------------------------------------------------------------------------------- |\n| ネットワーク名 | NERO Chain メインネット |\n| RPCエンドポイント | https://rpc.nerochain.io |\n| チェーンID | 1689 |\n| 通貨シンボル | NERO |\n| エクスプローラー | https://neroscan.io |\n| ウォレット接続 | [ここをクリックしてウォレットをNEROメインネットに接続](https://chainlist.org/?search=Nero) |\n| ノードWebソケット | wss://ws.nerochain.io |\n| サブグラフ・サンドボックス| https://subgraph.mainnet.nero.metaborong.com/ |\n\n### AA URL\n\n| パラメータ | 値 |\n| :------------ | :------------------------------------------------ |\n| プラットフォーム | https://aa-platform.nerochain.io/ |\n| プラットフォームAPI | https://api-aa-platform.nerochain.io/ |\n| ペイマスターRPC | https://paymaster-mainnet.nerochain.io |\n| バンドラー | https://bundler-mainnet.nerochain.io |\n| 価格サービス | https://aa-platform.nerochain.io/supported_tokens |\n\n### コントラクトアドレス\n\n| パラメータ | 値 |\n| :------------- | :----------------------------------------- |\n| ペイマスター | 0xC42E90D29D478ccFeCC28d3B838824E57e51F284 |\n| エントリーポイント | 0x5FF137D4b0FDCD49DcA30c7CF57E578a026d2789 |\n| アカウントファクトリー | 0x9406Cc6185a346906296840746125a0E44976454 |\n| マルチコール | 0x1dA998CfaA0C044d7205A17308B20C7de1bdCf74 |\n\n### フリーミントトークンアドレス\n\n| パラメータ | 値 |\n| :-------- | :----------------------------------------- |\n| テストトークン | 0xC86Fed58edF0981e927160C50ecB8a8B05B32fed |\n\n## NERO テストネット\n\n### ネットワーク情報\n\n| パラメータ | 値 |\n| :-------------- | :---------------------------------------------------------------------------------------------------- |\n| ネットワーク名 | NERO Chain テストネット |\n| RPCエンドポイント | https://rpc-testnet.nerochain.io |\n| チェーンID | 689 |\n| 通貨シンボル | NERO |\n| エクスプローラー | https://testnet.neroscan.io |\n| ウォレット接続 | [ここをクリックしてウォレットをNEROテストネットに接続](https://chainlist.org/?search=Nero&testnets=true) |\n| ノードWebソケット | wss://ws-testnet.nerochain.io |\n| サブグラフ・サンドボックス | https://subgraph.testnet.nero.metaborong.com/ |\n\n### AA URL\n\n| パラメータ | 値 |\n| :------------ | :------------------------------------- |\n| プラットフォーム | https://aa-platform.nerochain.io/ |\n| プラットフォームAPI | https://api-aa-platform.nerochain.io/ |\n| ペイマスターRPC | https://paymaster-testnet.nerochain.io |\n| バンドラー | https://bundler-testnet.nerochain.io/ |\n| 価格サービス | https://price-service.nerochain.io |\n\n### コントラクトアドレス\n\n| パラメータ | 値 |\n| :------------- | :----------------------------------------- |\n| ペイマスター | 0x5a6680dFd4a77FEea0A7be291147768EaA2414ad |\n| エントリーポイント | 0x5FF137D4b0FDCD49DcA30c7CF57E578a026d2789 |\n| アカウントファクトリー | 0x9406Cc6185a346906296840746125a0E44976454 |\n| マルチコール | 0x343A0DdD8e58bEaf29d69936c82F1516C6677B0E |\n\n### フォーセット\n\nフォーセットトークンをミントする: https://app.testnet.nerochain.io/faucet\n\n| パラメータ | 値 |\n| :-------- | :----------------------------------------- |\n| DAI | 0x5d0E342cCD1aD86a16BfBa26f404486940DBE345 |\n| USDT | 0x1dA998CfaA0C044d7205A17308B20C7de1bdCf74 |\n| USDC | 0xC86Fed58edF0981e927160C50ecB8a8B05B32fed |\n\n### フリーミントトークンアドレス\n\n| パラメータ | 値 |\n| :-------- | :----------------------------------------- |\n| テストトークン | 0xA919e465871871F2D1da94BccAF3acaF9609D968 |\n\n> **_注意:_** 関数mint(address to, uint256 amount)を呼び出すことで自由にミント可能"} {"url":"https://docs.nerochain.io/ja/developer-tools","locale":"ja","section":"developer-tools","title":"開発者ツール&アカウント抽象化","summary":"NEROの開発者ツールスイートを探索し、高度なアカウント抽象化機能について学びましょう。","headings":["# 開発者ツール&アカウント抽象化","## 開発者ツール"],"tokens":46,"markdown":"NEROの開発者ツールスイートを探索し、高度なアカウント抽象化機能について学びましょう。\n\n## 開発者ツール\n\n- UserOpSdk SDK\n- Paymaster API\n- Paymaster プラットフォーム\n- NEROWallet(近日公開!)\n\nサイドバーからトピックを選択して、NEROの開発者ツールとアカウント抽象化機能について詳しく学びましょう。"} {"url":"https://docs.nerochain.io/ja/developer-tools/paymaster-api/best-practices","locale":"ja","section":"developer-tools","title":"ベストプラクティス","summary":"## 1. UserOpSDKを活用する SDKはペイマスターAPIとUserOperationsとのやり取りに関連する複雑さの多くを管理します。リトライと組み込みのエラー処理により、統合が大幅に簡素化されます。","headings":["# ベストプラクティス","## 1. UserOpSDKを活用する","## 2. サポートされているトークンをキャッシュする","## 3. 適切なエラー処理を適用する","## 4. トークン承認を評価する","## 5. APIキーを安全に保管する","## 6. 消費量を追跡する","## 7. 適切なガス制限を設定する","## 8. レート制限とクォータ"],"tokens":224,"markdown":"## 1. UserOpSDKを活用する\nSDKはペイマスターAPIとUserOperationsとのやり取りに関連する複雑さの多くを管理します。リトライと組み込みのエラー処理により、統合が大幅に簡素化されます。\n\n## 2. サポートされているトークンをキャッシュする\nサポートされているトークンのリストを定期的に更新して、頻繁なAPIリクエストを防ぎます。これによりサーバーの負担が軽減され、パフォーマンスが向上します。\n\n## 3. 適切なエラー処理を適用する\n常に障害の種類に応じてエラーをキャッチし、適切に処理してください。ネットワーク問題などの特定のエラーは_再試行可能_かもしれませんが、不適切なパラメーターなどの他のエラーは人間の介入を必要とします。\n\n## 4. トークン承認を評価する\nタイプ1と2の支払いでは、UserOperationを転送する前にユーザーのトークン支払い承認を確認してください。これによりユーザーエクスペリエンスが向上し、無駄な失敗を排除するのに役立ちます。\n\n## 5. APIキーを安全に保管する\nクライアント向けに書かれたコードにAPIキーを表示しないでください。常にバックエンドシステムで安全に保管してください。\n\n## 6. 消費量を追跡する\nクォータを超えることによる予期しないサービス停止を防ぐために、AAプラットフォームでスポンサーシップの使用状況を追跡してください。\n\n## 7. 適切なガス制限を設定する\nガス見積もり方法を使用して、UserOperationsの正確なガス値を取得してください。適切な制限により費用が最適化され、トランザクションの失敗を最小限に抑えるのに役立ちます。\n\n## 8. レート制限とクォータ\nAPIの使用は、AAプラットフォームアカウントにある設定によって制限されています:\n\n- 日次ガス制限\n- トランザクション数制限\n- トークン許可リスト\n- ガス価格上限\n\nこれらの設定は[AAプラットフォーム](https://aa-platform.nerochain.io)で監視および調整できます。"} {"url":"https://docs.nerochain.io/ja/developer-tools/paymaster-api/core-methods","locale":"ja","section":"developer-tools","title":"コアJSON-RPCメソッド","summary":"ペイマスターAPIはJSON-RPCを使用しており、これはEthereum互換ノードと通信するための標準です。以下が利用可能な主要なメソッドです:","headings":["# コアJSON-RPCメソッド","## pm_supported_tokens","## pm_sponsor_userop","## pm_entrypoints"],"tokens":998,"markdown":"ペイマスターAPIはJSON-RPCを使用しており、これはEthereum互換ノードと通信するための標準です。以下が利用可能な主要なメソッドです:\n\n## pm_supported_tokens\n\nペイマスターがガス支払いをサポートするERC20トークンのリストと価格情報を取得します。\n\n**パラメータ:**\n1. `userOperation` - 少なくともsenderフィールドを含む最小限のUserOperationオブジェクト\n2. `apiKey` - AAプラットフォームから取得したAPIキー\n3. `entryPoint` - EntryPointコントラクトアドレス(通常は`0x5FF137D4b0FDCD49DcA30c7CF57E578a026d2789`)\n\n**リクエスト例:**\n```json\n{\n \"jsonrpc\": \"2.0\",\n \"id\": 1,\n \"method\": \"pm_supported_tokens\",\n \"params\": [\n {\n \"sender\": \"0xAAWalletAddress\",\n \"nonce\": \"0x0\",\n \"initCode\": \"0x\",\n \"callData\": \"0x\",\n \"callGasLimit\": \"0x0\",\n \"verificationGasLimit\": \"0x0\",\n \"preVerificationGas\": \"0x0\",\n \"maxFeePerGas\": \"0x0\",\n \"maxPriorityFeePerGas\": \"0x0\",\n \"paymasterAndData\": \"0x\",\n \"signature\": \"0x\"\n },\n \"YOUR_API_KEY\",\n \"0x5FF137D4b0FDCD49DcA30c7CF57E578a026d2789\"\n ]\n}\n```\n\n**レスポンス例:**\n```json\n{\n \"jsonrpc\": \"2.0\",\n \"id\": 1,\n \"result\": {\n \"freeGas\": true,\n \"native\": { \n \"gas\": \"0x337dc\", \n \"price\": 1, \n \"decimals\": 18, \n \"symbol\": \"NERO\" \n },\n \"tokens\": [\n {\n \"type\": \"system\",\n \"token\": \"0xD5a6dcff7AC339A03f6964c315575bF65c3c6cF6\",\n \"symbol\": \"DAI\",\n \"decimals\": 18,\n \"price\": 2.1\n },\n {\n \"type\": \"custom\",\n \"token\": \"0x13DCf97b6B94bDA883492AB46d556E8919445876\",\n \"symbol\": \"TestToken\",\n \"decimals\": 18,\n \"price\": 0.1\n }\n ]\n }\n}\n```\n\nこのレスポンスでは:\n- `freeGas`はガススポンサーシップ(タイプ0)が利用可能かどうかを示します\n- `native`はネイティブトークン(NERO)に関する情報を提供します\n- `tokens`はNEROに対する相対価格比率を持つすべてのサポート対象ERC20トークンをリストします\n\n## pm_sponsor_userop\n\nペイマスターでUserOperationに署名し、スポンサードまたはトークン支払いトランザクションに必要なpaymasterAndDataフィールドを追加します。\n\n**パラメータ:**\n1. `userOperation` - 署名される完全なUserOperation\n2. `apiKey` - AAプラットフォームから取得したAPIキー\n3. `entryPoint` - EntryPointコントラクトアドレス\n4. `context` - 支払い詳細を含むオブジェクト:\n - `type` - 支払いタイプ(0:スポンサード、1:前払い、2:後払い)\n - `token` - ERC20トークンアドレス(タイプ1と2では必須)\n\n**無料ガス(タイプ0)のリクエスト例:**\n```json\n{\n \"jsonrpc\": \"2.0\",\n \"id\": 1,\n \"method\": \"pm_sponsor_userop\",\n \"params\": [\n {\n \"sender\": \"0xAAWalletAddress\",\n \"nonce\": \"0x0\",\n \"initCode\": \"0x\",\n \"callData\": \"0xCallData\",\n \"callGasLimit\": \"0x88b8\",\n \"verificationGasLimit\": \"0x33450\",\n \"preVerificationGas\": \"0xc350\",\n \"maxFeePerGas\": \"0x9502f900\",\n \"maxPriorityFeePerGas\": \"0x9502f900\",\n \"paymasterAndData\": \"0x\",\n \"signature\": \"0xUserSignature\"\n },\n \"YOUR_API_KEY\",\n \"0x5FF137D4b0FDCD49DcA30c7CF57E578a026d2789\",\n {\n \"type\": 0\n }\n ]\n}\n```\n\n**ERC20支払い(タイプ1)のリクエスト例:**\n```json\n{\n \"jsonrpc\": \"2.0\",\n \"id\": 1,\n \"method\": \"pm_sponsor_userop\",\n \"params\": [\n {\n \"sender\": \"0xAAWalletAddress\",\n \"nonce\": \"0x0\",\n \"initCode\": \"0x\",\n \"callData\": \"0xCallData\",\n \"callGasLimit\": \"0x88b8\",\n \"verificationGasLimit\": \"0x33450\",\n \"preVerificationGas\": \"0xc350\",\n \"maxFeePerGas\": \"0x9502f900\",\n \"maxPriorityFeePerGas\": \"0x9502f900\",\n \"paymasterAndData\": \"0x\",\n \"signature\": \"0xUserSignature\"\n },\n \"YOUR_API_KEY\",\n \"0x5FF137D4b0FDCD49DcA30c7CF57E578a026d2789\",\n {\n \"type\": 1,\n \"token\": \"0xTokenAddress\"\n }\n ]\n}\n```\n\n**レスポンス例:**\n```json\n{\n \"jsonrpc\": \"2.0\",\n \"id\": 1,\n \"result\": {\n \"sender\": \"0xAAWalletAddress\",\n \"nonce\": \"0x0\",\n \"initCode\": \"0x\",\n \"callData\": \"0xCallData\",\n \"callGasLimit\": \"0x88b8\",\n \"verificationGasLimit\": \"0x33450\",\n \"preVerificationGas\": \"0xc350\",\n \"maxFeePerGas\": \"0x9502f900\",\n \"maxPriorityFeePerGas\": \"0x9502f900\",\n \"paymasterAndData\": \"0xPaymasterAddress+EncodedData+PaymasterSignature\",\n \"signature\": \"0xUserSignature\"\n }\n}\n```\n\n## pm_entrypoints\n\n現在サポートされているEntryPointアドレスを取得します。\n\nリクエスト:\n\n```json\n{\n \"jsonrpc\": \"2.0\",\n \"id\": 1,\n \"method\": \"pm_entrypoints\",\n \"params\": [\n \"entryPoint\"\n ]\n}\n```\n\nレスポンス:\n\n```json\n{\n \"jsonrpc\": \"2.0\",\n \"id\": 1,\n \"result\": [\n \"0x5FF137D4b0FDCD49DcA30c7CF57E578a026d2789\"\n ]\n}\n```"} {"url":"https://docs.nerochain.io/ja/developer-tools/paymaster-api/error-handling","locale":"ja","section":"developer-tools","title":"エラー処理","summary":"ペイマスターAPIを統合する際には、適切なエラー処理が不可欠です。このセクションでは、遭遇する可能性のある一般的なエラーと堅牢な実装のためのベストプラクティスについて説明します。","headings":["# エラー処理","## 一般的なエラーコード","## 一般的な特定エラー"],"tokens":280,"markdown":"ペイマスターAPIを統合する際には、適切なエラー処理が不可欠です。このセクションでは、遭遇する可能性のある一般的なエラーと堅牢な実装のためのベストプラクティスについて説明します。\n\n## 一般的なエラーコード\n\nトランザクションの送信などのペイマスターAPIとのやり取りでは、標準的なJSON-RPCエラーが返されることがあります。以下は一般的なエラーコードとその意味です:\n\nこれらのエラーの多くには、EntryPointからの追加のエラーメッセージも含まれています。\n\n|コード\t| 説明|\n|------------|-------------|\n|-32521\t| 実行フェーズ中にトランザクションがリバートした(またはリバートする予定)。|\n|-32602\t| 無効なUserOperation構造体/フィールド。|\n|-32500\t| アカウント作成または検証中にentryPointのsimulateValidationによってトランザクションが拒否された。|\n|-32501\t| paymasterのvalidatePaymasterUserOpによってトランザクションが拒否された。|\n|-32502\t| オペコード検証によってトランザクションが拒否された。|\n|-32503\t| UserOperationが時間範囲外:アカウントまたはペイマスターが時間範囲を返し、既に期限切れ(またはすぐに期限切れになる)。|\n|-32504\t| ペイマスター(または署名アグリゲーター)がスロットル/禁止されているためトランザクションが拒否された。|\n|-32505\t| ペイマスター(または署名アグリゲーター)のステークまたはアンステーク遅延が低すぎるためトランザクションが拒否された。|\n|-32506\t| アカウントが未サポートの署名アグリゲーターを指定したためトランザクションが拒否された。|\n|-32507\t| validateUserOpまたはvalidatePaymasterUserOpが無効な署名チェックを返した。|\n\n## 一般的な特定エラー\n\nバンドラーエラーコードには、追加のガイダンスを提供するためにEntryPointによって提供される追加のAAxxコードが付随していることがよくあります。\n\n- AA1xエラーコードはアカウントの作成に関連しています\n- AA2xエラーコードはユーザー操作の送信者に関連しています\n- AA3xエラーコードはペイマスターに関連しています\n- AA4xエラーコードは一般的な検証に関連しています\n- AA5xエラーはユーザー操作が実行された後のアクションに関連しています"} {"url":"https://docs.nerochain.io/ja/developer-tools/paymaster-api","locale":"ja","section":"developer-tools","title":"ペイマスターAPI","summary":"開発者がdAppsでガス抽象化を使用できるようにすることで、NerochainペイマスターAPIはユーザーがERC20トークンを使用してガスコストを支払ったり、トランザクションを完全にスポンサーしたりすることを可能にします。このガイドでは、統合のための推奨プラクティス、リクエスト/レスポンス形式、APIエンドポイントについて説明します。","headings":["# ペイマスターAPI","## 概要","## APIエンドポイント","### ベースURL","### 認証","## このセクションの内容"],"tokens":257,"markdown":"開発者がdAppsでガス抽象化を使用できるようにすることで、NerochainペイマスターAPIはユーザーがERC20トークンを使用してガスコストを支払ったり、トランザクションを完全にスポンサーしたりすることを可能にします。このガイドでは、統合のための推奨プラクティス、リクエスト/レスポンス形式、APIエンドポイントについて説明します。\n\n## 概要\n\nペイマスターAPIはあなたのdAppとNerochainブロックチェーンの間に位置し、以下のサービスを提供します:\n\n1. ユーザーのガス料金をスポンサーする。\n2. ユーザーがERC20トークンでガスを支払えるようにする。\n3. バンドラーに送信される前にUserOperationを検証して署名する。\n4. ユーザーのトランザクションに設定したガス戦略を適用する。\n\n\n \n*図1:ペイマスターAPIの統合/使用フロー*\n\n## APIエンドポイント\n\n### ベースURL\n\nペイマスターAPIは以下で利用可能です:\n\n```\nhttps://paymaster-testnet.nerochain.io\n```\n\nメインネット向け:\n\n```\nhttps://paymaster-mainnet.nerochain.io\n```\n\n### 認証\n\nすべてのAPIリクエストには、[AAプラットフォーム](https://aa-platform.nerochain.io)を通じて作成されたAPIキーが必要です。APIキーはRPC呼び出しのパラメータとして含める必要があります。\n\n## このセクションの内容\n\n- [コアメソッド](./paymaster-api/core-methods) - すべてのペイマスターAPIメソッドの詳細なAPIリファレンス\n- [支払いタイプ](./paymaster-api/payment-types) - 異なる支払いタイプの説明\n- [エラー処理](./paymaster-api/error-handling) - 一般的なエラーとトラブルシューティング\n- [ベストプラクティス](./paymaster-api/best-practices) - ペイマスターを統合する際に念頭に置くべきこと"} {"url":"https://docs.nerochain.io/ja/developer-tools/paymaster-api/payment-types","locale":"ja","section":"developer-tools","title":"支払いタイプ","summary":"ペイマスターは、ガス料金の処理方法に柔軟性を提供する3つの支払いタイプをサポートしています。各タイプは異なるメリットとトレードオフを提供します。","headings":["# 支払いタイプ","## タイプ0:無料ガス(スポンサード)","## タイプ1:ERC20での前払い","## タイプ2:ERC20での後払い","## 適切な支払いタイプの選択"],"tokens":284,"markdown":"ペイマスターは、ガス料金の処理方法に柔軟性を提供する3つの支払いタイプをサポートしています。各タイプは異なるメリットとトレードオフを提供します。\n\n## タイプ0:無料ガス(スポンサード)\n\n開発者がユーザーのガス料金を完全にスポンサーします。以下のケースに最適です:\n\n- ユーザーのオンボーディング\n- プロモーションキャンペーン\n- UXの簡素化\n- GameFiアプリケーション\n\nこのタイプを使用するには、`pm_sponsor_userop`を呼び出す際にコンテキストオブジェクトで`type: 0`を設定します。\n\n## タイプ1:ERC20での前払い\n\nユーザーはトランザクション実行前にERC20トークンでガスを支払います:\n\n1. 検証フェーズ中に全額の見積もりが事前に収集されます\n2. 実行後に余剰分は返金されます\n3. トランザクション前にトークン承認が必要です\n\nこのタイプを使用するには:\n- コンテキストオブジェクトで`type: 1`を設定します\n- コンテキストオブジェクトに`token`アドレスを含めます\n- ユーザーがペイマスターコントラクトにトークンを使用する権限を与えていることを確認します\n\n## タイプ2:ERC20での後払い\n\nユーザーはトランザクション実行後にERC20トークンでガスを支払います:\n\n1. トランザクション完了後に正確なガスコストのみが収集されます\n2. 実行前にトークン承認が必要です\n3. ユーザーは必要な分だけ支払うため、UXが向上します\n4. UserOperationがトークンを使い果たした場合、実行後の支払い失敗のリスクがあります\n\nこのタイプを使用するには:\n- コンテキストオブジェクトで`type: 2`を設定します\n- コンテキストオブジェクトに`token`アドレスを含めます\n- ユーザーがペイマスターコントラクトにトークンを使用する権限を与えていることを確認します\n\n## 適切な支払いタイプの選択\n\nどの支払いタイプを使用するかを決定する際には、以下の要素を考慮してください:\n\n- **タイプ0(無料)**:新規ユーザー獲得に最適ですが、開発者のコストが増加します\n- **タイプ1(前払い)**:より信頼性が高いですが、ユーザーは必要な量よりもわずかに多くのトークンを持っている必要があります\n- **タイプ2(後払い)**:最高のユーザーエクスペリエンスを提供しますが、失敗のリスクがあります\n\nほとんどのアプリケーションでは、初回ユーザーや特定のアクションには無料ガスを提供し、通常の操作にはトークン支払いを使用するなど、支払いタイプの組み合わせを使用しています。"} {"url":"https://docs.nerochain.io/ja/developer-tools/user-op-sdk/advanced-usage","locale":"ja","section":"developer-tools","title":"高度な使用法","summary":"このセクションでは、UserOperationsの高度なカスタマイズオプションについて説明します。","headings":["# 高度な使用法","## カスタムガスパラメータ","## カスタムナンス管理","## 追加のカスタマイズ","## 次のステップ"],"tokens":248,"markdown":"このセクションでは、UserOperationsの高度なカスタマイズオプションについて説明します。\n\n## カスタムガスパラメータ\n\nUserOperationsのガスパラメータをカスタマイズできます:\n\n```typescript\n// 特定のガス値を設定\nbuilder.setCallGasLimit(\"0x88b8\");\nbuilder.setVerificationGasLimit(\"0x33450\");\nbuilder.setPreVerificationGas(\"0xc350\");\nbuilder.setMaxFeePerGas(\"0x2162553062\");\nbuilder.setMaxPriorityFeePerGas(\"0x40dbcf36\");\n```\n\n## カスタムナンス管理\n\n必要に応じて、UserOperationsのナンスを手動で設定できます:\n\n```typescript\n// 現在のナンスを取得\nconst aaWallet = new ethers.Contract(\n aaWalletAddress,\n ['function getNonce() view returns (uint256)'],\n accountSigner\n);\nconst nonce = await aaWallet.getNonce();\n\n// カスタムナンスを設定\nbuilder.setNonce(nonce.add(1));\n```\n\n## 追加のカスタマイズ\n\nガスパラメータとナンス管理以外にも、以下のことができます:\n\n- 署名メカニズムのカスタマイズ\n- 独自のアカウントアブストラクションロジックの実装\n- 特定のユースケース向けのカスタムプリセットの作成\n\n## 次のステップ\n\n高度なカスタマイズオプションについて学んだ後、以下のことを検討するかもしれません:\n- [エラー処理について学ぶ](https://docs.nerochain.io/ja/developer-tools/user-op-sdk/error-handling)\n- [ベストプラクティスを確認する](https://docs.nerochain.io/ja/developer-tools/user-op-sdk/best-practices)"} {"url":"https://docs.nerochain.io/ja/developer-tools/user-op-sdk/basic-usage","locale":"ja","section":"developer-tools","title":"インストールと基本的な使い方","summary":"```bash npm install github:nerochain/aa-userop-sdk ```","headings":["# インストールと基本的な使い方","## インストール","## 基本的な使い方","### SDKのインポート","### 設定定数","### クライアントの初期化","### SimpleAccountビルダーの作成","## 次のステップ"],"tokens":377,"markdown":"## インストール\n\nGitHubから直接UserOpSDKをインストールできます:\n\n```bash\nnpm install github:nerochain/aa-userop-sdk\n```\n\nまたは、yarnを使用:\n\n```bash\nyarn add github:nerochain/aa-userop-sdk\n```\n\n## 基本的な使い方\n\nこのセクションでは、UserOpSDKの使用を開始するための基本的なステップを説明します。\n\n### SDKのインポート\n\n```typescript\n\n```\n\n### 設定定数\n\n必要なコントラクトアドレスとサービスエンドポイントで設定を行います:\n\n```typescript\n// Chain configuration\nconst NERO_RPC_URL = \"https://rpc-testnet.nerochain.io\";\nconst BUNDLER_URL = \"https://bundler-testnet.nerochain.io/\";\nconst PAYMASTER_URL = \"https://paymaster-testnet.nerochain.io\";\n\n// Contract addresses\nconst ENTRYPOINT_ADDRESS = \"0x5FF137D4b0FDCD49DcA30c7CF57E578a026d2789\";\nconst ACCOUNT_FACTORY_ADDRESS = \"0x9406Cc6185a346906296840746125a0E44976454\";\n```\n\n### クライアントの初期化\n\n```typescript\n// Initialize the AA Client\nconst client = await Client.init(NERO_RPC_URL, {\n overrideBundlerRpc: BUNDLER_URL,\n entryPoint: ENTRYPOINT_ADDRESS,\n});\n```\n\n### SimpleAccountビルダーの作成\n\nSimpleAccountビルダーは、UserOperationsの作成と設定をサポートします:\n\n```typescript\n// accountSigner is the EOA wallet that will own the AA wallet\nconst builder = await Presets.Builder.SimpleAccount.init(\n accountSigner,\n NERO_RPC_URL,\n {\n overrideBundlerRpc: BUNDLER_URL,\n entryPoint: ENTRYPOINT_ADDRESS,\n factory: ACCOUNT_FACTORY_ADDRESS,\n }\n);\n```\n\n## 次のステップ\n\nクライアントとビルダーをインストール、初期化したら、次のことができます:\n- [AAウォレットの操作](https://docs.nerochain.io/ja/developer-tools/user-op-sdk/working-with-wallets)\n- [UserOperationsの作成](https://docs.nerochain.io/ja/developer-tools/user-op-sdk/creating-user-operations)"} {"url":"https://docs.nerochain.io/ja/developer-tools/user-op-sdk/best-practices","locale":"ja","section":"developer-tools","title":"ベストプラクティス","summary":"本番アプリケーションでUserOpSDKの使用を最適化するために、これらのベストプラクティスに従ってください。","headings":["# ベストプラクティス","## 1. AAウォレットアドレスをキャッシュする","## 2. 包括的なエラー処理を実装する","## 3. ガス見積もり","## 4. テストネットでテストする","## 5. セキュリティ","## 追加リソース"],"tokens":408,"markdown":"本番アプリケーションでUserOpSDKの使用を最適化するために、これらのベストプラクティスに従ってください。\n\n## 1. AAウォレットアドレスをキャッシュする\n\n冗長な計算を避けるために、AAウォレットアドレスを計算して保存します:\n\n```typescript\n// 一度計算してデータベースやローカルストレージに保存\nconst aaWalletAddress = await builder.getSender();\n```\n\n## 2. 包括的なエラー処理を実装する\n\nユーザーエクスペリエンスを向上させるために、すべての潜在的なエラーを適切に処理します:\n\n```typescript\ntry {\n const result = await client.sendUserOperation(builder);\n // 成功パス\n} catch (error) {\n // 異なるエラータイプを分類して処理\n if (error.message.includes('AA21')) {\n // 資金不足を処理\n } else if (error.message.includes('AA31')) {\n // ペイマスター検証エラーを処理\n } else {\n // 一般的なエラー処理\n }\n}\n```\n\n## 3. ガス見積もり\n\n複雑な操作では、十分なガスを確保するためにガス見積もり関数を使用します:\n\n```typescript\n// 送信前にガスを見積もる\nconst gasEstimation = await client.estimateUserOperationGas(builder);\nbuilder.setCallGasLimit(gasEstimation.callGasLimit);\nbuilder.setVerificationGasLimit(gasEstimation.verificationGasLimit);\nbuilder.setPreVerificationGas(gasEstimation.preVerificationGas);\n```\n\n## 4. テストネットでテストする\n\nメインネットにデプロイする前に、必ずNERO Chainのテストネットで実装をテストしてください:\n\n```typescript\n// テストネット設定\nconst NERO_TESTNET_RPC_URL = \"https://rpc-testnet.nerochain.io\";\nconst TESTNET_BUNDLER_URL = \"https://bundler-testnet.nerochain.io\";\nconst TESTNET_PAYMASTER_URL = \"https://paymaster-testnet.nerochain.io\";\n```\n\n## 5. セキュリティ\n\n秘密鍵やAPIキーをクライアントサイドコードに保存しないでください:\n\n```typescript\n// 悪い例:ハードコードされたAPIキー\nconst PAYMASTER_API_KEY = \"your-api-key\"; // これはしないでください!\n\n// 良い例:サーバー上で環境変数から読み込む\nconst PAYMASTER_API_KEY = process.env.PAYMASTER_API_KEY;\n```\n\n## 追加リソース\n\n詳細と高度なユースケースについては、以下のリソースを参照してください:\n- [ERC-4337仕様](https://eips.ethereum.org/EIPS/eip-4337)\n- [UserOpSDK GitHubリポジトリ](https://github.com/nerochain/aa-userop-sdk)"} {"url":"https://docs.nerochain.io/ja/developer-tools/user-op-sdk/creating-user-operations","locale":"ja","section":"developer-tools","title":"UserOperationsの作成","summary":"このパートでは、SDKを使用してさまざまな種類のUserOperationsを作成する方法について説明します。","headings":["# UserOperationsの作成","## 最小限のUserOperationsを理解する","## 単純なトークン送金","## 複数のトランザクションの実行","## 次のステップ"],"tokens":856,"markdown":"このパートでは、SDKを使用してさまざまな種類のUserOperationsを作成する方法について説明します。\n\n## 最小限のUserOperationsを理解する\n\nユーザー操作には標準的な構造があるため、特定のトランザクションを開始する前に理解することが重要です。単純なユーザー操作には、プレースホルダー値であっても、必要なフィールドがすべて含まれています:\n\n```typescript\n// Create a minimal UserOp\nconst minimalUserOp = {\n sender: aaWalletAddress, // The AA wallet address\n nonce: \"0x0\", // Will be filled by the SDK or custom logic\n initCode: \"0x\", // Empty for existing wallets\n callData: \"0x\", // Will be filled with actual transaction data\n callGasLimit: \"0x0\", // Gas estimation\n verificationGasLimit: \"0x0\",\n preVerificationGas: \"0x0\",\n maxFeePerGas: \"0x0\",\n maxPriorityFeePerGas: \"0x0\",\n paymasterAndData: \"0x\", // Will be filled by Paymaster integration\n signature: \"0x\" // Will be filled with EOA signature\n};\n```\n\nこの最小限の構造は以下の目的に役立ちます:\n- UserOperation構造を必要とするRPC呼び出しを行う\n- 特定の詳細を入力する前にUserOperationを初期化する\n- テストとデバッグ\n- PaymasterAPIなどのサービスとの対話\n\nUserOpSDKは自動的にこれらのフィールドのほとんどを埋めてくれますが、SDKを使用してカスタムユーティリティを開発する際には、この構造を理解しておくと役立ちます。\n\n## 単純なトークン送金\n\nERC-20トークンの単純な送金を実行するには、[基本的な使い方](https://docs.nerochain.io/ja/developer-tools/user-op-sdk/basic-usage)セクションで作成したビルダーから始めて、特定のトランザクションを追加します:\n\n```typescript\n// 1. Start with the builder from previous setup\n// const builder = await Presets.Builder.SimpleAccount.init(...);\n\n// 2. Create an ERC-20 contract instance\nconst tokenContract = new ethers.Contract(\n tokenAddress,\n ['function transfer(address to, uint256 amount) returns (bool)'],\n accountSigner\n);\n\n// 3. Prepare the call data for transfer\nconst callData = tokenContract.interface.encodeFunctionData(\n 'transfer',\n [recipientAddress, ethers.utils.parseUnits(amount, decimals)]\n);\n\n// 4. Add the transaction to the builder\n// This will incorporate the transaction into a UserOperation\nbuilder.execute(tokenAddress, 0, callData);\n\n// 5. The builder now contains the UserOperation with your transfer\n// Under the hood, it fills in the parameters of the minimal UserOperation:\n// - sender: from builder.getSender()\n// - nonce: auto-retrieved from the AA wallet\n// - callData: your transfer function call\n// - gas parameters: estimated or set manually\n```\n\n`builder.execute()`を呼び出すと、SDKはトランザクションをUserOperation構造に組み込み、最小限のUserOperationの各フィールドを手動で構築する必要がなくなります。\n\n## 複数のトランザクションの実行\n\n同じビルダーパターンを使用して、複数のアクションを単一のUserOperationにバンドルできます:\n\n```typescript\n// 1. Start with the same builder\n// const builder = await Presets.Builder.SimpleAccount.init(...);\n\n// 2. Prepare multiple call data and targets\nconst callData = [\n tokenContract.interface.encodeFunctionData('approve', [spender, amount]),\n tokenContract.interface.encodeFunctionData('transfer', [recipient, amount])\n];\nconst callTo = [tokenAddress, tokenAddress];\n\n// 3. Add batch execution to the builder\n// This bundles multiple transactions into a single UserOperation\nbuilder.executeBatch(callTo, callData);\n\n// 4. The builder now contains a UserOperation with multiple actions\n// The single UserOperation will:\n// - Approve tokens to be spent by another address\n// - Transfer tokens to the recipient\n// All in one atomic transaction\n```\n\nバッチ実行機能により、複数のアクションが単一のUserOperationの`callData`フィールドに結合され、複雑な操作を効率的に実行できます。\n\n## 次のステップ\n\nビルダーでUserOperationsを作成した後:\n- ガス支払いを処理するために[Paymasterと統合する](https://docs.nerochain.io/ja/developer-tools/user-op-sdk/paymaster-integration)\n- [UserOperationsをネットワークに送信する](https://docs.nerochain.io/ja/developer-tools/user-op-sdk/sending-user-operations)"} {"url":"https://docs.nerochain.io/ja/developer-tools/user-op-sdk/error-handling","locale":"ja","section":"developer-tools","title":"エラー処理","summary":"UserOpSDKは操作中にさまざまなエラーを返す可能性があります。このセクションでは、一般的なエラーとその処理方法について説明します。","headings":["# エラー処理","## 一般的なエラータイプ","## エラーコードカテゴリ","## ユーザーフレンドリーなエラー処理","## 次のステップ"],"tokens":397,"markdown":"UserOpSDKは操作中にさまざまなエラーを返す可能性があります。このセクションでは、一般的なエラーとその処理方法について説明します。\n\n## 一般的なエラータイプ\n\n```typescript\ntry {\n const result = await client.sendUserOperation(builder);\n // 結果を処理\n} catch (error) {\n if (error.message.includes('AA1')) {\n console.error('アカウント作成に関連するエラーコード');\n // 資金不足エラーを処理\n } else if (error.message.includes('AA2')) {\n console.error('ユーザー操作の送信者に関連するエラーコード');\n // 検証エラーを処理\n } else if (error.message.includes('AA3')) {\n console.error('ペイマスターに関連するエラーコード');\n // ペイマスターエラーを処理\n } else if (error.message.includes('AA4')) {\n console.error('一般的な検証に関連するエラーコード');\n // ペイマスターエラーを処理\n } else if (error.message.includes('AA5')) {\n console.error('ユーザー操作が実行された後のアクションに関連するエラー');\n // ペイマスターエラーを処理\n } else {\n console.error('不明なエラー:', error);\n // その他のエラーを処理\n }\n}\n```\n\n## エラーコードカテゴリ\n\n- **AA1** - アカウント作成エラー(例:反実仮想デプロイメントのための資金不足)\n- **AA2** - 送信者エラー(例:無効な署名)\n- **AA3** - ペイマスターエラー(例:預金不足、操作拒否)\n- **AA4** - 一般的な検証エラー\n- **AA5** - 実行後のエラー\n\n## ユーザーフレンドリーなエラー処理\n\nユーザーインターフェースを構築する際は、技術的なエラーをユーザーフレンドリーなメッセージに変換します:\n\n```typescript\nfunction getUserFriendlyErrorMessage(error) {\n if (error.message.includes('AA21')) {\n return \"このトランザクションを支払うのに十分な資金がありません。\";\n } else if (error.message.includes('AA23')) {\n return \"トランザクション署名が無効です。もう一度お試しください。\";\n } else if (error.message.includes('AA25')) {\n return \"ガス支払いの詳細が無効です。別の支払いオプションを選択してください。\";\n } else {\n return \"トランザクションの処理中にエラーが発生しました。もう一度お試しください。\";\n }\n}\n```\n\n## 次のステップ\n\nエラー処理を実装した後、以下のことを検討するかもしれません:\n- SDKを使用するための[ベストプラクティスを確認する](https://docs.nerochain.io/ja/developer-tools/user-op-sdk/best-practices)"} {"url":"https://docs.nerochain.io/ja/developer-tools/user-op-sdk","locale":"ja","section":"developer-tools","title":"UserOpSDK: アカウントアブストラクションSDK","summary":"UserOpSDKは強力なJavaScript/TypeScriptツールとして設計され、NERO Chain上でのUserOperationsの作成、署名、送信を効率化します。このセクションでは、SDKを使用してdAppでアカウントアブストラクション機能を活用する方法をサポートします。","headings":["# UserOpSDK: アカウントアブストラクションSDK","## 目次"],"tokens":335,"markdown":"UserOpSDKは強力なJavaScript/TypeScriptツールとして設計され、NERO Chain上でのUserOperationsの作成、署名、送信を効率化します。このセクションでは、SDKを使用してdAppでアカウントアブストラクション機能を活用する方法をサポートします。\n\nUserOpSDKは、NERO Chain上の基本的なアカウントアブストラクション機能へのアクセスを提供し、以下のような機能があります:\n\n- コントラクト呼び出しや送金のためのUserOperationsの作成\n- イーサリアム署名者によるUserOperationsの署名\n- トランザクションを実行するためのバンドラーとの通信\n- ガススポンサーシップやERC-20トークン受け入れのためのPaymasterとの統合\n- スマートコントラクトウォレットの作成と管理\n\nこのセクションでは、SDKの使い方と一般的な操作の例を紹介します。\n\n## 目次\n\n- [インストールと基本的な使い方](https://docs.nerochain.io/ja/developer-tools/user-op-sdk/basic-usage) - SDKのインストール方法と始め方\n- [AAウォレットの操作](https://docs.nerochain.io/ja/developer-tools/user-op-sdk/working-with-wallets) - ウォレットアドレスの取得とデプロイステータスの確認\n- [UserOperationsの作成](https://docs.nerochain.io/ja/developer-tools/user-op-sdk/creating-user-operations) - 単純な操作とバッチ操作の作成\n- [Paymasterの統合](https://docs.nerochain.io/ja/developer-tools/user-op-sdk/paymaster-integration) - APIキーの設定、サポートされているトークンの取得、支払いタイプ\n- [UserOperationsの送信](https://docs.nerochain.io/ja/developer-tools/user-op-sdk/sending-user-operations) - 操作をネットワークに送信する方法\n- [高度な使用法](https://docs.nerochain.io/ja/developer-tools/user-op-sdk/advanced-usage) - カスタムガスパラメータとナンス管理\n- [エラー処理](https://docs.nerochain.io/ja/developer-tools/user-op-sdk/error-handling) - 一般的なエラーとその対処法\n- [ベストプラクティス](https://docs.nerochain.io/ja/developer-tools/user-op-sdk/best-practices) - 最適なSDK使用のためのヒント"} {"url":"https://docs.nerochain.io/ja/developer-tools/user-op-sdk/paymaster-integration","locale":"ja","section":"developer-tools","title":"Paymasterの統合","summary":"Paymasterサービスは、UserOperationsに対して柔軟なガス支払いオプションを提供します。","headings":["# Paymasterの統合","## Paymaster用のAPIキーの設定","## サポートされているトークンの取得","## 支払いタイプの設定","## 次のステップ"],"tokens":739,"markdown":"Paymasterサービスは、UserOperationsに対して柔軟なガス支払いオプションを提供します。\n\n## Paymaster用のAPIキーの設定\n\nPaymasterサービスを使用するには、APIキーを設定します:\n\n```typescript\nbuilder.setPaymasterOptions({\n apikey: YOUR_API_KEY,\n rpc: PAYMASTER_URL\n});\n```\n\n## サポートされているトークンの取得\n\nSDKにはサポートされているトークンを取得するための組み込みメソッドはありません。Paymaster APIに直接RPCコールを行う必要があります:\n\n```typescript\n// サポートされているトークンを取得するヘルパー関数を作成\nasync function getSupportedTokens(client, builder) {\n try {\n // ウォレットアドレスを取得\n const sender = await builder.getSender();\n \n // リクエスト用の最小限のUserOpを作成\n const minimalUserOp = {\n sender,\n nonce: \"0x0\",\n initCode: \"0x\",\n callData: \"0x\",\n callGasLimit: \"0x0\",\n verificationGasLimit: \"0x0\",\n preVerificationGas: \"0x0\",\n maxFeePerGas: \"0x0\",\n maxPriorityFeePerGas: \"0x0\",\n paymasterAndData: \"0x\",\n signature: \"0x\"\n };\n \n // paymaster RPC用のプロバイダーを設定\n const provider = new ethers.providers.JsonRpcProvider(PAYMASTER_URL);\n \n // pm_supported_tokensメソッドを呼び出す\n const tokensResponse = await provider.send(\"pm_supported_tokens\", [\n minimalUserOp,\n YOUR_API_KEY,\n ENTRYPOINT_ADDRESS\n ]);\n \n // トークンリストを解析して返す\n if (tokensResponse && tokensResponse.tokens) {\n return tokensResponse.tokens.map(token => ({\n address: token.token || token.address,\n decimals: token.decimals,\n symbol: token.symbol,\n type: token.type\n }));\n }\n \n return [];\n } catch (error) {\n console.error(\"サポートされているトークンの取得エラー:\", error);\n return [];\n }\n}\n\n// 使用例\nconst supportedTokens = await getSupportedTokens(client, builder);\nconsole.log(\"サポートされているトークン:\", supportedTokens);\n```\n\n異なるPaymaster実装では、トークンが異なる形式で返される場合があります。より堅牢な実装では、この例に示すようにさまざまなレスポンス形式の処理が含まれます:\n\n```typescript\n// 異なるレスポンス形式を処理\nlet tokens = [];\nif (tokensResponse.tokens) {\n tokens = tokensResponse.tokens;\n} else if (Array.isArray(tokensResponse)) {\n tokens = tokensResponse;\n} else if (typeof tokensResponse === 'object') {\n // レスポンスオブジェクト内でトークンを見つける\n const possibleTokensArray = Object.values(tokensResponse).find(val => Array.isArray(val));\n if (possibleTokensArray && Array.isArray(possibleTokensArray)) {\n tokens = possibleTokensArray;\n }\n}\n```\n\n## 支払いタイプの設定\n\nユーザーがガスをどのように支払うかを設定します:\n\n```typescript\n// タイプ0:無料ガス(開発者がスポンサー)\nbuilder.setPaymasterOptions({ \n type: 0,\n apikey: YOUR_API_KEY,\n rpc: PAYMASTER_URL\n});\n\n// タイプ1:ERC20トークンでの前払い\nbuilder.setPaymasterOptions({ \n type: 1,\n token: TOKEN_ADDRESS, // ERC20トークンアドレス\n apikey: YOUR_API_KEY,\n rpc: PAYMASTER_URL\n});\n\n// タイプ2:ERC20トークンでの後払い\nbuilder.setPaymasterOptions({ \n type: 2,\n token: TOKEN_ADDRESS, // ERC20トークンアドレス\n apikey: YOUR_API_KEY,\n rpc: PAYMASTER_URL\n});\n```\n\n## 次のステップ\n\nUserOperationのPaymasterを設定した後、以下のことができます:\n- [UserOperationsをネットワークに送信する](https://docs.nerochain.io/ja/developer-tools/user-op-sdk/sending-user-operations)\n- カスタマイズのための[高度なオプションを探索する](https://docs.nerochain.io/ja/developer-tools/user-op-sdk/advanced-usage)"} {"url":"https://docs.nerochain.io/ja/developer-tools/user-op-sdk/sending-user-operations","locale":"ja","section":"developer-tools","title":"UserOperationsの送信","summary":"UserOperationの設定が完了したら、それをネットワークに送信できます。このセクションでは、操作の送信と結果の処理について説明します。","headings":["# UserOperationsの送信","## UserOperationの送信","## UserOperationのステータス監視","## 次のステップ"],"tokens":256,"markdown":"UserOperationの設定が完了したら、それをネットワークに送信できます。このセクションでは、操作の送信と結果の処理について説明します。\n\n## UserOperationの送信\n\n```typescript\ntry {\n // UserOperationを送信\n const result = await client.sendUserOperation(builder);\n \n // トランザクションハッシュを取得\n const userOpHash = result.userOpHash;\n console.log(\"UserOperation ハッシュ:\", userOpHash);\n \n // トランザクションがマイニングされるのを待つ\n const receipt = await result.wait();\n console.log(\"トランザクションハッシュ:\", receipt.transactionHash);\n \n return receipt;\n} catch (error) {\n console.error(\"UserOperation送信エラー:\", error);\n throw error;\n}\n```\n\n## UserOperationのステータス監視\n\nUserOperationを送信した後、そのステータスを監視できます:\n\n1. まず、`sendUserOperation`の結果から`userOpHash`を取得します。\n2. 次に、操作がブロックに含まれるのを待つために結果に対して`wait()`を使用できます。\n3. レシートにはトランザクションハッシュが含まれており、これを使用してブロックエクスプローラーで詳細を検索できます。\n\n## 次のステップ\n\nUserOperationsの送信後、以下のことを検討するかもしれません:\n- カスタマイズのための[高度なオプションを探索する](https://docs.nerochain.io/ja/developer-tools/user-op-sdk/advanced-usage)\n- より良いユーザーエクスペリエンスのための[エラー処理について学ぶ](https://docs.nerochain.io/ja/developer-tools/user-op-sdk/error-handling)"} {"url":"https://docs.nerochain.io/ja/developer-tools/user-op-sdk/working-with-wallets","locale":"ja","section":"developer-tools","title":"AAウォレットの操作","summary":"アカウントアブストラクションウォレットは各EOAウォレットに対して決定論的に生成されます。このセクションでは、これらのAAウォレットの操作方法について説明します。","headings":["# AAウォレットの操作","## AAウォレットアドレスの取得","## AAウォレットのデプロイ状態の確認","## 次のステップ"],"tokens":214,"markdown":"アカウントアブストラクションウォレットは各EOAウォレットに対して決定論的に生成されます。このセクションでは、これらのAAウォレットの操作方法について説明します。\n\n## AAウォレットアドレスの取得\n\n各EOAウォレットには、決定論的に生成される対応するAAウォレットアドレスがあります:\n\n```typescript\n// Get the AA wallet address (works even if not yet deployed on-chain)\nconst aaWalletAddress = await builder.getSender();\nconsole.log(\"AA Wallet Address:\", aaWalletAddress);\n```\n\n## AAウォレットのデプロイ状態の確認\n\nAAウォレットが既にデプロイされているかどうかを確認できます:\n\n```typescript\nconst provider = new ethers.providers.JsonRpcProvider(NERO_RPC_URL);\nconst code = await provider.getCode(aaWalletAddress);\nconst isDeployed = code !== '0x';\nconsole.log(\"Wallet deployed:\", isDeployed);\n```\n\n## 次のステップ\n\nAAウォレットアドレスの操作後、次のことができます:\n- [UserOperationsの作成](https://docs.nerochain.io/ja/developer-tools/user-op-sdk/creating-user-operations)\n- [Paymasterとの統合](https://docs.nerochain.io/ja/developer-tools/user-op-sdk/paymaster-integration)"} {"url":"https://docs.nerochain.io/ja/faq","locale":"ja","section":"faq","title":"よくある質問","summary":"このFAQでは、NERO Chainでの開発において開発者が直面する一般的な課題、落とし穴、質問に回答します。","headings":["# よくある質問","## アカウントアブストラクション","### アカウントアブストラクションとは正確には何ですか?","### なぜUserOperationsが拒否され続けるのですか?","### AAエラーコードのデバッグ方法は?","## ペイマスター統合","### スポンサード・トランザクションが失敗する理由は?","### 支払い戦略タイプの違いは何ですか?","### ガス支払いに対応しているトークンを確認する方法は?","## 開発環境","### テスト用に利用できるネットワークは?","### テストネットトークンの入手方法は?","## セキュリティのベストプラクティス","### どのようなセキュリティ対策を実装すべきですか?","### ペイマスターAPIキーを保護する方法は?","## スマートコントラクトのデプロイ","### コントラクトのデプロイが失敗する理由は?","### どのSolidityバージョンを使用すべきですか?","### OpenZeppelinプロキシコントラクトの検証が失敗する理由は?","## ウォレット統合","### なぜAAウォレットアドレスを生成できないのですか?","### ウォレットの復旧をどう処理すればよいですか?","## トラブルシューティング","### 行き詰まった場合はどこで助けを得られますか?","### UserOperationが処理されたかどうかを確認する方法は?"],"tokens":1191,"markdown":"このFAQでは、NERO Chainでの開発において開発者が直面する一般的な課題、落とし穴、質問に回答します。\n\n## アカウントアブストラクション\n\n### アカウントアブストラクションとは正確には何ですか?\nアカウントアブストラクション(AA)は、ユーザーがガス代用のネイティブトークン(NERO)を保持する必要なく、スマートコントラクトウォレットがトランザクションを実行できるようにするパラダイムです。アカウントアブストラクション(AA)により、トランザクションのスポンサーシップ、バッチ処理トランザクション、複雑な認証方法などの機能が可能になり、アカウント管理ロジックをトランザクション検証から分離することができます。\n\n### なぜUserOperationsが拒否され続けるのですか?\nUserOperationsが拒否される理由はいくつかあります:\n- **無効な署名**:ウォレット用の正しい署名者を使用していることを確認してください\n- **ガス不足**:ガス制限を増やすか、SDKのガス見積もり関数を使用してみてください\n- **ペイマスターの拒否**:ペイマスターAPIキーが有効で、十分な資金があることを確認してください。APIキーに十分な残りのリクエスト数があるかを確認してください。リクエスト数が不足している場合は、NEROチームにお問い合わせください。\n- **ノンス問題**:アカウントに対して正しいノンスを使用していることを確認してください\n- **検証の失敗**:スマートコントラクトウォレットは、その要件を満たさない操作を拒否する場合があります\n\n### AAエラーコードのデバッグ方法は?\nエラーコードは以下のパターンに従います:\n- **AA1**コードはアカウントの作成に関連しています(例:デプロイメントのための資金不足)\n- **AA2**コードは送信者に関連しています(例:無効な署名)\n- **AA3**コードはペイマスターに関連しています(例:デポジット不足)\n- **AA4**コードは一般的な検証の失敗に関連しています\n- **AA5**コードは実行後の問題に関連しています\n\n## ペイマスター統合\n\n### スポンサード・トランザクションが失敗する理由は?\nペイマスターが失敗する一般的な理由には以下があります:\n- **APIキーのレート制限**:キーの使用パターンを確認し、制限の引き上げを検討してください\n- **戦略の拒否**:戦略パラメータがアプリケーションのニーズと一致していることを確認してください\n- **資金不足**:Type 0戦略の場合、スポンサーシップアカウントに十分な資金があることを確認してください\n- **ユーザー支払いの失敗**:Type 1/2戦略の場合、ユーザーが十分なトークン残高を持ち、ペイマスターコントラクトを承認していることを確認してください\n- **残りのリクエスト数不足**:APIに十分な残りのリクエスト数があるかを確認してください\n\n### 支払い戦略タイプの違いは何ですか?\n- **Type 0(スポンサーシップ)**:ガス料金は開発者/アプリケーションによって完全にカバーされます\n- **Type 1(ERC-20前払い)**:ユーザーは実行前にERC-20トークンでガス料金を支払います\n- **Type 2(ERC-20後払い)**:ユーザーは実行後にERC-20トークンでガス料金を支払います\n\n### ガス支払いに対応しているトークンを確認する方法は?\nペイマスターAPIのコア機能を使用して、ペイマスターでのガス支払いに使用できるERC-20トークンを確認できます。これはType 1およびType 2の支払い戦略にとって特に重要です。\n\n## 開発環境\n\n### テスト用に利用できるネットワークは?\nNERO Chainは開発とテスト用のテストネット環境を提供しています:\n- **テストネットRPC**:https://rpc-testnet.nerochain.io\n- **テストネットバンドラー**:https://bundler-testnet.nerochain.io/\n- **テストネットペイマスター**:https://paymaster-testnet.nerochain.io\n\nメインネットにデプロイする前に、必ずテストネットで実装を徹底的にテストしてください。\n\n### テストネットトークンの入手方法は?\nNERO Chainのフォーセット[app.testnet.nerochain.io/faucet](https://app.testnet.nerochain.io/faucet/)からテストネットNEROトークンを入手できます。\n\n## セキュリティのベストプラクティス\n\n### どのようなセキュリティ対策を実装すべきですか?\n- **秘密鍵をクライアント側のコードに保存しない**:安全な鍵管理を使用してください\n- **APIキーには環境変数を使用する**:アプリケーションにAPIキーをハードコーディングしないでください\n- **ガス制限を実装する**:過剰なコストを防ぐために適切なガス制限を設定してください\n- **ユーザー入力を検証する**:トランザクションで使用される入力は常に検証してください\n- **適切なエラー処理を実装する**:操作が失敗した場合にユーザーに明確なフィードバックを提供してください\n\n### ペイマスターAPIキーを保護する方法は?\nペイマスターAPIキーは機密認証情報として扱う必要があります:\n- コードではなく環境変数に保存する\n- 乱用を検出するためにレート制限とモニタリングを実装する\n- セキュリティを強化するためにAPIキーを定期的にローテーションする\n\n## スマートコントラクトのデプロイ\n\n### コントラクトのデプロイが失敗する理由は?\nデプロイメントが失敗する一般的な理由:\n- **ネットワーク設定の誤り**:HardhatやRemixの設定が正しいNERO Chain RPCを指していることを確認してください\n- **ガス不足**:デプロイメントのガス制限を増やしてみてください\n- **コントラクトサイズの制限**:非常に大きなコントラクトはサイズ制限を超える可能性があります\n- **コンパイルエラー**:SolidityコンパイラバージョンがNERO Chainと互換性があることを確認してください\n\n### どのSolidityバージョンを使用すべきですか?\nNERO ChainはEthereumのLondonフォークと互換性のあるすべてのSolidityバージョンをサポートしています。最適な互換性とセキュリティのために、Solidity ^0.8.12の使用をお勧めします。\n\n**重要**:Neroscanでのコントラクト検証については、Solidityバージョン0.8.29以下を使用することを確認してください。EVMバージョンの依存関係を含む様々な要因により、Neroscanは新しいSolidityバージョンをタイムリーにサポートできない場合があります。\n\n### OpenZeppelinプロキシコントラクトの検証が失敗する理由は?\nOpenZeppelinプロキシコントラクトはNeroscanで特定の検証の課題に直面する可能性があります:\n\n**一般的な問題**:実装コントラクトは正常に検証されるにもかかわらず、TransparentUpgradeableProxyやProxyAdminコントラクトを検証しようとする際に「Invalid compilerVersion」エラーが発生します。\n\n**根本的な原因**:ブロックエクスプローラーの検証インフラストラクチャには、OpenZeppelinプロキシコントラクトのコンパイル設定とバージョン互換性に制限があります。\n\n**解決策**:\n- **Solidity ≤ 0.8.29を使用**:テストネット/メインネットのブロックエクスプローラーは現在、Solidityバージョン0.8.29までをサポートしています\n- **OpenZeppelin v5サポート**:エクスプローラーは、Solidity 0.8.29でプリコンパイルされたバイトコードを使用するOpenZeppelin v5プロキシコントラクトをサポートしています\n- **検証順序**:常に実装コントラクトを最初に検証し、その後プロキシコントラクトの検証を試行してください\n\n**重要なポイント**:\n- 実装コントラクトは通常、問題なく検証されます\n- プロキシコントラクト(TransparentUpgradeableProxy、ProxyAdmin)にはサポートされているSolidityバージョンが必要です\n- EVMバージョンの更新やその他の要因により、Neroscanは最新のSolidityバージョンをすぐにサポートできない場合があります\n\nプロキシコントラクトの検証で問題が続く場合は、開発環境でコンパイルとデプロイメントの両方にSolidity 0.8.29以前のバージョンを使用していることを確認してください。\n\n## ウォレット統合\n\n### なぜAAウォレットアドレスを生成できないのですか?\nAAウォレット生成に関する潜在的な問題:\n- **ファクトリーアドレスの誤り**:正しいアカウントファクトリーアドレスを使用していることを確認してください\n- **ソルト衝突**:アドレス派生に異なるソルト値を試してみてください\n- **チェーンIDの不一致**:NERO Chainの正しいチェーンIDを使用していることを確認してください\n- **初期化データの問題**:初期化コールデータが正しくフォーマットされていることを確認してください\n\n### ウォレットの復旧をどう処理すればよいですか?\nAAウォレットには、以下のような復旧メカニズムを実装してください:\n- 信頼できる連絡先を通じたソーシャルリカバリー\n- 特定のアクションに対するマルチシグ要件\n- セキュリティ上重要な操作のためのタイムロック\n- 遅延後に有効化できるバックアップ署名者\n\n## トラブルシューティング\n\n### 行き詰まった場合はどこで助けを得られますか?\n持続的な問題が発生した場合は、以下を通じてNERO Chainサポートに連絡してください:\n- [Discordコミュニティ](https://discord.gg/nerochainofficial)\n- [サポートメール](mailto:support@nerochain.io)\n- [GitHub Issues](https://github.com/nerochain)\n\n### UserOperationが処理されたかどうかを確認する方法は?\n以下を使用してUserOperationのステータスを確認できます:\n- UserOpSDKの`client.getUserOperationReceipt(hash)`メソッド\n- [neroscan.io](https://neroscan.io)のNERO Chain Explorer\n- `eth_getUserOperationReceipt`メソッドを使用したバンドラーRPCエンドポイント"} {"url":"https://docs.nerochain.io/ja/getting-started/introduction","locale":"ja","section":"getting-started","title":"NEROチェーン:開発者向けの「What, Why, and How」","summary":"根本的なスケーラビリティ、柔軟性、およびユーザー体験の向上を念頭に置いたNEROチェーンは、開発者向けに設計されたモジュラー型のLayer 1ブロックチェーンです。NEROチェーンは、ネイティブなアカウント抽象化(AA)とPaymaster(容易に設定可能なAPIプラットフォーム付き)によって他とは一線を画し、開発者がユーザーに新しく円滑な体験を提供しながら、アプリケーションの価値の大部分を自身に","headings":["# NEROチェーン:開発者向けの「What, Why, and How」","## NEROチェーンとは?","## なぜNEROチェーンで開発するのか?","### 真の価値を獲得するアプリケーション","### シームレスなユーザー体験","## NERO Chainで開発する方法"],"tokens":426,"markdown":"## NEROチェーンとは?\n\n根本的なスケーラビリティ、柔軟性、およびユーザー体験の向上を念頭に置いたNEROチェーンは、開発者向けに設計されたモジュラー型のLayer 1ブロックチェーンです。NEROチェーンは、ネイティブなアカウント抽象化(AA)とPaymaster(容易に設定可能なAPIプラットフォーム付き)によって他とは一線を画し、開発者がユーザーに新しく円滑な体験を提供しながら、アプリケーションの価値の大部分を自身に還元できるようにします。開発者がNEROチェーンに魅力を感じる主な特長は以下の通りです。\n\n- **ネイティブアカウント抽象化**:ERC-4337をネイティブでサポートし、コンセンサス層の変更が不要。\n- **Paymasterシステム**:ユーザーがERC20トークンで支払ったり、ガス費用を完全にスポンサーすることを可能にします。Paymasterプラットフォームを使用してこれらを即座に設定可能です。\n- **Blockspace 2.0**:効率的な手数料共有システムを活用した高度なトランザクション処理と料金分配により、ネットワークリソースの効果的な利用を保証します。\n- **完全なEVM互換性**:Solidity、Hardhat、Remixなどの人気の開発環境を使用して、スマートコントラクトを作成・利用できます。\n\n## なぜNEROチェーンで開発するのか?\n\nNEROチェーンはブロックチェーン技術に新しい視点をもたらし、インフラレベルの価値抽出よりもアプリケーション自体を重視しています。\n\n### 真の価値を獲得するアプリケーション\n\nチェーンのネイティブ通貨であるGasは、各アプリケーションがトランザクションの価値をチェーンに譲り渡す必要なく、自身のエコシステム内で価値を直接保持・活用できるように設計されています。\n\nERC20トークンを使ったガス支払いを可能にすることで、開発者は持続可能な需要と手数料収入を創出し、トークン価値を高めることができます。これは特別な結果をもたらします。あなたのプロジェクトが活動を促進するほど、その恩恵はユーザーやエコシステムに直接還元されるのです。\n\n\n \n*図1:他チェーンと比較した開発者トークンのパフォーマンスのシミュレーション。*\n\n### シームレスなユーザー体験\n\nユーザーインタラクションの複雑さは、ブロックチェーン採用の大きな障害でした。NEROチェーンでは、この課題に直接取り組んでいます。\n\n- **Paymasterシステム**:ユーザーがERC20トークンでガス代を支払ったり、dApp側が完全にガス代をスポンサーすることも可能です。Paymasterプラットフォームで柔軟に設定可能です。\n- **アカウント抽象化**:EOAよりも高度なソーシャルログインやセキュリティ、リカバリーオプションを利用可能にします。\n- **バンドル化されたトランザクション**:1回のトランザクションで複数のアクションを実行できます。\n\nこれにより、ブロックチェーン未経験のユーザーでも簡単に参加でき、Web3の普及を妨げていた障壁を取り除きます。\n\n## NERO Chainで開発する方法\n\nNEROチェーンでの開発は簡単に開始できます。\n\n1. **テストネットの利用**:NEROチェーンのTestnetで開発とテストを行い、本番環境へのデプロイはメインネットで。\n2. **アカウント抽象化の統合**:UserOpSDKを使ってAA機能を実装し、Paymaster APIと接続します。\n3. **Paymasterを活用する**:柔軟な支払い方法を有効にし、優れたユーザー体験を提供します。\n\nこれらの特徴を活用することで、シームレスなユーザーエクスペリエンスを提供するアプリケーションを構築可能になります。"} {"url":"https://docs.nerochain.io/ja/getting-started/key-features","locale":"ja","section":"getting-started","title":"開発者向けの主な特徴","summary":"このセクションでは、開発者にとって理想的なプラットフォームであるNEROチェーンの主な機能について、高レベルで概要を説明します。これらの特性を理解することで、NEROチェーンを活用したアプリ開発を最大限に行えます。","headings":["# 開発者向けの主な特徴","## ネイティブアカウント抽象化","## Paymasterシステム","## Blockspace 2.0"],"tokens":493,"markdown":"このセクションでは、開発者にとって理想的なプラットフォームであるNEROチェーンの主な機能について、高レベルで概要を説明します。これらの特性を理解することで、NEROチェーンを活用したアプリ開発を最大限に行えます。\n\n## ネイティブアカウント抽象化\n\nネイティブのERC-4337アカウント抽象化実装を利用することで、NEROチェーンは開発者が高度なツールを使い、より良いユーザー体験を構築できるようサポートします。\n\n#### スマートコントラクトウォレット\n\n従来の外部所有アカウント(EOA)とは異なり、NEROチェーン上のスマートコントラクトウォレットは以下の特長を提供します。\n\n- **プログラム可能な認証**:任意の検証ロジックをトランザクション承認に適用できます。\n- **マルチシグサポート**:トランザクション承認に複数の署名者を要求可能です。\n- **ソーシャルリカバリー**:信頼できる友人やサービスを通じてアカウントの復元が可能。\n- **セッションキー**:特定のアプリケーションや期間限定で使える一時的なキーを発行可能です。\n\n#### UserOperationとBundlers\n\nアカウント抽象化の中心にあるのが、`UserOperation`オブジェクトです。\n\n- **柔軟なトランザクション形式**:ユーザーの意図とトランザクション実行を完全に分離します。\n- **Bundlers**:複数のUserOperationをまとめて単一のトランザクションにパッケージ化する専用ノード。\n- **メンプール管理**:UserOperation専用のメンプールにより、予測可能性を高めます。\n\n## Paymasterシステム\n\nPaymasterは、柔軟なガス支払いメカニズムを可能にする中心的な要素です。また、AAプラットフォームを通じて、開発者は設定を簡単に行えます。\n\n#### 支払いオプション\n\n- **スポンサードトランザクション(無料)**:開発者がユーザーのガス代を完全にカバーできます。\n- **ERC20トークンでの支払い**:ユーザーはNEROではなく、サポートされたERC20トークンを使ってガス料金を支払うことができます。\n- **プリファンド/ポストファンドモデル**:トランザクションの前払いまたは実行後精算のどちらかを選択可能です。\n\n\n \n*図1:AAプラットフォームでのガス料金用トークンの設定*\n\n#### 統合のメリット\n\n- **トークンの有用性向上**:トークンをガス支払いに使用可能にすることでトークンの実用性を向上。\n- **ユーザー体験の向上**:ユーザーがNEROトークンを持たなくてもdAppとやり取りできるようにします。\n- **柔軟な価格設定モデル**:サブスクリプションモデル、無料トライアル、アクション毎の料金設定などが可能。\n\n## Blockspace 2.0\n\n従来のブロックチェーンシステムではすべてのトランザクションを一律に処理していましたが、Blockspace 2.0は取引コストやリソース管理に革新的なアプローチを導入し、柔軟性・効率性・公平性を実現しています。\n\n#### スマートな料金体系による独自UX\n\n- **カスタム価格モデル**:開発者は特定のニーズに合った独自の価格モデルを作成可能。\n- **料金シェアリング**:あなたのdAppがトランザクションを生成すると、ユーザーと開発者の双方がネットワーク手数料をシェアできます。\n- **安定した価格設定**:従来の変動の激しいガス価格に比べ、より予測可能な料金体系を提供します。\n\n#### リソースの有効活用\n- バンドル化されたトランザクション - トランザクションを効率的にまとめ、不必要なコストを削減します。\n- 高速レーンのように、緊急のトランザクションを優先的に処理します。\n- 効率的なリソース配分により、開発者は必要な処理能力をより正確に見積もれるため、予期せぬ負担を軽減できます。\n\nBlockspace 2.0により、NEROチェーンは単にコスト削減を目指すのではなく、よりスマートで持続可能なプラットフォームを実現します。\n\n\n \n*図2:Blockspace 2.0のアーキテクチャ*"} {"url":"https://docs.nerochain.io/ja/getting-started/nero-dapp-architecture","locale":"ja","section":"getting-started","title":"dAppのアーキテクチャ","summary":"NEROチェーンのアーキテクチャを理解することで、その独自機能を活用し、革新的なアプリケーションと新しいユーザー体験を構築する方法が見えてきます。この概要では、アカウント抽象化、Paymaster機能、その他主要な機能を可能にする各コンポーネントがどのように連携しているかを説明します。","headings":["# dAppのアーキテクチャ","## 主要コンポーネントとトランザクションの流れ","### ユーザーおよび認証レイヤー","### アプリケーションコンポーネント","### バックエンドインフラ","## トランザクションフロー","### 接続フェーズ","### UserOperation構築フェーズ","### トランザクション提出フェーズ","### 実行フェーズ","### 管理コンポーネント","## Paymasterの支払いタイプとユーザー体験","### タイプ0:開発者スポンサー型ガス(無料)","### タイプ1:ERC20トークン前払い","### タイプ2:ERC20トークン後払い","## 高度なアプリケーションの構築"],"tokens":1584,"markdown":"NEROチェーンのアーキテクチャを理解することで、その独自機能を活用し、革新的なアプリケーションと新しいユーザー体験を構築する方法が見えてきます。この概要では、アカウント抽象化、Paymaster機能、その他主要な機能を可能にする各コンポーネントがどのように連携しているかを説明します。\n\n分散型アプリケーション(dApp)内で複数のコンポーネントが一体となり、堅牢で安全かつ効率的なブロックチェーン運用を実現しています。各コンポーネントを詳しく見ていきましょう。\n\n\n \n*図1:NEROチェーンのdAppアーキテクチャ*\n\n## 主要コンポーネントとトランザクションの流れ\n\n### ユーザーおよび認証レイヤー\n\nNEROチェーンのユーザー体験の基礎となるのは、初心者からWeb3ユーザーまで対応した柔軟な認証メカニズムです。\n\n**AAウォレット**(スマートコントラクトウォレット)は、多様な認証方法を同時にサポートする柔軟なウォレットで、ユーザーがブロックチェーン機能と対話する際の中心となります。従来のウォレットが秘密鍵のみに依存するのに対し、NEROチェーンのAAウォレットは、MetaMaskのような馴染みある第三者ウォレット、GoogleやTwitterログインなどの実用的なWeb2認証、さらには従来のパスワードベースの認証でもアクセス可能です。専門的なユーザーにセキュリティと柔軟性を提供しつつ、一般ユーザーに対しても参入障壁を大きく取り除くことが可能になります。\n\n\n \n*図2:ソーシャルログインの例*\n\nユーザーはスマートフォンでソーシャルログインを使用してAAウォレットを設定し、同じオンチェーンのアイデンティティや資産をPCのMetaMaskなどでも利用可能です。\n\n### アプリケーションコンポーネント\n\nアプリケーションレイヤーは、ユーザーとブロックチェーン間を繋ぐ役割を果たし、複数の統合されたコンポーネントを特徴としています。\n\n**ウォレットSDK** は、他のWeb3アプリケーションでも使用可能であり、トランザクション構築や提出の難しい作業を処理し、AAウォレットと分散型アプリケーションの間を繋ぎます。このSDKを使用してNEROチェーンにデプロイされたAAウォレットファクトリーからウォレットを取得します。\n\nNEROチェーン上に構築された分散型アプリケーションは、このアーキテクチャを利用してシームレスなフロントエンドのインタラクションを提供できます。DEX、NFTマーケットプレイス、ゲーミングプラットフォームなど、どのようなアプリを開発する場合でも、ウォレットSDKを通じてユーザーに快適な体験を提供できます。\n\n**Developer SDK(UserOpSDK)** は開発者がアカウント抽象化機能をアプリケーションに統合するために必要なツールを提供します。UserOperationの構築、EntryPointコントラクトとの連携、Paymasterの利用方法をカバーしています。\n\n**Paymaster API** を活用することで、dAppはガス代のスポンサーや代替支払い手段を利用できます。ユーザーがトランザクションを開始すると、Paymaster APIに問い合わせを行い、適切な支払い方法を探してUserOperationに必要な情報を組み込めます。\n\n### バックエンドインフラ\n\nユーザー向けコンポーネントの背後には、NEROチェーンの独自機能を支える堅牢なインフラがあります。\n\n- **AAプラットフォーム** はPaymaster設定を行い、トークンによるガス支払いの許可、使用量のモニタリングなどを行うダッシュボードです。\n- **価格サービス** はERC20トークンとガス料金間の為替レートを算定し、公正な料金計算を支援します。\n- **Bundlers** は複数ユーザーのUserOperationを収集し、標準的なトランザクションにバッチ処理して効率化します。\n- **Paymasterコントラクト** は実際のガス料金抽象化を担い、スポンサーシップの判断やトークンベースの支払い処理を行います。\n- **EntryPointコントラクト**(アドレス: `0x5FF137D4b0FDCD49DcA30c7CF57E578a026d2789`)はすべてのUserOperationの中心的なハブとして機能し、Bundlerから送信された操作を処理します。\n- 各ユーザーの **Contract Account** はスマートコントラクトウォレットであり、アカウントファクトリー経由でデプロイされ、マルチシグ、支出制限、アカウントリカバリー機能などを追加可能です。\n- 高度な用途として、オプショナルな **Aggregator** は署名の集約を処理し、マルチシグ操作を効率化します。\n\n次のセクションでは、トランザクションの詳細な流れを説明します。\n\n## トランザクションフロー\n\n### 接続フェーズ\nユーザーがdAppに接続することでプロセスが始まります。この初期接続では、ユーザーのブラウザとブロックチェーン間の通信チャネルが確立されます。この段階で、ユーザーは好みの方法(MetaMask、ソーシャルログイン、パスワードなど)で認証を行い、dAppはユーザーのAAウォレットアドレスを特定します。ウォレットがまだデプロイされていない場合はカウンターファクチュアル(未実体化)アドレスが使用されます。\n\n### UserOperation構築フェーズ\n接続後、トランザクションの準備プロセスが始まります。ユーザーがトークン交換やNFTミントなどの操作を開始すると、dAppは直接またはDeveloper SDKを通じてUserOperationを構築します。従来のトランザクションとは異なり、UserOperationにはアカウント抽象化に必要な追加フィールドが含まれます。\n\nガス抽象化が必要な場合、Developer SDKはPaymaster APIと通信し、支払い方法を決定します。トークンベースの支払いの場合、価格サービスは現在の為替レートと推定ガス消費量に基づいて必要なトークン量を計算します。Paymaster APIはその後、ガス処理に必要なすべての情報を含むpaymasterAndDataフィールドを返します。\n\nこのモジュラーなアプローチにより、開発者はアプリケーションの主要ロジックを変更せずに柔軟な支払いオプションを提供できます。ユーザーはネイティブトークンを特別に取得せずとも、すでに持っているトークンで支払いが可能です。\n\n### トランザクション提出フェーズ\nUserOperationが構築され署名されると、提出プロセスが始まります。dAppは完成したUserOperationをウォレットSDKに送信し、ウォレットSDKはユーザーとの対話を通じて署名を取得します。この署名プロセスは、MetaMaskのポップアップまたはアプリ内の署名要求など、認証方法に応じて異なります。\n\n署名完了後、AAウォレットはUserOperationをBundlersに送信します。Bundlersは複数ユーザーの操作を収集し、ガスの使用を最適化して効率を高めます。操作をバッチ処理することで、Bundlersは1操作あたりのコストを大幅に削減できます。\n\n### 実行フェーズ\nBundlerが十分な操作を収集するか、一定の時間閾値に達すると、最終段階が行われます。BundlerはUserOperationsをまとめてEntryPointコントラクトを呼び出すトランザクションを作成し、EntryPointは各操作を順次処理します。\n\n各操作に対して、EntryPointは署名を検証し、ガス要件が満たされていることを確認します(ユーザーのウォレット残高またはPaymaster経由)。その後、ユーザーのContract Accountを呼び出し、実際のトランザクションロジックを実行します。Paymasterが関与している場合、設定された戦略に基づいてガスの支払いを処理します。\n\nこのマルチステッププロセスはユーザーには透明で、最終的には通常のトランザクションと同様に処理・確認されますが、より柔軟でコスト効率の高い方法となります。\n\n### 管理コンポーネント\n開発者はAAプラットフォームを通じてガススポンサーシップのポリシーを管理できます。ここでは支払い戦略の設定、日次またはユーザーごとのクォータ設定、使用パターンの監視が可能です。この管理レイヤーにより、経済的に持続可能で優れたユーザー体験を提供できます。\n\n\n \n*図3:AAプラットフォームのポリシー設定ダッシュボード*\n\nまた、NEROオペレーターはプラットフォームレベルの設定にアクセスでき、全体的なシステムの健全性管理や公平なリソース配分を確保できます。\n\n## Paymasterの支払いタイプとユーザー体験\n\nPaymasterシステムは、NEROチェーンの最も革新的な機能の1つであり、柔軟なガス支払いメカニズムを実現し、ユーザー体験を大幅に向上させます。ここでは、異なる支払いタイプとその影響について説明します。\n\n### タイプ0:開発者スポンサー型ガス(無料)\n\nタイプ0の支払いでは、開発者がユーザーのガス代を完全にカバーします。これにより、ユーザーはWeb2アプリケーションと同じように、トランザクション手数料を気にする必要がなくなり、シームレスな体験を得ることができます。\n\nこのモデルは、特に新規ユーザーのオンボーディングに適しています。通常、新しいユーザーが特定のトークンを取得する必要があると、参入障壁が高くなります。しかし、最初のインタラクション時にガス代を開発者が負担することで、スムーズにアプリケーションを利用できるようになります。\n\nまた、プロモーションキャンペーンにも適しており、一時的にトランザクションコストをゼロにすることでユーザーの関心を集めることができます。特に、ゲームやメタバースアプリケーションでは、ブロックチェーンの複雑さを隠し、ユーザーがガス管理ではなくゲームプレイに集中できる環境を作るのに役立ちます。\n\nタイプ0の支払いを実装するには、開発者はAAプラットフォームアカウントに一定の残高を維持し、日次またはユーザーごとの制限を設定してコストを管理します。プラットフォームは、ユーザーの行動やコンバージョン指標を基にスポンサー戦略を最適化するための分析機能を提供します。\n\n### タイプ1:ERC20トークン前払い\n\nタイプ1の支払いモデルでは、ユーザーがNEROトークンを保有する必要なく、すでに所有しているERC20トークンを使用してガス料金を支払うことができます。これにより、特に独自のトークンエコシステムを持つアプリケーションにおいて、採用障壁が大幅に低下します。\n\nこのモデルでは、トランザクションの実行前に推定されるガス代(選択されたトークンでの換算額)をユーザーから徴収します。トランザクション完了後、余剰分が自動的にユーザーに返金されます。\n\nこの方法は、ユーザーと開発者の双方にとってメリットがあります。ユーザーは最大の支払額を事前に把握でき、開発者は実行前に支払いが確定しているため、リスクを最小限に抑えることができます。特に、ガス代が全体のトランザクション価値のごく一部である高額取引に適しています。\n\nこのモデルの実装には、ユーザーがPaymasterコントラクトにトークン使用許可を与える必要があります。これは通常、ウォレットSDKを通じて適切なUIガイド付きで処理されます。\n\n### タイプ2:ERC20トークン後払い\n\nタイプ2の支払いモデルでもERC20トークンが使用されますが、ガス料金の徴収はトランザクション実行後に行われます。これにより、ユーザーは実際に消費したガス量のみを支払うことができ、事前に推定額を用意する必要がなくなります。\n\n特に、コントラクトの実行パスによってガスコストが大きく変動する可能性があるトランザクションにおいて、このアプローチは非常に便利です。しかし、このモデルでは、トランザクション完了後にユーザーのトークン残高や許可が不足していると、支払いが失敗するリスクが発生します。\n\nこのモデルは、ユーザーが他の目的で一定量のトークンを保有しているアプリケーションと統合することで、支払い失敗リスクを最小限に抑えることができます。\n\n## 高度なアプリケーションの構築\n\nNEROチェーンのアーキテクチャを活用することで、これまでにないアプリケーションを開発できます。以下は、その一例です。\n\n**トークン中心のエコシステム**: ユーザーがアプリケーションのトークンでガスを支払えるようにすることで、トークンエコノミー内で完結するシステムを構築できます。これにより、トークンの実用性と需要が向上し、ユーザー体験もシンプルになります。\n\n**摩擦のないオンボーディング**: 最初は開発者がガスをスポンサーし、ユーザーがアプリに慣れた後にトークンでの支払いに移行することで、Web3特有の「暗号資産の取得」という障壁を取り除くことができます。\n\n**バンドルトランザクション**: ユーザーが1回の操作で複数のアクションを実行できるようにすることで(例:トークンスワップと承認、NFTの一括ミント)、コスト削減とUXの向上を実現します。\n\n**高度なセキュリティ機能**: マルチシグ承認、支出制限、タイムロックなどの機能を簡単に実装できます。スマートコントラクトウォレットを活用することで、従来のEOAよりも強固なセキュリティを提供できます。\n\n**ソーシャルリカバリーシステム**: 信頼できる友人やサービスプロバイダーを通じたアカウント回復メカニズムを実装できます。これにより、秘密鍵の紛失による資産喪失のリスクを軽減できます。\n\n**サブスクリプションモデル**: 従来のサブスクリプション型アプリと同様に、定期的な支払いを自動処理できます。Paymasterは、これらの事前承認されたトランザクションのガス代を処理できます。\n\nNEROチェーンの機能を十分に理解し活用することで、ブロックチェーンのセキュリティと所有権のメリットを活かしつつ、従来のUXの課題を克服したアプリケーションを開発できます。\n\n次のセクションでは、これらのコンポーネントをアプリケーションに実装する具体的な方法を解説します。"} {"url":"https://docs.nerochain.io/ja","locale":"ja","section":"","title":"NERO Chainドキュメントへようこそ","summary":"NERO Chainテクノロジー、エコシステム、開発に関する決定的なリファレンスへようこそ。アプリケーションを構築する開発者、ノードを運用するオペレーター、アーキテクチャを探求する研究者、またはブロックチェーンを始めたばかりの方でも、このドキュメントはNERO Chainの独自機能を理解し活用するのに役立ちます。","headings":["# NERO Chainドキュメントへようこそ","## ビルダージャーニー","## クイックスタートガイド","## 人気の開発ガイド","## アカウント抽象化技術","## 必須ツール","## 技術リソース","## NERO Chainについて"],"tokens":4337,"markdown":"NERO Chainテクノロジー、エコシステム、開発に関する決定的なリファレンスへようこそ。アプリケーションを構築する開発者、ノードを運用するオペレーター、アーキテクチャを探求する研究者、またはブロックチェーンを始めたばかりの方でも、このドキュメントはNERO Chainの独自機能を理解し活用するのに役立ちます。\n\n## ビルダージャーニー\n\n\n dAppデベロッパー\nNERO Chainのユニークな機能でdAppを構築する。
\n \n \n \n \n \n ノードオペレーター\nNERO ネットワークデプロイし、維持する。
\n \n \n \n \n \n 研究者・開発者\n技術アーキテクチャとプロトコルの詳細を探る。
\n \n \n \n\n## クイックスタートガイド\n\n\n \n 開発者ツール\nNERO Chainの独自機能を理解します。
\n \n \n \n \n 開発者クックブック\nNERO Chainでの構築に役立つ実践的なレシピ。
\n \n \n \n \n FAQ\nよくある課題とその解決策。
\n \n\n## 人気の開発ガイド\n\n\n \n 初回スマコンデプロイ\nNERO Chainにスマートコントラクトをデプロイします。
\n \n \n \n \n 初めてのdAppを構築\nNFTミンティングdAppを作成します。
\n \n \n \n \n ペイマスターを統合\nガススポンサーシップとトークン支払いを有効にします。
\n \n\n## アカウント抽象化技術\n\n\n \n UserOp SDK\nJavaScript SDKを使用してUserOperationを作成・送信します。
\n \n \n \n \n AAウォレット統合\nアプリケーションにスマートコントラクトウォレットを実装します。
\n \n \n \n \n AAプラットフォーム\nガススポンサーシップポリシーと支払い戦略を管理します。
\n \n\n## 必須ツール\n\n\n \n NEROフォーセット\n開発のためのテストネットNEROトークンを入手します。
\n \n \n \n \n NEROエクスプローラー\nトランザクションとブロックを検索・表示します。
\n \n \n \n \n ペイマスターアクセス\nガススポンサーシップと支払いポリシーを管理します。
\n \n\n## 技術リソース\n\n\n \n ネットワーク情報\nNERO ChainのRPCエンドポイントとチェーンIDを参照します。
\n \n \n \n \n GitHubリポジトリ\nオープンソースのコードとSDKにアクセスします。
\n \n\n \n \n サポート\n開発者サポートとコミュニティリソースを利用します。
\n \n\n## NERO Chainについて\n\nモジュラーブロックチェーンとして構築されたNERO Chainは、インフラレベルの価値キャプチャよりもアプリケーションに価値を提供することを重視しています。NERO Chainは、dAppがトランザクション価値を収集・共有できるようにすることで、従来のブロックチェーン経済を変革し、アプリケーションの成功が基盤ネットワークだけでなく、その開発者とユーザーにも利益をもたらすことを保証します。完全なEVM互換性と高性能な決済レイヤーを備えたNEROは、ネイティブアカウント抽象化、ペイマスター駆動のガススポンサーシップ、そして開発者にシームレスな体験を提供するBlockspace 2.0などの最新技術を含む、驚異的なスケーラビリティと柔軟性を提供します。"} {"url":"https://docs.nerochain.io/ja/node-validators/commandLineOptions","locale":"ja","section":"node-validators","title":"コマンドラインオプション","summary":"Gethは主にコマンドラインを使用して制御されます。Gethはgethコマンドを使用して開始します。Ctrl+Cキーを押すと停止します。","headings":["# コマンドラインオプション","## コマンド"],"tokens":7502,"markdown":"Gethは主にコマンドラインを使用して制御されます。Gethはgethコマンドを使用して開始します。Ctrl+Cキーを押すと停止します。\n\nコマンドラインオプション(別名フラグ)を使用してGethを設定できます。Gethにはサブコマンドもあり、コンソールやブロックチェーンのインポート/エクスポートなどの機能を呼び出すために使用できます。\n\n便宜のために、コマンドラインヘルプの一覧を以下に再現しています。同じ情報は、いつでも以下を実行することでGethインスタンスから取得できます:\n\n```\ngeth --help\n```\n\n## コマンド\n\n```shell showLineNumbers{1}\nNAME:\n geth - the go-ethereum command line interface\n\nUSAGE:\n geth [global options] command [command options] [arguments...]\n\nVERSION:\n 1.13.1-stable-3f40e65c\n\nCOMMANDS:\n account Manage accounts\n attach Start an interactive JavaScript environment (connect to node)\n console Start an interactive JavaScript environment\n db Low level database operations\n dump Dump a specific block from storage\n dumpconfig Export configuration values in a TOML format\n dumpgenesis Dumps genesis block JSON configuration to stdout\n export Export blockchain into file\n export-preimages Export the preimage database into an RLP stream\n import-preimages Import the preimage database from an RLP stream\n init Bootstrap and initialize a new genesis block\n js (DEPRECATED) Execute the specified JavaScript files\n license Display license information\n removedb Remove blockchain and state databases\n show-deprecated-flags Show flags that have been deprecated\n snapshot A set of commands based on the snapshot\n verkle A set of experimental verkle tree management commands\n version Print version numbers\n version-check Checks (online) for known Geth security vulnerabilities\n wallet Manage Ethereum presale wallets\n help, h Shows a list of commands or help for one command\n\nGLOBAL OPTIONS:\n\n --log.rotate (default: false) ($GETH_LOG_ROTATE)\n Enables log file rotation\n\n ACCOUNT\n\n --allow-insecure-unlock (default: false) ($GETH_ALLOW_INSECURE_UNLOCK)\n Allow insecure account unlocking when account-related RPCs are exposed by http\n\n --keystore value ($GETH_KEYSTORE)\n Directory for the keystore (default = inside the datadir)\n\n --lightkdf (default: false) ($GETH_LIGHTKDF)\n Reduce key-derivation RAM & CPU usage at some expense of KDF strength\n\n --password value ($GETH_PASSWORD)\n Password file to use for non-interactive password input\n\n --pcscdpath value (default: \"/run/pcscd/pcscd.comm\") ($GETH_PCSCDPATH)\n Path to the smartcard daemon (pcscd) socket file\n\n --signer value ($GETH_SIGNER)\n External signer (url or path to ipc file)\n\n --unlock value ($GETH_UNLOCK)\n Comma separated list of accounts to unlock\n\n --usb (default: false) ($GETH_USB)\n Enable monitoring and management of USB hardware wallets\n\n ALIASED (deprecated)\n\n --cache.trie.journal value ($GETH_CACHE_TRIE_JOURNAL)\n Disk journal directory for trie cache to survive node restarts\n\n --cache.trie.rejournal value (default: 0s) ($GETH_CACHE_TRIE_REJOURNAL)\n Time interval to regenerate the trie cache journal\n\n --nousb (default: false) ($GETH_NOUSB)\n Disables monitoring for and managing USB hardware wallets (deprecated)\n\n --txlookuplimit value (default: 2350000) ($GETH_TXLOOKUPLIMIT)\n Number of recent blocks to maintain transactions index for (default = about one\n year, 0 = entire chain) (deprecated, use history.transactions instead)\n\n --v5disc (default: false) ($GETH_V5DISC)\n Enables the experimental RLPx V5 (Topic Discovery) mechanism (deprecated, use\n --discv5 instead)\n\n --whitelist value ($GETH_WHITELIST)\n Comma separated block number-to-hash mappings to enforce (図1: npx hardhat
\n\n## スマートコントラクトの作成\n\ncontractsディレクトリを作成(まだ作成されていない場合)し、スマートコントラクトファイルを追加します:\n\n```bash\nmkdir -p contracts\n```\n\n独自のスマートコントラクトを作成するか、[Openzeppelinトークンスマートコントラクト](https://github.com/OpenZeppelin/openzeppelin-contracts/blob/master/contracts/token/ERC20/ERC20.sol)などのテンプレートを使用できます。\n\n以下は使用可能なシンプルなサンプルコントラクトです:\n\n```solidity\n// SPDX-License-Identifier: MIT\npragma solidity ^0.8.17;\n\ncontract HelloWorld {\n string private greeting = \"Hello, NERO Chain!\";\n\n function setGreeting(string calldata _greet) public {\n greeting = _greet;\n }\n\n function getGreeting() public view returns (string memory) {\n return greeting;\n }\n}\n```\n\n## NEROチェーン用のHardhat設定\n\nプロジェクトのルートに`.env`ファイルを作成し、以下の変数を設定します:\n\n```\nNERO_TESTNET_PROVIDER_URL=https://rpc-testnet.nerochain.io\nPRIVATE_KEY=あなたの秘密鍵をここに入力\nAPI_KEY=dummy\n```\n\n次に、Hardhat設定ファイルを更新します:\n\n**hardhat.config.js:**\n\n```javascript \n require(\"@nomicfoundation/hardhat-toolbox\");\n require(\"@nomicfoundation/hardhat-ignition-ethers\");\n require(\"dotenv\").config();\n const { vars } = require(\"hardhat/config\");\n\n const NERO_TESTNET_PROVIDER_URL = process.env.NERO_TESTNET_PROVIDER_URL || vars.get(\"NERO_TESTNET_PROVIDER_URL\");\n const PRIVATE_KEY = process.env.PRIVATE_KEY || vars.get(\"PRIVATE_KEY\");\n const API_KEY = process.env.API_KEY || vars.get(\"API_KEY\");\n\n module.exports = {\n solidity: \"0.8.24\",\n defaultNetwork: \"nero_testnet\",\n networks: {\n nero_testnet: {\n url: NERO_TESTNET_PROVIDER_URL,\n accounts: [PRIVATE_KEY],\n chainId: 689\n },\n },\n etherscan: {\n apiKey: API_KEY,\n customChains: [\n {\n network: \"nero_testnet\",\n chainId: 689,\n urls: {\n apiURL: \"https://api-testnet.neroscan.io/api\",\n browserURL: \"https://testnet.neroscan.io\",\n },\n },\n ],\n enabled: true\n },\n };\n ```\n\n**hardhat.config.ts:**\n\n```typescript\n\n dotenv.config();\n\n const NERO_TESTNET_PROVIDER_URL = process.env.NERO_TESTNET_PROVIDER_URL || vars.get(\"NERO_TESTNET_PROVIDER_URL\");\n const PRIVATE_KEY = process.env.PRIVATE_KEY || vars.get(\"PRIVATE_KEY\");\n const API_KEY = process.env.API_KEY || vars.get(\"API_KEY\");\n\n const config: HardhatUserConfig = {\n solidity: \"0.8.24\",\n defaultNetwork: \"nero_testnet\",\n networks: {\n nero_testnet: {\n url: NERO_TESTNET_PROVIDER_URL,\n accounts: [PRIVATE_KEY],\n chainId: 689\n },\n },\n etherscan: {\n apiKey: API_KEY,\n customChains: [\n {\n network: \"nero_testnet\",\n chainId: 689,\n urls: {\n apiURL: \"https://api-testnet.neroscan.io/api\",\n browserURL: \"https://testnet.neroscan.io\",\n },\n },\n ],\n enabled: true\n },\n };\n export default config;\n ```\n\n## スマートコントラクトのデプロイ\n\nコントラクトのデプロイには、デプロイメントスクリプトまたはHardhat Ignitionを使用できます。\n\n### オプション1: デプロイメントスクリプトを使用\n\nscriptsディレクトリを作成し、デプロイメントスクリプトを追加します:\n\n```bash\nmkdir -p scripts\n```\n\n`scripts/deploy.js`ファイルを作成して以下の内容を入力します:\n\n```javascript\nasync function main() {\n const HelloWorld = await ethers.getContractFactory(\"HelloWorld\");\n const contract = await HelloWorld.deploy();\n await contract.waitForDeployment();\n console.log(\"HelloWorld deployed to:\", await contract.getAddress());\n}\n\nmain().catch((error) => {\n console.error(error);\n process.exitCode = 1;\n});\n```\n\n次のコマンドでデプロイします:\n\n```bash\nnpx hardhat run scripts/deploy.js --network nero_testnet\n```\n\n### オプション2: Hardhat Ignitionを使用\n\nより複雑なデプロイメントには、Hardhat Ignitionを使用できます:\n\n1. ignitionモジュールディレクトリを作成します:\n```bash\nmkdir -p ignition/modules\n```\n\n2. デプロイメントモジュールファイル(例:`ignition/modules/deploy-hello-world.js`)を作成します:\n\n```javascript\nconst { buildModule } = require(\"@nomicfoundation/hardhat-ignition/modules\");\n\nmodule.exports = buildModule(\"HelloWorldModule\", (m) => {\n const helloWorld = m.contract(\"HelloWorld\");\n return { helloWorld };\n});\n```\n\n3. Ignitionでデプロイします:\n```bash\nnpx hardhat ignition deploy ./ignition/modules/deploy-hello-world.js --network nero_testnet\n```\n\n4. 出力からデプロイされたコントラクトアドレスを保存します。\n\n## スマートコントラクトの検証\n\nコントラクトをデプロイした後、NEROチェーンエクスプローラー上でソースコードを公開するために検証します:\n\n```bash\nnpx hardhat verify --network nero_testnet デプロイされたコントラクトアドレス\n```\n\n「デプロイされたコントラクトアドレス」は実際のデプロイされたコントラクトアドレスに置き換えてください。\n\n### 検証のトラブルシューティング\n\n1. 検証に失敗する場合は、Solidityコンパイラのバージョンが完全に一致していることを確認します\n2. コントラクトがフラット化されたファイルに含まれていないライブラリや依存関係を使用していないか確認します\n3. コンストラクタ引数を使用している場合は、検証コマンドで正しく提供されていることを確認します:\n ```bash\n npx hardhat verify --network nero_testnet デプロイされたコントラクトアドレス \"コンストラクタ引数1\" \"コンストラクタ引数2\"\n ```\n\n## 結論\n\nデプロイと検証が完了したら、[テストネットエクスプローラー](https://testnet.neroscan.io/)でコントラクトを確認できます。\n\n\n図2: NEROテストネットスキャン
\n\nおめでとうございます!スマートコントラクトのデプロイと検証に成功しました。このチュートリアルではテストネットを使用しましたが、RPCエンドポイントとネットワーク設定を更新することで、メインネットでも同じプロセスを使用できます。"} {"url":"https://docs.nerochain.io/ja/tutorials/first-contract/using-remix","locale":"ja","section":"tutorials","title":"NEROチェーンでRemixを使用した初めてのコントラクトのデプロイ","summary":"このチュートリアルでは、Remix IDEを使用してNEROチェーン上にスマートコントラクトを作成してデプロイするプロセスを説明します。Remixは人気のあるブラウザベースの開発環境で、セットアップが不要なため、初心者に最適です。","headings":["# NEROチェーンでRemixを使用した初めてのコントラクトのデプロイ","## 前提条件","## 環境のセットアップ","### 1. ウォレットをNEROチェーンに接続する","### 2. Remix IDEを開く","## シンプルなスマートコントラクトの作成","### 1. 新しいファイルを作成","### 2. スマートコントラクトを書く","## コントラクトのコンパイル","### 1. コンパイラタブに移動","### 2. コンパイラバージョンの選択","### 3. コントラクトのコンパイル","## コントラクトのデプロイ","### 1. デプロイタブに移動","### 2. 環境の設定","### 3. コントラクトのデプロイ","## デプロイされたコントラクトとの対話","### 挨拶の読み取り","### 挨拶の更新","## ブロックエクスプローラーでのコントラクトの検証","## 一般的な問題のトラブルシューティング","### トランザクションの失敗","### 高いガス料金","### コンパイラエラー","## 高度なヒント","### ライブラリの使用","### コンストラクタ引数","### コントラクトサイズの制限","## 次のステップ"],"tokens":1162,"markdown":"このチュートリアルでは、Remix IDEを使用してNEROチェーン上にスマートコントラクトを作成してデプロイするプロセスを説明します。Remixは人気のあるブラウザベースの開発環境で、セットアップが不要なため、初心者に最適です。\n\n## 前提条件\n\n- ブラウザにインストールされたWeb3ウォレット(MetaMaskなど)\n- Solidityプログラミング言語の基本知識\n- ガス代用のNEROテストネットトークン([NEROフォーセット](https://app.testnet.nerochain.io/)から入手可能)\n\n## 環境のセットアップ\n\n### 1. ウォレットをNEROチェーンに接続する\n\n始める前に、NEROチェーンをMetaMaskウォレットに追加する必要があります:\n\n1. MetaMaskを開き、上部のネットワークドロップダウンをクリック\n2. 「ネットワークを追加」を選択 \n3. NEROテストネットの場合、以下の設定を使用:\n - ネットワーク名:`NEROテストネット`\n - RPC URL:`https://rpc-testnet.nerochain.io`\n - チェーンID:`689`\n - 通貨シンボル:`NERO`\n - ブロックエクスプローラーURL:`https://testnet.neroscan.io`\n\n\n\n### 2. Remix IDEを開く\n\nブラウザで[Remix IDE](https://remix.ethereum.org/)に移動します。\n\n## シンプルなスマートコントラクトの作成\n\nストレージ機能を持つシンプルな「Hello World」コントラクトを作成しましょう。\n\n### 1. 新しいファイルを作成\n\nRemixで:\n1. 左側のサイドバーにある「ファイルエクスプローラー」アイコンをクリック\n2. 「+」アイコンをクリックして新しいファイルを作成\n3. `HelloWorld.sol`という名前を付ける\n\n### 2. スマートコントラクトを書く\n\n以下のコードを新しいファイルにコピー&ペーストします:\n\n```solidity\n// SPDX-License-Identifier: MIT\npragma solidity ^0.8.17;\n\ncontract HelloWorld {\n string private greeting;\n \n constructor() {\n greeting = \"Hello, NERO Chain!\";\n }\n \n function setGreeting(string memory _greeting) public {\n greeting = _greeting;\n }\n \n function getGreeting() public view returns (string memory) {\n return greeting;\n }\n}\n```\n\nこのシンプルなコントラクトは:\n- 挨拶メッセージを保存する\n- 誰でも挨拶を更新できる\n- 現在の挨拶を取得する関数を提供する\n\n\n\n## コントラクトのコンパイル\n\n### 1. コンパイラタブに移動\n\n左側のサイドバーにある「Solidityコンパイラ」アイコン(2番目のアイコン)をクリックします。\n\n### 2. コンパイラバージョンの選択\n\npragmaステートメントに一致するコンパイラバージョンを選択します(この場合、0.8.17以上)。\n\n### 3. コントラクトのコンパイル\n\n「HelloWorld.solをコンパイル」ボタンをクリックします。成功すると、緑色のチェックマークが表示されます。\n\n\n\n## コントラクトのデプロイ\n\n### 1. デプロイタブに移動\n\n左側のサイドバーにある「デプロイ&実行トランザクション」アイコン(3番目のアイコン)をクリックします。\n\n### 2. 環境の設定\n\n1. 「環境」ドロップダウンから「Injected Provider - MetaMask」を選択\n2. MetaMaskが接続を促します - NEROテストネットに接続されていることを確認\n3. 「アカウント」フィールドにウォレットアドレスが表示されていることを確認\n\n### 3. コントラクトのデプロイ\n\n1. 「コントラクト」ドロップダウンで「HelloWorld」が選択されていることを確認\n2. 「デプロイ」ボタンをクリック\n3. MetaMaskがトランザクションの確認を求めます - ガス料金を確認して「確認」をクリック\n4. トランザクションがマイニングされるのを待ちます(NEROチェーンでは通常数秒かかります)\n\n\n\n## デプロイされたコントラクトとの対話\n\nデプロイ後、コントラクトは「デプロイされたコントラクト」セクションに表示されます。\n\n### 挨拶の読み取り\n\n1. 「デプロイされたコントラクト」セクションでコントラクトを展開\n2. 「getGreeting」関数を見つける(青いボタン、読み取り専用関数を示す)\n3. クリックして保存されている挨拶を取得\n\n### 挨拶の更新\n\n1. 「setGreeting」関数を見つける(オレンジ色のボタン、状態を変更することを示す)\n2. 入力フィールドに新しい挨拶メッセージを入力\n3. 「setGreeting」ボタンをクリック\n4. MetaMaskでトランザクションを確認\n5. トランザクションがマイニングされた後、再度「getGreeting」を呼び出して更新を確認\n\n\n\n## ブロックエクスプローラーでのコントラクトの検証\n\n他の人があなたのコントラクトと対話し、そのコードを表示できるようにするには、ブロックエクスプローラーでそれを検証する必要があります:\n\n1. Remixの「デプロイされたコントラクト」セクションからコントラクトアドレスをコピー\n2. [NEROチェーンエクスプローラー](https://testnet.neroscan.io)にアクセス\n3. 検索バーにコントラクトアドレスを貼り付け\n4. 「Contract」タブをクリック\n5. 「Verify and Publish」をクリック\n6. 必要な情報を入力:\n - コントラクト名:`HelloWorld`\n - コンパイラバージョン:使用したバージョン(例:`v0.8.17+commit.8df45f5f`)\n - オープンソースライセンスタイプ:`MIT License (MIT)`\n7. 「Enter the Solidity Contract Code」フィールドに、コントラクトコード全体を貼り付け\n8. 「Verify and Publish」をクリック\n\n検証後、ユーザーはエクスプローラーから直接あなたのコントラクトコードを読み、対話することができます。\n\n## 一般的な問題のトラブルシューティング\n\n### トランザクションの失敗\n\nデプロイトランザクションが失敗する場合、以下を確認してください:\n- ガス代のために十分なNEROトークンがありますか?\n- MetaMaskはNEROチェーンに接続されていますか?\n- コントラクトコードにエラーはありませんか?\n\n### 高いガス料金\n\nNEROチェーンは比較的ガス料金が低いですが、高く感じる場合:\n- 正しいネットワークに接続されているか確認\n- 混雑していない時間に試す\n\n### コンパイラエラー\n\nコンパイラエラーが発生した場合:\n- Solidityバージョンが互換性があることを確認(0.8.0以上を推奨)\n- 構文エラーがないか確認\n- NEROチェーンで利用できないかもしれないイーサリアム固有の関数への参照がないか確認\n\n## 高度なヒント\n\n### ライブラリの使用\n\n外部ライブラリを使用する場合:\n1. importステートメントを使ってそれらをインポート\n2. NEROチェーンと互換性があることを確認\n\n```solidity\n// OpenZeppelinのERC20コントラクトをインポートする例\n\n```\n\n### コンストラクタ引数\n\nコントラクトがコンストラクタ引数を必要とする場合:\n1. 「デプロイ」ボタンの横のフィールドにそれらを入力\n2. 複数の引数はカンマで区切る\n\n### コントラクトサイズの制限\n\nNEROチェーンは、イーサリアムと同様に、最大コントラクトサイズ制限があります。コントラクトが大きすぎる場合:\n- 複数のコントラクトに分割\n- コードを最適化\n- コードを再利用するためにライブラリを使用\n\n## 次のステップ\n\n最初のコントラクトをデプロイしたので、次のことを学ぶことができます:\n\n1. [NEROチェーン上のアカウント抽象化](https://docs.nerochain.io/ja/tutorials/low-level/aa-wallet-integration)について学ぶ\n2. ガスレストランザクションのための[Paymasterインテグレーション](https://docs.nerochain.io/ja/tutorials/low-level/paymaster-integration)を探る\n3. [Reactを使った完全なdApp](https://docs.nerochain.io/ja/tutorials/low-level/create-first-dapp)を構築する\n4. より複雑なプロジェクトのために[Hardhat](https://docs.nerochain.io/ja/tutorials/low-level/first-contract/using-hardhat)を使ったデプロイを試す\n5. [クイックビルディング](https://docs.nerochain.io/ja/tutorials/high-level/building-blocks) 用のハイレベルテンプレートを試してみてください。"} {"url":"https://docs.nerochain.io/ja/tutorials/first-contract/verifyExplorer","locale":"ja","section":"tutorials","title":"NEROエクスプローラーを通じたスマートコントラクトの検証","summary":"このガイドでは、NEROチェーンテストネット上のスマートコントラクトをブロックエクスプローラーインターフェースで検証するプロセスについて説明します。コントラクト検証により、ソースコードが公開され、ユーザーはエクスプローラーから直接コントラクトとやり取りできるようになります。","headings":["# NEROエクスプローラーを通じたスマートコントラクトの検証","## 前提条件","## ステップ1: NEROチェーンエクスプローラーへのアクセス","## ステップ2: コントラクトの検索","## ステップ3: 検証ページへのアクセス","## ステップ4: コントラクト情報の入力","## ステップ5: 検証の完了","## 次のステップ"],"tokens":387,"markdown":"このガイドでは、NEROチェーンテストネット上のスマートコントラクトをブロックエクスプローラーインターフェースで検証するプロセスについて説明します。コントラクト検証により、ソースコードが公開され、ユーザーはエクスプローラーから直接コントラクトとやり取りできるようになります。\n\n## 前提条件\n\n- NEROチェーン上にデプロイされたスマートコントラクト\n- コントラクトのソースコード\n- コントラクトのデプロイアドレス\n- デプロイパラメータ(コンパイラバージョン、最適化設定など)\n\n## ステップ1: NEROチェーンエクスプローラーへのアクセス\n\nWebブラウザで[NEROテストネットエクスプローラー](https://testnet.neroscan.io/)にアクセスします。\n\n## ステップ2: コントラクトの検索\n\nエクスプローラーページ上部の検索ボックスにコントラクトのデプロイアドレスを入力します。\n\n\n図3: アドレスによるコントラクトの検索
\n\n## ステップ3: 検証ページへのアクセス\n\nコントラクト詳細ページで「Verify and Publish」ボタンを見つけてクリックします。\n\n\n図4: 検証オプション付きのコントラクト詳細ページ
\n\n## ステップ4: コントラクト情報の入力\n\n検証フォームにコントラクトの詳細を入力します:\n\n1. **コントラクト名**: 正確なコントラクト名を入力\n2. **コンパイラバージョン**: デプロイ時に使用したバージョンを選択\n3. **最適化**: デプロイ設定と一致させる\n4. **ソースコード**: 完全なコントラクトソースコードを貼り付け\n5. **コンストラクタ引数**: ABIエンコードされたコンストラクタ引数を入力(該当する場合)\n\n\n図5: コントラクト検証フォーム
\n\n\n図6: 詳細なコントラクト検証設定
\n\n## ステップ5: 検証の完了\n\n「Verify and Publish」ボタンをクリックして情報を送信します。成功すると、コントラクトのソースコードがエクスプローラー上で公開されます。\n\n## 次のステップ\n\n検証が完了すると、ユーザーは以下のことができるようになります:\n- コントラクトのソースコードを読む\n- エクスプローラーインターフェースから直接コントラクトとやり取りする\n- コントラクトのセキュリティと機能性に対する信頼性が向上する\n\nプログラムによる検証オプションについては、[Hardhat検証ガイド](https://docs.nerochain.io/ja/tutorials/first-contract/using-hardhat)を参照してください。"} {"url":"https://docs.nerochain.io/ja/tutorials/high-level/building-blocks","locale":"ja","section":"tutorials","title":"クイック・ビルディングブロック","summary":"このガイドでは、次のセクションで紹介する NERO Wallet dApp の拡張における設計選択と実装の詳細について説明します。本ガイドは、チュートリアルであると同時に、アカウント抽象化(Account Abstraction)の概念を理解するための解説資料でもあります。","headings":["# クイック・ビルディングブロック","## アカウント抽象化とは?","## User Operation(UserOp)の理解","## 書き込み操作における UserOps の利用","## 読み取り操作におけるダイレクトRPCの使用","## The NERO Wallet Configuration","### 1. Web3Auth 統合","### 2. コンフィグレーションコンテキスト","### 3. スマートコントラクトとのやり取り","## NERO Wallet の AA機能を最大限に活用するには","### 1. ガス代のスポンサー機能","### 2. Social Login","### 3. Transaction Batching","## NERO Wallet 開発におけるベストプラクティス","## 今後の拡張アイデア","## Conclusion"],"tokens":1066,"markdown":"このガイドでは、次のセクションで紹介する NERO Wallet dApp の拡張における設計選択と実装の詳細について説明します。本ガイドは、チュートリアルであると同時に、アカウント抽象化(Account Abstraction)の概念を理解するための解説資料でもあります。\n\n## アカウント抽象化とは?\n\nアカウント抽象化(AA)とは、スマートコントラクトウォレットを、通常のユーザーアカウントのように動作させつつ、より高度な機能を持たせることを可能にする仕組みです。\n従来のEOA(Externally Owned Account)ウォレットは秘密鍵に依存していますが、AAウォレットはスマートコントラクトを利用してトランザクションを処理します。これにより、以下のような機能が実現できます:\n\n- マルチシグ認証\n- ガス代スポンサー(ユーザーがトークンを持たなくてもOK)\n- トランザクションのバッチ処理\n- アカウント復元メカニズム\n- プログラム可能なセキュリティルール\n\n## User Operation(UserOp)の理解\n\nNERO Wallet の実装では、ERC-4337標準に基づいてUser Operation(UserOp)という概念を導入しています。これは通常のトランザクションとは異なります:\n\n1. 通常のトランザクション:ブロックチェーンに直接送信され、送信者がガス代を支払う必要があります\n\n2. User Operation:専用のメモリプールに送信され、Bundler や Paymaster といったインフラによって処理されます\n\nUserOp の処理フローは以下のようになります:\n\n```\nUser → UserOp → Bundler → EntryPoint Contract → Smart Contract Wallet (AA) → Target Contract\n```\n\nそれぞれの役割は:\n\n- **Bundler**:UserOp を集めてブロックチェーンに送信\n- **Paymaster**:ユーザーの代わりにガス代を負担\n- **EntryPoint Contract**:UserOp を検証・実行する中心的なコントラクト\n\n## 書き込み操作における UserOps の利用\n\n以下の例は、高レベルテンプレートの useSendUserOp を用いた書き込み操作の方法です:\n\n```js\nawait execute({\n function: 'mint',\n contractAddress: FREE_NFT_ADDRESS,\n abi: NERO_NFT_ABI,\n params: [AAaddress, nftImageUrl],\n value: 0,\n});\n```\n\n**UserOp を使うメリット**:\n\n1. **ガスの抽象化**: ユーザーがガストークンを持っていなくても操作可能\n2. **バッチ処理**: 複数の操作を一括で実行できる\n3. **署名の抽象化**: 秘密鍵の代わりにソーシャルログインが利用可能\n4. **UX向上**: ユーザーにとって分かりやすく、簡単に操作できる\n\n## 読み取り操作におけるダイレクトRPCの使用\n\n読み取り操作は、「バニラスタイル」でシンプルにブロックチェーンから情報を取得できます。\n\n```js\nconst provider = new ethers.providers.JsonRpcProvider(config.rpcUrl);\nconst nftContract = new ethers.Contract(FREE_NFT_ADDRESS, NERO_NFT_ABI, provider);\nconst balance = await nftContract.balanceOf(AAaddress);\n```\n\n**Direct RPC を使うメリット**:\n\n1. **効率的**: 読み取り専用操作にUserOpは不要\n2. **無料**: 読み取りはガス代がかからない\n3. **高速**: BundlerやPaymasterを経由しないため速い\n4. **シンプル**: 実装やデバッグが簡単\n\n## The NERO Wallet Configuration\n\nThe NERO Wallet leverages several key components for configuration:\n\n### 1. Web3Auth 統合\n\nソーシャルログイン機能のために Web3Auth を利用しており、GoogleやFacebookなどのアカウントでログイン可能です。秘密鍵の管理が不要になります。\n\n```js\n// From nerowallet.config.ts\nweb3auth: {\n clientId: import.meta.env.VITE_TESTNET_WEB3AUTH_ID ?? '',\n network: 'testnet',\n uiConfig: {\n appName: 'NERO',\n // ... other config\n },\n loginConfig: {\n google: {\n // ... google config\n },\n facebook: {\n // ... facebook config\n }\n }\n}\n```\n\n### 2. コンフィグレーションコンテキスト\n\nチェーン情報やRPC URL、コントラクトアドレスなどを一元管理するための設定コンテキストを使用しています。これにより、テストネット/メインネットどちらでも動作させることが可能です。\n\n```js\nconst config = useConfig(); // Access RPC URL, chain info, etc.\n```\n\n### 3. スマートコントラクトとのやり取り\n\nウォレットは以下の2つの方法でスマートコントラクトと通信します:\n\n**書き込み操作:useSendUserOp フックを使用**:\n\n```js\nconst { execute, waitForUserOpResult } = useSendUserOp();\nawait execute({/* operation details */});\nconst result = await waitForUserOpResult();\n```\n\n**読み取り操作:ethers.js を直接使用**:\n\n```js\nconst provider = new ethers.providers.JsonRpcProvider(config.rpcUrl);\nconst contract = new ethers.Contract(address, abi, provider);\nconst data = await contract.someReadFunction();\n```\n\n## NERO Wallet の AA機能を最大限に活用するには\n\n### 1. ガス代のスポンサー機能\n\nPaymaster がガス代をユーザーの代わりに支払う設定になっており、NEROトークンを持っていないユーザーでもトランザクションを実行できます。\n\n```js\naa: {\n bundler: 'https://bundler-testnet.nerochain.io/',\n paymaster: 'https://paymaster-testnet.nerochain.io',\n paymasterAPIKey: 'YOUR_API_KEY_HERE',\n},\n```\n\n### 2. Social Login\n\nWeb3Auth の統合により、秘密鍵を使わずにソーシャルログインが可能です。\n\n```js\nloginConfig: {\n google: {\n name: 'google',\n verifier: 'NeroTest-Google-Maintest',\n typeOfLogin: 'google',\n clientId: import.meta.env.VITE_GOOGLE_CLIENT_ID,\n },\n // ...other login methods\n}\n```\n\n### 3. Transaction Batching\n\n今回の例では未実装ですが、NERO Walletは複数の操作を1つのトランザクションにまとめるバッチ処理もサポートしています。\n\n## NERO Wallet 開発におけるベストプラクティス\n\n1.**書き込み操作にはUserOpを使う**:状態を変更する操作はUserOpを使用\n2.**読み取り操作にはRPCを使う**:UserOpを使わず効率よく読み取り\n3.**エラー処理を丁寧に**:わかりやすいエラーメッセージとフォールバック処理を用意\n4.**モバイルUI最適化**:多くのユーザーがモバイルからアクセスします\n5.**ユーザーデータの安全管理**:localStorageなどに機密情報を保存しない\n6.**複数ネットワークでのテスト**:テストネットとメインネット両方で動作確認を行う\n\n## 今後の拡張アイデア\n\n1.**マルチ送金機能**:複数の宛先に一括送金\n2.**NFTメタデータのIPFS保存**:より分散的な管理を実現\n3.**複数NFTの同時ミント**:バッチミント機能\n4.**WalletConnect対応**:ハードウェアウォレット接続のサポート\n6.**トランザクション履歴**:ユーザーが過去の操作履歴を確認可能に\n7.**トークンスワップ機能**:DEX機能の統合によるトークン交換\n\n## Conclusion\n\nNERO Walletの仕組みと実装の背景を理解することで、開発者はアカウント抽象化の機能を活かした強力なdAppを構築できます。この理解をもとに、次のセクションに進んで、各ステップの詳細を確認してみましょう。"} {"url":"https://docs.nerochain.io/ja/tutorials/high-level/high-level-quickstart","locale":"ja","section":"tutorials","title":"テンプレートからdAppへ:NEROウォレットテンプレートにNFT&トークン機能を追加","summary":"このチュートリアルでは、NERO WalletテンプレートにNFTミント、トークン作成、NFTギャラリー機能を追加する方法を解説します。最後まで完了すると、以下のような結果になるはずです。","headings":["# テンプレートからdAppへ:NEROウォレットテンプレートにNFT&トークン機能を追加","## 前提条件","## ステップ1:プロジェクト構成の理解","## ステップ2:HomePageコンポーネントを作成","## ステップ3:NERONFTのABIを定義","## ステップ4:Reactの状態とフックを設定","## ステップ5:タブ切り替え機能の実装","## ステップ6:トークンミント機能の実装","## ステップ7:NFTミント機能の実装","## ステップ8:Direct RPCによるNFTギャラリー機能","## ステップ9:UIの基本構造を作成","## ステップ10:各タブのUIとロジックの追加","### NFTミントタブ:名前、説明、画像URLを入力してNFTをミントします。","### トークン作成タブ:トークン名、シンボル、初期供給量を入力して作成します。","### NFTギャラリータブ:保有しているNFTをギャラリー形式で表示します。","## ステップ11:トランザクションステータスの表示","## ステップ12:HomePageコンポーネントのエクスポート","## ステップ13:`main.tsx` を更新","## ステップ14:`nerowallet.config.ts` を更新","## ステップ15:アプリケーションのテスト","## 覚えておくべきポイント"],"tokens":3909,"markdown":"このチュートリアルでは、NERO WalletテンプレートにNFTミント、トークン作成、NFTギャラリー機能を追加する方法を解説します。最後まで完了すると、以下のような結果になるはずです。\n\n\n \n \n*図1:NEROウォレットを使用したアプリケーション*\n\n## 前提条件\n\n1. `nero-aa-wallet` テンプレートを使用してプロジェクトを作成してください:\n```js\ngit clone https://github.com/nerochain/nero-aa-wallet\n```\n2. [AA-PlatformのAPIキーを用意してください.](https://docs.nerochain.io/en/developer-tools/aa-platform/getting-started).\n\n> ****注意****: この例ではソーシャルログインも有効化できます。Web3Authのサイトにアクセスして、GoogleやFacebookなどのプロバイダでClientIdを発行してください。\n\n## ステップ1:プロジェクト構成の理解\n\nまずは、プロジェクト構成を把握しましょう。\n\n```js\n├── nerowallet.config.ts # Wallet configuration with chain and API details\n├── src/\n│ ├── App.tsx # Main application component\n│ ├── Sample.tsx # Sample implementation with a single button\n│ ├── index.tsx # Entry point for React\n│ ├── main.tsx # Main rendering\n│ ├── abis/ # Contract ABIs\n│ ├── components/ # UI components\n│ ├── hooks/ # React hooks\n│ └── constants/ # Constants like ABIs\n```\n## ステップ2:HomePageコンポーネントを作成\n\n1. `src/HomePage.tsx` という新しいファイルを作成します。 . NFTミント、トークン作成、NFTギャラリーの3つのタブで構成します。\n\n2. 初期インポート文を追加します:\n\n```js\n\n// Import ABIs\n\n// Define contract addresses\nconst TOKEN_FACTORY_ADDRESS = '0x00ef47f5316A311870fe3F3431aA510C5c2c5a90';\nconst FREE_NFT_ADDRESS = '0x63f1f7c6a24294a874d7c8ea289e4624f84b48cb';\n```\n\n## ステップ3:NERONFTのABIを定義\n\nmint関数を含むNERONFTのABIを追加します。:\n\n```js\n// Define NERONFT ABI with the mint function\nconst NERO_NFT_ABI = [\n // Basic ERC721 functions from the standard ABI\n ...ERC721_ABI,\n // Add the mint function that exists in the NERONFT contract\n 'function mint(address to, string memory uri) returns (uint256)',\n 'function tokenURI(uint256 tokenId) view returns (string memory)',\n];\n```\n\n## ステップ4:Reactの状態とフックを設定\n\nウォレットの状態管理とhooksを導入して機能を構築していきます。:\n```js\nconst HomePage = () => {\n const [activeTab, setActiveTab] = useState('mint-nft');\n const { AAaddress, isConnected } = useSignature();\n const { execute, waitForUserOpResult } = useSendUserOp();\n const config = useConfig();\n const [isLoading, setIsLoading] = useState(false);\n const [userOpHash, setUserOpHash] = useState(null);\n const [txStatus, setTxStatus] = useState('');\n const [isPolling, setIsPolling] = useState(false);\n const [nfts, setNfts] = useState([]);\n \n // Form state\n const [tokenName, setTokenName] = useState('');\n const [tokenSymbol, setTokenSymbol] = useState('');\n const [tokenSupply, setTokenSupply] = useState('100000');\n const [nftName, setNftName] = useState('');\n const [nftDescription, setNftDescription] = useState('');\n const [nftImageUrl, setNftImageUrl] = useState('');\n```\n\n## ステップ5:タブ切り替え機能の実装\n\nアクティブなタブを切り替える関数を追加します:\n\n```js\n\n// Handle tab change\nconst handleTabChange = (tab) => {\n setActiveTab(tab);\n setTxStatus('');\n setUserOpHash(null);\n \n // If switching to NFT gallery, fetch the NFTs\n if (tab === 'nft-gallery' && isConnected) {\n fetchNFTs();\n }\n};\n```\n\n## ステップ6:トークンミント機能の実装\n\nERC20トークンを作成するための関数を追加します。 \n\n```js\n\n// Mint ERC20 token\nconst handleMintToken = async () => {\n if (!isConnected) {\n alert('Please connect your wallet first');\n return;\n }\n\n setIsLoading(true);\n setUserOpHash(null);\n setTxStatus('');\n\n try {\n // Call the createToken function on the token factory contract\n await execute({\n function: 'createToken',\n contractAddress: TOKEN_FACTORY_ADDRESS,\n abi: CreateTokenFactory.abi,\n params: [tokenName, tokenSymbol, tokenSupply],\n value: 0,\n });\n\n const result = await waitForUserOpResult();\n setUserOpHash(result.userOpHash);\n setIsPolling(true);\n\n if (result.result === true) {\n setTxStatus('Success!');\n setIsPolling(false);\n } else if (result.transactionHash) {\n setTxStatus('Transaction hash: ' + result.transactionHash);\n }\n } catch (error) {\n console.error('Error:', error);\n setTxStatus('An error occurred');\n } finally {\n setIsLoading(false);\n }\n};\n\n```\n\n## ステップ7:NFTミント機能の実装\n\nNFTをミントする機能を実装します。異なるコントラクトを呼び出す点に注意しましょう。\n```js\n// Mint NFT\nconst handleMintNFT = async () => {\n if (!isConnected) {\n alert('Please connect your wallet first');\n return;\n }\n\n if (!nftName || !nftImageUrl) {\n alert('Please provide a name and image URL for your NFT');\n return;\n }\n\n setIsLoading(true);\n setUserOpHash(null);\n setTxStatus('');\n\n try {\n // Create metadata JSON\n const metadataJson = JSON.stringify({\n name: nftName,\n description: nftDescription,\n image: nftImageUrl,\n attributes: []\n });\n\n // For this demo, we'll just use the image URL directly\n await execute({\n function: 'mint',\n contractAddress: FREE_NFT_ADDRESS,\n abi: NERO_NFT_ABI,\n params: [AAaddress, nftImageUrl],\n value: 0,\n });\n\n const result = await waitForUserOpResult();\n setUserOpHash(result.userOpHash);\n setIsPolling(true);\n\n if (result.result === true) {\n setTxStatus(`Success! NFT \"${nftName}\" minted!`);\n setIsPolling(false);\n // Reset form\n setNftName('');\n setNftDescription('');\n setNftImageUrl('');\n // Refresh NFT gallery after successful mint\n fetchNFTs();\n } else if (result.transactionHash) {\n setTxStatus('Transaction hash: ' + result.transactionHash);\n }\n } catch (error) {\n console.error('Error:', error);\n setTxStatus('An error occurred');\n } finally {\n setIsLoading(false);\n }\n};\n```\n\n## ステップ8:Direct RPCによるNFTギャラリー機能\n\nmintしたNFTを表示するために、RPCを使ってNFT情報を取得する機能を追加します。\n\n```js\n// Fetch NFTs for the gallery using direct RPC calls\nconst fetchNFTs = async () => {\n if (!isConnected || !AAaddress) return;\n\n try {\n setIsLoading(true);\n setNfts([]); // Clear existing NFTs while loading\n \n // Create a provider using the RPC URL from config\n const provider = new ethers.providers.JsonRpcProvider(config.rpcUrl);\n \n // Create a contract instance for the NFT contract\n const nftContract = new ethers.Contract(FREE_NFT_ADDRESS, NERO_NFT_ABI, provider);\n \n // Get the balance of NFTs for the user\n const balance = await nftContract.balanceOf(AAaddress);\n const balanceNumber = parseInt(balance.toString());\n \n if (balanceNumber > 0) {\n const fetchedNfts = [];\n \n // Fetch each NFT the user owns\n for (let i = 0; i < Math.min(balanceNumber, 10); i++) {\n try {\n // This is a simplified approach - in a real app, you'd need to get tokenIds owned by the address\n const tokenId = i;\n \n // Try to get the token URI\n const tokenURI = await nftContract.tokenURI(tokenId);\n \n // Add to our NFTs array\n fetchedNfts.push({\n tokenId: tokenId.toString(),\n tokenURI: tokenURI,\n name: `NERO NFT #${tokenId}`,\n });\n } catch (error) {\n console.error(`Error fetching NFT #${i}:`, error);\n }\n }\n \n if (fetchedNfts.length > 0) {\n setNfts(fetchedNfts);\n setTxStatus(`Found ${fetchedNfts.length} NFTs`);\n } else {\n // Fallback to sample NFTs\n setNfts([\n {\n tokenId: '1',\n tokenURI: 'https://bafybeigxmkl4vto4zqs7yk6wkhpwjqwaay7jkhjzov6qe2667y4qw26tde.ipfs.nftstorage.link/',\n name: 'NERO Sample NFT #1',\n },\n {\n tokenId: '2',\n tokenURI: 'https://bafybeic6ru2bkkridp2ewhhcmkbh563xtq3a7kl5g5k7obcwgxupx2yfxy.ipfs.nftstorage.link/',\n name: 'NERO Sample NFT #2',\n }\n ]);\n setTxStatus('Using sample NFTs for display');\n }\n } else {\n setTxStatus('No NFTs found for this address');\n }\n } catch (error) {\n console.error('Error fetching NFTs:', error);\n setTxStatus('Error fetching NFTs');\n \n // Fallback to sample NFTs\n setNfts([/* Sample NFTs */]);\n } finally {\n setIsLoading(false);\n }\n};\n```\n\n## ステップ9:UIの基本構造を作成\n\nタブ切り替えボタンとコンテンツ表示用のJSXを作成します。\n\n```js\nreturn (\n\n Connected Address: {AAaddress}\n
\n )}\n \n {/* Tabs */}\nLoading your NFTs...
\n ) : nfts.length > 0 ? (\n nfts.map((nft, index) => (\nToken ID: {nft.tokenId}
\n \n View Original\n \n ))\n ) : (\nNo NFTs found. Mint some NFTs first!
\n\n Status: {txStatus}\n
\n {userOpHash && (\n\n UserOpHash: {userOpHash}\n
\n )}\n)}\n```\n\n## ステップ12:HomePageコンポーネントのエクスポート\n\nFinish by exporting the component:\n```js\nexport default HomePage;\n```\n## ステップ13:`main.tsx` を更新\n\nReplace the Sample component with your new HomePage component:\n\n1. Open src/main.tsx\n\n2. Update the imports\n\n```js\n```\n3. Replace\n```js\nReactDOM.createRoot(document.getElementById('root')!).render(\nRemix IDEを使用して最初のコントラクトを立ち上げる。
\n \n \n \nHardhatの開発環境を使用してコントラクトをデプロイする。
\n \n\n \n近日公開!
\n \n\n## 低レベルのレシピ\n\n\nシームレスなUXのためにReactアプリケーションにスマートコントラクトウォレットを追加する。
\n \n\n \nアカウントアブストラクションを通じてスポンサード型ガスでトランザクションを実行する。
\n \n\n \ndAppにさまざまなガス支払いオプションを実装する。
\n \n\n \nNERO Chain Paymasterがサポートするトークンを照会して表示する。
\n \n\n \nガスレストランザクションを備えた完全なNFTミンティングアプリケーションを構築する。
\n \n\n## 高レベルのレシピ\n\n\nハイレベルテンプレート上に機能を実装する方法を理解する。
\n \n\n \nNEROウォレットテンプレートを使用して。
\n "} {"url":"https://docs.nerochain.io/ja/tutorials/low-level/aa-wallet-integration","locale":"ja","section":"tutorials","title":"AAウォレット連携","summary":"英語版のドキュメントは[こちら](/en/tutorials/low-level/aa-wallet-integration)でご覧いただけます。","headings":["# AAウォレット連携","# Reactでのアカウントアブストラクションウォレットの統合","## 学ぶこと","## 前提条件","## アカウントアブストラクションウォレットの理解","## 事前準備","## ステップ1:設定のセットアップ","## ステップ2:ユーティリティ関数の作成","## ステップ3:types.d.tsファイルの作成","## ステップ4:Reactコンポーネントの作成","## AAウォレットの仕組み","## 統合のテスト","## 重要な注意点","## 次のステップ"],"tokens":1508,"markdown":"このページは現在準備中です。翻訳は後日提供されます。\n\n英語版のドキュメントは[こちら](https://docs.nerochain.io/en/tutorials/low-level/aa-wallet-integration)でご覧いただけます。\n\n# Reactでのアカウントアブストラクションウォレットの統合\n\nこのチュートリアルでは、NERO Chain AAプラットフォームを使用して、アカウントアブストラクション(AA)ウォレットの作成と管理をReactアプリケーションに統合する方法を示します。\n\n## 学ぶこと\n- アカウントアブストラクションウォレットとは何か、そしてユーザーエクスペリエンスをどのように改善するか\n- NERO Chain AAプラットフォームの設定方法\n- AAウォレット統合のためのユーティリティ関数の作成方法\n- ウォレット接続とAAアドレス表示のためのReactコンポーネントの構築方法\n- AAウォレットのcounterfactualデプロイメントの仕組み\n\n## 前提条件\n- ReactとTypeScriptの基本知識\n- [NERO Chainでの最初のコントラクトのデプロイ](https://docs.nerochain.io/ja/tutorials/first-contract)チュートリアルを完了していること(推奨)\n- NERO Chainテストネットへのアクセス\n\n## アカウントアブストラクションウォレットの理解\n\n従来のイーサリアムモデルでは、ユーザーはガス料金を支払うためにETHを所有する必要がありました。アカウントアブストラクション(AA)では、ユーザーは以下のことができます:\n\n- ガス用のネイティブトークンを保持せずにトランザクションを実行\n- 高度な機能を持つスマートコントラクトウォレットを使用\n- 第三者(Paymaster)によるトランザクションのスポンサー\n\n## 事前準備\n\nTypeScriptを使用した新しいReactプロジェクトを作成するか、当社の簡単なテンプレートリポジトリを使用して進めることができます。新しいプロジェクトを作成する場合は、以下の依存関係をインストールしてください:\n\n```bash\nnpm install github:nerochain/aa-userop-sdk\n```\n\nそして\n\n```bash\nnpm install ethers@5.7.2\n```\n\nテンプレートを使用してこれを進めたい場合は、以下を使用してください:\n\n```\ngit clone https://github.com/nerochain/application-templates-nero.git my-application\ncd my-application\ncd react-ts\nnpm install\n```\n> **_注意_**: テンプレートフォルダにはさらに多くのコンポーネントが含まれています。\n\n## ステップ1:設定のセットアップ\n\nまず、チェーン情報とAAコントラクトアドレスを含む設定ファイルを作成します:\n\n```typescript\n// src/config.ts\nexport const NERO_CHAIN_CONFIG = {\n chainId: 689,\n chainName: \"NERO Chain Testnet\",\n rpcUrl: \"https://rpc-testnet.nerochain.io\",\n currency: \"NERO\",\n explorer: \"https://testnet.neroscan.io\"\n};\n\nexport const AA_PLATFORM_CONFIG = {\n bundlerRpc: \"https://bundler-testnet.nerochain.io/\",\n paymasterRpc: \"https://paymaster-testnet.nerochain.io\",\n};\n\nexport const CONTRACT_ADDRESSES = {\n entryPoint: \"0x5FF137D4b0FDCD49DcA30c7CF57E578a026d2789\",\n accountFactory: \"0x9406Cc6185a346906296840746125a0E44976454\",\n};\n```\n\n## ステップ2:ユーティリティ関数の作成\n\nAAウォレットとやり取りするためのユーティリティ関数を作成します:\n\n```typescript\n// src/utils/aaUtils.ts\n\n// Ethereumプロバイダーを取得\nexport const getProvider = () => {\n return new ethers.providers.JsonRpcProvider(NERO_CHAIN_CONFIG.rpcUrl);\n};\n\n// ブラウザウォレットからサイナーを取得\nexport const getSigner = async () => {\n if (!window.ethereum) {\n throw new Error(\"暗号ウォレットが見つかりません。Metamaskをインストールしてください。\");\n }\n \n await window.ethereum.request({ method: 'eth_requestAccounts' });\n const provider = new ethers.providers.Web3Provider(window.ethereum);\n return provider.getSigner();\n};\n\n// AAクライアントを初期化\nexport const initAAClient = async (accountSigner: ethers.Signer) => {\n return await Client.init(NERO_CHAIN_CONFIG.rpcUrl, {\n overrideBundlerRpc: AA_PLATFORM_CONFIG.bundlerRpc,\n entryPoint: CONTRACT_ADDRESSES.entryPoint,\n });\n};\n\n// サイナーのAAウォレットアドレスを取得\nexport const getAAWalletAddress = async (accountSigner: ethers.Signer, apiKey?: string) => {\n try {\n // SimpleAccountビルダーを初期化\n const simpleAccount = await Presets.Builder.SimpleAccount.init(\n accountSigner,\n NERO_CHAIN_CONFIG.rpcUrl,\n {\n overrideBundlerRpc: AA_PLATFORM_CONFIG.bundlerRpc,\n entryPoint: CONTRACT_ADDRESSES.entryPoint,\n factory: CONTRACT_ADDRESSES.accountFactory,\n }\n );\n \n // AAウォレットのcounterfactualアドレスを取得\n const address = await simpleAccount.getSender();\n console.log(\"AAウォレットアドレス:\", address);\n \n return address;\n } catch (error) {\n console.error(\"AAウォレットアドレスの取得エラー:\", error);\n throw error;\n }\n};\n```\n\n## ステップ3:types.d.tsファイルの作成\n\n```\ninterface Window {\n ethereum?: {\n isMetaMask?: boolean;\n request: (request: { method: string; params?: any[] }) => Promise\n このAAウォレットはcounterfactualであり、最初のトランザクション時にデプロイされます。\n
\n )}\n );\n};\n\nexport default AAWalletConnect;\n```\n\n## AAウォレットの仕組み\n\n1. **Counterfactualデプロイメント**: AAウォレットアドレスはオンチェーンにデプロイされる前に計算されます\n2. **遅延デプロイメント**: ウォレットコントラクトは最初のトランザクション時に自動的にデプロイされます\n3. **決定論的アドレス**: 同じEOA(ユーザーウォレット)は常に同じAAウォレットアドレスを取得します\n\n## 統合のテスト\n\n1. メインのAppコンポーネントに`AAWalletConnect`コンポーネントを追加\n2. Reactアプリケーションを実行\n3. 「ウォレットを接続」をクリックし、ブラウザウォレットで接続を承認\n4. EOAアドレスとAAウォレットアドレスの両方が表示されるはずです\n\n## 重要な注意点\n\n- AAウォレットはチェーンごとに一意であるため、同じEOAは異なるチェーンで異なるAAアドレスを持ちます\n- ウォレットアドレスはファクトリーアドレス、EOAアドレス、ソルト値から派生します\n- AAウォレットはガスコストを節約するために最初のトランザクションでのみデプロイされます\n\n## 次のステップ\nAAウォレット統合をセットアップしたので、これらのウォレットを通じてオペレーションを送信する方法を学ぶ準備ができました。次のチュートリアル:[UserOperationsの送信](https://docs.nerochain.io/ja/tutorials/low-level/sending-ops)に進んで、AAウォレットを使用してトランザクションを実行する方法を学びましょう。"} {"url":"https://docs.nerochain.io/ja/tutorials/low-level/checking-sup-tokens","locale":"ja","section":"tutorials","title":"NERO Chainトランザクションのためのシンプルなトークン選択","summary":"このチュートリアルでは、NFTミントを例として使用して、NERO Chainトランザクションのためのシンプルなトークン選択UIを実装する方法を説明します。","headings":["# NERO Chainトランザクションのためのシンプルなトークン選択","## 学習内容","## 前提条件","## 概要","## ステップ1:支払い優先のNFTミントコンポーネントの作成","## ステップ2:App.tsxへの統合","## 仕組み","## 次のステップ"],"tokens":1849,"markdown":"このチュートリアルでは、NFTミントを例として使用して、NERO Chainトランザクションのためのシンプルなトークン選択UIを実装する方法を説明します。\n\n## 学習内容\n- NERO Chain Paymasterからサポートされているトークンを取得する方法\n- 支払いタイプ選択ワークフローを作成する方法\n- 異なる支払い方法のためにトークンを選択する方法\n- 選択した支払い方法でNFTミントトランザクションを実行する方法\n\n## 前提条件\n- [AAウォレット統合](https://docs.nerochain.io/ja/tutorials/low-level/aa-wallet-integration)チュートリアルを完了していること\n- [UserOperationsの送信](https://docs.nerochain.io/ja/tutorials/low-level/sending-ops)チュートリアルを完了していること\n- [支払い方法](https://docs.nerochain.io/ja/tutorials/low-level/types-payments)チュートリアルを完了していること\n\n## 概要\n\nこのチュートリアルでは、ユーザーがまず支払いタイプ(前払いまたは後払い)を選択し、次に利用可能なトークンから選択するシンプルなインターフェースを作成します。このワークフローは、特定のトークンを選択する前に、ユーザーが支払いフローを理解するのに役立ちます。実用的な例としてNFTミントを使用します。\n\n## ステップ1:支払い優先のNFTミントコンポーネントの作成\n\nまず支払いタイプを求め、次に利用可能なトークンを表示するコンポーネントを作成しましょう:\n\n```typescript\n// src/components/NFTMintWithPaymentSelector.tsx\n\n getSigner, \n getSupportedTokens, \n executeOperation \n} from '../utils/aaUtils';\n\ninterface Token {\n address: string;\n symbol: string;\n type?: number; // フィルタリングに使用しないためオプショナル\n}\n\nconst NFTMintWithPaymentSelector: React.FC = () => {\n const [tokens, setTokens] = useStateトークンを読み込み中...
;\n }\n \n if (tokens.length === 0) {\n returnサポートされているトークンが見つかりません。
;\n }\n \n // ミントボタンを有効にするかどうかを判断\n const canMint = paymentType > 0 && selectedToken !== '';\n\n return (\nNFTが正常にミントされました!
\n {tokenId &&トークンID: {tokenId}
}\n \n エクスプローラーで表示\n \n )}\n );\n};\n\nexport default NFTMintWithPaymentSelector;\n```\n\n## ステップ2:App.tsxへの統合\n\n次に、このコンポーネントをアプリケーションに統合しましょう:\n\n```typescript\n// src/App.tsx\n\nconst App: React.FC = () => {\n const [isConnected, setIsConnected] = useState(false);\n const [isLoading, setIsLoading] = useState(false);\n \n // シンプルなウォレット接続関数\n const connectWallet = async () => {\n try {\n setIsLoading(true);\n \n const signer = await getSigner();\n await getAAWalletAddress(signer); // AAウォレットを初期化\n \n setIsConnected(true);\n } catch (error) {\n console.error(\"ウォレット接続エラー:\", error);\n alert(\"ウォレットの接続に失敗しました\");\n } finally {\n setIsLoading(false);\n }\n };\n \n return (\nトランザクション成功!
\n \n エクスプローラーで表示\n \n )}\n );\n};\n\nexport default NFTMinterButton;\n```\n\n## テスト\n\n前回と同様に、コンポーネントをApp.tsxファイルに追加して実行します。\n\n## Paymasterフローの理解\n\n1. **ビルダーの作成**: あなたのサイナーでSimpleAccountビルダーを初期化\n2. **Paymaster設定**: APIキーと支払いタイプ(0は無料/スポンサー付き)を設定\n3. **操作の準備**: 関数のコントラクト呼び出しデータを作成\n4. **UserOp作成**: ビルダーでUserOperationを構築\n5. **UserOp送信**: クライアントを通じて操作をバンドラーに送信\n6. **トランザクション追跡**: レシートを待ち、結果を追跡\n\n## スポンサー付きトランザクションのベストプラクティス\n\n1. **エラー処理**: 常に適切なエラー処理を実装し、ユーザーにフィードバックを提供する\n2. **ガスパラメータ**: 操作の複雑さに基づいてガスパラメータを調整する\n3. **APIキーのセキュリティ**: 本番環境では環境変数とバックエンドプロキシを使用してAPIキーを保護する\n4. **コスト監視**: NERO Chain AAプラットフォームダッシュボードを通じてスポンサー付きトランザクションの使用状況を追跡する\n5. **ユーザーフィードバック**: ローディング状態とトランザクション結果を明確に表示して、ユーザー体験を向上させる\n\n## Paymaster使用における重要な考慮事項\n\n1. **APIキーのセキュリティ**: 本番環境のクライアント側コードにPaymaster APIキーを公開しないでください。バックエンドプロキシの使用を検討してください。\n2. **ガス制限**: ガスパラメータは、トランザクションの複雑さに基づいて調整する必要があります。\n3. **エラー処理**: Paymaster関連の障害に対して堅牢なエラー処理を実装してください。\n4. **レート制限**: スポンサー付きトランザクションには、アカウントに基づく使用制限がある場合があることに注意してください。\n\n## 次のステップ\nAAウォレットでスポンサー付きUserOperationsを送信する方法を学んだので、次は代替支払い方法を探求したいかもしれません。[支払い方法](https://docs.nerochain.io/ja/tutorials/low-level/types-payments)チュートリアルに進んで、ERC20トークンを使用した前払いと後払いのトランザクションを実装する方法を学びましょう。"} {"url":"https://docs.nerochain.io/ja/tutorials/low-level/types-payments","locale":"ja","section":"tutorials","title":"NERO Chainトランザクションの支払い方法","summary":"このチュートリアルでは、NERO Chain Paymasterを使用してトランザクションのガス料金に異なる支払い方法を実装する方法を説明します。スポンサー付きトランザクションの代替としてERC20トークン支払いに焦点を当てています。","headings":["# NERO Chainトランザクションの支払い方法","## 学習内容","## 前提条件","## Paymaster支払いタイプの理解","## ステップ1:サポートされているトークンの取得","## ステップ2:ERC20トークン承認の処理","## ステップ3:統一されたトランザクション関数の実装","## ステップ4:NFTミント用の統一関数の使用","## ステップ5:支払いタイプセレクターの作成","## ステップ6:NFTミントコンポーネントでの支払いセレクターの使用","## 支払いタイプの比較","## ベストプラクティス","## 各支払いタイプを使用するタイミング","## 次のステップ"],"tokens":4667,"markdown":"このチュートリアルでは、NERO Chain Paymasterを使用してトランザクションのガス料金に異なる支払い方法を実装する方法を説明します。スポンサー付きトランザクションの代替としてERC20トークン支払いに焦点を当てています。\n\n## 学習内容\n- NERO Chain Paymasterがサポートするトークンのリストを取得する方法\n- トランザクションに異なる支払いタイプ(スポンサー付き、前払い、後払い)を実装する方法\n- Paymasterの操作のためのトークン承認を処理する方法\n- アプリケーションの支払い選択インターフェースを構築する方法\n\n## 前提条件\n- [AAウォレット統合](https://docs.nerochain.io/ja/tutorials/low-level/aa-wallet-integration)チュートリアルを完了していること\n- [UserOperationsの送信](https://docs.nerochain.io/ja/tutorials/low-level/sending-ops)チュートリアル(スポンサー付きトランザクション)を完了していること\n- [NERO Chain AAプラットフォーム](https://aa-platform.nerochain.io)からのAPIキー\n\n## Paymaster支払いタイプの理解\n\n前回のチュートリアルでは、開発者がすべてのガスコストを負担するスポンサー付きトランザクション(タイプ0)の使用方法を学びました。NERO Chain Paymasterは、さらに2つの支払いタイプをサポートしています:\n\n1. **ERC20前払い(タイプ1)**:ユーザーはERC20トークンでガスコストを前払いします\n2. **ERC20後払い(タイプ2)**:ユーザーはトランザクション実行後にERC20トークンでガスコストを支払います\n\nこれらの支払いタイプを実装する前に、まずPaymaster APIからサポートされているトークンを取得する必要があります。\n\n## ステップ1:サポートされているトークンの取得\n\nサポートされているトークンを照会するユーティリティ関数を作成しましょう:\n\n```typescript\n// src/utils/aaUtils.ts\n\n NERO_CHAIN_CONFIG, \n AA_PLATFORM_CONFIG, \n CONTRACT_ADDRESSES,\n API_KEY \n} from '../config';\n\n// 過剰なAPI呼び出しを避けるためのキャッシュ\nlet tokenCache: any[] = [];\nlet lastFetchTime: number = 0;\nconst CACHE_DURATION = 5 * 60 * 1000; // 5分\n\n// トークンレスポンスデータの変換\nconst transformTokensResponse = (response: any) => {\n if (!response || !response.tokens) return [];\n \n return response.tokens.map((token: any) => ({\n address: token.token,\n decimal: parseInt(token.decimal),\n symbol: token.symbol,\n type: parseInt(token.type),\n price: token.price ? parseFloat(token.price) : undefined\n }));\n};\n\n// Paymaster APIからサポートされているトークンを取得\nexport const getSupportedTokens = async (accountSigner: ethers.Signer) => {\n // まずキャッシュをチェック\n const now = Date.now();\n if (tokenCache.length > 0 && now - lastFetchTime < CACHE_DURATION) {\n console.log(\"キャッシュされたトークンリストを使用\");\n return tokenCache;\n }\n \n try {\n // SimpleAccountビルダーを初期化\n const builder = await Presets.Builder.SimpleAccount.init(\n accountSigner,\n NERO_CHAIN_CONFIG.rpcUrl,\n {\n overrideBundlerRpc: AA_PLATFORM_CONFIG.bundlerRpc,\n entryPoint: CONTRACT_ADDRESSES.entryPoint,\n factory: CONTRACT_ADDRESSES.accountFactory,\n }\n );\n \n // AAウォレットアドレスを取得\n const sender = await builder.getSender();\n \n // トークンを照会するための最小限のUserOp\n const minimalUserOp = {\n sender,\n nonce: \"0x0\",\n initCode: \"0x\",\n callData: \"0x\",\n callGasLimit: \"0x88b8\",\n verificationGasLimit: \"0x33450\",\n preVerificationGas: \"0xc350\",\n maxFeePerGas: \"0x2162553062\",\n maxPriorityFeePerGas: \"0x40dbcf36\",\n paymasterAndData: \"0x\",\n signature: \"0x\"\n };\n \n // paymaster API呼び出し用のプロバイダーを設定\n const provider = new ethers.providers.JsonRpcProvider(AA_PLATFORM_CONFIG.paymasterRpc);\n \n // paymaster APIからサポートされているトークンを照会\n const tokensResponse = await provider.send(\"pm_supported_tokens\", [\n minimalUserOp,\n API_KEY,\n CONTRACT_ADDRESSES.entryPoint\n ]);\n \n // 結果を変換してキャッシュ\n const tokens = transformTokensResponse(tokensResponse);\n tokenCache = tokens;\n lastFetchTime = now;\n \n console.log(`${tokens.length}個のサポートされているトークンが見つかりました`);\n return tokens;\n } catch (error) {\n console.error(\"サポートされているトークンの取得エラー:\", error);\n \n // 利用可能な場合はキャッシュデータを返し、それ以外は空の配列\n return tokenCache.length > 0 ? tokenCache : [];\n }\n};\n```\n\n## ステップ2:ERC20トークン承認の処理\n\nERC20トークンをガスに使用する場合(支払いタイプ1と2)、ユーザーのAAウォレットは最初にトークンペイマスターコントラクトを承認する必要があります:\n\n```typescript\n// src/utils/aaUtils.ts\n// 既存のユーティリティ関数に以下を追加\n\n// ペイマスターのトークン承認を処理\nexport const approveTokenForPaymaster = async (\n accountSigner: ethers.Signer,\n tokenAddress: string,\n amount: string = ethers.constants.MaxUint256.toString()\n) => {\n try {\n // クライアントを初期化\n const client = await Client.init(NERO_CHAIN_CONFIG.rpcUrl, {\n overrideBundlerRpc: AA_PLATFORM_CONFIG.bundlerRpc,\n entryPoint: CONTRACT_ADDRESSES.entryPoint,\n });\n \n // ビルダーを初期化\n const builder = await Presets.Builder.SimpleAccount.init(\n accountSigner,\n NERO_CHAIN_CONFIG.rpcUrl,\n {\n overrideBundlerRpc: AA_PLATFORM_CONFIG.bundlerRpc,\n entryPoint: CONTRACT_ADDRESSES.entryPoint,\n factory: CONTRACT_ADDRESSES.accountFactory,\n }\n );\n \n // AAウォレットアドレスを取得\n const aaWalletAddress = await builder.getSender();\n \n // トークンコントラクトインターフェースを作成\n const erc20Interface = new ethers.utils.Interface([\n 'function approve(address spender, uint256 amount) returns (bool)',\n 'function allowance(address owner, address spender) view returns (uint256)'\n ]);\n \n // 現在の許可額を確認\n const provider = new ethers.providers.JsonRpcProvider(NERO_CHAIN_CONFIG.rpcUrl);\n const tokenContract = new ethers.Contract(\n tokenAddress,\n [\n 'function allowance(address owner, address spender) view returns (uint256)'\n ],\n provider\n );\n \n const currentAllowance = await tokenContract.allowance(\n aaWalletAddress,\n CONTRACT_ADDRESSES.tokenPaymaster\n );\n \n // 許可額が十分な場合は早期に戻る\n if (!currentAllowance.lt(ethers.utils.parseUnits(\"100\", 18))) {\n console.log(\"トークンは既に承認されています\");\n return true;\n }\n \n console.log(\"ペイマスターのトークンを承認中...\");\n \n // 承認のコールデータを作成\n const approveCallData = erc20Interface.encodeFunctionData(\n 'approve',\n [CONTRACT_ADDRESSES.tokenPaymaster, amount]\n );\n \n // 無料ガス用のペイマスターを設定(承認トランザクション用)\n builder.setPaymasterOptions({\n apikey: API_KEY,\n rpc: AA_PLATFORM_CONFIG.paymasterRpc,\n type: \"0\" // 承認には無料を使用\n });\n \n // ガスパラメータを設定\n const gasParams = {\n callGasLimit: \"0x88b8\",\n verificationGasLimit: \"0x33450\",\n preVerificationGas: \"0xc350\",\n maxFeePerGas: \"0x2162553062\",\n maxPriorityFeePerGas: \"0x40dbcf36\",\n };\n \n builder.setCallGasLimit(gasParams.callGasLimit);\n builder.setVerificationGasLimit(gasParams.verificationGasLimit);\n builder.setPreVerificationGas(gasParams.preVerificationGas);\n builder.setMaxFeePerGas(gasParams.maxFeePerGas);\n builder.setMaxPriorityFeePerGas(gasParams.maxPriorityFeePerGas);\n \n // 承認用のUserOperationを作成\n const userOp = await builder.execute(tokenAddress, 0, approveCallData);\n \n // 承認UserOperationを送信\n console.log(\"承認トランザクションを送信中...\");\n const res = await client.sendUserOperation(userOp);\n console.log(\"承認トランザクションが送信されました。ハッシュ:\", res.userOpHash);\n \n // 承認がマイニングされるのを待つ\n const receipt = await res.wait();\n if (!receipt) {\n throw new Error(\"トランザクションレシートがnullです\");\n }\n console.log(\"トークン承認がブロックで確認されました:\", receipt.blockNumber);\n \n return true;\n } catch (error) {\n console.error(\"ペイマスターのトークン承認エラー:\", error);\n throw error;\n }\n};\n```\n\n## ステップ3:統一されたトランザクション関数の実装\n\n各支払いタイプに対して別々の関数を作成する代わりに、すべてのタイプを処理できる単一の関数を作成しましょう:\n\n```typescript\n// src/utils/aaUtils.ts\n/**\n * 設定可能な支払いタイプで操作を実行\n * @param accountSigner ユーザーの署名者\n * @param contractAddress ターゲットコントラクトアドレス\n * @param contractAbi コントラクトABI\n * @param functionName 呼び出す関数\n * @param functionParams 関数のパラメータ\n * @param paymentType 0 = スポンサー付き、1 = 前払い、2 = 後払い\n * @param tokenAddress 支払いタイプ1と2に必要\n * @param options 追加オプション\n */\nexport const executeOperation = async (\n accountSigner: ethers.Signer,\n contractAddress: string,\n contractAbi: any,\n functionName: string,\n functionParams: any[],\n paymentType: number = 0,\n tokenAddress?: string,\n options?: {\n apiKey?: string;\n gasMultiplier?: number;\n }\n) => {\n try {\n // トークン支払いの場合、必要に応じて最初にトークンを承認\n if ((paymentType === 1 || paymentType === 2) && tokenAddress) {\n await approveTokenForPaymaster(accountSigner, tokenAddress);\n } else if ((paymentType === 1 || paymentType === 2) && !tokenAddress) {\n throw new Error(`支払いタイプ${paymentType}にはトークンアドレスが必要です`);\n }\n \n // AAクライアントを初期化\n const client = await Client.init(NERO_CHAIN_CONFIG.rpcUrl, {\n overrideBundlerRpc: AA_PLATFORM_CONFIG.bundlerRpc,\n entryPoint: CONTRACT_ADDRESSES.entryPoint,\n });\n \n // AAビルダーを初期化\n const builder = await Presets.Builder.SimpleAccount.init(\n accountSigner,\n NERO_CHAIN_CONFIG.rpcUrl,\n {\n overrideBundlerRpc: AA_PLATFORM_CONFIG.bundlerRpc,\n entryPoint: CONTRACT_ADDRESSES.entryPoint,\n factory: CONTRACT_ADDRESSES.accountFactory,\n }\n );\n \n // ガスパラメータを設定\n const gasParams = {\n callGasLimit: \"0x88b8\",\n verificationGasLimit: \"0x33450\",\n preVerificationGas: \"0xc350\",\n maxFeePerGas: \"0x2162553062\",\n maxPriorityFeePerGas: \"0x40dbcf36\",\n };\n \n // ガスパラメータを設定\n builder.setCallGasLimit(gasParams.callGasLimit);\n builder.setVerificationGasLimit(gasParams.verificationGasLimit);\n builder.setPreVerificationGas(gasParams.preVerificationGas);\n builder.setMaxFeePerGas(gasParams.maxFeePerGas);\n builder.setMaxPriorityFeePerGas(gasParams.maxPriorityFeePerGas);\n \n // 支払いタイプに基づいてpaymasterを設定\n const paymasterOptions: any = {\n apikey: options?.apiKey || API_KEY,\n rpc: AA_PLATFORM_CONFIG.paymasterRpc,\n type: paymentType.toString()\n };\n \n // トークン支払いの場合、トークンアドレスを追加\n if ((paymentType === 1 || paymentType === 2) && tokenAddress) {\n paymasterOptions.token = tokenAddress;\n }\n \n // paymasterオプションを設定\n builder.setPaymasterOptions(paymasterOptions);\n \n // コントラクトインスタンスを作成\n const contract = new ethers.Contract(\n contractAddress,\n contractAbi,\n ethers.getDefaultProvider()\n );\n \n // 関数呼び出しをエンコード\n const callData = contract.interface.encodeFunctionData(\n functionName,\n functionParams\n );\n \n // ログ用の人間が読める形式の支払いタイプ\n const paymentTypeNames = [\"スポンサー付き\", \"前払い\", \"後払い\"];\n console.log(`${paymentTypeNames[paymentType]}支払いでUserOperationを送信中...`);\n \n // UserOperationを作成\n const userOp = await builder.execute(contractAddress, 0, callData);\n \n // UserOperationを送信\n const res = await client.sendUserOperation(userOp);\n console.log(\"UserOperationがハッシュで送信されました:\", res.userOpHash);\n \n // トランザクションが含まれるのを待つ\n const receipt = await res.wait();\n if (!receipt) {\n throw new Error(\"トランザクションレシートがnullです\");\n }\n console.log(\"トランザクションがブロックでマイニングされました:\", receipt.blockNumber);\n\n return {\n userOpHash: res.userOpHash,\n transactionHash: receipt.transactionHash,\n receipt: receipt\n };\n } catch (error) {\n console.error(`支払いタイプ${paymentType}での操作実行エラー:`, error);\n throw error;\n }\n};\n```\n\n## ステップ4:NFTミント用の統一関数の使用\n\n統一された操作実行者を使用するようにNFTミント関数を更新しましょう:\n\n```typescript\n// src/utils/aaUtils.ts\n\n// 汎用的なNFT ABI\nconst NFT_ABI = [\n \"function mint(address to, string memory uri) external\",\n \"function tokenURI(uint256 tokenId) external view returns (string memory)\",\n \"function balanceOf(address owner) external view returns (uint256)\"\n];\n\nexport const mintNFT = async (\n accountSigner: ethers.Signer,\n recipientAddress: string,\n metadataUri: string,\n paymentType: number = 0,\n tokenAddress?: string,\n options?: {\n apiKey?: string;\n gasMultiplier?: number;\n }\n) => {\n try {\n // 指定された支払いタイプでミント関数を実行\n return await executeOperation(\n accountSigner,\n CONTRACT_ADDRESSES.nftContract,\n NFT_ABI,\n 'mint',\n [recipientAddress, metadataUri],\n paymentType,\n tokenAddress,\n options\n );\n } catch (error) {\n console.error(\"NFTミントエラー:\", error);\n throw error;\n }\n};\n```\n\n## ステップ5:支払いタイプセレクターの作成\n\nユーザーが好みの支払い方法を選択できるようにするために、支払いタイプとトークンを選択するためのコンポーネントを作成しましょう:\n\n```typescript\n// src/components/PaymentTypeSelector.tsx\n\ninterface Token {\n address: string;\n symbol: string;\n type: number;\n decimal: number;\n}\n\ninterface PaymentTypeSelectorProps {\n onPaymentTypeChange: (type: number, token?: string) => void;\n disabled?: boolean;\n}\n\nconst PaymentTypeSelector: React.FC\n {paymentType === 0 \n ? \"ガス料金はアプリケーションによってスポンサーされます。\" \n : paymentType === 1 \n ? \"ERC20トークンでガスを前払いします。余剰分は返金されます。\" \n : \"トランザクション実行後に正確なガスコストを支払います。\"}\n
\n \n {paymentType > 0 && (\n \n {isLoading ? (\nサポートされているトークンをロード中...
\n ) : error ? (\n{error}
\n ) : availableTokens.length === 0 ? (\nこの支払いタイプで利用可能なトークンがありません。
\n ) : (\nトランザクション成功!
\n