Figure 1: NERO Architecture Diagram
* Access Layer: responsible for accepting various user operations as well as transferring and committing them to the chain. {/* * Execution Layer: responsible for the execution of almost all contract-based transactions and supports decentralized applications. It is the application of ZK Rollup, where the execution results are submitted to the settlement layer and the settlement layer establishes undeniable security as well as objective finality. */} * Settlement layer: responsible for verifying and settling the execution results of the execution layer and is also the asset layer, responsible for the management and settlement of the assets on the chain. * Data availability layer: focusing on execution data, it will ensure data availability in the network based on data sharding, and data sampling technologies. --- # Data Availability Layer: Storage Scalability Source: https://docs.nerochain.io/en/core-concepts/architecture/dataAvailabilityLayer Section: White Paper In order to conserve valuable storage capacity within the settlement layer, NERO designed the data availability layer to offer dependable on-chain storage for Rollup. This eliminates the reliance on external storage protocols for the original transaction data associated with Rollup, resolving the issue entirely within the NERO Chain. Moreover, NERO designed the data availability layer with a Sharding architecture to engage a greater number of nodes, enhancing decentralization and scalability. This structure enables each node to store only a portion of data (shard), while a number of nodes ensure data accessibility. As an independent storage layer, NERO's data availability layer possesses several key features compared to traditional blockchains: * Only data storage is necessary on the chain, with no transaction execution and the absence of a world state. * Block verification does not rely on historical data. * Only the settlement layer conducts unified management. --- # Settlement layer: High-performance EVM-compatible Chain Source: https://docs.nerochain.io/en/core-concepts/architecture/settlementLayer Section: White Paper The execution layer is key to NERO’s scalability. NERO is optimized by transferring resource-intensive transaction processing from the on-chain environment to the off-chain, while retaining the on-chain focus on result validation. Dividing the transaction process into two phases. Initially, a multitude of transactions are executed off-chain and subsequently combined. Then, they are collectively submitted to the main chain for validation. The original transaction data is compressed and stored on-chain. This approach minimizes the volume of data transmitted to the main chain, thereby facilitating faster and more cost-effective transactions. ## Full Ethereum Compatibility NERO believes that Ethereum is the industry standard for blockchain application development. To attract more high-quality dApps projects and developers to join the NERO ecosystem, NERO has implemented the full Ethereum protocol in the settlement layer. NERO not only has full compatibility with EVM but also keeps up with the latest EIPs so that developers can directly deploy the existing DApps on Ethereum to NERO. On the other hand, all the development tools developed on Ethereum, including Wallet, Solidity, Remix, Truffle, and Hardhat, can also be directly used on the NERO Chain. Besides, NERO is also compatible with almost all of the RPC interfaces of Ethereum, so developers can switch to NERO’s application development at no cost and get the rewards for NERO’s ecosystem development. --- # Consensus Source: https://docs.nerochain.io/en/core-concepts/consensus-mechanism/overview Section: White Paper Consensus is the core component of a blockchain, and NERO employs a hybrid randomized DPoSA (Delegated Proof of Staked Authority) protocol. This consensus protocol, grounded in DPoSA consensus, integrates a random selection mechanism for nodes, thus widening participation and enhancing system decentralization. Within the consensus nodes, a BFT (Byzantine Fault Tolerance) consensus mechanism ensures fast transaction confirmations. Furthermore, the conventional consensus workflow is divided into phrase of transaction distribution, phrase of execution process and phrase of execution result spread. This approach establishes a pipeline mechanism for transaction processing, improving system throughput greatly. > ⚠️ **Note:** The randomized selection aspect of the DPoSA protocol is planned for future implementation. Currently, validator selection follows a deterministic process. The consensus protocol of NERO selects the set of nodes to propose and validate blocks, which is an important mechanism to introduce more nodes into the system to participate in the consensus process. The consensus process is divided into different epochs according to a fixed number of blocks, and the same set of validators is used in each epoch for proposing and validating blocks. --- # Pipelined Consensus Source: https://docs.nerochain.io/en/core-concepts/consensus-mechanism/pipelinedConsensus Section: White Paper In traditional blockchain systems such as Ethereum, the block generation process consists of several steps: - The miner (block proposer) packs the transaction and executes it; - The miner sets the execution results to the block header; - Block propagation; - Other nodes execute the transactions in the block; - And then validate the execution results of the block. It can be seen that a transaction undergoes two serial executions from the time it is packaged to the time it reaches network-wide consensus, in addition to a serial propagation process, which has a lot of room for optimization. We take a closer look at the structure of a block, which contains a batch of transactions and various Merkle roots associated with the execution results. The transaction list mainly represents the sequence of transaction execution, while the block header can be seen as the result of the block execution. We can consider separating the consensus of these two into a transaction sequence consensus and an execution result consensus. As depicted in Figure 4, if the block under consensus is denoted as block N, the BFT process does not consent to the entire content of block N. Instead, it agrees on the transaction list and certain metadata of block N, along with the block hash of block N - 2. Once the BFT process concludes, the consensus on block N + 1 proceeds, while block N is executed concurrently. Furthermore, given that block N contains the hash of block N - 2, the conclusion of consensus on block N also implies confirmation of block N - 2. 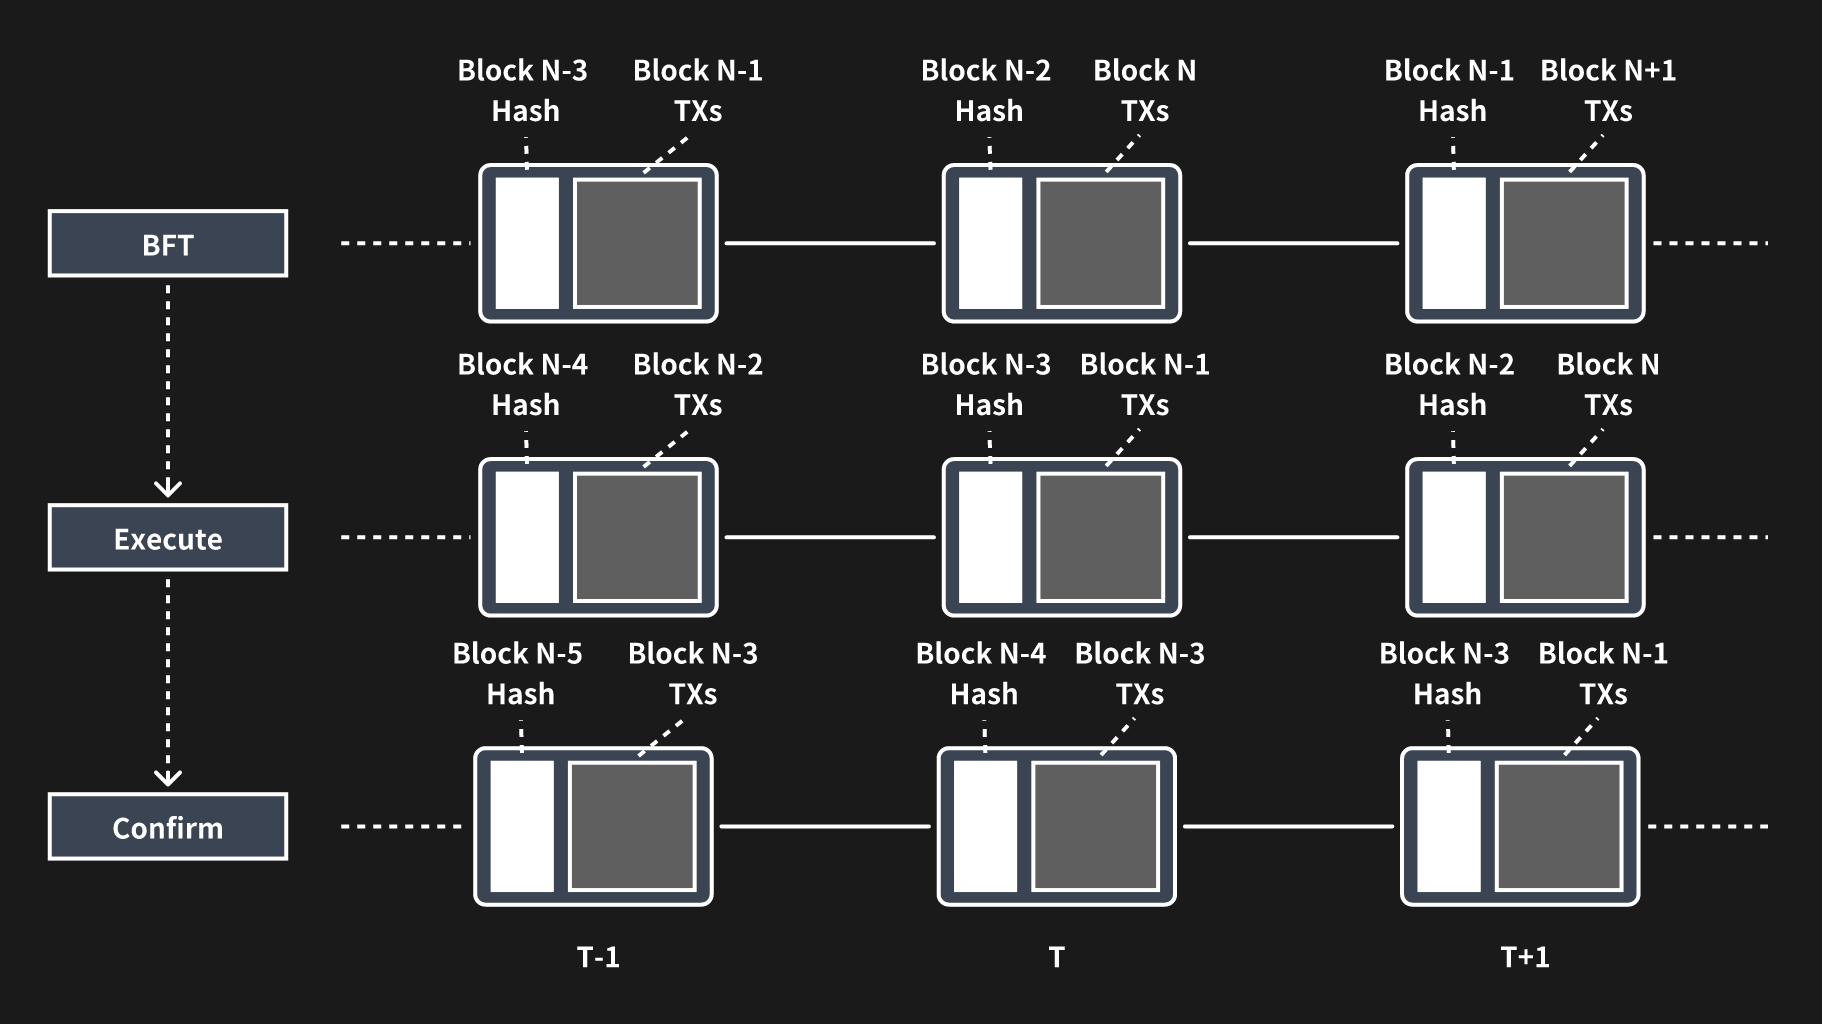Figure 4: Pipelined processing of BFT, execution, and validation.
--- # Random Number Generation Source: https://docs.nerochain.io/en/core-concepts/consensus-mechanism/randomNumberGeneration Section: White Paper > ⚠️ **Note:** This feature is planned but not currently implemented. Validator selection is currently deterministic. Considering the security of random selection above, the generation of random numbers must occur through a decentralized scheme. Additionally, it's imperative that the produced random numbers are verifiable and that consistency is ensured across all nodes. Furthermore, during the random number generation process, no single node should have the ability to influence or manipulate the outcome. The random numbers in NERO are generated through the MPC (Multiparty Computation) approach. Each participating node initially generates its own random numbers locally. Subsequently, the system utilizes specific operations to produce a public random number derived from the contributions of all nodes. To prevent any node from accessing the random numbers of others prior to generating its own, NERO employs the cryptographic PVSS (Publicly Verifiable Secret Sharing) scheme, based on Shamir Secret Sharing, during the random number generation process. This scheme enables the current set of validators to collaboratively generate a random number while employing cryptographic techniques to safeguard against manipulation of the process. The process is as follows: * Validator $D$ partitions its secret $S$ into n fragments$(S1,...,Sn)$based on the threshold t. Then it encrypts each fragment using the public keys$(Px,...,PN)$ of the n participants, generates the corresponding commitment (by zero-knowledge proof), and shares all this information. * It can be verified that all the n values from validator $D$ are valid without obtaining additional information; * If necessary, participants can decrypt the share with their private key, and then share it with others; * Anyone can reconstruct the secret $S$ after obtaining $≥ t$ decrypted shares. Last but not least, the generation of a shared random number occurs at each epoch. The current epoch utilizes the random numbers generated by the previous epoch. --- # Fraud-Proof Source: https://docs.nerochain.io/en/core-concepts/data-availability/dataAvailabilityVerification/fraudProof Section: White Paper The random sampling method mentioned above ensures that there are sufficient fragments within the network to recover the corresponding blocks, thus ensuring data availability. However, it does not guarantee the validity of all data within these fragments. Therefore, it is necessary to address this issue through fraud-proof mechanisms. Fraud proof can be categorized into proof of invalid transaction and proof of invalid data encoding. For the DA chain, the focus lies on the latter. Fraud-proof generation hinges on the ability of the RS code within each row and column of the 2D encoding to accurately reconstruct the original data. Therefore, only one row or column of data is necessary to generate the proof, resulting in a proof size proportional to the size of all data, denoted as n. In situations where nodes gather sufficient fragments but are unable to decode them correctly, they must broadcast these fragments along with their Merkle proofs. These proofs serve as the fraud-proof, allowing other nodes to verify their authenticity. The node that first submits the fraud-proof is rewarded accordingly. --- # Data availability verification Source: https://docs.nerochain.io/en/core-concepts/data-availability/dataAvailabilityVerification/overview Section: White Paper In terms of verification, we define the following roles of DA nodes in the DA layer of NERO: * **Common DA nodes.** Common DA nodes store the whole block of their sharding DA chain like full nodes and provide sampled block data to others. They can also broadcast fraud-proof if some invalid block is found. * **Maintainer DA nodes.** Regular DA nodes have the option to stake tokens in the settlement layer, thereby qualifying as candidate maintainer DA nodes within their respective sharding chain. The top N nodes with the highest staked amounts will then assume the role of maintainer DA nodes. These nodes are entitled to share the fee generated from providing DA capabilities while also being mandated to submit block sampling data. Data availability verification is conducted by validators within the settlement layer. Upon proposal of a block in the DA chain by the settlement layer's validator, who also serves as the block producer, the hash of the DA block is transmitted to the settlement layer. Subsequently, other validators within the settlement layer verify the data availability of the DA block through random sampling. If successfully verified, a settlement layer validator broadcasts the signature of the DA block hash, indicating validation. Once signatures from 2/3 of these validators are obtained, they are submitted to the settlement layer as confirmation proof. Upon passing the settlement layer verification in the subsequent settlement block, and provided no fraud-proof has been issued since the DA block is marked as confirmed within the settlement layer. Simultaneously, the next DA block is proposed. --- # Random Sampling Source: https://docs.nerochain.io/en/core-concepts/data-availability/dataAvailabilityVerification/randomSampling Section: White Paper The DA block contains a header and body. The header is relatively small and can be downloaded and checked directly, whereas the body is much bigger, which is the one needed to be sampled randomly to verify data availability. When a block is produced, it is sliced into $k * k$ fragments by size, and then $2k * 2k$ fragments are generated by applying the 2-dimension RS (Reed-Solomon) code. Then the Merkle trees are created for each row and column of each fragment, so there are $2k + 2k = 4k$ Merkle trees. 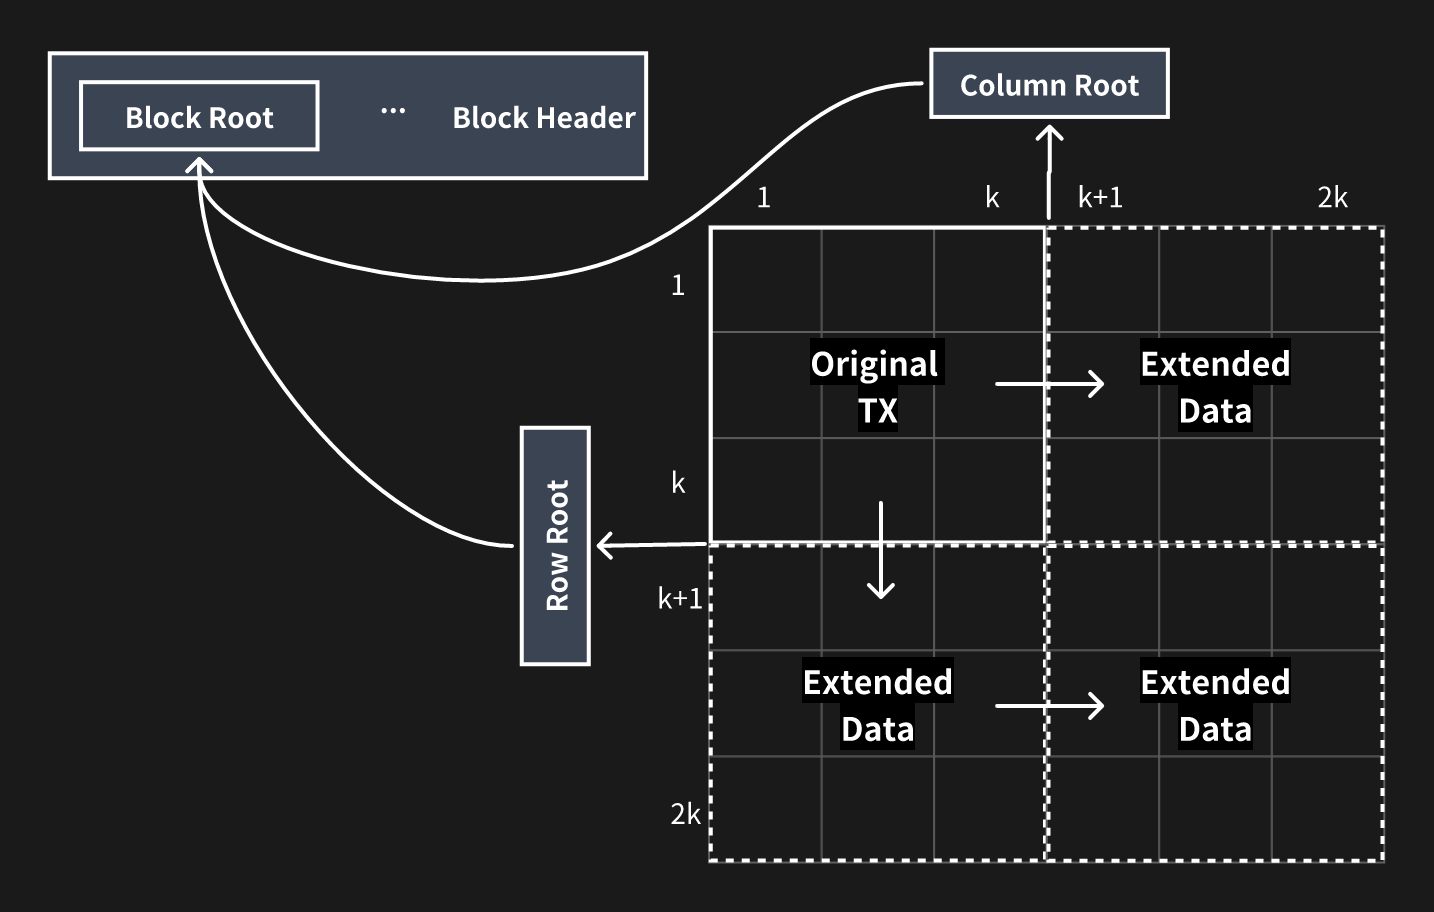Figure 5: Block slicing and encoding of data availability layer
These $4k$ Merkle roots are finally formed into one Merkle tree and the root of the tree is used as the root of the whole block, and we combine the root and other metadata into the header. Then the header and original body are broadcast through the P2P network. When other DA nodes receive the block, they will repeat the 2-dimension RS encoding the same way above and calculate the root, then accept it if it is the same as the one in the header. The validators of the settlement layer receive the header from the DA block proposer and connect to at least one of the DA nodes. These validators randomly download s of the fragments and their Merkle paths to the block root. If all of those fragments can be acquired successfully, the sampling validator can confirm the availability of the DA block at a very high possibility. Next, we will calculate the probability that an unavailable DA block is recognized as available under such a mechanism of random sampling. As stated above, the DA block is encoded into RS code of $2k * 2k$ fragments, and any k fragments of each row or column can recover that row or column, so the adversary needs to withhold at least fragments to make the whole block unavailable. Assuming that one validator randomly samples fragments from a DA block, the probability of sampling at least one unavailable fragment performed by a single validator is shown below if the DA block has minimal unavailable pieces. $$ P_{single}=1-\frac{C_S^{2k ⋅ 2k-(k+1)^2}}{C_S^{2k ⋅ 2k}}=1-\prod_{i=0}^{S-1}(1-\frac{(k+1)^2}{4k^2-i}) $$ That is also the minimal probability that one can correctly recognize an unavailable DA block. And if we have N active validators in the committee of the settlement layer and at most f of them are malicious, which is less than N/3. Also, we need to collect N - f votes to confirm the DA block. Therefore, at least f+1 validators of the N - f honest ones are required to find out the unavailability to not confirm the invalid DA block. So the unavailable DA block will be recognized by the network at the probability below: $$ P_{network}=1-\sum_{i=0}^f C_i^{N-f} ⋅ P_{single} ⋅ (1-P_{single})^{N-f-i} $$ In NERO, we have N = 21, f = 6, so the probabilities can be calculated under different k and S below $$ k=64, S=5 ⇒ P_{single}=77.94\%, P_{network}=99.81\% $$ $$ k=64, S=10 ⇒ P_{single}=94.94\%, P_{network}=99.9999917\% $$ $$ k=128, S=10 ⇒ P_{single}=94.66\%, P_{network}=99.9999987\% $$ $$ k=128, S=15 ⇒ P_{single}=98.77\%, P_{network}=99.9999999999969\% $$ We can see that when $k = 128$ and $S = 15$ any unavailable DA block will be revealed at the probability of almost 100%, and the sampling validator only needs to download 0.09% of the original data in such condition. --- # Model and Assumptions Source: https://docs.nerochain.io/en/core-concepts/data-availability/modelAndAssumptions Section: White Paper Firstly, we establish the network model: * **Topology:** Nodes are interconnected via a P2P network. * **Maximum network delay:** The network's maximum delay is denoted as $D$. If an honest node receives specific data in the network at time $T$, then other honest nodes can acquire the same data before time $T + D$. Subsequently, the security model is outlined as follows: * Detection of any invalid block is guaranteed, as at least one honest node in the network will uncover and disseminate it. * Each honest node maintains connections with at least one other honest node. --- # Data availability Source: https://docs.nerochain.io/en/core-concepts/data-availability/overview Section: White Paper Data availability is also the key component of NERO, which is quite critical for rollups. In NERO, we designed a new type of chain and transaction, especially for data availability as an independent layer, known as the data availability (DA) layer. The DA layer is also under the management of the settlement layer and maintained by a group of nodes (DA nodes) that have staked tokens in the settlement layer. Validators in the settlement layer can check the availability of DA blocks through random sampling and fraud-proof, thus confirming the DA chain. In addition, we can broaden the scope of DA nodes to encompass multiple groups, with each group maintaining a distinct DA chain. This approach enables us to establish a sharding system, thereby catering to diverse storage demands. The overall system architecture is illustrated below. --- # Transaction Fees and Incentives Source: https://docs.nerochain.io/en/core-concepts/data-availability/transactionFeesAndIncentives Section: White Paper 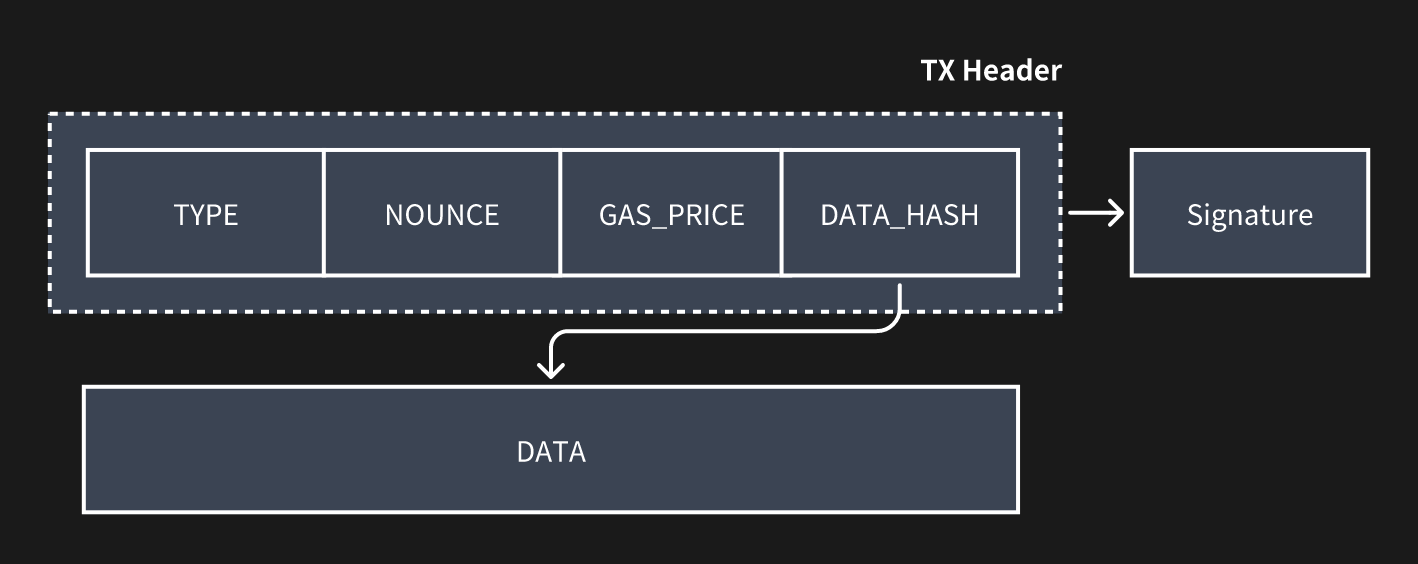Figure 6: Data availability layer transaction format
The header of the DA transaction will also be committed to the settlement layer alongside the DA block hash when the data availability verification has been passed. Then the transaction fees will be deducted from the senders' accounts and distributed as rewards to the DA block proposer, the DA block confirmation proposer, and all the related DA maintainer nodes of this shard. --- # Fee-sharing Mechanism in Ecosystem Source: https://docs.nerochain.io/en/core-concepts/fee-sharing/Overview Section: White Paper > ⚠️ **Note:** The automatic fee-sharing mechanism described here is a future feature and is not yet active in the current mainnet/testnet. Currently, there is a Fee sharing mechanism as a off-chain agreement with NERO Foundation. The application fee-sharing mechanism in NERO is designed to incentivize and reward ecosystem participants for their contributions to the network. This mechanism ensures that transaction fees generated by dApps are redistributed among widely used applications, fostering a sustainable and collaborative economic alignment. **Contribution-Based Rewards:** NERO's fee-sharing mechanism allocates transaction fees based on the contributions made by various applications in the network. This includes developers who create and deploy dApps, and validators who secure and validate transactions on the blockchain. Each dApp's contribution will be measured and quantified, and they are rewarded accordingly with a portion of the transaction fees generated by them. **Customizable Parameters:** NERO's fee-sharing mechanism offers flexibility and customization options to accommodate the diverse needs and preferences of ecosystem participants. Developers have the ability to define the specific rules and parameters governing fee-sharing arrangements within their dApps, allowing them to tailor the distribution of transaction fees according to their unique business models and fee-sharing agreements. **Economic Alignment:** By distributing transaction fees among applications, NERO's fee-sharing mechanism aligns economic incentives and fosters cooperation and alignment of interests within the ecosystem. Developers are incentivized to create high-quality dApps that attract users and generate transaction volume. This economic alignment promotes the growth and sustainability of the NERO ecosystem over time. 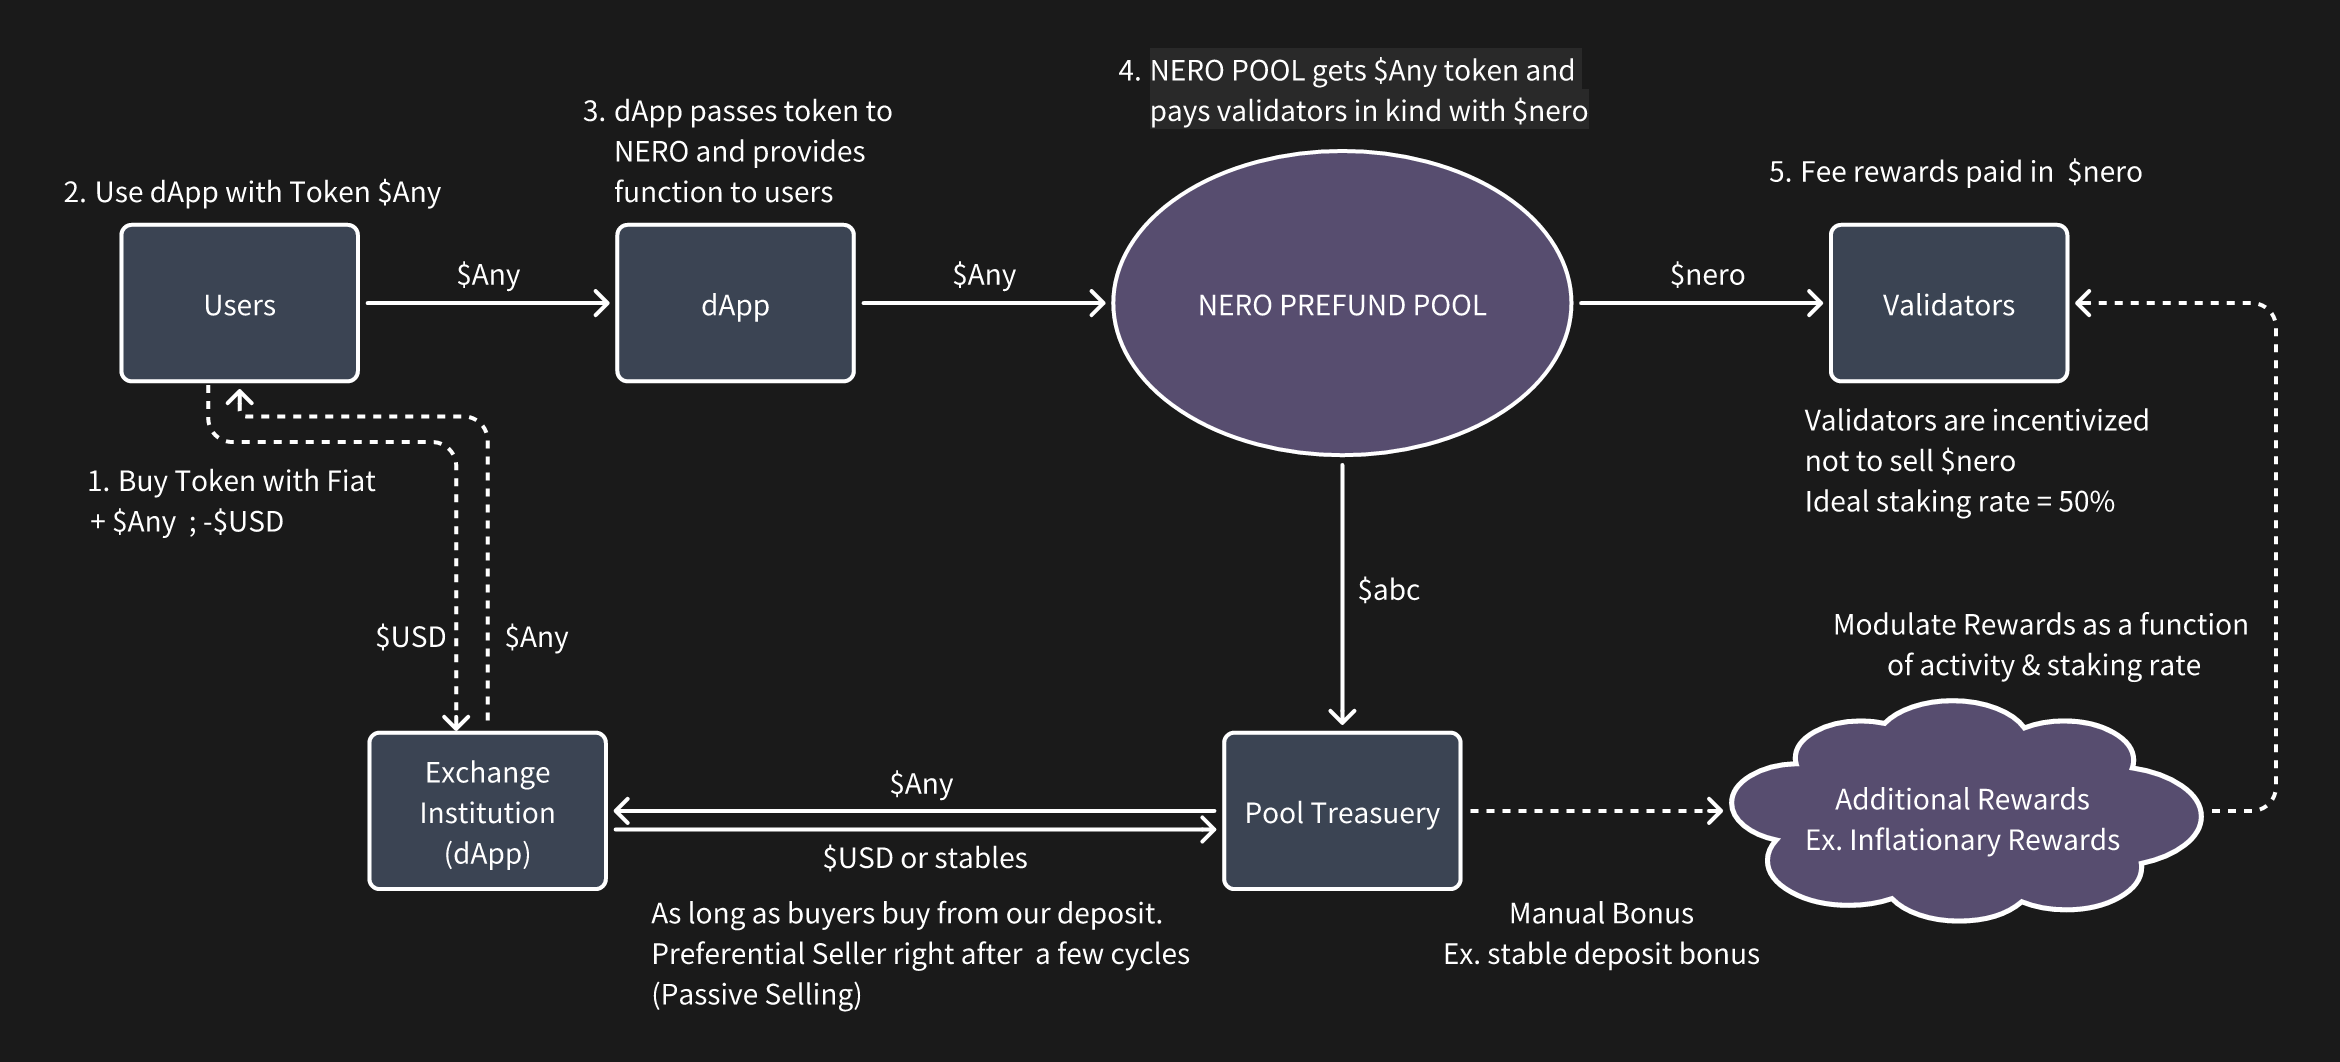Figure 10: Fee-sharing mechanism
--- # Overview Source: https://docs.nerochain.io/en/core-concepts Section: White Paper Since the introduction of Bitcoin, blockchain technology and the concept of decentralization have progressively gained popularity. Ethereum, with its smart contracts, opened the door to nearly limitless applications for distributed ledger technology. Early blockchain technology primarily addressed concerns related to security and decentralization, emphasizing the resolution of trust issues. As the demand for transaction processing capacity surged, Solana and other permissionless blockchains proposed solutions to scale processing performance to tens of thousands of TPS. Nevertheless, the current pivotal challenge lies in delivering an improved experience for users and developers, given the explosive growth of decentralized applications like Defi, GameFi, and NFTs. For instance, users must rely on the encryption method provided by each blockchain exclusively, and nothing will help if they happen to lose their private keys. Besides, dApps also cannot share transaction fees, even if they have a significant contribution to the transaction volumes. This is not conducive to the formation of an ecosystem. The inflexibility in user operations and the fee mechanism are hindering the development of the decentralized economy. The account abstraction solution of the Ethereum community has alleviated the mentioned issues above to some extent, but not in a somewhat thorough, native manner. Additionally, there is currently a lack of fee-sharing mechanisms which are widely used within decentralized communities to attract applications and foster ecosystem economic alignment. The Flexibility of the blockchain needs to be increased in order to address the issues. Therefore, we propose NERO, a next-generation modular blockchain featuring a native account abstraction mechanism, that is secure, scalable, and most importantly, flexible. NERO introduces a more structured and native mechanism for account abstraction, including integrated smart contracts, user operation pools, Paymaster, and more. This enables users to navigate the Web3 world with the familiarity of web2 experiences. Additionally, NERO has devised a gas fee economics model that empowers DApps by sharing the gas fee according to the contribution, encouraging DApps to make every effort to optimize themselves. Moreover, NERO adopts a modular design to ensure high-performance transaction processing. The entire process is vertically divided into execution, settlement, and data availability. Along with a settlement chain fully compatible with EVM and Ethereum protocols, with the consensus that supports large-scale node participation. Its data availability is based on data sampling validation schemes, which currently have the highest efficiency. NERO is designed to collaborate with and support the development of dApps within its ecosystem. It establishes a novel foundation by leveraging a high-performance underlying permissionless blockchain, gradually adding flexibility enhancement in phases. NERO actively supports the development of Web 3.0 through innovative concepts, forming a permissionless blockchain with complete underlying capabilities that everyone can participate in. Compared with other permissionless blockchains, NERO is committed to making innovations and contributions in flexibility as well as transaction scaling, with the following 5 core technical features: - Utilizing native account abstraction for a Web2-like user experience - Blockspace 2.0: Implementing a multidimensional gas fee economy with transaction fee redistribution across the ecosystem dApps - Employing a pipelined optimized BFT consensus mechanism, ensuring high throughput, decentralization, security, and fast transaction confirmation - Ensuring full compatibility with Ethereum protocols and EVM, facilitating seamless application migration within the ecosystem --- # MPC-TSS Technology Integration Source: https://docs.nerochain.io/en/core-concepts/native-account-abstraction/MpcTssTechnologyIntegration Section: White Paper NERO employs a cutting-edge technology known as MPC-TSS(Multi-Party Computation with Threshold Secret Sharing) to enhance the security and control of EOAs(Externally Owned Accounts). MPC-TSS represents a sophisticated cryptographic technique that enables secure and distributed computation among multiple parties, ensuring that no single entity has access to sensitive information in its entirety. With MPC-TSS, the control over EOAs in the NERO ecosystem is decentralized and safeguarded against potential security threats. Rather than relying on a single entity or centralized authority to manage and control EOAs, MPC-TSS distributes control among multiple parties, each holding a share of the cryptographic key required to access the EOA. This distribution of control ensures that no single party can access the EOA's assets or perform unauthorized transactions without the cooperation of the other parties involved in the MPC-TSS protocol. Moreover, MPC-TSS enhances the resilience of EOA control by implementing a threshold mechanism, which specifies the minimum number of parties required to collaboratively reconstruct the cryptographic key and access the EOA. This threshold-based approach adds an additional layer of security, as it ensures that even if some parties become compromised or unavailable, the EOA remains protected as long as the threshold requirement is not breached. 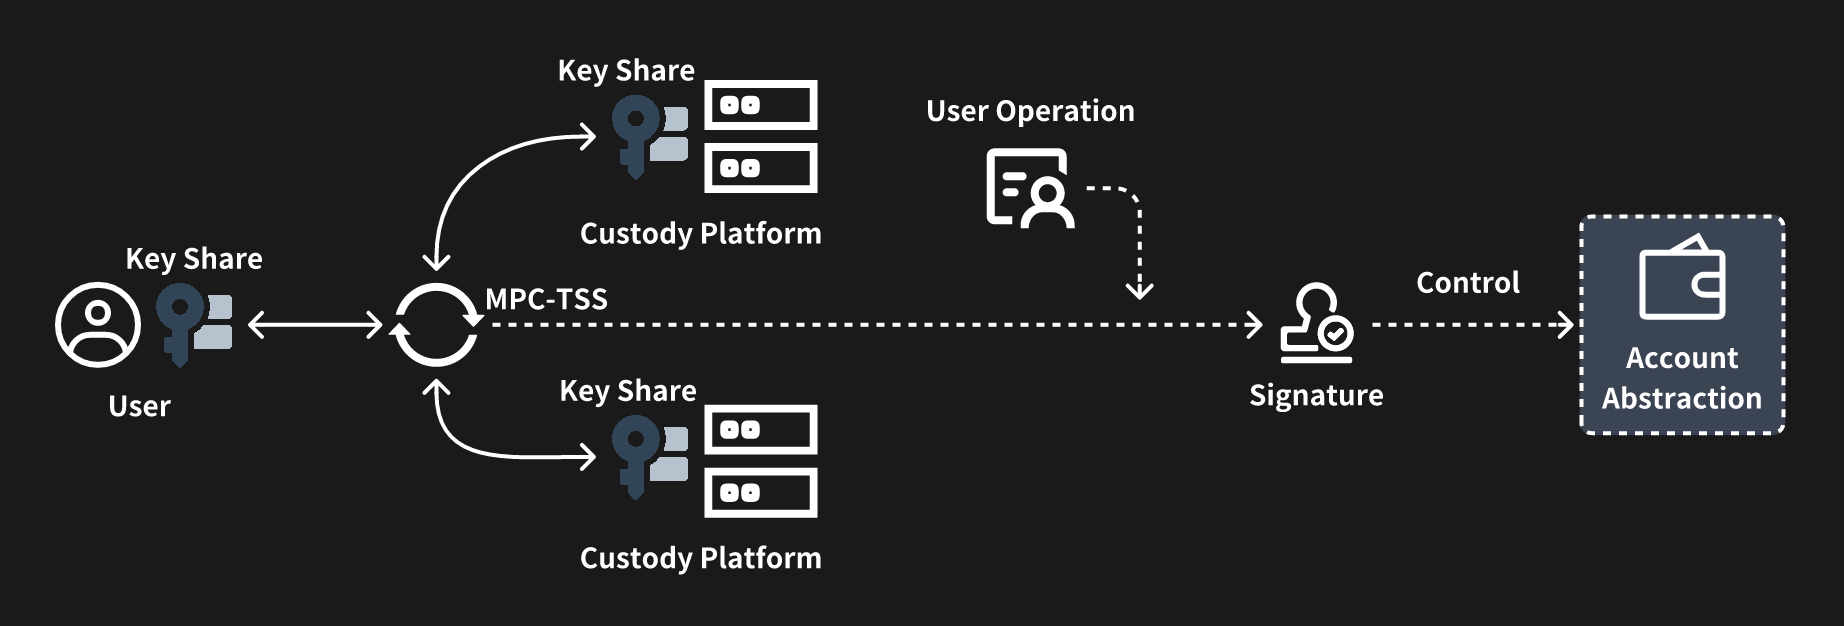Figure 9: Account abstraction with MPC-TSS
--- # Flexible Gas Mechanism Source: https://docs.nerochain.io/en/core-concepts/native-account-abstraction/flexibleGasMechanism Section: White Paper NERO developed a module called Paymaster, which is responsible for managing the payment of transaction fees associated with user operations on the blockchain. As part of the account abstraction model, the Pay Master serves to abstract the handling of transaction fees away from the users and into a centralized contract entity, streamlining the fee payment process and enhancing user experience. The primary function of the Pay Master is to facilitate the payment of transaction fees incurred by users when interacting with the blockchain. In traditional blockchain systems, users are required to manually include transaction fees with each transaction they submit to the network. However, in account abstraction, this responsibility is shifted to the Pay Master contract, relieving users of the burden of managing transaction fees directly. When a user initiates a transaction or performs any other operation that incurs a fee, the corresponding operation is processed through the Pay Master contract. The Pay Master calculates the appropriate fee based on factors such as the complexity of the operation and current network conditions. It then deducts the fee from the user's account balance or prompts the user to authorize the payment of the fee through a separate mechanism. Furthermore, the Pay Master may incorporate additional features and functionalities to enhance its capabilities. For example, it may implement dynamic fee adjustment algorithms to optimize fee pricing based on network congestion levels or user preferences. It may also support various payment methods and fee structures to accommodate diverse user needs and preferences. 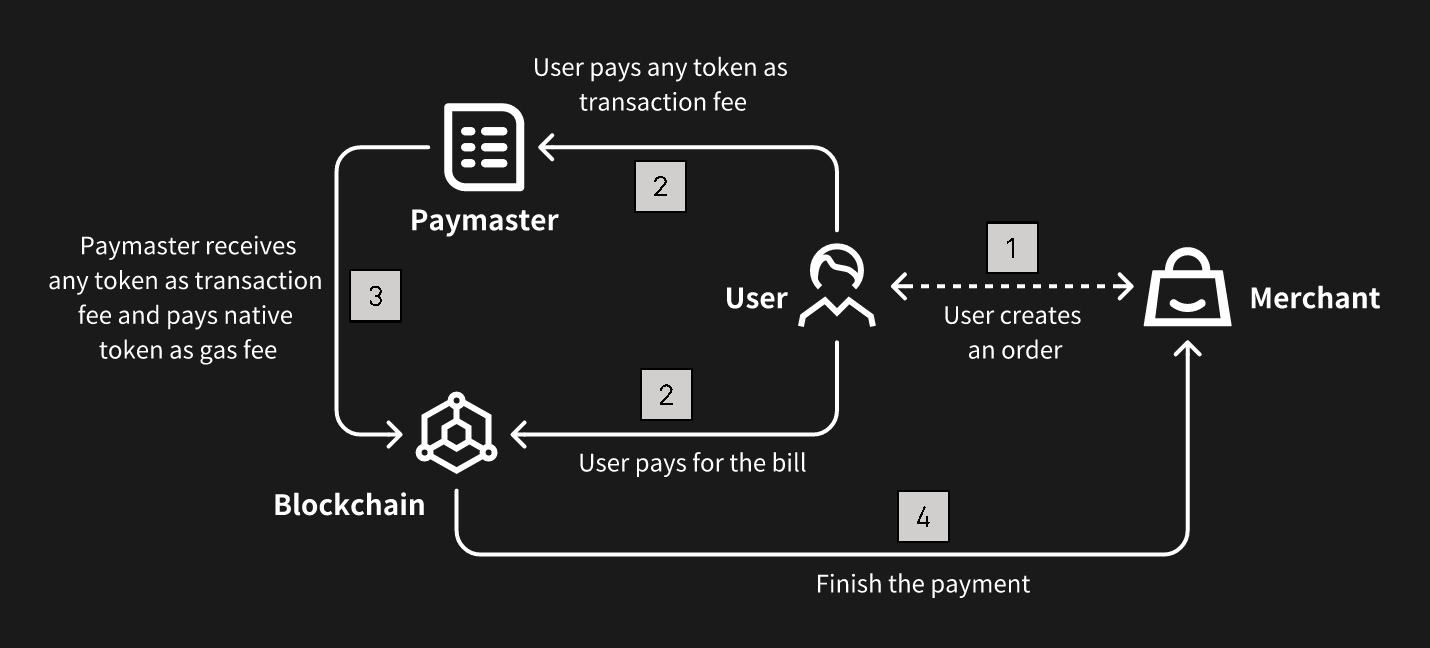Figure 8: Flexible gas fee mechanism
--- # Key Components Source: https://docs.nerochain.io/en/core-concepts/native-account-abstraction/keyComponents Section: White Paper Account abstraction redefines the way user accounts are managed and interacted with on the blockchain. By abstracting account management into smart contracts, account abstraction enables greater flexibility, security, and efficiency in DApps. NERO has built all the key components of account abstraction inside its own framework, including the User Operation Mempool, Bundler, and Entry Point Contract: **User Operation Mempool:** The User Operation Mempool serves as the repository for pending user operations awaiting execution on the blockchain. It functions similarly to the traditional transaction mempool but is specifically designed to handle user operations within the context of account abstraction. When users initiate account-related operations, such as fund transfers or smart contract interactions, these operations are temporarily stored in the User Operation Mempool until they are processed by the blockchain. **Bundler:** The Bundler is responsible for packaging and bundling user operations from the User Operation Mempool into atomic bundles for execution on the blockchain. It aggregates multiple user operations into a single transaction bundle, optimizing the use of blockchain resources and reducing transaction overhead. The Bundler ensures that bundled operations are executed atomically, meaning that either all operations within the bundle are executed successfully, or none of them are, ensuring consistency and integrity across the blockchain. **Entry Point Contract:** The Entry Point Contract serves as the interface through which users interact with their abstract accounts on the blockchain. It is a smart contract deployed on the blockchain that acts as the entry point for all user operations related to a specific abstract account. The Entry Point Contract contains the logic necessary to handle incoming user operations, such as depositing funds, withdrawing funds, or invoking custom account functions. Users interact with their abstract accounts by sending transactions to the Entry Point Contract, which then routes the operations to the appropriate account contract for execution. --- # Native Account Abstraction Support Source: https://docs.nerochain.io/en/core-concepts/native-account-abstraction/nativeAccountAbstractionSupport Section: White Paper Account abstraction is a concept within blockchain technology that aims to provide flexible management of user accounts based on smart contracts. Traditionally, in blockchain networks, user accounts are managed directly through the blockchain's native account system, with each account possessing an address and a private key. These accounts are used to send and receive cryptocurrency and interact with smart contracts deployed on the blockchain. However, with account abstraction, the responsibility for managing user accounts is shifted away from the blockchain's native account system and into the realm of smart contracts themselves. In this model, user accounts are represented as smart contracts, with management modules containing the necessary logic to handle transactions and manage balances. Users interact with their accounts by invoking methods on these smart contract representations, rather than by directly interacting with the blockchain's account system. NERO deeply integrates the account abstraction model, natively supporting various functions of abstract accounts, and systematically enhances user interactions in the following aspects: * **Enhanced Flexibility:** By abstracting account management into smart contracts, users gain greater flexibility and control over their accounts. They can define custom account structures and behaviors to suit their specific needs, rather than being constrained by the limitations of the blockchain's native account system. * **Improved Privacy:** Account abstraction can improve privacy by enabling users to implement sophisticated privacy-enhancing techniques within their account contracts. For example, users can implement privacy-preserving transaction protocols like zero-knowledge proofs or ring signatures directly within their account contracts, enhancing the confidentiality of their transactions. * **Reduced Gas Costs:** Account abstraction can potentially reduce gas costs for users by enabling more efficient transaction processing. Since account contracts can implement custom transaction logic tailored to specific use cases, they can optimize transaction execution to minimize gas consumption. This can result in cost savings for users, particularly for complex or frequent transactions. * **Enhanced Security:** By abstracting account management into smart contracts, account abstraction can enhance security by reducing the attack surface of the blockchain's native account system. Smart contracts can implement robust security measures, such as multi-signature authentication or time-locked transactions, to protect user funds and prevent unauthorized access. --- # References Source: https://docs.nerochain.io/en/core-concepts/references Section: White Paper 1. M. Al-Bassam, A. Sonnino, and V. Buterin, "Fraud proofs: Maximising light client security and scaling blockchains with dishonest majorities," *CoRR*, vol. abs/1809.09044, 2018. 2. E. Syta, P. Jovanovic, E. Kokoris-Kogias, N. Gailly, L. Gasser, I. Khoffi, M. J. Fischer, and B. Ford, "Scalable Bias-Resistant Distributed Randomness," In *38th IEEE Symposium on Security and Privacy*, May 2017. 3. The Ethereum Team, "A note on data availability and erasure coding," [https://github.com/ethereum/research/wiki/A-note-on-data-availability-and-erasure-coding](https://github.com/ethereum/research/wiki/A-note-on-data-availability-and-erasure-coding) 4. Satoshi Nakamoto, "Bitcoin: A peer-to-peer electronic cash system," 2008. [https://bitcoin.org/bitcoin.pdf](https://bitcoin.org/bitcoin.pdf) 5. The Ethereum Foundation, "Ethereum Whitepaper." [https://github.com/ethereum/wiki/wiki/White-Paper](https://github.com/ethereum/wiki/wiki/White-Paper) 6. E. Kokoris-Kogias, P. Jovanovic, L. Gasser, N. Gailly, E. Syta, and B. Ford, "Omniledger: A secure, scale-out, decentralized ledger via sharding," in *2018 IEEE Symposium on Security and Privacy (SP)*, pp. 19–34, 2018. 7. A. Kiayias, I. Konstantinou, A. Russell, B. David, and R. Oliynykov, "Ouroboros: A provably secure proof-of-stake blockchain protocol," *Cryptology ePrint Archive*, Report 2016/889, 2016. [http://eprint.iacr.org/](http://eprint.iacr.org/) 8. George Danezis and Sarah Meiklejohn, "Centrally banked cryptocurrencies," In *23rd Annual Network and Distributed System Security Symposium, NDSS*, 2016. 9. P. Daian, R. Pass and E. Shi, "Snow White: Robustly reconfigurable consensus and applications to provably secure proofs of stake," *Cryptology ePrint Archive*, Report 2016/919, 2017. 10. M. Zamani, M. Movahedi, and M. Raykova, "RapidChain: A Fast Blockchain Protocol via Full Sharding," *Cryptology ePrint Archive*, Report 2018/460, 2018. [https://eprint.iacr.org/2018/460](https://eprint.iacr.org/2018/460) 11. P. Vasin, "Blackcoin's Proof-of-Stake Protocol v2," 2014. [https://blackcoin.co/blackcoin-pos-protocol-v2-whitepaper.pdf](https://blackcoin.co/blackcoin-pos-protocol-v2-whitepaper.pdf) 12. Loi Luu, Viswesh Narayanan, Chaodong Zheng, Kunal Baweja, Seth Gilbert, and Prateek Saxena, "A secure sharding protocol for open blockchains," In *Proceedings of the 2016 ACM SIGSAC Conference on Computer and Communications Security*, CCS '16, pages 17–30, 2016. 13. Rafael Pass and Elaine Shi, "Thunderella: Blockchains with optimistic instant confirmation." [https://eprint.iacr.org/2017/913.pdf](https://eprint.iacr.org/2017/913.pdf) 14. Joseph Poon, Vitalik Buterin, "Plasma: Scalable Autonomous Smart Contracts." [http://plasma.io/plasma-deprecated.pdf](http://plasma.io/plasma-deprecated.pdf) 15. Vitalik Buterin, "An Incomplete Guide to Rollups," [https://vitalik.ca/general/2021/01/05/rollup.html](https://vitalik.ca/general/2021/01/05/rollup.html) 16. S. Dziembowski, S. Faust, and K. Hostakova, "Foundations of state channel networks," *Cryptology ePrint Archive*, Report 2018/320, 2018. [https://eprint.iacr.org/2018/320](https://eprint.iacr.org/2018/320) --- # Configuring Policies Source: https://docs.nerochain.io/en/developer-tools/aa-platform/configuring-policies Section: Developer Tools Policies determine how your application handles transaction fees for users. There are four main configurations to consider: - Enabling ERC20 Payments - Discounts per Address - Offers for all addresses - Specify Callbacks ## Enabling ERC20 Payments 1. Go to the "API Keys" tab and select the desired APIKey to configure 2. Click in the "Policies" tab 3. Click on the ERC-20 Payment toggle 4. Select Between the Payment modes: Pre-Payment and Post Payment or only Pre-Payment  *Figure 1: Configuring a Gas Policy* ### Selecting tokens that supports Gas Payment Here you can select any ERC20 token you wish to receive as Payment for Gas. 1. Click on the "Select" button 2. Select the tokens on the list or Input a Token contract in the text field to make it appear on the list 3. "Confirm" your selection 4. Configure the Gas-Payment Floating rate. 5. Click in the "Save" button at the end of the dashboard.  *Figure 2: Selecting Tokens for Gas Supported.* ### Strategy Types Explained #### Free Gas (Type 0) With this strategy, you fully cover the gas costs for your users. This is ideal for: - Onboarding new users who don't own crypto - Promotional campaigns - Applications where you want to remove all friction - GameFi applications where you want to hide blockchain complexity #### ERC20 Prepay (Type 1) Users pay for gas using ERC20 tokens before the transaction is executed: - The full estimated amount is collected upfront - Any excess is refunded after execution - More secure for the developer as payment is guaranteed - Better suited for high-value operations #### ERC20 Postpay (Type 2) Users pay for gas using ERC20 tokens after the transaction is executed: - Only the exact gas cost is collected - Requires token approval before execution - Slightly better UX as users only pay what's needed - Has a risk of payment failure after execution ## Giving Discounts per Address You can configure the total USD or native tokens you are willing to sponsor per address. 1. On the Policies tab, toggle the "Discount per address" option 2. Configure the amount of times per address per day, week , or month modes. 3. Maximum free amount per new address : you can use this to set a total limit you can sponsor per address 4. You can also set the amount of overral free times an address can be sponsored. 5. Click on the "Save" button.  *Figure 3: Configuring Discounts.* ## Offers for all addresses You can also have a similar configuration configured for all address at the same time. 1. On the Policies tab, toggle the "All Addresses offer" option 2. Configure the amount of times per address per day, week , or month modes. 3. Maximum free amount per new address : you can use this to set a total limit you can sponsor per address 4. You can also set the amount of overral free times an address can be sponsored. 5. Click on the "Save" button.  *Figure 4: Configuring Discounts for all addresses.* ## Specify Callbacks You can set specific addresses wheter a user operation should be sponsored or not. 1. Toggle the "Specify Callback" option. 2. Set the address 3. Save ## Next Steps After configuring your policies, you should: - [Manage your payments](https://docs.nerochain.io/en/developer-tools/aa-platform/payment-management) to ensure sufficient funds for your strategies - [Integrate with your application](https://docs.nerochain.io/en/developer-tools/aa-platform/integration-and-best-practices) to start using your configured policies --- # EntryPoint Error Codes Documentation Source: https://docs.nerochain.io/en/developer-tools/aa-platform/entrypoint-error-codes Section: Developer Tools This document provides a comprehensive reference for all error codes used in the EntryPoint contract. Error codes follow the pattern `AAmn`, where: - `m` indicates the category: - `1` = Factory/InitCode issues - `2` = Account issues - `3` = Paymaster issues - `4` = Gas/Validation issues - `5` = PostOp issues - `9` = Other/Internal issues - `n` is a specific error number within that category ## Error Codes Reference Table | Code | Category | Error Message | Description | Location | Common Causes | Resolution | |------|----------|---------------|-------------|-----------|----------------|------------| | **AA10** | Factory | `"AA10 sender already constructed"` | Sender account contract already exists at the specified address | `_createSenderIfNeeded()` | UserOperation includes `initCode` but account already deployed | Remove `initCode` or use different sender address | | **AA13** | Factory | `"AA13 initCode failed or OOG"` | Account creation via `initCode` failed | `_createSenderIfNeeded()` | Factory reverts, insufficient gas, or returns `address(0)` | Check factory contract, ensure sufficient `verificationGasLimit` | | **AA14** | Factory | `"AA14 initCode must return sender"` | Factory returned address doesn't match expected sender | `_createSenderIfNeeded()` | Factory returns different address than calculated | Ensure factory uses correct address calculation method | | **AA15** | Factory | `"AA15 initCode must create sender"` | No code deployed at sender address after `initCode` execution | `_createSenderIfNeeded()` | Factory execution completed but no contract code exists | Verify factory properly deploys account contract | | **AA20** | Account | `"AA20 account not deployed"` | Account contract doesn't exist and no `initCode` provided | `_validateSenderAndPaymaster()` (simulation only) | Account not deployed, no `initCode` | Provide `initCode` or ensure account is deployed | | **AA21** | Account | `"AA21 didn't pay prefund"` | Account deposit insufficient to cover required prefund | `_validateAccountPrepayment()` | Account deposit < required prefund | Deposit sufficient funds to EntryPoint for account | | **AA22** | Account | `"AA22 expired or not due"` | UserOperation outside valid time range | `_validateAccountAndPaymasterValidationData()` | Block timestamp after `validUntil` or before `validAfter` | Submit within valid time window | | **AA23** | Account | `"AA23 reverted:Figure 12: spacify callback
### 2. API Call ```bash POST /v1/apiKey/policy/saveOrUpdate { "projectId": 123, "policy": { "isCallback": true, "callbackUrl": "https://your-callback-server.com/paymaster/callback" } } ``` ## Callback Protocol ### Request Specification - URL: Callback URL specified in project settings - Method: POST - Content-Type: application/json - Timeout: 2 seconds ### Headers ```jsx API-SIGNATURE: MD5 hash signature Content-Type: application/json ``` ### Request Body ```json { "sender": "0x1234...", "nonce": "0x1", "initCode": "0x", "callData": "0x...", "callGasLimit": "0x5208", "verificationGasLimit": "0x5208", "preVerificationGas": "0x5208", "maxFeePerGas": "0x3b9aca00", "maxPriorityFeePerGas": "0x3b9aca00", "paymasterAndData": "0x", "signature": "0x..." } ``` ### Signature Verification The signature is generated through the following steps: 1. Sort request body keys in dictionary order 2. Concatenate in `key + value` format 3. Append the project's `callbackKey` at the end 4. Calculate MD5 hash ### Response Specification ```json { "status": 1 // 1: PASS, 2: NOT_PASS, 3: LIMITED } ``` ### Status Values | Status | Value | Meaning | Action | | -------- | ----- | -------- | -------------------------------- | | PASS | 1 | Approved | Provide free gas fee sponsorship | | NOT_PASS | 2 | Rejected | Deny free gas fee sponsorship | | LIMITED | 3 | Limited | Mark as limited state | ## Sample Implementation Below is an example callback server implementation: ```tsx interface PaymasterSupportedToken { sender: string; nonce: string; initCode: string; callData: string; callGasLimit: string; verificationGasLimit: string; preVerificationGas: string; maxFeePerGas: string; maxPriorityFeePerGas: string; paymasterAndData: string; signature: string; } interface PaymasterRule { is_sponsored: boolean; is_blocked: boolean; } const paymasterRules: MapFigure 1: Login 1
1. First, locate the power button on the device and click it to turn the device on. This will bring up the main wallet connection screen. 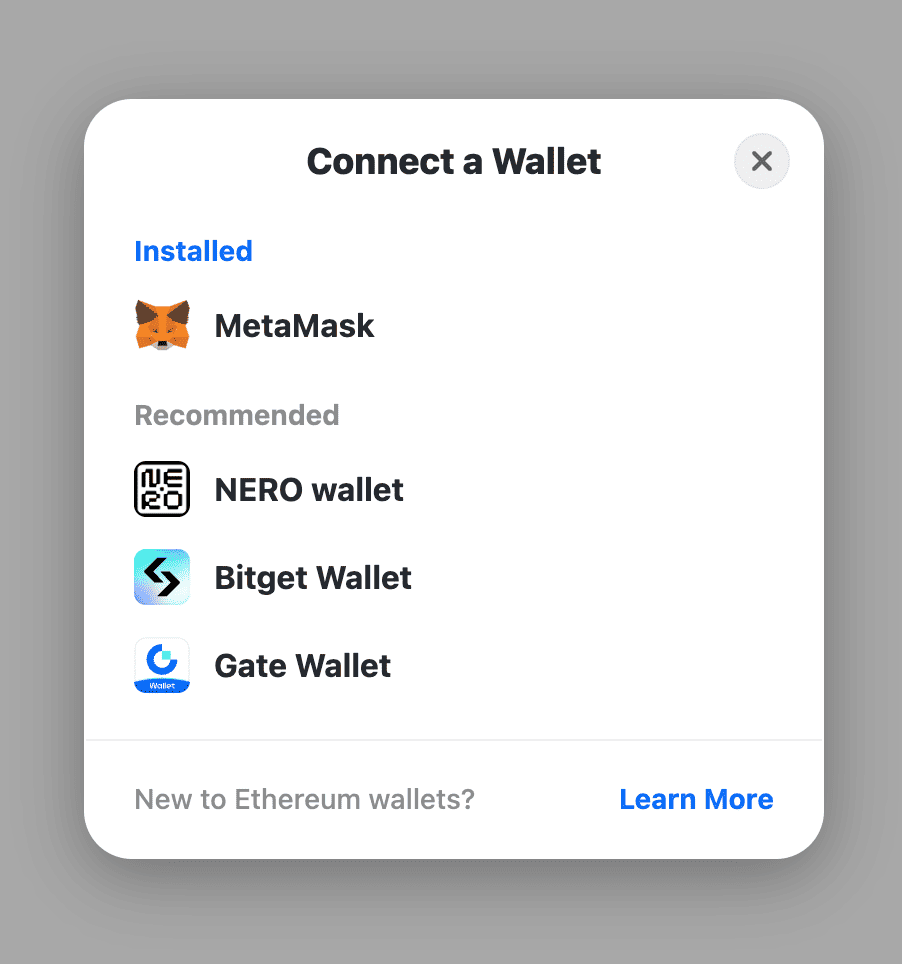Figure 2: Login 2
2. On the "Connect a Wallet" screen, you will see a list of installed and recommended wallet options. Scroll down and select "NERO wallet" from the Recommended section. 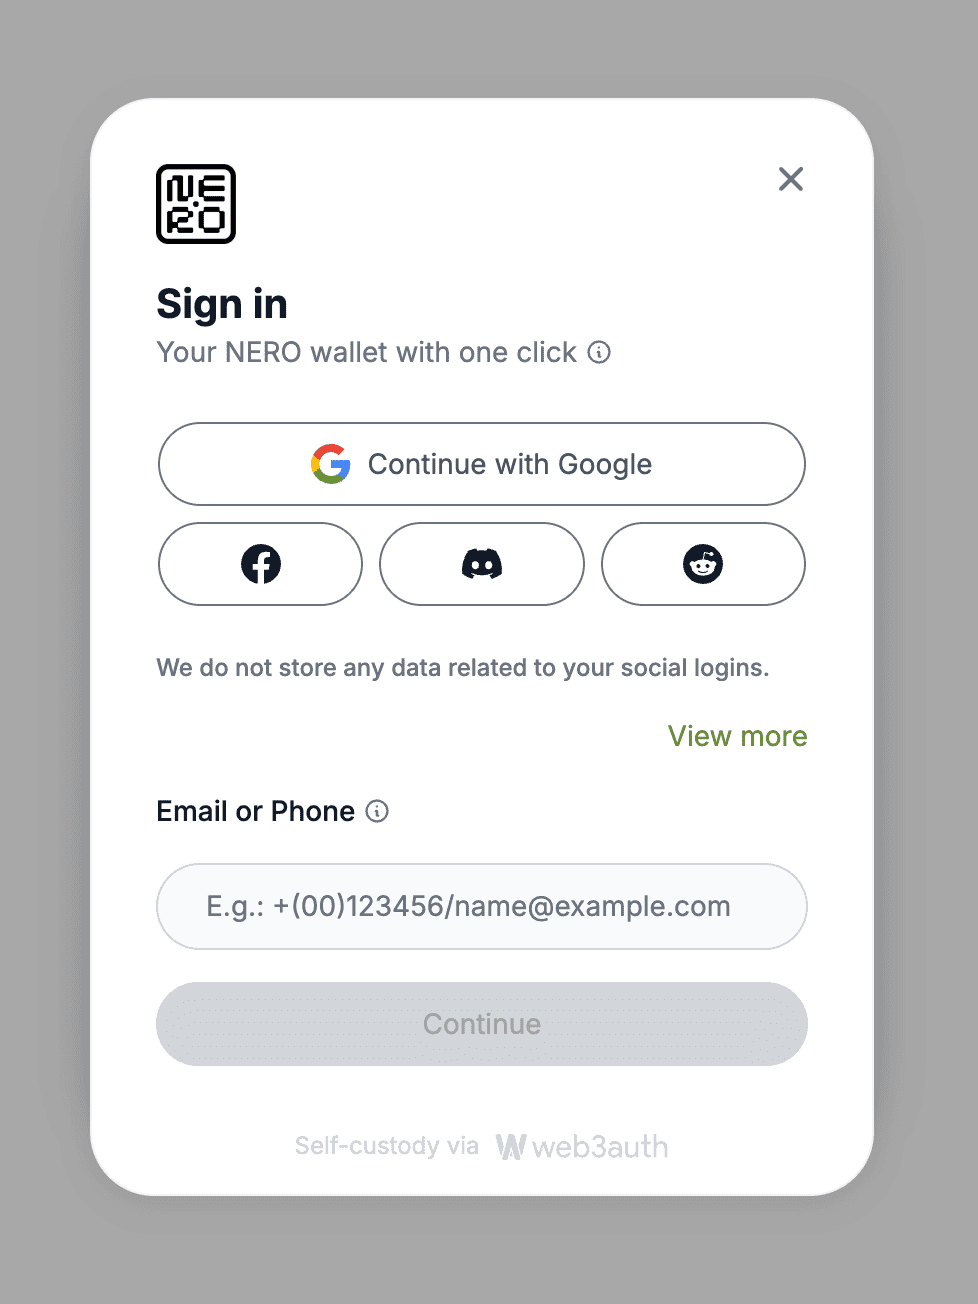Figure 3: Login 3
3. After selecting NERO wallet, you will be prompted to provide some account information to set up the wallet. You can enter your preferred social media account, email address, or phone number that you would like associated with the wallet. 4. Double-check the information you entered to make sure it's correct, then click the "Continue" button at the bottom of the screen. 4. Double-check the information you entered to make sure it's correct, then click the “Continue” button at the bottom of the screen. 5. When the setup is finished, you should see the main NERO wallet interface load, indicating that the setup process is complete. **Note:** Even if you log in with other wallets like **Bitget Wallet** or **Gate Wallet**, you will still be logged in as an AA Wallet. ## Wallet Home 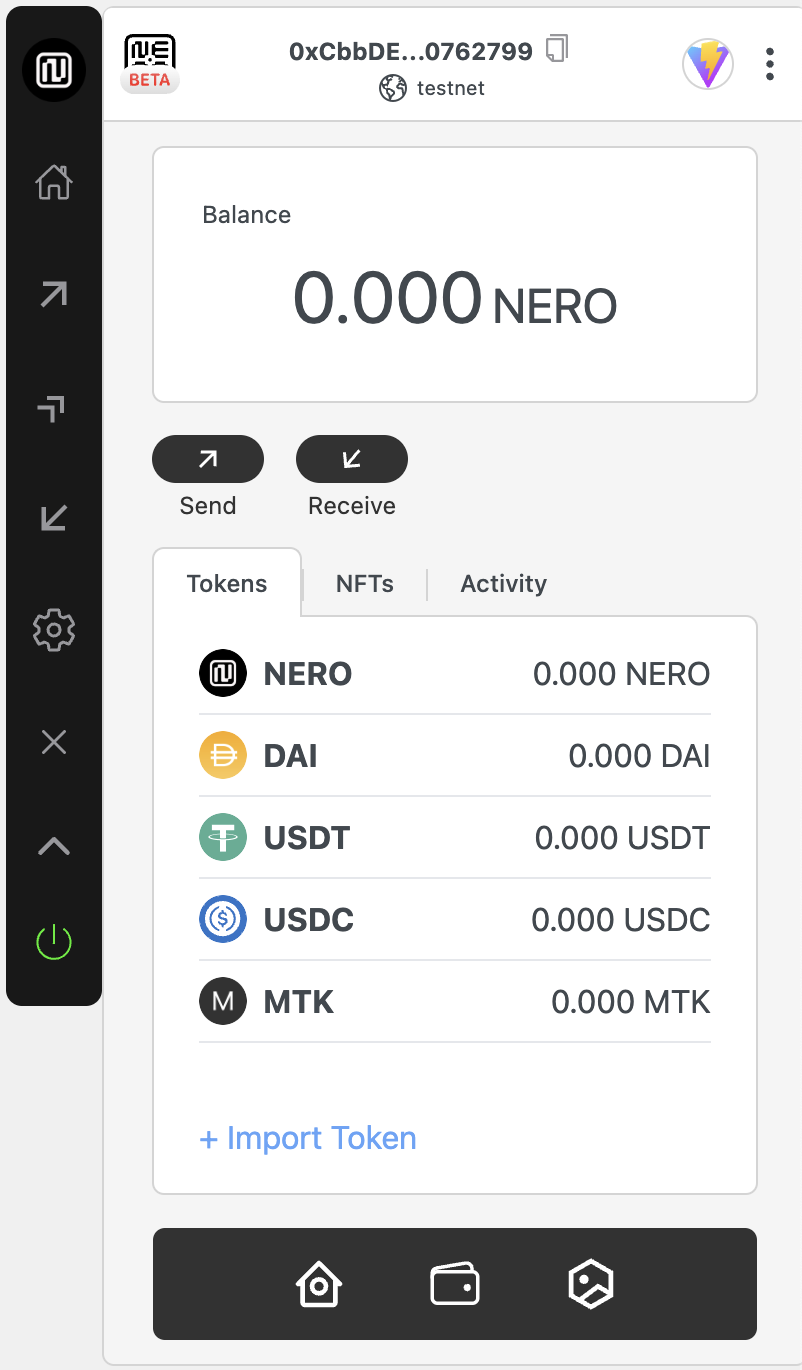Figure 4: Home
The home screen provides a clean and intuitive interface where users can view their total NERO balance. Below that, users will find two main action buttons: Send for initiating transfers and Receive to get your wallet address for receiving transfers. There are also three tabs at the bottom for different features. #### 1. Tokens: _Tokens_ shows a list of default tokens and their balances including; - NERO (native token) - DAI - USDT - USDC #### 2. NFTs: NFTs displays your NFT collection #### 3. Activity: Activity displays your transaction history. Users can tap on any token to see more details. The interface is designed simple and user-friendly, making it easy to access essential wallet functions and monitor token balances at a glance. Note: These default tokens are pre-configured for convenience, and additional tokens can be added using the “+ Import Token” feature. ## Sidebar Functions 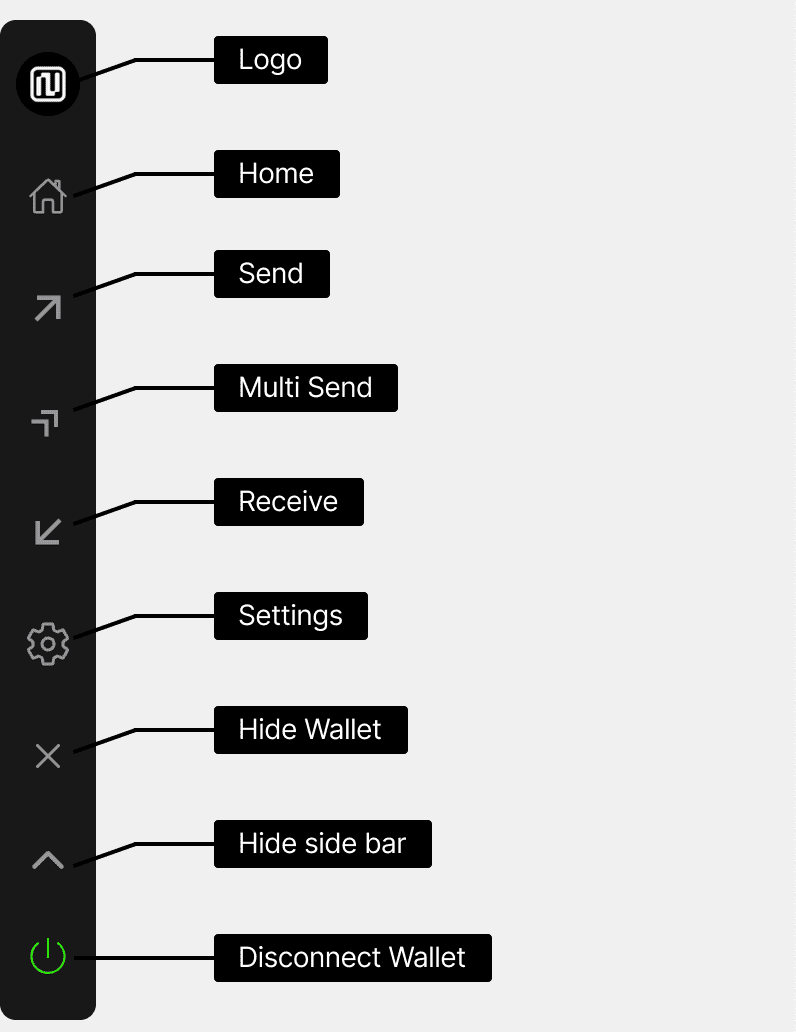Figure 5: Sidebar Functions
The sidebar is the main navigation menu for the AA Wallet application. The menu items allow users to access the core functionality and settings of the digital wallet. - **Logo** - Takes you to the main homepage or dashboard - **Home** - Takes you to the wallet's main dashboard or home screen - **Send** - Allows users to start a transaction - **Multi Send** - Send assets to multiple addresses in a single transaction - **Receive** - Provides QR code and wallet address to receive assets - **Settings** - Adjust your wallet preference and configuration options - **Hide Wallet** - Hide your main wallet interface for privacy or security - **Hide Sidebar** - Minimize the left-hand navigation menu to free more screen space - **Disconnect Wallet** - Log out and disconnect your wallet This menu allows easy access to all the key features and controls they would need to manage their digital assets effectively. ## Send UserOperation Flow All Actions Issue UserOperations to Generate Transactions ### UserOperation Verification 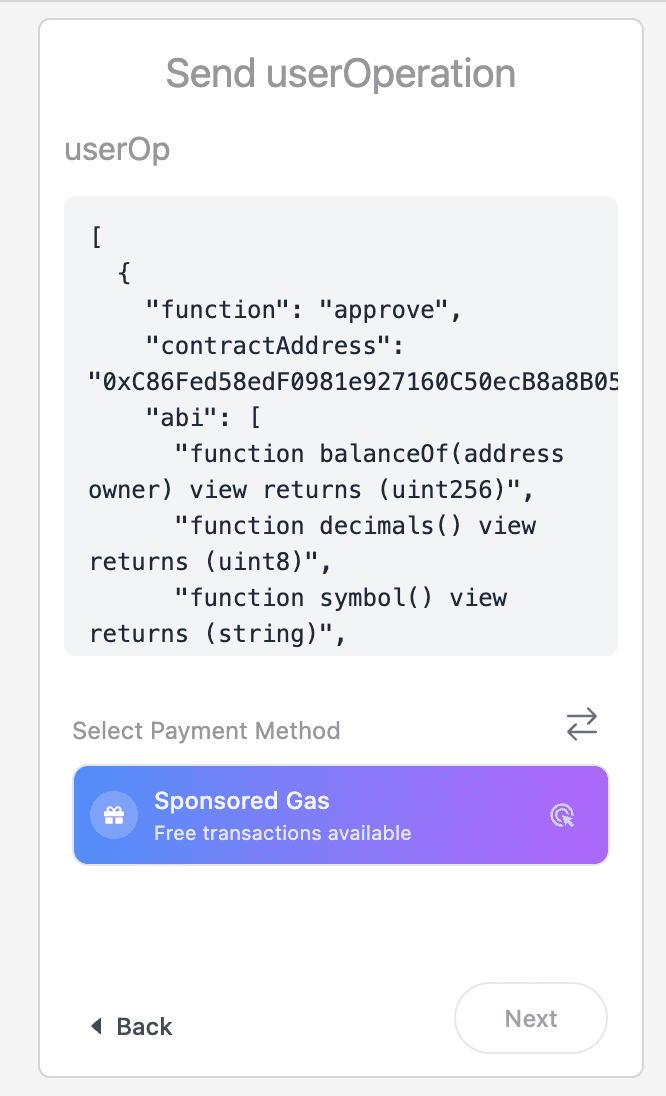Figure 6: Send userOperation
Before executing any action in the AA Wallet, review the UserOperation details. This screen displays the complete operation data, including: - Function calls - Contract addresses - ABI information This verification step ensures transparency and allows users to confirm the details of their transaction before proceeding. ### Operation Details Screen 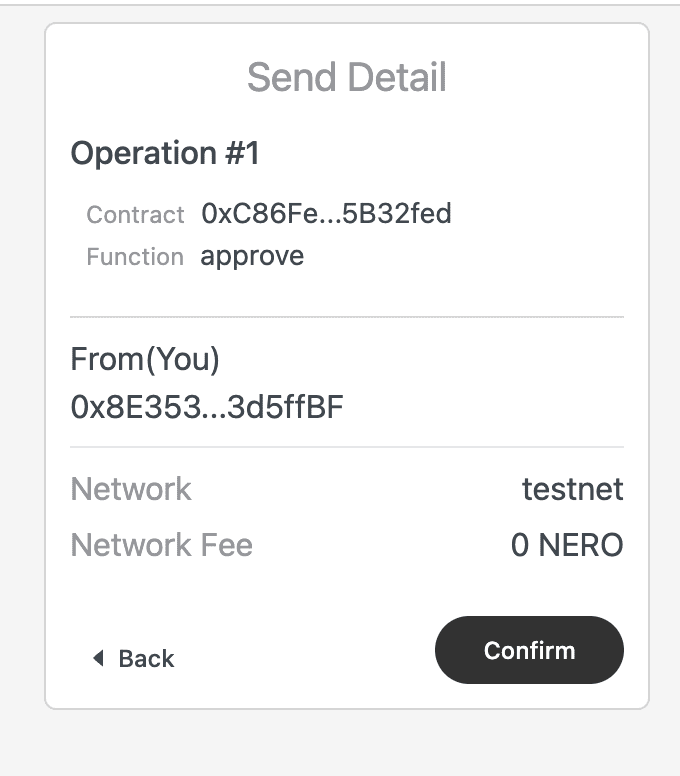Figure 7: Send userOperation Detail
The detail provides a view of the operation, including: - Operation number and type - Contract address - Function being called - Sender address (You) and Receive address - Network information - Network fee ### Confirmation Process 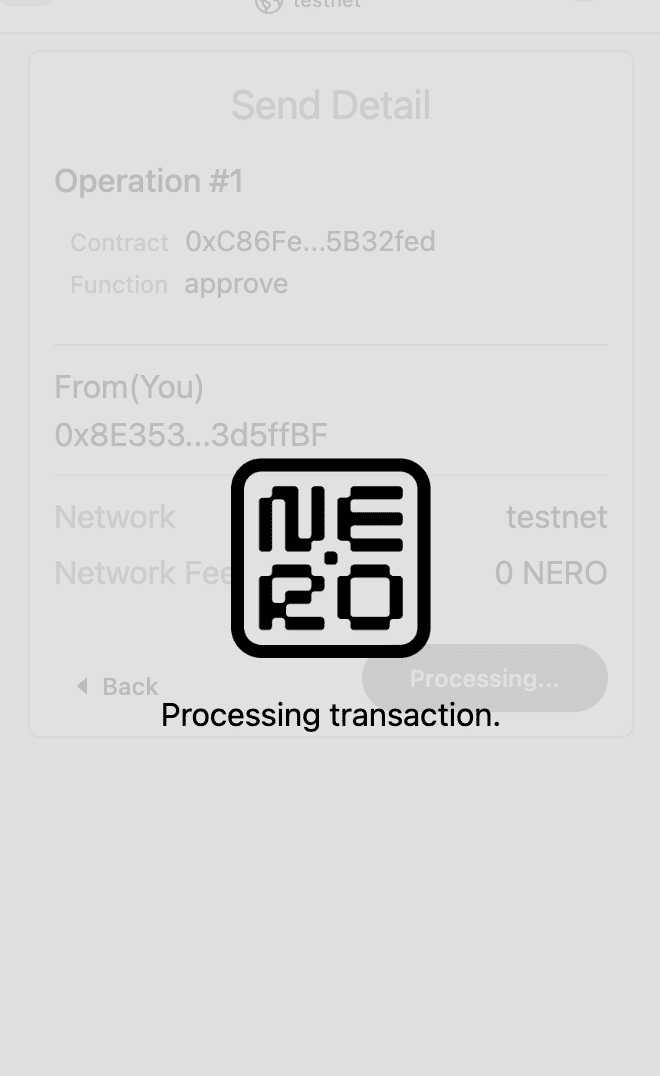Figure 8: loading
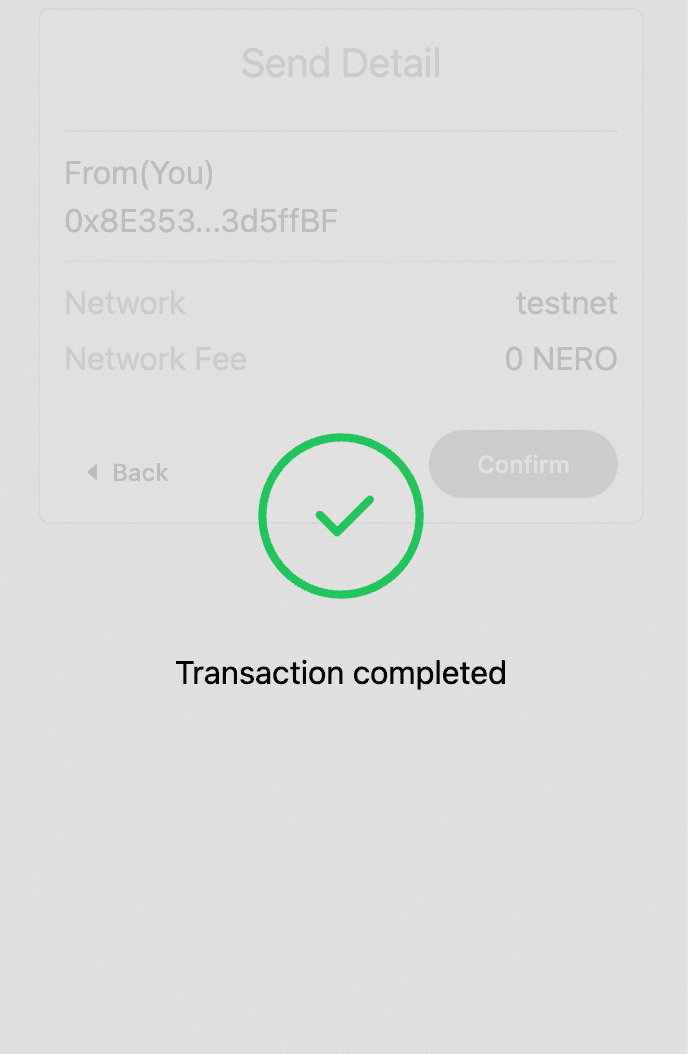Figure 9: success
1. Carefully review all operation detailsClick the “Confirm” button to initiate the UserOperation 2. Status Updates: - Loading: The transaction is being processed - Success: The UserOperation has been successfully created and sent to the network. When you see the success message, it confirms the transaction is complete. ## Payment Methods The “Select Payment Method” screen offers two options: ### Sponsored Gas - This payment method allows users to complete transactions without having to pay the gas fees themselves. - The gas fees are covered by the project or platform that has integrated the AA Wallet. - However, the _Sponsored Gas_ option is only available if the project has enabled and configured this feature on the AA Platform. - If it is not enabled, this option will not be selectable. 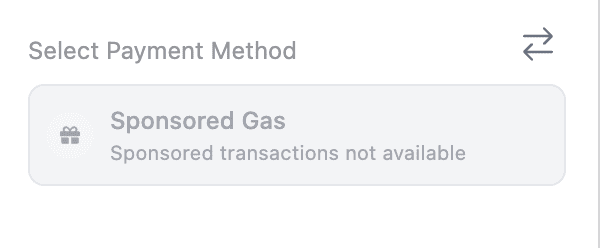Figure 10: Sponsored Gas Not Available
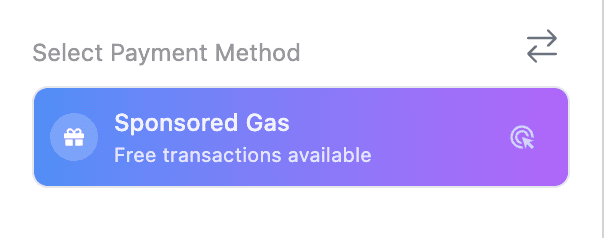Figure 11: Sponsored Gas Available
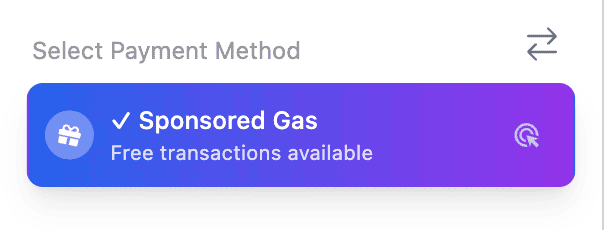Figure 12: Clicked Sponsored Gas
### Pay with Token - This payment method allows users to pay the gas fees using a specific ERC20 token. - The project or platform integrating the AA Wallet can specify which ERC20 token(s) can be used to cover the gas fees. - The number of tokens available is displayed to the user (for example, 6 tokens are available). 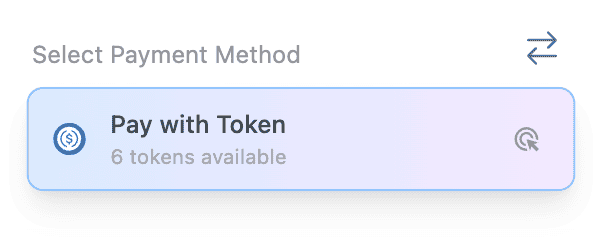Figure 13: Pay with Token
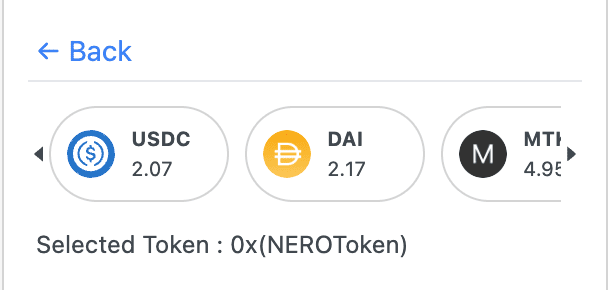Figure 14: Pay with Token(select)
**Note:** The default token is NEROToken(Native Token) #### Gas fee Display **Sponsored Gas** - When the Sponsored Gas option is selected, the gas fee is shown as 0, indicating that the project is covering the full gas fee for the user. - This allows users to complete transactions without paying any gas fees. 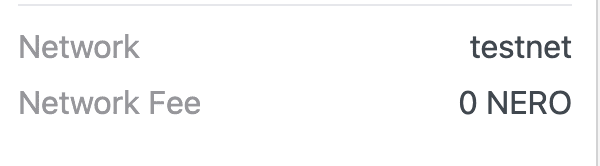Figure 15: Sponsor Gas Fee Display
**Pay with Token** - When the Pay with Token option is selected, the maximum possible gas fee that the user may need to pay is displayed. - This provides transparency regarding the potential gas fee users may incur when using this payment method. - The user must ensure they have enough of the project-specified ERC20 token to cover this maximum gas fee. Figure 16: Erc20 Gas Fee Display
--- # Network Informations Source: https://docs.nerochain.io/en/developer-tools/accessEntryPoint Section: Developer Tools ## NERO Mainnet ### Network Information | Parameter | Value | | :-------------- | :-------------------------------------------------------------------------------------- | | Network Name | NERO Chain Mainnet | | RPC Endpoint | https://rpc.nerochain.io | | Chain ID | 1689 | | Currency symbol | NERO | | Explorer | https://neroscan.io | | Connect Wallet | [Click here to connect your wallet to NERO Mainnet](https://chainlist.org/?search=Nero) | | Node Web Socket | wss://ws.nerochain.io | | Subgraph SandBox | https://subgraph.mainnet.nero.metaborong.com/ | ### AA URLs | Parameter | Value | | :------------ | :------------------------------------------------ | | Platform | https://aa-platform.nerochain.io/ | | Platform API | https://api-aa-platform.nerochain.io/ | | Paymaster RPC | https://paymaster-mainnet.nerochain.io | | Bundler | https://bundler-mainnet.nerochain.io | | PriceService | https://aa-platform.nerochain.io/supported_tokens | ### Contract Addresses | Parameter | Value | | :------------- | :----------------------------------------- | | Paymaster | 0xC42E90D29D478ccFeCC28d3B838824E57e51F284 | | Entrypoint | 0x5FF137D4b0FDCD49DcA30c7CF57E578a026d2789 | | AccountFactory | 0x9406Cc6185a346906296840746125a0E44976454 | | MultiCall | 0x1dA998CfaA0C044d7205A17308B20C7de1bdCf74 | ### Free-Mint Tokens addresses | Parameter | Value | | :-------- | :----------------------------------------- | | TestToken | 0xC86Fed58edF0981e927160C50ecB8a8B05B32fed | ## NERO Testnet ### Network Information | Parameter | Value | | :-------------- | :---------------------------------------------------------------------------------------------------- | | Network Name | NERO Chain Testnet | | RPC Endpoint | https://rpc-testnet.nerochain.io | | Chain ID | 689 | | Currency symbol | NERO | | Explorer | https://testnet.neroscan.io | | Connect Wallet | [Click here to connect your wallet to NERO Testnet](https://chainlist.org/?search=Nero&testnets=true) | | Node Web Socket | wss://ws-testnet.nerochain.io | | Subgraph SandBox | https://subgraph.testnet.nero.metaborong.com/ | ### AA URLs | Parameter | Value | | :------------ | :------------------------------------- | | Platform | https://aa-platform.nerochain.io/ | | Platform API | https://api-aa-platform.nerochain.io/ | | Paymaster RPC | https://paymaster-testnet.nerochain.io | | Bundler | https://bundler-testnet.nerochain.io/ | | PriceService | https://price-service.nerochain.io | ### Contract Addresses | Parameter | Value | | :------------- | :----------------------------------------- | | Paymaster | 0x5a6680dFd4a77FEea0A7be291147768EaA2414ad | | Entrypoint | 0x5FF137D4b0FDCD49DcA30c7CF57E578a026d2789 | | AccountFactory | 0x9406Cc6185a346906296840746125a0E44976454 | | MultiCall | 0x343A0DdD8e58bEaf29d69936c82F1516C6677B0E | ### Faucet Mint faucet tokens in : https://app.testnet.nerochain.io/faucet | Parameter | Value | | :-------- | :----------------------------------------- | | DAI | 0x5d0E342cCD1aD86a16BfBa26f404486940DBE345 | | USDT | 0x1dA998CfaA0C044d7205A17308B20C7de1bdCf74 | | USDC | 0xC86Fed58edF0981e927160C50ecB8a8B05B32fed | ### Free-Mint Tokens Addresses | Parameter | Value | | :-------- | :----------------------------------------- | | TestToken | 0xA919e465871871F2D1da94BccAF3acaF9609D968 | > **_NOTE:_** Freely mintable by call function mint(address to, uint256 amount)) --- # Developer Tools & Account Abstraction Source: https://docs.nerochain.io/en/developer-tools Section: Developer Tools Explore NERO's suite of developer tools and learn about our advanced account abstraction capabilities. ## Developer Tools - UserOpSdk SDK - Paymaster API - Paymaster Platform - NEROWallet (coming soon!) Choose a topic from the sidebar to learn more about NERO's developer tools and account abstraction features. --- # Best Practices Source: https://docs.nerochain.io/en/developer-tools/paymaster-api/best-practices Section: Developer Tools ## 1. Make use of UserOpSDK. The SDK manages much of the complexity involved in interacting with the Paymaster API and UserOperations. Retries and built-in error handling help to greatly simplify integration. ## 2. Cache Tokens Supported Periodically update the list of supported tokens to help to prevent frequent API requests. This lightens your servers' burden and enhances performance. ## 3. Apply appropriate error handling. Depending on the kind of fault, always catch and treat them suitably. While certain mistakes—like network problems—might be _retryable_, others—like improper parameters—call for human action. ## 4. Evaluate Token Approvals Verify users' authorized token spending for Type 1 and 2 payments before forwarding the User Operation. This enhances user experience and helps to eliminate pointless failures. ## 5. safely save API keys Never show your API key in code written for a client. Keep it always safe on your backend systems. ## 6. Track Consumption Track your sponsorship use on the AA Platform to prevent unplanned service outages brought on by exceeding quotas. ## 7. Establish Appropriate Gas Restraints Get precise gas values for your UserOperations using the gas estimating approach. Appropriate restrictions maximize expenses and aid to minimize transaction failures. ## 8. Rate Limitations and Quotas Your use of APIs is limited by the settings found in your AA Platform account: - Daily gas limits - Transaction count limits - Token allowlists - Gas price caps You can monitor and adjust these settings in the [AA Platform](https://aa-platform.nerochain.io). --- # Core JSON-RPC Methods Source: https://docs.nerochain.io/en/developer-tools/paymaster-api/core-methods Section: Developer Tools The Paymaster API uses JSON-RPC, which is the standard for communicating with Ethereum-compatible nodes. Below are the key methods available: ## pm_supported_tokens Retrieves the list of ERC20 tokens supported by the Paymaster for gas payments along with pricing information. **Parameters:** 1. `userOperation` - A minimal UserOperation object with at least the sender field 2. `apiKey` - Your API key from the AA Platform 3. `entryPoint` - The EntryPoint contract address (typically `0x5FF137D4b0FDCD49DcA30c7CF57E578a026d2789`) **Example Request:** ```json { "jsonrpc": "2.0", "id": 1, "method": "pm_supported_tokens", "params": [ { "sender": "0xAAWalletAddress", "nonce": "0x0", "initCode": "0x", "callData": "0x", "callGasLimit": "0x0", "verificationGasLimit": "0x0", "preVerificationGas": "0x0", "maxFeePerGas": "0x0", "maxPriorityFeePerGas": "0x0", "paymasterAndData": "0x", "signature": "0x" }, "YOUR_API_KEY", "0x5FF137D4b0FDCD49DcA30c7CF57E578a026d2789" ] } ``` **Example Response:** ```json { "jsonrpc": "2.0", "id": 1, "result": { "freeGas": true, "native": { "gas": "0x337dc", "price": 1, "decimals": 18, "symbol": "NERO" }, "tokens": [ { "type": "system", "token": "0xD5a6dcff7AC339A03f6964c315575bF65c3c6cF6", "symbol": "DAI", "decimals": 18, "price": 2.1 }, { "type": "custom", "token": "0x13DCf97b6B94bDA883492AB46d556E8919445876", "symbol": "TestToken", "decimals": 18, "price": 0.1 } ] } } ``` In this response: - `freeGas` indicates whether gas sponsorship (Type 0) is available - `native` provides information about the native token (NERO) - `tokens` lists all supported ERC20 tokens with their respective price ratios relative to NERO ## pm_sponsor_userop Signs a UserOperation with the Paymaster, adding the paymasterAndData field necessary for sponsored or token-paid transactions. **Parameters:** 1. `userOperation` - The complete UserOperation to be signed 2. `apiKey` - Your API key from the AA Platform 3. `entryPoint` - The EntryPoint contract address 4. `context` - An object containing payment details: - `type` - Payment type (0 for sponsored, 1 for prepay, 2 for postpay) - `token` - ERC20 token address (required for types 1 and 2) **Example Request for Free Gas (Type 0):** ```json { "jsonrpc": "2.0", "id": 1, "method": "pm_sponsor_userop", "params": [ { "sender": "0xAAWalletAddress", "nonce": "0x0", "initCode": "0x", "callData": "0xCallData", "callGasLimit": "0x88b8", "verificationGasLimit": "0x33450", "preVerificationGas": "0xc350", "maxFeePerGas": "0x9502f900", "maxPriorityFeePerGas": "0x9502f900", "paymasterAndData": "0x", "signature": "0xUserSignature" }, "YOUR_API_KEY", "0x5FF137D4b0FDCD49DcA30c7CF57E578a026d2789", { "type": 0 } ] } ``` **Example Request for ERC20 Payment (Type 1):** ```json { "jsonrpc": "2.0", "id": 1, "method": "pm_sponsor_userop", "params": [ { "sender": "0xAAWalletAddress", "nonce": "0x0", "initCode": "0x", "callData": "0xCallData", "callGasLimit": "0x88b8", "verificationGasLimit": "0x33450", "preVerificationGas": "0xc350", "maxFeePerGas": "0x9502f900", "maxPriorityFeePerGas": "0x9502f900", "paymasterAndData": "0x", "signature": "0xUserSignature" }, "YOUR_API_KEY", "0x5FF137D4b0FDCD49DcA30c7CF57E578a026d2789", { "type": 1, "token": "0xTokenAddress" } ] } ``` **Example Response:** ```json { "jsonrpc": "2.0", "id": 1, "result": { "sender": "0xAAWalletAddress", "nonce": "0x0", "initCode": "0x", "callData": "0xCallData", "callGasLimit": "0x88b8", "verificationGasLimit": "0x33450", "preVerificationGas": "0xc350", "maxFeePerGas": "0x9502f900", "maxPriorityFeePerGas": "0x9502f900", "paymasterAndData": "0xPaymasterAddress+EncodedData+PaymasterSignature", "signature": "0xUserSignature" } } ``` ## pm_entrypoints Get the EntryPoint addresss currently supported. request: ```json { "jsonrpc": "2.0", "id": 1, "method": "pm_entrypoints", "params": [ "entryPoint" ] } ``` response: ```json { "jsonrpc": "2.0", "id": 1, "result": [ "0x5FF137D4b0FDCD49DcA30c7CF57E578a026d2789" ] } ``` --- # Error Handling Source: https://docs.nerochain.io/en/developer-tools/paymaster-api/error-handling Section: Developer Tools Proper error handling is essential when integrating with the Paymaster API. This section covers common errors you may encounter and best practices for a robust implementation. ## Common Error Codes Interacting with the Paymaster API like sending transactions can return standard JSON-RPC errors in those scenarios. Here are common error codes and their meanings: Many of these errors will also be accompanied by an additional error message from the EntryPoint. |Code | Description| |------------|-------------| |-32521 | Transaction reverted (or will revert) during execution phase.| |-32602 | Invalid UserOperation struct/fields.| |-32500 | Transaction rejected by entryPoint's simulateValidation, during account creation or validation.| |-32501 | Transaction rejected by paymaster's validatePaymasterUserOp.| |-32502 | Transaction rejected because of opcode validation.| |-32503 | UserOperation out of time-range: either account or paymaster returned a time-range, and it is already expired (or will expire soon).| |-32504 | Transaction rejected because paymaster (or signature aggregator) is throttled/banned.| |-32505 | Transaction rejected because paymaster (or signature aggregator) stake or unstake-delay is too low.| |-32506 | Transaction rejected because account specified unsupported signature aggregator.| |-32507 | Either validateUserOp or validatePaymasterUserOp returned an invalid signature check.| ## Common Specific Errors Bundler error codes often are accompanied by an additional AAxx code provided by the EntryPoint to give additional guidance. - AA1x error codes relate to creating an account - AA2x error codes relate to the sender of the user operation - AA3x error codes relate to paymasters - AA4x error codes relate to verification generally - AA5x errors relate to actions after the user operation was executed --- # Paymaster API Source: https://docs.nerochain.io/en/developer-tools/paymaster-api Section: Developer Tools By letting developers use gas abstraction in their dApps, the NERO Chain Paymaster API lets users pay gas costs using ERC20 tokens or have transactions sponsored totally. This guide addresses recommended practices for integration, request/response forms, and API endpoints. ## Introduction The Paymaster API sits between your dApp and the NERO Chain blockchain, providing services to: 1. Sponsor gas fees for your users. 2. Allow users to pay for gas with ERC20 tokens. 3. Validate and sign UserOperations before they're sent to the bundler. 4. Apply your configured gas strategies to user transactions.  *Figure 1: Paymaster API integration/usage flow* ## API Endpoints ### Base URL The Paymaster API is available at: ``` https://paymaster-testnet.nerochain.io ``` For mainnet: ``` https://paymaster-mainnet.nerochain.io ``` ### Authentication All API requests require an API key created through the [AA Platform](https://aa-platform.nerochain.io). The API key should be included as a parameter in your RPC calls. ## In This Section - [Core Methods](./paymaster-api/core-methods) - Detailed API reference for all Paymaster API methods - [Payment Types](./paymaster-api/payment-types) - Explanation of different payment types - [Error Handling](./paymaster-api/error-handling) - Common errors and troubleshooting - [Best Practices](./paymaster-api/best-practices) - What to keep in mind while integrating Paymaster --- # Payment Types Source: https://docs.nerochain.io/en/developer-tools/paymaster-api/payment-types Section: Developer Tools The Paymaster supports three payment types that provide flexibility in how gas fees are handled. Each type offers different benefits and trade-offs. ## Type 0: Free Gas (Sponsored) The developer fully sponsors gas fees for the user. This is ideal for: - User onboarding - Promotional campaigns - Simplifying UX - GameFi applications To use this type, set `type: 0` in your context object when calling `pm_sponsor_userop`. ## Type 1: Prepay with ERC20 Users pay for gas with ERC20 tokens before transaction execution: 1. The full estimated amount is collected upfront during the verification phase 2. Excess is refunded after execution 3. Requires token approval before transaction To use this type: - Set `type: 1` in your context object - Include the `token` address in your context object - Ensure the user has approved the Paymaster contract to spend their tokens ## Type 2: Postpay with ERC20 Users pay for gas with ERC20 tokens after transaction execution: 1. Only the exact gas cost is collected after the transaction completes 2. Requires token approval before execution 3. Better UX as users only pay what's needed 4. Has a risk of payment failure after execution if the UserOperation depletes tokens To use this type: - Set `type: 2` in your context object - Include the `token` address in your context object - Ensure the user has approved the Paymaster contract to spend their tokens ## Choosing the Right Payment Type When deciding which payment type to use, consider these factors: - **Type 0 (Free)**: Great for new user acquisition, but increases costs for the developer - **Type 1 (Prepay)**: More reliable but requires users to have slightly more tokens than needed - **Type 2 (Postpay)**: Best user experience but comes with failure risk Most applications use a combination of payment types - offering free gas for first-time users or specific actions while using token payments for regular operations. --- # Advanced Usage Source: https://docs.nerochain.io/en/developer-tools/user-op-sdk/advanced-usage Section: Developer Tools This section covers advanced customization options for your UserOperations. ## Custom Gas Parameters You can customize gas parameters for your UserOperations: ```typescript // Set specific gas values builder.setCallGasLimit("0x88b8"); builder.setVerificationGasLimit("0x33450"); builder.setPreVerificationGas("0xc350"); builder.setMaxFeePerGas("0x2162553062"); builder.setMaxPriorityFeePerGas("0x40dbcf36"); ``` ## Custom Nonce Management If needed, you can manually set the nonce for your UserOperations: ```typescript // Get the current nonce const aaWallet = new ethers.Contract( aaWalletAddress, ['function getNonce() view returns (uint256)'], accountSigner ); const nonce = await aaWallet.getNonce(); // Set a custom nonce builder.setNonce(nonce.add(1)); ``` ## Additional Customization Beyond gas parameters and nonce management, you can also: - Customize the signature mechanism - Implement your own account abstraction logic - Create custom presets for specific use cases ## Next Steps After learning about advanced customization options, you might want to: - [Learn about error handling](https://docs.nerochain.io/en/developer-tools/user-op-sdk/error-handling) - [Review best practices](https://docs.nerochain.io/en/developer-tools/user-op-sdk/best-practices) --- # Installation and Basic Usage Source: https://docs.nerochain.io/en/developer-tools/user-op-sdk/basic-usage Section: Developer Tools ## Installation You can install the UserOpSDK directly from GitHub: ```bash npm install github:nerochain/aa-userop-sdk ``` Or using yarn: ```bash yarn add github:nerochain/aa-userop-sdk ``` ## Basic Usage This section covers the essential steps to start using the UserOpSDK. ### Importing the SDK ```typescript ``` ### Configuration Constants Set up your configuration with the necessary contract addresses and service endpoints: ```typescript // Chain configuration const NERO_RPC_URL = "https://rpc-testnet.nerochain.io"; const BUNDLER_URL = "https://bundler-testnet.nerochain.io/"; const PAYMASTER_URL = "https://paymaster-testnet.nerochain.io"; // Contract addresses const ENTRYPOINT_ADDRESS = "0x5FF137D4b0FDCD49DcA30c7CF57E578a026d2789"; const ACCOUNT_FACTORY_ADDRESS = "0x9406Cc6185a346906296840746125a0E44976454"; ``` ### Initializing the Client ```typescript // Initialize the AA Client const client = await Client.init(NERO_RPC_URL, { overrideBundlerRpc: BUNDLER_URL, entryPoint: ENTRYPOINT_ADDRESS, }); ``` ### Creating a SimpleAccount Builder The SimpleAccount builder helps you create and configure UserOperations: ```typescript // accountSigner is the EOA wallet that will own the AA wallet const builder = await Presets.Builder.SimpleAccount.init( accountSigner, NERO_RPC_URL, { overrideBundlerRpc: BUNDLER_URL, entryPoint: ENTRYPOINT_ADDRESS, factory: ACCOUNT_FACTORY_ADDRESS, } ); ``` ## Next Steps Now that you've installed, initialized the client and builder, you can: - [Work with AA Wallets](https://docs.nerochain.io/en/developer-tools/user-op-sdk/working-with-wallets) - [Create UserOperations](https://docs.nerochain.io/en/developer-tools/user-op-sdk/creating-user-operations) --- # Best Practices Source: https://docs.nerochain.io/en/developer-tools/user-op-sdk/best-practices Section: Developer Tools Follow these best practices to optimize your use of the UserOpSDK in production applications. ## 1. Cache AA Wallet Addresses Calculate and store AA wallet addresses to avoid redundant computation: ```typescript // Calculate once and store in your database or local storage const aaWalletAddress = await builder.getSender(); ``` ## 2. Implement Comprehensive Error Handling Handle all potential errors gracefully to improve user experience: ```typescript try { const result = await client.sendUserOperation(builder); // Success path } catch (error) { // Categorize and handle different error types if (error.message.includes('AA21')) { // Handle insufficient funds } else if (error.message.includes('AA31')) { // Handle paymaster validation error } else { // Generic error handling } } ``` ## 3. Gas Estimation For complex operations, use gas estimation functions to ensure sufficient gas: ```typescript // Estimate gas before sending const gasEstimation = await client.estimateUserOperationGas(builder); builder.setCallGasLimit(gasEstimation.callGasLimit); builder.setVerificationGasLimit(gasEstimation.verificationGasLimit); builder.setPreVerificationGas(gasEstimation.preVerificationGas); ``` ## 4. Test on Testnet Always test your implementation on NERO Chain's testnet before deploying to mainnet: ```typescript // Testnet configuration const NERO_TESTNET_RPC_URL = "https://rpc-testnet.nerochain.io"; const TESTNET_BUNDLER_URL = "https://bundler-testnet.nerochain.io"; const TESTNET_PAYMASTER_URL = "https://paymaster-testnet.nerochain.io"; ``` ## 5. Security Never store private keys or API keys in client-side code: ```typescript // BAD: Hardcoded API key const PAYMASTER_API_KEY = "your-api-key"; // Don't do this! // GOOD: Load from environment variables on the server const PAYMASTER_API_KEY = process.env.PAYMASTER_API_KEY; ``` ## Additional Resources For more details and advanced use cases, refer to the following resources: - [ERC-4337 Specification](https://eips.ethereum.org/EIPS/eip-4337) - [UserOpSDK GitHub Repository](https://github.com/nerochain/aa-userop-sdk) --- # Creating UserOperations Source: https://docs.nerochain.io/en/developer-tools/user-op-sdk/creating-user-operations Section: Developer Tools This part walks over how to use the SDK to produce various kinds of UserOperations. ## Understanding Minimal UserOperations User operations have a standard structure, hence it's crucial to know before starting certain transactions. A simple user operation includes all necessary fields even with placeholder values: ```typescript // Create a minimal UserOp const minimalUserOp = { sender: aaWalletAddress, // The AA wallet address nonce: "0x0", // Will be filled by the SDK or custom logic initCode: "0x", // Empty for existing wallets callData: "0x", // Will be filled with actual transaction data callGasLimit: "0x0", // Gas estimation verificationGasLimit: "0x0", preVerificationGas: "0x0", maxFeePerGas: "0x0", maxPriorityFeePerGas: "0x0", paymasterAndData: "0x", // Will be filled by Paymaster integration signature: "0x" // Will be filled with EOA signature }; ``` This minimal structure is useful for: - Making RPC calls that require a UserOperation structure - Initializing a UserOperation before filling in specific details - Testing and debugging - Interacting with services like the Paymaster API The UserOpSDK will handle filling in most of these fields automatically, but understanding this structure is helpful when working with the SDK and developing your own utilities. ## Simple Token Transfer To perform a simple ERC-20 token transfer, you'll start with the builder created in the [Basic Usage](https://docs.nerochain.io/en/developer-tools/user-op-sdk/basic-usage) section and add your specific transaction: ```typescript // 1. Start with the builder from previous setup // const builder = await Presets.Builder.SimpleAccount.init(...); // 2. Create an ERC-20 contract instance const tokenContract = new ethers.Contract( tokenAddress, ['function transfer(address to, uint256 amount) returns (bool)'], accountSigner ); // 3. Prepare the call data for transfer const callData = tokenContract.interface.encodeFunctionData( 'transfer', [recipientAddress, ethers.utils.parseUnits(amount, decimals)] ); // 4. Add the transaction to the builder // This will incorporate the transaction into a UserOperation builder.execute(tokenAddress, 0, callData); // 5. The builder now contains the UserOperation with your transfer // Under the hood, it fills in the parameters of the minimal UserOperation: // - sender: from builder.getSender() // - nonce: auto-retrieved from the AA wallet // - callData: your transfer function call // - gas parameters: estimated or set manually ``` When you call `builder.execute()`, the SDK takes care of incorporating your transaction into the UserOperation structure, eliminating the need to manually build each field of the minimal UserOperation. ## Executing Multiple Transactions You can bundle multiple actions into a single UserOperation using the same builder pattern: ```typescript // 1. Start with the same builder // const builder = await Presets.Builder.SimpleAccount.init(...); // 2. Prepare multiple call data and targets const callData = [ tokenContract.interface.encodeFunctionData('approve', [spender, amount]), tokenContract.interface.encodeFunctionData('transfer', [recipient, amount]) ]; const callTo = [tokenAddress, tokenAddress]; // 3. Add batch execution to the builder // This bundles multiple transactions into a single UserOperation builder.executeBatch(callTo, callData); // 4. The builder now contains a UserOperation with multiple actions // The single UserOperation will: // - Approve tokens to be spent by another address // - Transfer tokens to the recipient // All in one atomic transaction ``` With the batch execution feature, multiple actions are combined into a single UserOperation's `callData` field, allowing you to perform complex operations efficiently. ## Next Steps After creating UserOperations with the builder: - [Integrate with Paymaster](https://docs.nerochain.io/en/developer-tools/user-op-sdk/paymaster-integration) to handle gas payments - [Send UserOperations](https://docs.nerochain.io/en/developer-tools/user-op-sdk/sending-user-operations) to the network --- # Error Handling Source: https://docs.nerochain.io/en/developer-tools/user-op-sdk/error-handling Section: Developer Tools The UserOpSDK may return various errors during operation. This section covers common errors and how to handle them. ## Common Error Types ```typescript try { const result = await client.sendUserOperation(builder); // Process result } catch (error) { if (error.message.includes('AA1')) { console.error('error codes relate to creating an account'); // Handle insufficient funds error } else if (error.message.includes('AA2')) { console.error('error codes relate to the sender of the user operation'); // Handle validation error } else if (error.message.includes('AA3')) { console.error('error codes relate to paymasters'); // Handle paymaster error } else if (error.message.includes('AA4')) { console.error('error codes relate to verification generally'); // Handle paymaster error } else if (error.message.includes('AA5')) { console.error('errors relate to actions after the user operation was executed'); // Handle paymaster error } else { console.error('Unknown error:', error); // Handle other errors } } ``` ## Error Code Categories - **AA1** - Account creation errors (e.g., insufficient funds for counterfactual deployment) - **AA2** - Sender errors (e.g., invalid signature) - **AA3** - Paymaster errors (e.g., insufficient deposit, rejected operation) - **AA4** - General verification errors - **AA5** - Post-execution errors ## User-Friendly Error Handling When building a user interface, translate technical errors into user-friendly messages: ```typescript function getUserFriendlyErrorMessage(error) { if (error.message.includes('AA21')) { return "You don't have enough funds to pay for this transaction."; } else if (error.message.includes('AA23')) { return "The transaction signature is invalid. Please try again."; } else if (error.message.includes('AA25')) { return "The gas payment details are invalid. Please select a different payment option."; } else { return "An error occurred while processing your transaction. Please try again."; } } ``` ## Next Steps After implementing error handling, you might want to: - [Review best practices](https://docs.nerochain.io/en/developer-tools/user-op-sdk/best-practices) for using the SDK --- # UserOpSDK: Account Abstraction SDK Source: https://docs.nerochain.io/en/developer-tools/user-op-sdk Section: Developer Tools Designed as a potent JavaScript/TypeScript tool, the UserOpSDK streamlines UserOperations on NERO Chain creation, signing, and transmission. This piece will assist you to use Account Abstraction capabilities in your dApp by using the SDK. The UserOpSDK provides access to fundamental Account Abstraction functionality on NERO Chain, with capabilities such as: - Creating UserOperations for contract calls and transfers - Signing UserOperations with Ethereum signers - Communicating with bundlers to execute transactions - Integrating with Paymasters to sponsor gas or accept ERC-20 tokens - Creating and managing smart contract wallets This section helps you get started with the SDK and provides examples of common operations. ## What's Inside - [Installation & Basic Usage](https://docs.nerochain.io/en/developer-tools/user-op-sdk/basic-usage) - How to install the SDK and get started - [Working with AA Wallets](https://docs.nerochain.io/en/developer-tools/user-op-sdk/working-with-wallets) - Getting wallet addresses and checking deployment status - [Creating UserOperations](https://docs.nerochain.io/en/developer-tools/user-op-sdk/creating-user-operations) - Creating simple and batch operations - [Paymaster Integration](https://docs.nerochain.io/en/developer-tools/user-op-sdk/paymaster-integration) - Setting API keys, getting supported tokens, and payment types - [Sending UserOperations](https://docs.nerochain.io/en/developer-tools/user-op-sdk/sending-user-operations) - How to submit operations to the network - [Advanced Usage](https://docs.nerochain.io/en/developer-tools/user-op-sdk/advanced-usage) - Custom gas parameters and nonce management - [Error Handling](https://docs.nerochain.io/en/developer-tools/user-op-sdk/error-handling) - Common errors and how to handle them - [Best Practices](https://docs.nerochain.io/en/developer-tools/user-op-sdk/best-practices) - Tips for optimal SDK usage --- # Paymaster Integration Source: https://docs.nerochain.io/en/developer-tools/user-op-sdk/paymaster-integration Section: Developer Tools The Paymaster service allows for flexible gas payment options for UserOperations. ## Setting API Key for Paymaster To use the Paymaster service, set your API key: ```typescript builder.setPaymasterOptions({ apikey: YOUR_API_KEY, rpc: PAYMASTER_URL }); ``` ## Getting Supported Tokens The SDK doesn't include a built-in method for retrieving supported tokens. You need to make a direct RPC call to the Paymaster API: ```typescript // Create a helper function to get supported tokens async function getSupportedTokens(client, builder) { try { // Get the wallet address const sender = await builder.getSender(); // Create a minimal UserOp for the request const minimalUserOp = { sender, nonce: "0x0", initCode: "0x", callData: "0x", callGasLimit: "0x0", verificationGasLimit: "0x0", preVerificationGas: "0x0", maxFeePerGas: "0x0", maxPriorityFeePerGas: "0x0", paymasterAndData: "0x", signature: "0x" }; // Setup the provider for the paymaster RPC const provider = new ethers.providers.JsonRpcProvider(PAYMASTER_URL); // Call the pm_supported_tokens method const tokensResponse = await provider.send("pm_supported_tokens", [ minimalUserOp, YOUR_API_KEY, ENTRYPOINT_ADDRESS ]); // Parse and return the token list if (tokensResponse && tokensResponse.tokens) { return tokensResponse.tokens.map(token => ({ address: token.token || token.address, decimals: token.decimals, symbol: token.symbol, type: token.type })); } return []; } catch (error) { console.error("Error getting supported tokens:", error); return []; } } // Usage const supportedTokens = await getSupportedTokens(client, builder); console.log("Supported tokens:", supportedTokens); ``` Different Paymaster implementations may return tokens in different formats. A more robust implementation would include handling for various response formats as shown in this example: ```typescript // Handle different response formats let tokens = []; if (tokensResponse.tokens) { tokens = tokensResponse.tokens; } else if (Array.isArray(tokensResponse)) { tokens = tokensResponse; } else if (typeof tokensResponse === 'object') { // Try to find tokens in the response object const possibleTokensArray = Object.values(tokensResponse).find(val => Array.isArray(val)); if (possibleTokensArray && Array.isArray(possibleTokensArray)) { tokens = possibleTokensArray; } } ``` ## Setting Payment Type Configure how users will pay for gas: ```typescript // Type 0: Free gas (developer sponsors) builder.setPaymasterOptions({ type: 0, apikey: YOUR_API_KEY, rpc: PAYMASTER_URL }); // Type 1: Prepay with ERC20 tokens builder.setPaymasterOptions({ type: 1, token: TOKEN_ADDRESS, // The ERC20 token address apikey: YOUR_API_KEY, rpc: PAYMASTER_URL }); // Type 2: Postpay with ERC20 tokens builder.setPaymasterOptions({ type: 2, token: TOKEN_ADDRESS, // The ERC20 token address apikey: YOUR_API_KEY, rpc: PAYMASTER_URL }); ``` ## Next Steps After configuring the Paymaster for your UserOperation, you can: - [Send UserOperations](https://docs.nerochain.io/en/developer-tools/user-op-sdk/sending-user-operations) to the network - [Explore advanced options](https://docs.nerochain.io/en/developer-tools/user-op-sdk/advanced-usage) for customization --- # Sending UserOperations Source: https://docs.nerochain.io/en/developer-tools/user-op-sdk/sending-user-operations Section: Developer Tools Once your UserOperation is configured, you can send it to the network. This section covers the process of sending operations and handling the results. ## Sending the UserOperation ```typescript try { // Send the UserOperation const result = await client.sendUserOperation(builder); // Get the transaction hash const userOpHash = result.userOpHash; console.log("UserOperation hash:", userOpHash); // Wait for the transaction to be mined const receipt = await result.wait(); console.log("Transaction hash:", receipt.transactionHash); return receipt; } catch (error) { console.error("Error sending UserOperation:", error); throw error; } ``` ## Monitoring UserOperation Status After sending a UserOperation, you can monitor its status: 1. First, you get the `userOpHash` from the result of `sendUserOperation`. 2. Then, you can use `wait()` on the result to wait for the operation to be included in a block. 3. The receipt contains the transaction hash that can be used to look up details on a block explorer. ## Next Steps After sending UserOperations, you might want to: - [Explore advanced options](https://docs.nerochain.io/en/developer-tools/user-op-sdk/advanced-usage) for customization - [Learn about error handling](https://docs.nerochain.io/en/developer-tools/user-op-sdk/error-handling) for better user experience --- # Working with AA Wallets Source: https://docs.nerochain.io/en/developer-tools/user-op-sdk/working-with-wallets Section: Developer Tools Account Abstraction wallets are deterministically generated for each EOA wallet. This section covers how to work with these AA wallets. ## Getting the AA Wallet Address Each EOA wallet has a corresponding AA wallet address that's deterministically generated: ```typescript // Get the AA wallet address (works even if not yet deployed on-chain) const aaWalletAddress = await builder.getSender(); console.log("AA Wallet Address:", aaWalletAddress); ``` ## Checking AA Wallet Deployment Status You can check if an AA wallet has already been deployed: ```typescript const provider = new ethers.providers.JsonRpcProvider(NERO_RPC_URL); const code = await provider.getCode(aaWalletAddress); const isDeployed = code !== '0x'; console.log("Wallet deployed:", isDeployed); ``` ## Next Steps After working with AA wallet addresses, you can: - [Create UserOperations](https://docs.nerochain.io/en/developer-tools/user-op-sdk/creating-user-operations) - [Integrate with Paymaster](https://docs.nerochain.io/en/developer-tools/user-op-sdk/paymaster-integration) --- # Frequently Asked Questions Source: https://docs.nerochain.io/en/faq Section: faq This FAQ answers common challenges, pitfalls, and questions that developers may have when building on NERO Chain. ## Account Abstraction ### What exactly is Account Abstraction? Account Abstraction (AA) is a paradigm that allows smart contract wallets to execute transactions without users needing to hold the native token (NERO) for gas fees. Account Abstraction (AA) is a paradigm that allows smart contract wallets to execute transactions without users needing to hold the native token (NERO) for gas fees. It lets features like transaction sponsorship, batch transactions, and complex authorizing methods isolate the account management logic from transaction validation. ### Why do my UserOperations keep getting rejected? UserOperations might be rejected for several reasons: - **Invalid signature**: Ensure you're using the correct signer for the wallet - **Insufficient gas**: Try increasing gas limits or using the SDK's gas estimation functions - **Paymaster rejections**: Check if your Paymaster API key is valid and has sufficient funding. Check if the APIKey has enough Remaining Requests. If it runs out of requests, please enter in contact with NERO team. - **Nonce issues**: Ensure you're using the correct nonce for the account - **Validation failures**: Smart contract wallet might reject operations that don't meet its requirements ### How do I debug AA error codes? Error codes follow a pattern where: - **AA1** codes relate to creating an account (e.g., insufficient funds for deployment) - **AA2** codes relate to the sender (e.g., invalid signature) - **AA3** codes relate to paymasters (e.g., insufficient deposit) - **AA4** codes relate to general verification failures - **AA5** codes relate to post-execution issues ## Paymaster Integration ### Why are my sponsored transactions failing? Common reasons for paymaster failures include: - **API Key rate limiting**: Check your key's usage patterns and consider increasing limits - **Strategy rejection**: Verify your strategy parameters match your application's needs - **Insufficient funds**: Ensure your sponsorship account has adequate funds for Type 0 strategies - **User payment failure**: For Type 1/2 strategies, ensure users have sufficient token balances and have approved the paymaster contract - **Insufficient Remaining Requests**: Check if your API has enought Remaining requests. ### What's the difference between payment strategy types? - **Type 0 (Sponsorship)**: Gas fees are fully covered by the developer/application - **Type 1 (ERC-20 Prepayment)**: Users pay gas in an ERC-20 token before execution - **Type 2 (ERC-20 Postpayment)**: Users pay gas in an ERC-20 token after execution ### How do I verify which tokens are supported for gas payment? Use the Paymaster API core functions to verify which ERC-20 tokens can be used for gas payment with the paymaster. This is particularly important for Type 1 and Type 2 payment strategies. ## Development Environment ### What networks are available for testing? NERO Chain provides a testnet environment for development and testing: - **Testnet RPC**: https://rpc-testnet.nerochain.io - **Testnet Bundler**: https://bundler-testnet.nerochain.io/ - **Testnet Paymaster**: https://paymaster-testnet.nerochain.io Always test your implementation thoroughly on testnet before deploying to mainnet. ### How do I get testnet tokens? You can get testnet NERO tokens from the NERO Chain faucet at [app.testnet.nerochain.io/faucet](https://app.testnet.nerochain.io/faucet/). ## Security Best Practices ### What security measures should I implement? - **Never store private keys in client-side code**: Use secure key management - **Use environment variables for API keys**: Never hardcode API keys in your application - **Implement gas limits**: Set appropriate gas limits to prevent excessive costs - **Validate user inputs**: Always validate any input that will be used in transactions - **Implement proper error handling**: Provide clear feedback to users when operations fail ### How do I protect my Paymaster API key? Your Paymaster API key should be treated as a sensitive credential: - Store it in environment variables, not in code - Implement rate limiting and monitoring to detect abuse - Regularly rotate your API keys for enhanced security ## Smart Contract Deployment ### Why is my contract deployment failing? Common reasons for deployment failures: - **Incorrect network configuration**: Ensure your Hardhat/Remix settings point to the correct NERO Chain RPC - **Insufficient gas**: Try increasing the gas limit for deployment - **Contract size limits**: Very large contracts may exceed size limits - **Compilation errors**: Ensure your Solidity compiler version is compatible with NERO Chain ### What Solidity version should I use? NERO Chain supports all Solidity versions that are compatible with the Ethereum London fork. We recommend using Solidity ^0.8.12 for optimal compatibility and security. **Important**: For contract verification on Neroscan, please ensure you use Solidity version ≤ 0.8.29. Due to various factors including EVM version dependencies, Neroscan may not support newer Solidity versions in a timely manner. ### Why is my OpenZeppelin proxy contract verification failing? OpenZeppelin proxy contracts may encounter specific verification challenges on Neroscan: **Common Issue**: You receive an "Invalid compilerVersion" error when attempting to verify TransparentUpgradeableProxy or ProxyAdmin contracts, even though your implementation contract verifies successfully. **Root Cause**: The block explorer's verification infrastructure has limitations with OpenZeppelin proxy contract compilation settings and version compatibility. **Solution**: - **Use Solidity ≤ 0.8.29**: The testnet/mainnet block explorer now supports Solidity version up to 0.8.29 - **OpenZeppelin v5 Support**: The explorer supports OpenZeppelin v5 proxy contracts that use precompiled bytecodes with Solidity 0.8.29 - **Verification Order**: Always verify your implementation contract first, then attempt proxy contract verification **Key Points**: - Implementation contracts typically verify without issues - Proxy contracts (TransparentUpgradeableProxy, ProxyAdmin) require the supported Solidity versions - Due to EVM version updates and other factors, Neroscan may not immediately support the latest Solidity versions If you continue experiencing verification issues with proxy contracts, ensure your development environment uses Solidity 0.8.29 or earlier for both compilation and deployment. ## Wallet Integration ### Why can't I generate an AA wallet address? Potential issues with AA wallet generation: - **Incorrect factory address**: Verify you're using the correct account factory address - **Salt collisions**: Try using a different salt value for address derivation - **Chain ID mismatch**: Ensure you're using the correct chain ID for NERO Chain - **Initialization data issues**: Verify your initialization calldata is correctly formatted ### How do I handle wallet recovery? For AA wallets, implement recovery mechanisms like: - Social recovery through trusted contacts - Multi-signature requirements for certain actions - Time-locks for security-critical operations - Backup signers that can be activated after a delay ## Troubleshooting ### Where can I get help if I'm stuck? If you encounter persistent issues, contact NERO Chain support through: - [Discord Community](https://discord.gg/nerochainofficial) - [Support Email](mailto:support@nerochain.io) - [GitHub Issues](https://github.com/nerochain) ### How do I see if a UserOperation was processed? You can check the status of a UserOperation using: - The `client.getUserOperationReceipt(hash)` method in the UserOpSDK - The NERO Chain Explorer at [neroscan.io](https://neroscan.io) - The bundler RPC endpoint with the `eth_getUserOperationReceipt` method --- # NERO Chain: What, Why, and How for Developers Source: https://docs.nerochain.io/en/getting-started/introduction Section: Getting Started ## What is NERO Chain? Fundamentally scalable, flexible, and with enhanced user experience in mind, NERO Chain is a Layer 1 modular blockchain fit for developers. NERO Chain distinguishes itself by native account abstraction (AA) and Paymaster (with an API platform for easy configuration), which helps developers create new and frictionless experiences for users while having more of their application value generated back for themselves. Developers find NERO Chain attractive due to its essential characteristics. - **Native Account Abstraction**: Built-in support for ERC-4337 removes the need for any consensus layer modifications. - **Paymaster System**: Allows dApps to let users pay with ERC20 tokens or sponsor gas costs entirely, with a Paymaster Platform to configure all of this on the fly. - **Blockspace 2.0**: By means of better transaction processing and fee distribution leveraging an effective fee-sharing system, Blockspace 2.0 guarantees effective use of network resources. - **Complete EVM Compatibility**: No learning conflict or migration. Using familiar tools such as Solidity, Hardhat, Remix, and other popular programming environments, create and use smart contracts. ## Why Build on NERO Chain? With a fresh perspective on blockchain technology, NERO Chain prioritizes applications over infrastructure-level value extraction. ### Applications that capture their true value Gas, the native currency of the chain, ensures that the blockchain reaps the maximum benefit from every transaction. This leads to a system in which apps generate value, with the underlying network extracting the majority of it. The NERO Chain introduces an economic framework that allows apps to participate in the network's success, a concept that many find upsetting. Developers may keep and share value in ways that directly benefit their users and ecosystems, therefore negating the need to turn transaction value over to the chain itself. Through creating sustainable demand and income for their systems, developers may improve the token value by allowing gas payments using ERC20 tokens. The result means something special: If your project drives activity, so will your tokens, but with significantly more value potential. 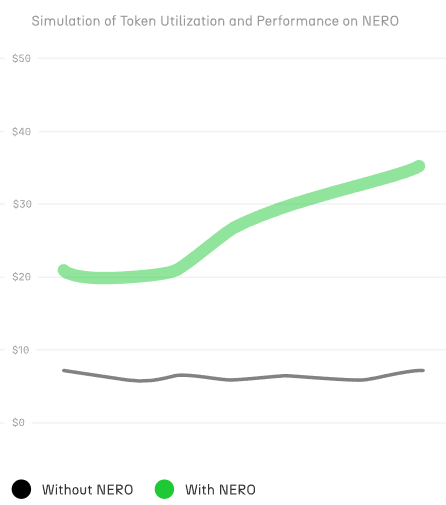 *Figure 1: Simulation of developer token performance compared with other chains.* ### Seamless User Experience User interactions' intricacy has been one of the main obstacles to blockchain acceptance. NERO Chain addresses this via: - **Gasless Transactions**: Depending on how the application developer enables the types of payment, users can interact with dApps without owning the native token or not having tokens at all. - **Smart Contract Wallets**: Enhanced security and recovery options compared to EOAs. We can enable social logins and much more through account abstraction. - **Bundled Transactions**: A single transaction can execute multiple actions. This means your applications have the tools that can onboard users who have never interacted with blockchain before, removing the friction that has historically limited Web3 adoption. ## How to Get Started with NERO Chain With NERO Chain's EVM compatibility and developer-friendly tools, starting with its development is simple. 1. **Set Up Your Environment**: Use known tools like Hardhat, Remix, or Truffle for contract development. 2. **Access the Testnet**: Connect to NERO Chain's Testnet for development and testing. Access the mainnet to deploy it to production. 3. **Integrate Account Abstraction**: Use the UserOpSDK to implement AA features and connect with the Paymaster API. 4. **Leverage the Paymaster**: Enable flexible gas payment options for your users. We will explore more in the sections below the main characteristics, architecture, and detailed instructions to let you create your first dApp on NERO Chain. --- # Key Features for Developers Source: https://docs.nerochain.io/en/getting-started/key-features Section: Getting Started This section provides a high-level overview of NERO Chain's key features that make it an ideal platform for developers. Knowing these characteristics will enable you to fully use NERO Chain for developing your apps. ## Native Account Abstraction Using a native ERC-4337 Account Abstraction implementation, NERO Chain provides developers with advanced tools allowing them to construct better user experiences: #### Smart Contract Wallets Unlike traditional Externally Owned Accounts (EOAs), smart contract wallets on NERO Chain provide: - **Programmable Authorization**: Implement any verification logic for transaction approval. - **Multi-signature Support**: Require multiple signers for transaction authorization. - **Social Recovery**: Enable account recovery through trusted friends or services. - **Session Keys**: Implement limited-use keys for specific applications or time periods. #### UserOperation and Bundlers At the core of Account Abstraction is the `UserOperation` object: - **Flexible Transaction Format**: Completely separates the user's intent from the transaction execution. - **Bundlers**: Specialized nodes that package multiple UserOperations into a single transaction. - **Mempool Management**: Dedicated mempool for UserOperations enhances predictability. ## Paymaster System The Paymaster is a core component that enables flexible gas payment mechanisms. And the AA Platform gives the developer an easy-to-use way to configure everything on the fly. #### Payment Options - **Sponsored Transactions (Free)**: Developers can fully cover gas costs for users. - **ERC20 Token Payments**: Users can pay gas fees using supported ERC20 tokens instead of NERO. - **Pre-fund/Post-fund Models**: Choose between upfront payments or after-execution settlements.  *Figure 1: Configuring tokens for gas fees on the AA Platform.* #### Integration Benefits - **Token Utility**: Increase your token's utility by enabling it for gas payments. - **User Experience**: Remove the need for users to own NERO tokens to interact with your dApp. - **Flexible Pricing Models**: Implement subscription models, free trials, or per-action pricing. ## Blockspace 2.0 Regarding fees, conventional blockchain systems handle every transaction the same. With Blockspace 2.0, a breakthrough approach to controlling transaction costs and resources, NERO Chain transforms that, guaranteeing flexibility, efficiency, and justice. #### Unique UX with Smarter Fees - **Custom price models**: Developers may create unique price models for their particular demands, therefore matching expenses with those of their consumers. - **Fee Sharing**: Should your dApp create transactions, users and developers stand to gain from a split of the network fees. - **Stable Pricing**: NERO's approach seeks a more predictable charge structure than wild fluctuations in conventional gas prices. #### Better Use of Resources - Bundled Transactions - Consider it as carpooling for transactions; NERO arranges them to save unwarranted expenses. - Like an express lane on a freeway, urgent transactions are handled faster in priority lanes. - Effective resource allocation helps developers better estimate the processing power a software requires, therefore lessening surprises. With Blockspace 2.0, NERO Chain is creating smarter, more sustainable, and better for everyone rather than only lowering costs. 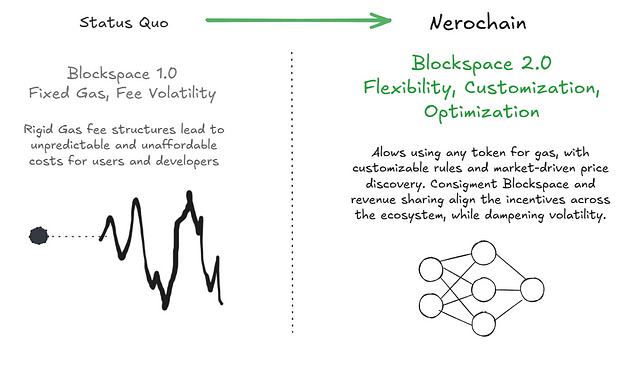 *Figure 2: Blockspace 2.0 Architecture* --- # The Architecture of a dApp Source: https://docs.nerochain.io/en/getting-started/nero-dapp-architecture Section: Getting Started Understanding NERO Chain's architecture helps us see how its unique features can be leveraged to build innovative applications with new user experiences. This overview explains how the various components work together to enable account abstraction, paymaster functionality, and other key capabilities. Multiple components working cohesively within the distributed application (dApp) architecture ensure robust, secure, and efficient blockchain operations. Each component is explained in detail below. 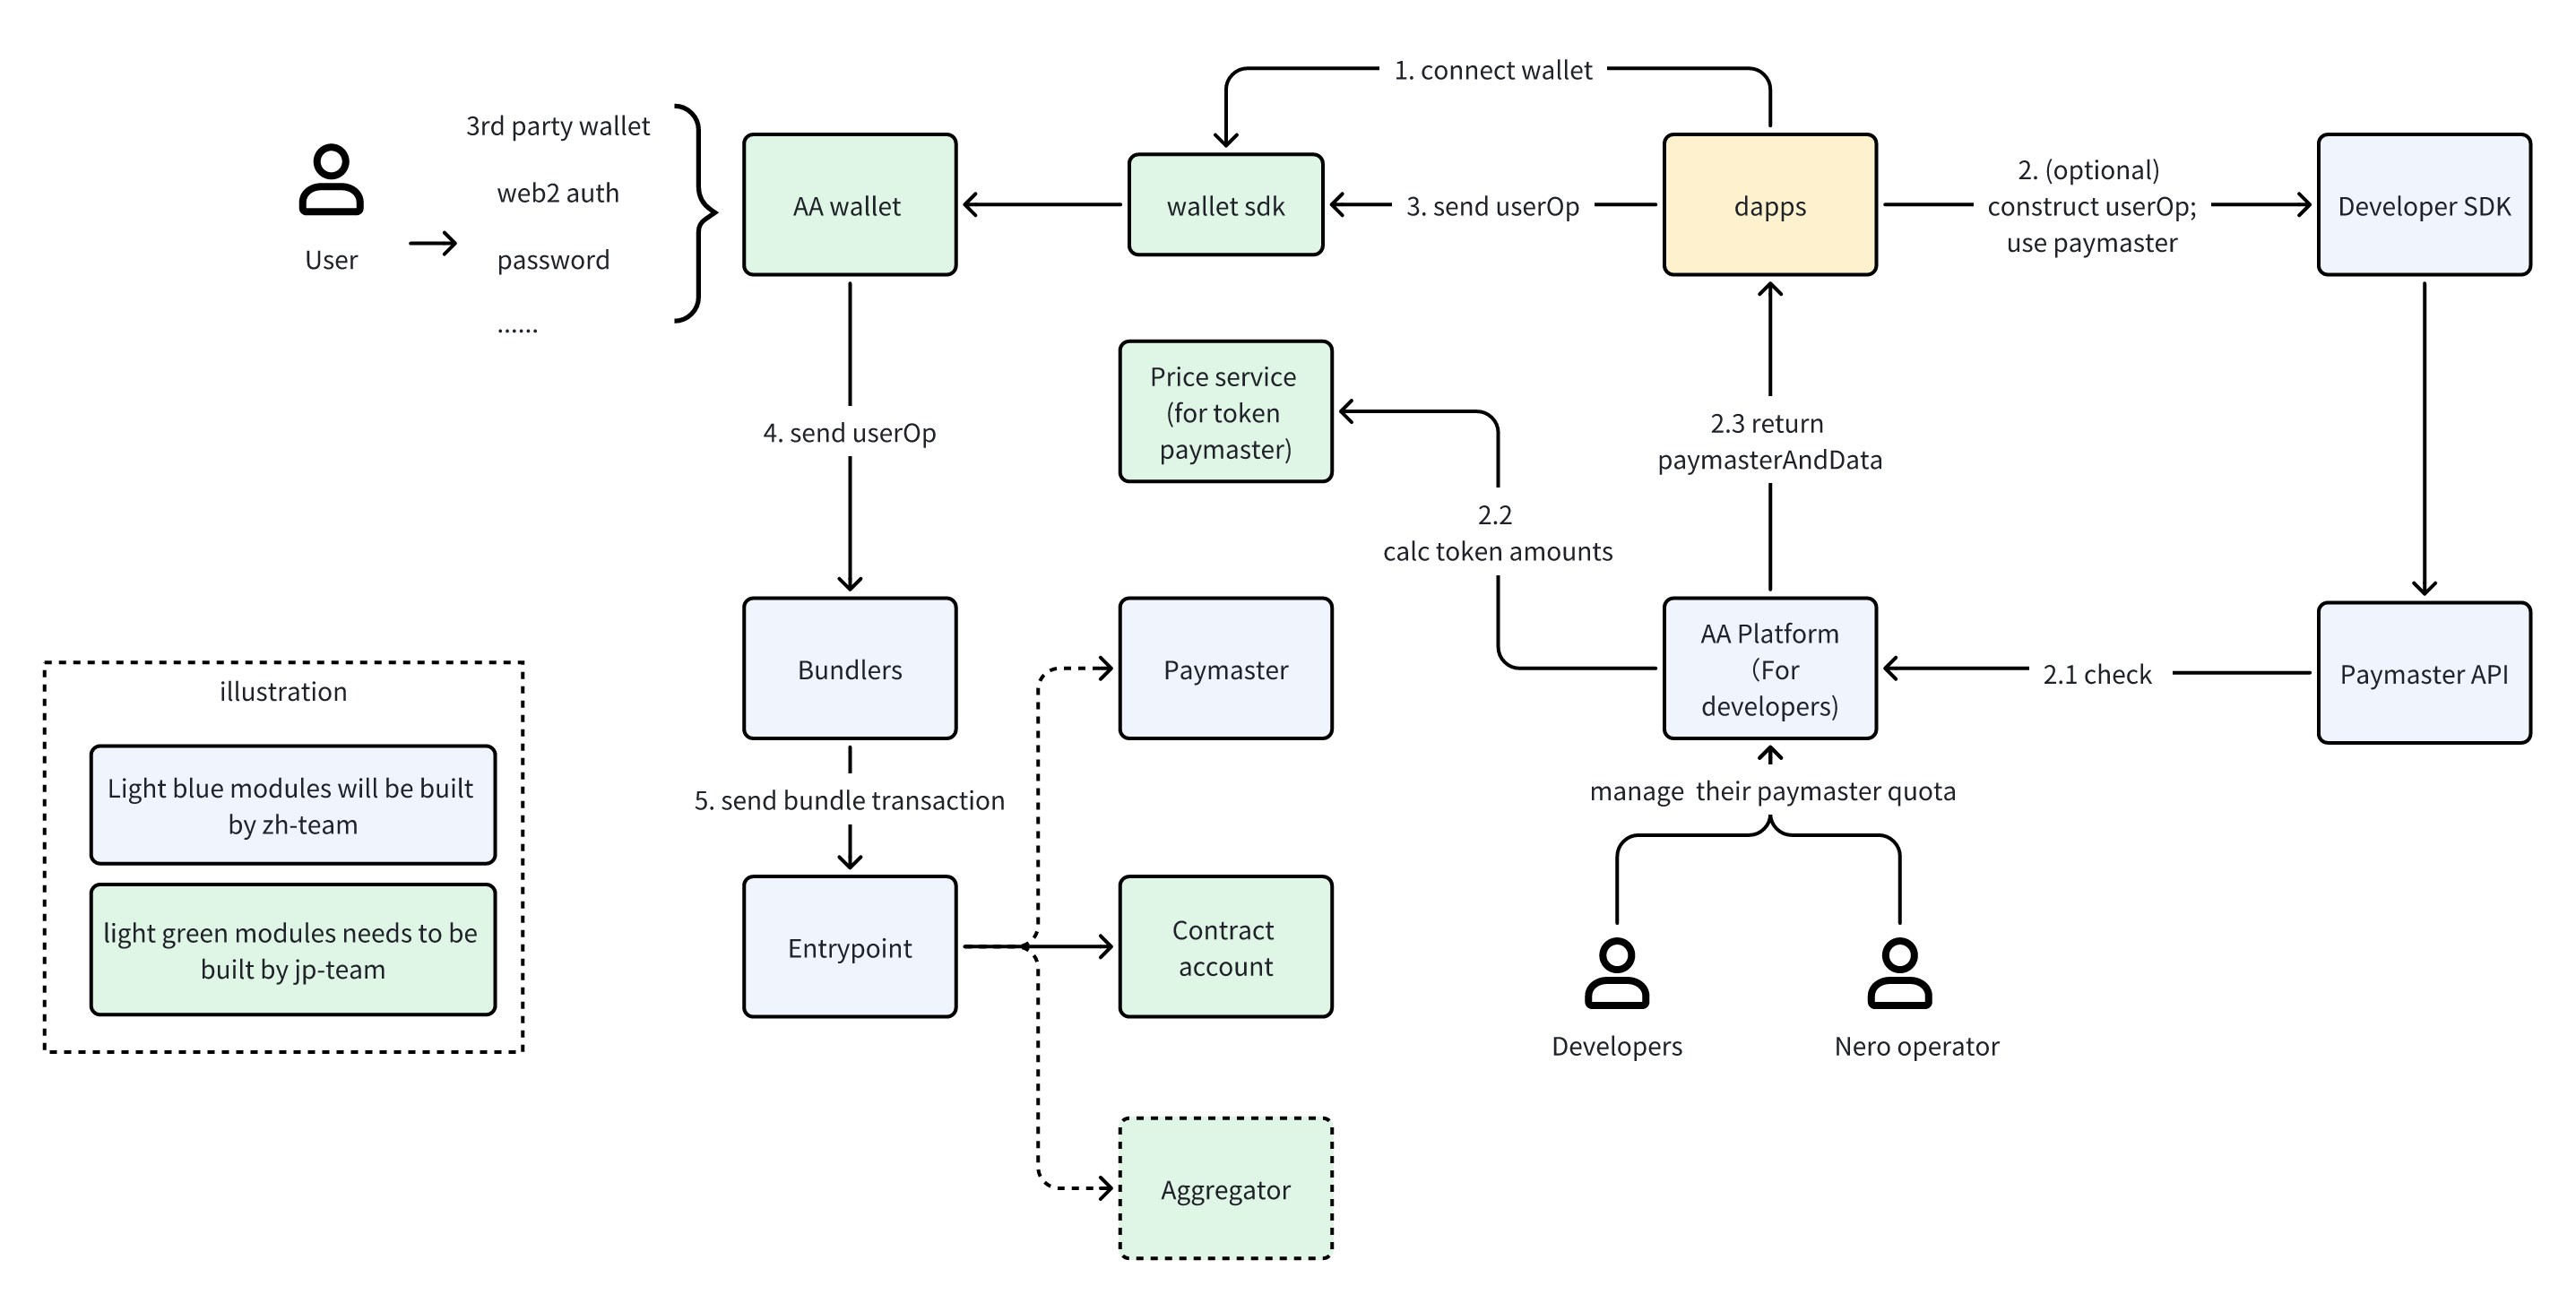 *Figure 1: NERO Chain's dApp Architecture* ## Key Components and Transaction Flow ### User and Authentication Layer The basis of NERO Chain's user experience is a flexible authentication mechanism that fits Web3 users as well as beginners alike. Through an **AA Wallet**, a smart contract wallet supporting many simultaneous authentication techniques, the **user** interacts with blockchain functionalities. Unlike conventional wallets that depend only on private keys, NERO Chain's AA wallets may be accessible using recognizable **3rd party wallets like MetaMask**, practical **Web2 authentication** mechanisms such as Google or Twitter login, and even conventional password-based security. While keeping security and optionality for expert users, this adaptability eliminates a major obstacle to entrance for ordinary consumers.  *Figure 2: Example of a Social Login.* For both owning the same on-chain identity and assets, a person may set up an AA wallet on their phone via social login but also connect to MetaMask on their PC. ### Application Components The application layer serves as the bridge between users and the blockchain, featuring several integrated components: The **Wallet SDK** can be the same used in any other Web3 application. Handling all the difficult chores of transaction building and submission, it serves as the interface between AA wallets and decentralized apps. It will let you get your AA wallet from the AA Wallet Factory deployed in NERO Chain. Decentralized applications built on NERO Chain can use this architecture to provide seamless front-end interactions. Your application connects with the Wallet SDK to provide consumers with a flawless experience, whether you are developing a DEX, NFT marketplace, or gaming platform. The Developer SDK (in our case, our **UserOpSDK**) provides developers with the tools needed to integrate account abstraction features into their applications. It covers techniques for building UserOperations, liaising with the EntryPoint contract, and using Paymasters. By letting dApps seek gas sponsorship or alternate payment options, the **Paymaster API** helps to create gas abstraction. Your application may search the Paymaster API when a user starts a transaction to find suitable payment choices and include the required information in the UserOperation. ### Backend Infrastructure Behind the user-facing components lies a robust infrastructure that powers NERO Chain's unique capabilities: The **AA Platform** serves as a control center for developers, providing a dashboard to configure paymaster settings, monitor quotas, and track usage. Through this platform, developers can define which tokens are accepted for gas payment, set spending limits, and configure other parameters that govern how users interact with their dApps. For token-based gas payments, the **Price Service** handles the critical function of determining exchange rates between ERC20 tokens and gas costs. This ensures users pay a fair amount when using tokens instead of the native NERO currency for gas. **Bundlers** are specialized services that collect UserOperations from multiple users and bundle them into standard transactions. By batching operations together, bundlers increase efficiency and reduce costs. These services listen for UserOperations and submit them to the EntryPoint contract. The **Paymaster** contract is responsible for the actual gas fee abstraction. It verifies whether a transaction should be sponsored and handles the accounting for token-based payments. The Paymaster interacts directly with the EntryPoint to ensure gas costs are covered appropriately. The **EntryPoint** contract (deployed at `0x5FF137D4b0FDCD49DcA30c7CF57E578a026d2789`) serves as the central hub for all UserOperations. This standardized contract processes bundled operations and interacts with both Contract Accounts and Paymasters to execute transactions. Each user's **Contract Account** is a smart contract wallet deployed using the account factory. These accounts execute the actual transaction logic and can implement additional features like multi-signature requirements, spending limits, or account recovery mechanisms. For advanced use cases, the optional **Aggregator** component handles signature aggregation, enabling more efficient processing of multi-signature operations. ## Transaction Flow ### Connection Phase The journey begins when a user connects to a dApp. This initial connection establishes the communication channel between the user's browser and the blockchain. During this phase, the user authenticates using their preferred method (MetaMask, social login, password, etc.), and the dApp identifies their AA wallet address, which may be a counterfactual address if the wallet hasn't been deployed yet. ### UserOperation Construction Phase Once connected, the transaction preparation process begins. When a user initiates an action, such as swapping tokens or minting an NFT, the dApp constructs a UserOperation either directly or through the Developer SDK. Unlike traditional transactions, UserOperations include additional fields necessary for account abstraction. If gas abstraction is desired, the Developer SDK communicates with the Paymaster API to determine payment options. For token-based payments, the Price Service calculates the exact token amount needed based on current exchange rates and expected gas consumption. The Paymaster API then returns the paymasterAndData field, which includes all necessary information for gas handling. This modular approach allows developers to offer flexible payment options without modifying their core application logic. Users can choose to pay with tokens they already have rather than acquiring the native token specifically for gas fees. ### Transaction Submission Phase With the UserOperation constructed and signed, the submission process begins. The dApp sends the complete UserOperation to the Wallet SDK, which handles the interaction with the user to obtain their signature. This might involve a popup in MetaMask or an in-app signature request, depending on the authentication method. After signing, the AA Wallet forwards the UserOperation to the Bundlers. These specialized services collect operations from multiple users to optimize gas usage and increase efficiency. By batching operations together, Bundlers can reduce the per-operation cost significantly. ### Execution Phase The final stage occurs when the Bundler has collected enough operations or reached a time threshold. The Bundler creates a transaction calling the EntryPoint contract with a batch of UserOperations. The EntryPoint then processes each operation sequentially. For each operation, the EntryPoint verifies the signature, checks that gas requirements are met (either through the user's wallet balance or via a Paymaster), and then calls the user's Contract Account to execute the actual transaction logic. If a Paymaster is involved, it handles the gas payment according to the configured strategy. This multi-step process happens transparently to the end user, who simply sees their transaction being processed and eventually confirmed, similar to a traditional transaction but with enhanced flexibility and potentially lower costs. ### Administrative Components Behind the scenes, developers maintain control over their gas sponsorship policies through the AA Platform. Here, they can configure payment strategies, set daily quotas, and monitor usage patterns. This administrative layer ensures that gas sponsorship remains economically viable for developers while providing a superior user experience.  *Figure 3: AA-platform policies configuration dashboard.* NERO operators also have access to platform-level settings, allowing them to manage the overall system health and ensure fair resource allocation. ## Paymaster Payment Types and User Experience The Paymaster system is one of NERO Chain's most innovative features, enabling flexible gas payment mechanisms that dramatically improve user experience. Let's explore the different payment types and their implications: ### Type 0: Developer-Sponsored Gas (Free) With Type 0 payments, developers fully cover the gas costs for their users. This creates a frictionless experience similar to Web2 applications, where users don't need to think about transaction fees. This model is ideal for user onboarding, where requiring new users to acquire a specific token creates unnecessary friction. By sponsoring gas for initial interactions, developers can create a smooth path for users to experience their application's value before requiring token acquisition. Promotional campaigns also benefit from sponsored gas, allowing temporary removal of transaction costs to drive engagement. Gaming applications and metaverse experiences particularly benefit from hiding blockchain complexity, letting users focus on gameplay rather than gas management. To implement Type 0 payments, developers maintain a balance in their AA Platform account, setting daily or per-user limits to control costs. The platform provides analytics to help optimize sponsorship strategies based on user behavior and conversion metrics. ### Type 1: Prepay with ERC20 Tokens The Type 1 payment model allows users to pay gas fees using ERC20 tokens they already own, rather than requiring them to hold NERO tokens. This removes a significant adoption barrier, especially for applications with their own token ecosystems. When using Type 1, the full estimated gas amount (converted to the equivalent value in the selected token) is collected from the user before transaction execution. After the transaction completes, any excess tokens are automatically refunded to the user. This approach provides certainty for both users and developers: users know the maximum they might spend, and developers know the payment is secured before execution. The model works particularly well for high-value operations where the gas cost is a small fraction of the total transaction value. Implementation requires users to approve the Paymaster contract to spend their tokens, which is typically handled through the Wallet SDK with appropriate UI guidance. ### Type 2: Postpay with ERC20 Tokens The Type 2 payment model also uses ERC20 tokens for gas but collects payment after transaction execution. This optimizes the user experience by only charging for the exact gas consumed rather than requiring an upfront estimate with a later refund. Users appreciate paying exactly what's needed, especially for transactions where gas costs might vary significantly based on execution paths in the contract. However, this model introduces a risk of payment failure if the user's token balance or approval is insufficient after the transaction executes. This model works best when integrated with applications where users are likely to maintain token balances for other purposes, minimizing the risk of payment failure. ## Building Advanced Applications The NERO Chain architecture enables developers to create applications with capabilities that weren't previously possible or practical. Here are some examples of what you can build: **Token-Centric Ecosystems**: By allowing users to pay gas with your application's token, you can create a closed ecosystem where users never need to leave your token economy. This increases the utility and demand for your token while simplifying the user experience. **Frictionless Onboarding**: Implement a gradual onboarding process where new users enjoy sponsored transactions initially, then transition to token payments once they're engaged with your platform. This removes the "crypto complexity" that often deters mainstream users. **Bundled Transactions**: Enable users to perform multiple actions in a single operation, such as approving and swapping tokens or minting multiple NFTs. This reduces costs and improves the user experience by minimizing the number of confirmations needed. **Enhanced Security Features**: Build applications with advanced security features like multi-signature requirements, spending limits, or time locks. The smart contract wallet architecture makes these features much easier to implement than with traditional EOAs. **Social Recovery Systems**: Implement account recovery mechanisms that don't depend on private key backup, such as social recovery through trusted friends or service providers. This addresses one of the biggest user experience challenges in crypto - fear of losing access to funds. **Subscription Models**: Create subscription-based services where users authorize recurring payments, similar to traditional subscription apps. The Paymaster can handle gas costs for these pre-approved transactions. By understanding and leveraging the full capabilities of NERO Chain's architecture, you can build applications that offer the security and ownership benefits of blockchain without the traditional UX limitations. In the following sections, we'll provide detailed guides on implementing each of these components in your application. --- # Welcome to the NERO Chain Docs Source: https://docs.nerochain.io/en Section: Overview Welcome to the definitive reference for all things NERO Chain technology, ecosystem, and development. Whether you're a developer building applications, an operator running nodes, a researcher exploring the architecture, or just getting started with blockchain, this documentation will help you understand and leverage NERO Chain's unique features. ## Builder Journeys dApp DevelopersBuild dApps with unique NERO features.
Chain & Node OperatorsDeploy and maintain NERO Chain networks and validator nodes.
Researchers & DevelopersExplore technical architecture, innovations, and protocol details.
## Quick Start Guides Developer ToolsUnderstand NERO Chain's unique features.
Developer CookbookPractical recipes for building on NERO Chain.
FAQCommon challenges and their solutions.
## Popular Development Guides Deploy First ContractDeploy a smart contract on NERO Chain.
Build Your First dAppCreate a dApp with NEROWallet.
Low Level BuildingLow-Level Building from scratch.
## Account Abstraction Technologies UserOp SDKCreate and send UserOperations with our JavaScript SDK.
AA Wallet IntegrationImplement smart contract wallets in your applications.
AA PlatformManage gas sponsorship policies and payment strategies.
## Essential Tools NERO FaucetGet testnet tokens to start building.
NERO ExplorerExplore blocks, transactions, and accounts.
Access PaymasterManage gas fees for your users.
## Technical Resources Network InfoAll Network informations.
GitHub ReposCheck our public codes.
SupportContact Us.
## About NERO Chain Built as a modular blockchain, NERO Chain stresses providing value to applications over infrastructure-level value capture. NERO Chain changes traditional blockchain economics by letting dApps gather and share transaction value, therefore ensuring that the success of an application benefits its developers and users instead of just the underlying network. With its complete EVM compatibility and high-performance settling layer, Nero offers amazing scalability and flexibility, including native account abstraction, paymaster-driven gas sponsorship, and current technologies like Blockspace 2.0 which provide developers with a flawless experience. --- # Command-line Options Source: https://docs.nerochain.io/en/node-validators/commandLineOptions Section: Node Validators Geth is primarily controlled using the command line. Geth is started using the geth command. It is stopped by pressing ctrl-c. You can configure Geth using command-line options (a.k.a. flags). Geth also has sub-commands, which can be used to invoke functionality such as the console or blockchain import/export. The command-line help listing is reproduced below for your convenience. The same information can be obtained at any time from your own Geth instance by running: ``` geth --help ``` ## Commands ```shell showLineNumbers{1} NAME: geth - the go-ethereum command line interface USAGE: geth [global options] command [command options] [arguments...] VERSION: 1.13.1-stable-3f40e65c COMMANDS: account Manage accounts attach Start an interactive JavaScript environment (connect to node) console Start an interactive JavaScript environment db Low level database operations dump Dump a specific block from storage dumpconfig Export configuration values in a TOML format dumpgenesis Dumps genesis block JSON configuration to stdout export Export blockchain into file export-preimages Export the preimage database into an RLP stream import-preimages Import the preimage database from an RLP stream init Bootstrap and initialize a new genesis block js (DEPRECATED) Execute the specified JavaScript files license Display license information removedb Remove blockchain and state databases show-deprecated-flags Show flags that have been deprecated snapshot A set of commands based on the snapshot verkle A set of experimental verkle tree management commands version Print version numbers version-check Checks (online) for known Geth security vulnerabilities wallet Manage Ethereum presale wallets help, h Shows a list of commands or help for one command GLOBAL OPTIONS: --log.rotate (default: false) ($GETH_LOG_ROTATE) Enables log file rotation ACCOUNT --allow-insecure-unlock (default: false) ($GETH_ALLOW_INSECURE_UNLOCK) Allow insecure account unlocking when account-related RPCs are exposed by http --keystore value ($GETH_KEYSTORE) Directory for the keystore (default = inside the datadir) --lightkdf (default: false) ($GETH_LIGHTKDF) Reduce key-derivation RAM & CPU usage at some expense of KDF strength --password value ($GETH_PASSWORD) Password file to use for non-interactive password input --pcscdpath value (default: "/run/pcscd/pcscd.comm") ($GETH_PCSCDPATH) Path to the smartcard daemon (pcscd) socket file --signer value ($GETH_SIGNER) External signer (url or path to ipc file) --unlock value ($GETH_UNLOCK) Comma separated list of accounts to unlock --usb (default: false) ($GETH_USB) Enable monitoring and management of USB hardware wallets ALIASED (deprecated) --cache.trie.journal value ($GETH_CACHE_TRIE_JOURNAL) Disk journal directory for trie cache to survive node restarts --cache.trie.rejournal value (default: 0s) ($GETH_CACHE_TRIE_REJOURNAL) Time interval to regenerate the trie cache journal --nousb (default: false) ($GETH_NOUSB) Disables monitoring for and managing USB hardware wallets (deprecated) --txlookuplimit value (default: 2350000) ($GETH_TXLOOKUPLIMIT) Number of recent blocks to maintain transactions index for (default = about one year, 0 = entire chain) (deprecated, use history.transactions instead) --v5disc (default: false) ($GETH_V5DISC) Enables the experimental RLPx V5 (Topic Discovery) mechanism (deprecated, use --discv5 instead) --whitelist value ($GETH_WHITELIST) Comma separated block number-to-hash mappings to enforce (Figure 1: npx hardhat
## Creating a Smart Contract Create a contracts directory (if not already created) and add your smart contract file: ```bash mkdir -p contracts ``` You can create your own smart contract or use templates like the [Openzeppelin token smart contract](https://github.com/OpenZeppelin/openzeppelin-contracts/blob/master/contracts/token/ERC20/ERC20.sol). Here's a simple example contract you can use: ```solidity // SPDX-License-Identifier: MIT pragma solidity ^0.8.17; contract HelloWorld { string private greeting = "Hello, NERO Chain!"; function setGreeting(string calldata _greet) public { greeting = _greet; } function getGreeting() public view returns (string memory) { return greeting; } } ``` ## Configuring Hardhat for NERO Chain Create a `.env` file in your project root with the following variables: ``` NERO_TESTNET_PROVIDER_URL=https://rpc-testnet.nerochain.io PRIVATE_KEY=your_private_key_here API_KEY=dummy ``` Then, update your Hardhat configuration file: ```javascript require("@nomicfoundation/hardhat-toolbox"); require("dotenv").config(); module.exports = { defaultNetwork: "nero", networks: { nero: { url: "https://rpc-testnet.nerochain.io", chainId: 689, accounts: [process.env.PRIVATE_KEY] }, }, solidity: "0.8.17", etherscan: { apiKey: "dummy", customChains: [ { network: "nero", chainId: 689, urls: { apiURL: "https://api-testnet.neroscan.io/api", browserURL: "https://testnet.neroscan.io/" } } ] } }; ``` ## Deploying Smart Contracts You can deploy your contract using either a deployment script or Hardhat Ignition. ### Option 1: Using a Deployment Script Create a scripts directory and add a deployment script: ```bash mkdir -p scripts ``` Create a file `scripts/deploy.js` with: ```javascript async function main() { const HelloWorld = await ethers.getContractFactory("HelloWorld"); const contract = await HelloWorld.deploy(); await contract.waitForDeployment(); console.log("HelloWorld deployed to:", await contract.getAddress()); } main().catch((error) => { console.error(error); process.exitCode = 1; }); ``` Then deploy by running: ```bash npx hardhat run scripts/deploy.js --network nero_testnet ``` ### Option 2: Using Hardhat Ignition For more complex deployments, you can use Hardhat Ignition: 1. Create an ignition module directory: ```bash mkdir -p ignition/modules ``` 2. Create a deployment module file (e.g., `ignition/modules/deploy-hello-world.js`): ```javascript const { buildModule } = require("@nomicfoundation/hardhat-ignition/modules"); module.exports = buildModule("HelloWorldModule", (m) => { const helloWorld = m.contract("HelloWorld"); return { helloWorld }; }); ``` 3. Deploy with Ignition: ```bash npx hardhat ignition deploy ./ignition/modules/deploy-hello-world.js --network nero_testnet ``` 4. Save the deployed contract address from the output. ## Verifying Smart Contracts After deploying your contract, you should verify it to make its source code public on the NERO Chain explorer: ```bash npx hardhat verify --network nero_testnet DEPLOYED_CONTRACT_ADDRESS ``` Replace `DEPLOYED_CONTRACT_ADDRESS` with your actual deployed contract address. ### Troubleshooting Verification 1. If verification fails, ensure your Solidity compiler version matches exactly 2. Check that your contract doesn't use libraries or dependencies not included in the flattened file 3. If using constructor arguments, make sure they're correctly provided in the verify command: ```bash npx hardhat verify --network nero_testnet DEPLOYED_CONTRACT_ADDRESS "constructor argument 1" "constructor argument 2" ``` ## Conclusion Once deployed and verified, you can view your contract on the [Testnet Explorer](https://testnet.neroscan.io/). 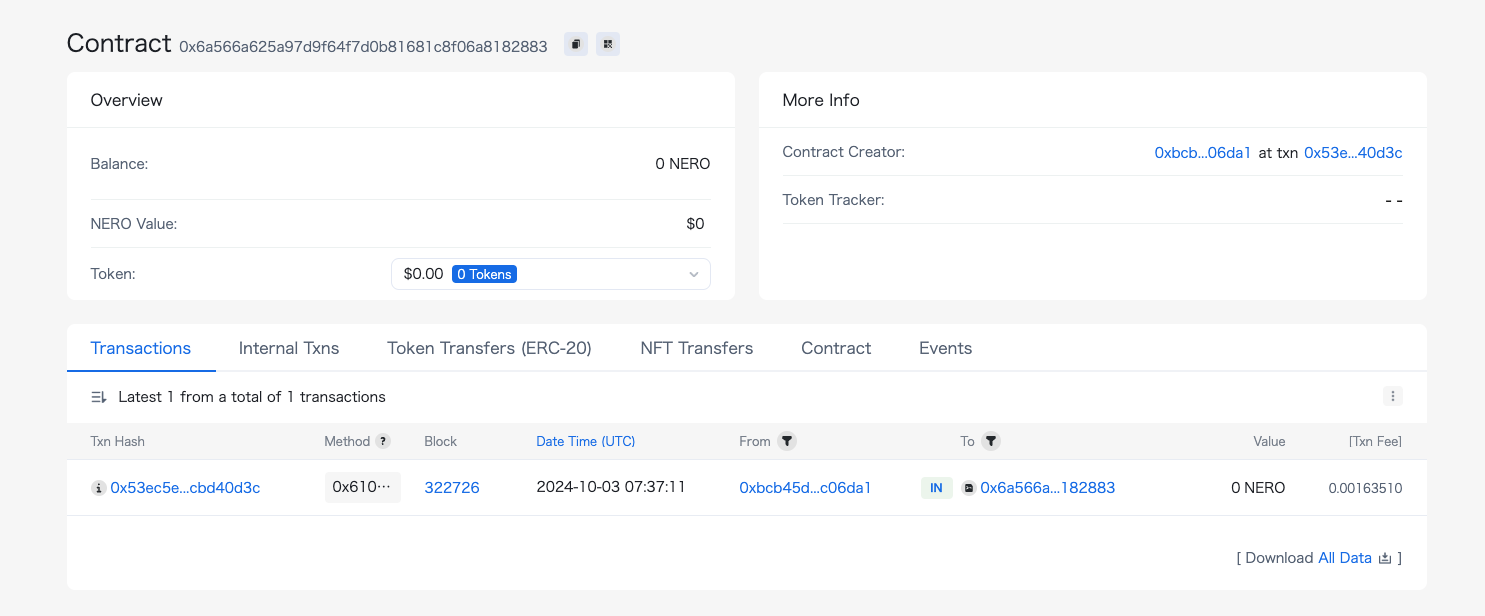Figure 2: NERO testnet scan
Congratulations! You have successfully deployed and verified your smart contract. Although this tutorial used the testnet, you can follow the same process for the mainnet by updating the RPC endpoints and network configuration. --- # Deploying Your First Contract on NERO Chain Using Remix Source: https://docs.nerochain.io/en/tutorials/first-contract/using-remix Section: Cookbook This tutorial will guide you through the process of creating and deploying a smart contract on NERO Chain using the Remix IDE. Remix is a popular, browser-based development environment that requires no setup, making it perfect for beginners. ## Prerequisites - A Web3 wallet (like MetaMask) installed in your browser - Basic knowledge of Solidity programming language - Some NERO testnet tokens for gas fees (get them from the [NERO Faucet](https://app.testnet.nerochain.io/)) ## Setting Up Your Environment ### 1. Connect Your Wallet to NERO Chain Before we start, you need to add NERO Chain to your MetaMask wallet: 1. Open MetaMask and click on the network dropdown at the top 2. Select "Add Network" 3. For the NERO Testnet, use these settings: - Network Name: `NERO Testnet` - RPC URL: `https://rpc-testnet.nerochain.io` - Chain ID: `689` - Currency Symbol: `NERO` - Block Explorer URL: `https://testnet.neroscan.io`  ### 2. Open Remix IDE Navigate to [Remix IDE](https://remix.ethereum.org/) in your browser. ## Creating a Simple Smart Contract Let's create a simple "Hello World" contract with storage functionality. ### 1. Create a New File In Remix: 1. Click on the "File explorers" icon in the left sidebar 2. Click the "+" icon to create a new file 3. Name it `HelloWorld.sol` ### 2. Write Your Smart Contract Copy and paste the following code into your new file: ```solidity // SPDX-License-Identifier: MIT pragma solidity ^0.8.17; contract HelloWorld { string private greeting; constructor() { greeting = "Hello, NERO Chain!"; } function setGreeting(string memory _greeting) public { greeting = _greeting; } function getGreeting() public view returns (string memory) { return greeting; } } ``` This simple contract: - Stores a greeting message - Allows anyone to update the greeting - Provides a function to retrieve the current greeting  ## Compiling Your Contract ### 1. Navigate to the Compiler Tab Click on the "Solidity compiler" icon in the left sidebar (the second icon). ### 2. Select Compiler Version Choose a compiler version that matches your pragma statement (in our case, 0.8.17 or higher). ### 3. Compile the Contract Click the "Compile HelloWorld.sol" button. If successful, you'll see a green checkmark.  ## Deploying Your Contract ### 1. Navigate to the Deploy Tab Click on the "Deploy & run transactions" icon in the left sidebar (the third icon). ### 2. Configure Environment 1. From the "ENVIRONMENT" dropdown, select "Injected Provider - MetaMask" 2. MetaMask will prompt you to connect - make sure you're connected to NERO Testnet 3. Confirm that the "ACCOUNT" field shows your wallet address ### 3. Deploy the Contract 1. Ensure "HelloWorld" is selected in the "CONTRACT" dropdown 2. Click the "Deploy" button 3. MetaMask will prompt you to confirm the transaction - review the gas fees and click "Confirm" 4. Wait for the transaction to be mined (this usually takes a few seconds on NERO Chain)  ## Interacting with Your Deployed Contract Once deployed, your contract will appear under the "Deployed Contracts" section. ### Reading the Greeting 1. Expand your contract in the "Deployed Contracts" section 2. Find the "getGreeting" function (blue button, indicating it's a read-only function) 3. Click it to retrieve the stored greeting ### Updating the Greeting 1. Find the "setGreeting" function (orange button, indicating it changes state) 2. Enter a new greeting message in the input field 3. Click the "setGreeting" button 4. Confirm the transaction in MetaMask 5. After the transaction is mined, you can call "getGreeting" again to verify the update  ## Verifying Your Contract on the Block Explorer For others to interact with your contract and view its code, you should verify it on the block explorer: 1. Copy your contract address from the "Deployed Contracts" section in Remix 2. Visit the [NERO Chain Explorer](https://testnet.neroscan.io) 3. Paste your contract address in the search bar 4. Click on the "Contract" tab 5. Click "Verify and Publish" 6. Fill in the required information: - Contract Name: `HelloWorld` - Compiler Version: The version you used (e.g., `v0.8.17+commit.8df45f5f`) - Open Source License Type: `MIT License (MIT)` 7. In the "Enter the Solidity Contract Code" field, paste your entire contract code 8. Click "Verify and Publish" Once verified, users can read your contract's code and interact with it directly from the explorer. ## Troubleshooting Common Issues ### Transaction Failing If your deployment transaction fails, check: - Do you have enough NERO tokens for gas? - Is your MetaMask connected to NERO Chain? - Is there an error in your contract code? ### High Gas Fees NERO Chain has relatively low gas fees, but if they seem high: - Check if you're connected to the right network - Try during a less busy time ### Compiler Errors If you encounter compiler errors: - Make sure your Solidity version is compatible (0.8.0 or higher is recommended) - Check for syntax errors - Look for references to Ethereum-specific functions that might not be available on NERO Chain ## Advanced Tips ### Using Libraries If you're using external libraries: 1. Import them using the import statement 2. Make sure they're compatible with NERO Chain ```solidity // Example of importing OpenZeppelin's ERC20 contract ``` ### Constructor Arguments If your contract requires constructor arguments: 1. Enter them in the field next to the "Deploy" button 2. Separate multiple arguments with commas ### Contract Size Limits NERO Chain, like Ethereum, has a maximum contract size limit. If your contract is too large: - Split it into multiple contracts - Optimize your code - Use libraries to reuse code ## Next Steps Now that you've deployed your first contract, you might want to: 1. Learn about [Account Abstraction on NERO Chain](https://docs.nerochain.io/en/tutorials/low-level/aa-wallet-integration) 2. Explore [Paymaster integration](https://docs.nerochain.io/en/tutorials/low-level/paymaster-integration) for gasless transactions 3. Build a complete [dApp with React](https://docs.nerochain.io/en/tutorials/low-level/create-first-dapp) 4. Try deploying using [Hardhat](https://docs.nerochain.io/en/tutorials/first-contract/using-hardhat) for more complex projects 5. Try the high-level template for [quick building](https://docs.nerochain.io/en/tutorials/high-level/building-blocks) ## Conclusion Congratulations! You've successfully deployed a smart contract on NERO Chain using Remix. This basic workflow—writing, compiling, deploying, and interacting with contracts—remains the same for more complex projects. NERO Chain's compatibility with Ethereum tools makes it easy to migrate existing projects or start new ones using familiar tools like Remix. --- # Verifying Smart Contracts through the NERO Explorer Source: https://docs.nerochain.io/en/tutorials/first-contract/verifyExplorer Section: Cookbook This guide walks you through the process of verifying your smart contract on the NERO Chain Testnet using the block explorer interface. Contract verification makes your source code publicly viewable and allows users to interact with your contract directly through the explorer. ## Prerequisites - A deployed smart contract on NERO Chain - The contract's source code - The contract's deployment address - Deployment parameters (compiler version, optimization settings, etc.) ## Step 1: Access the NERO Chain Explorer Navigate to the [NERO Testnet Explorer](https://testnet.neroscan.io/) in your web browser. ## Step 2: Locate Your Contract Enter your contract's deployment address in the search box at the top of the explorer page. Figure 3: Searching for your contract by address
## Step 3: Access the Verification Page On the contract details page, locate and click the "Verify and Publish" button. 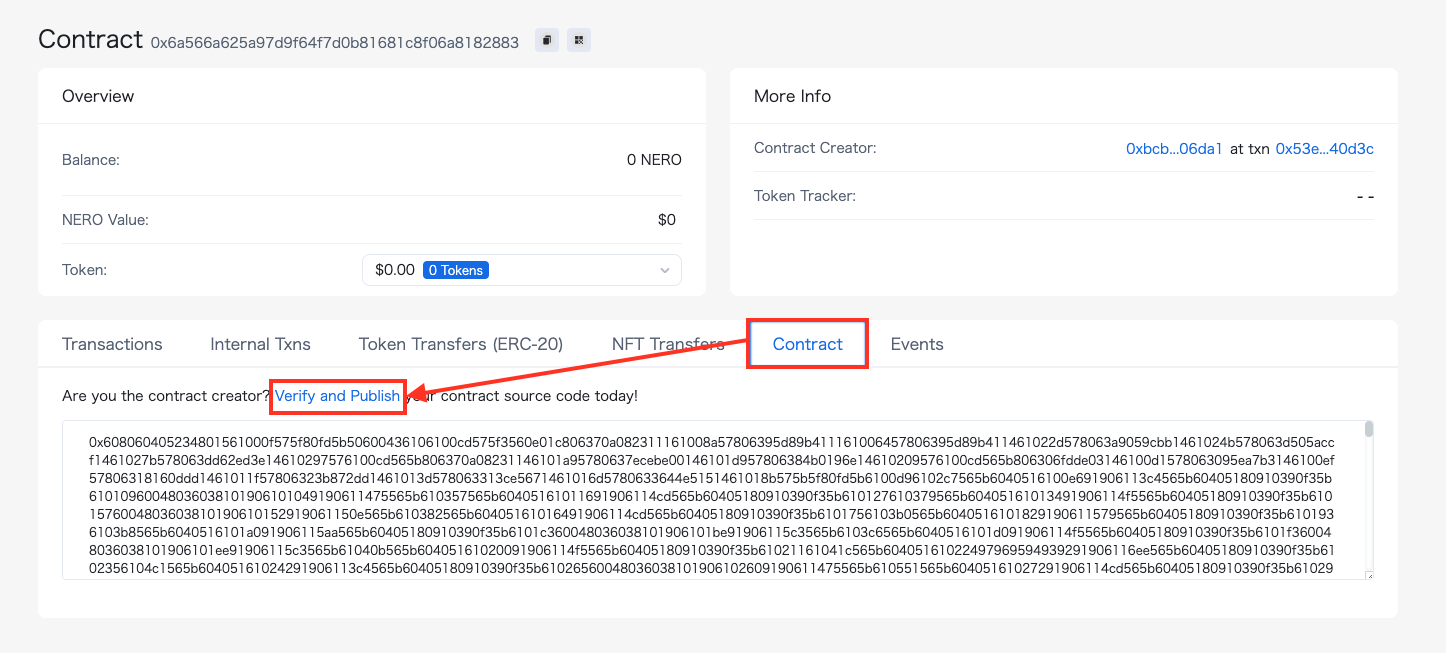Figure 4: Contract details page with verification option
## Step 4: Enter Contract Information Complete the verification form with your contract details: 1. **Contract Name**: Enter the exact name of your contract 2. **Compiler Version**: Select the same version used during deployment 3. **Optimization**: Match your deployment settings 4. **Source Code**: Paste your complete contract source code 5. **Constructor Arguments**: Enter ABI-encoded constructor arguments (if applicable) 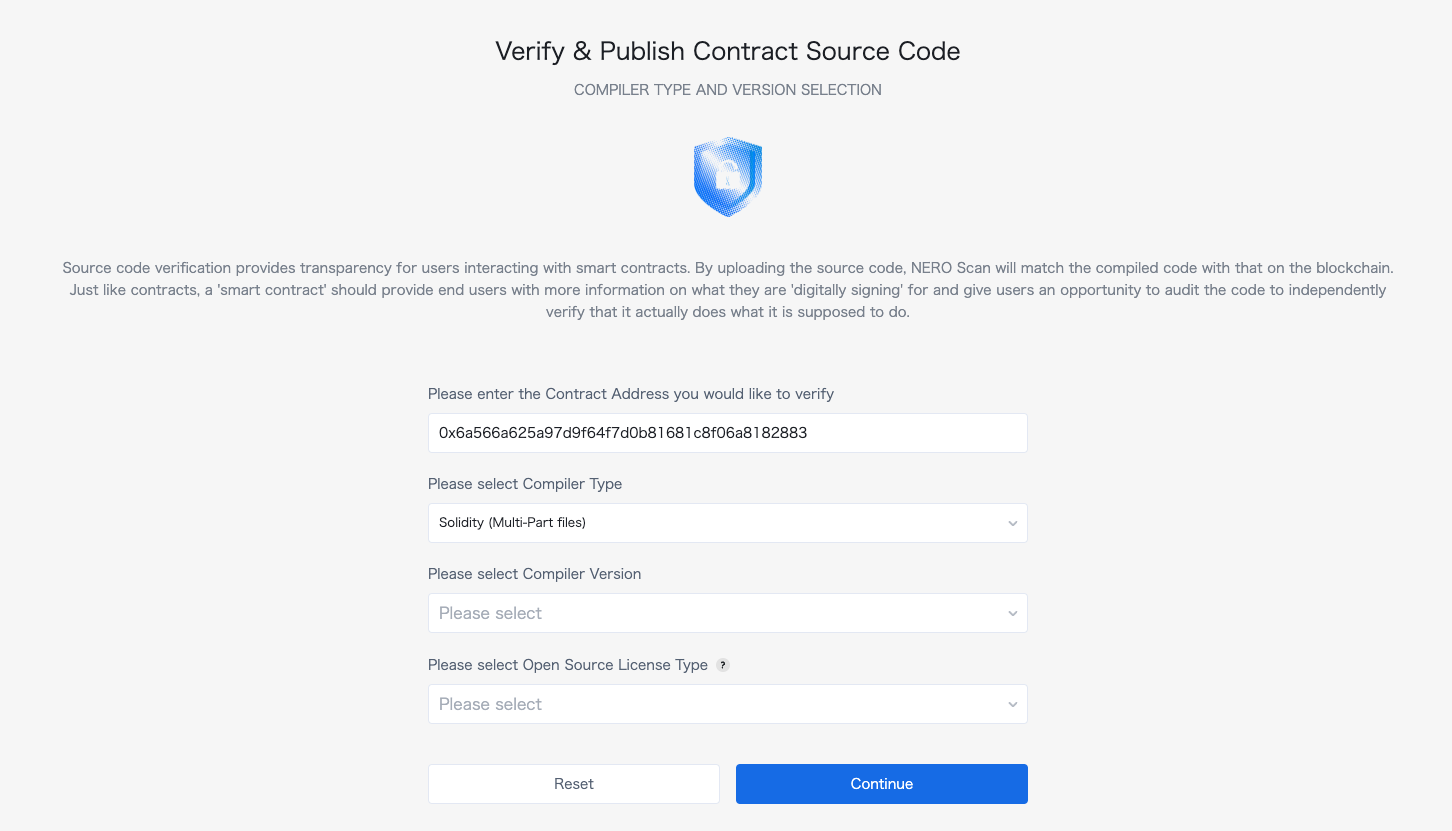Figure 5: Contract verification form
Figure 6: Detailed contract verification settings
## Step 5: Complete the Verification Click the "Verify and Publish" button to submit your information. If successful, your contract's source code will be publicly viewable on the explorer. ## What's Next? Once verified, users can: - Read your contract's source code - Interact with your contract directly through the explorer interface - Have greater confidence in your contract's security and functionality For programmatic verification options, see our [Hardhat verification guide](https://docs.nerochain.io/en/tutorials/first-contract/using-hardhat). --- # Quick Building Blocks Source: https://docs.nerochain.io/en/tutorials/high-level/building-blocks Section: Cookbook This guide explains the design choices and implementation details behind our NERO Wallet dApp enhancements om the next section. It serves as both a tutorial and an explanation of account abstraction concepts. ## What is Account Abstraction? Account abstraction (AA) enables smart contract wallets to act like regular user accounts but with advanced features. Unlike traditional EOA (Externally Owned Account) wallets that rely on private keys, AA wallets use smart contracts to process transactions, enabling features like: - Multi-signature authentication - Gas sponsorship (no need for users to hold gas tokens) - Transaction batching - Account recovery mechanisms - Programmable security rules ## Understanding User Operations (UserOps) In the NERO Wallet implementation, we use the ERC-4337 standard which introduces the concept of User Operations (UserOps). These differ from regular transactions: 1. **Regular Transaction**: Directly submitted to the blockchain, requiring gas fees paid by the sender. 2. **User Operation**: Submitted to a separate mempool and processed by special infrastructure called bundlers and paymasters. That said, an UserOp structure flow goes as follows: ``` User → UserOp → Bundler → EntryPoint Contract → Smart Contract Wallet (AA) → Target Contract ``` Where: - **Bundler**: Collects UserOps and submits them to the blockchain - **Paymaster**: Sponsors gas fees on behalf of users. - **EntryPoint Contract**: Central contract that validates and executes UserOps ## Using UserOps for Write Operations The example below shows how For write Operations, using the useSendUserOp from the high-level template: ```js await execute({ function: 'mint', contractAddress: FREE_NFT_ADDRESS, abi: NERO_NFT_ABI, params: [AAaddress, nftImageUrl], value: 0, }); ``` **Benefits of UserOps for Writing**: 1. **Gas Abstraction**: Users don't need to hold native tokens to pay for gas 2. **Batching**: Multiple operations can be combined (though we didn't implement this) 3. **Signature Abstraction**: Users can authenticate with social logins instead of private keys 4. **Better UX**: Simplifies the interaction flow for users ## Direct RPC for Read Operations For Read Operations We can go "vanilla style" for reading information from the chain. ```js const provider = new ethers.providers.JsonRpcProvider(config.rpcUrl); const nftContract = new ethers.Contract(FREE_NFT_ADDRESS, NERO_NFT_ABI, provider); const balance = await nftContract.balanceOf(AAaddress); ``` **Benefits of Direct RPC for Reading**: 1. **Efficiency**: No need to create UserOps for read-only operations 2. **Cost**: Read operations are free and don't require gas 3. **Speed**: Direct RPC calls are faster as they bypass the bundler/paymaster infrastructure 4. **Simplicity**: Easier to implement and debug ## The NERO Wallet Configuration The NERO Wallet leverages several key components for configuration: ### 1. Web3Auth Integration The wallet uses Web3Auth for social login capabilities, enabling users to log in with their Google/Facebook accounts instead of managing private keys. ```js // From nerowallet.config.ts web3auth: { clientId: import.meta.env.VITE_TESTNET_WEB3AUTH_ID ?? '', network: 'testnet', uiConfig: { appName: 'NERO', // ... other config }, loginConfig: { google: { // ... google config }, facebook: { // ... facebook config } } } ``` ### 2. Configuration Context The wallet uses a configuration context to manage chain details, RPC URLs, and contract addresses. This allows the dApp to work across different networks (testnet/mainnet): ```js const config = useConfig(); // Access RPC URL, chain info, etc. ``` ### 3. Smart Contract Interaction The wallet interacts with smart contracts in two ways: **For Write Operations (via useSendUserOp hook)**: ```js const { execute, waitForUserOpResult } = useSendUserOp(); await execute({/* operation details */}); const result = await waitForUserOpResult(); ``` **For Read Operations (via ethers.js)**: ```js const provider = new ethers.providers.JsonRpcProvider(config.rpcUrl); const contract = new ethers.Contract(address, abi, provider); const data = await contract.someReadFunction(); ``` ## Making the Most of NERO Wallet's Account Abstraction Features ### 1. Gas Sponsorship The NERO Wallet configuration includes a paymaster that can sponsor gas fees: ```js aa: { bundler: 'https://bundler-testnet.nerochain.io/', paymaster: 'https://paymaster-testnet.nerochain.io', paymasterAPIKey: 'YOUR_API_KEY_HERE', }, ``` This allows users to perform transactions without holding NERO tokens. ### 2. Social Login The Web3Auth integration enables social login without private keys: ```js loginConfig: { google: { name: 'google', verifier: 'NeroTest-Google-Maintest', typeOfLogin: 'google', clientId: import.meta.env.VITE_GOOGLE_CLIENT_ID, }, // ...other login methods } ``` ### 3. Transaction Batching Though not implemented in our example, the NERO Wallet supports transaction batching, allowing multiple operations to be executed in a single transaction. ## Best Practices for NERO Wallet Development 1. **Use UserOps for Write Operations**: Any operation that changes state should use UserOps 2. **Use Direct RPC for Read Operations**: Reading data should bypass UserOps for efficiency 3. **Handle Errors Gracefully**: Provide fallbacks and clear error messages 4. **Optimize UI for Mobile**: Many users will access the wallet from mobile devices 5. **Secure User Data**: Don't store sensitive data in local storage 6. **Test on Multiple Networks**: Ensure your dApp works on both testnet and mainnet ## Further Expansion Possibilities 1. **Multi-send Feature**: Allow users to send tokens to multiple recipients in one transaction 2. **NFT Metadata Storage**: Store NFT metadata on IPFS for proper decentralization 3. **Batch Minting**: Allow users to mint multiple NFTs in a single operation 4. **Wallet Connect Integration**: Add support for connecting hardware wallets 5. **Transaction History**: Show users their past transactions 6. **Token Swapping**: Integrate DEX functionality for token swapping ## Conclusion By understanding the concepts and implementation details behind the NERO Wallet, developers can build powerful dApps with account abstraction features. Understanding this you can jump to the next section and understand each step done in the process. --- # From Template to dApp: Adding NFT & Token Features to NERO Wallet Template Source: https://docs.nerochain.io/en/tutorials/high-level/high-level-quickstart Section: Cookbook This tutorial will guide you through the process of enhancing the NERO Wallet template with NFT minting, token creation, and an NFT gallery. At the end of it, you should have a similar result like below:  *Figure 1: Application with a NERO Wallet* ## Requirements 1. Create a project using our nero-aa-wallet template with: ```js git clone https://github.com/nerochain/nero-aa-wallet ``` 2. Have an AA-platform API Key. See how to [here](https://docs.nerochain.io/en/developer-tools/aa-platform/getting-started): >__**Note**__: You can enable social logins in this example. Go to the web3auth website and generate a clientId with your desired social provider (Google, Facebook, etc.). ## Step 1: Understanding the Project Structure First, familiarize yourself with the project structure: ```js ├── nerowallet.config.ts # Wallet configuration with chain and API details ├── src/ │ ├── App.tsx # Main application component │ ├── Sample.tsx # Sample implementation with a single button │ ├── index.tsx # Entry point for React │ ├── main.tsx # Main rendering │ ├── abis/ # Contract ABIs │ ├── components/ # UI components │ ├── hooks/ # React hooks │ └── constants/ # Constants like ABIs ``` ## Step 2: Create the HomePage Component 1. Create a new file src/HomePage.tsx . We will code it with three tabs: NFT Minting, Token Creation, and NFT Gallery. 2. Copy this starting imports for the on the HomePage.tsx: ```js // Import ABIs // Define contract addresses const TOKEN_FACTORY_ADDRESS = '0x00ef47f5316A311870fe3F3431aA510C5c2c5a90'; const FREE_NFT_ADDRESS = '0x63f1f7c6a24294a874d7c8ea289e4624f84b48cb'; ``` ## Step 3: Define the NERONFT ABI Add the specific NERONFT ABI to include the mint function: ```js // Define NERONFT ABI with the mint function const NERO_NFT_ABI = [ // Basic ERC721 functions from the standard ABI ...ERC721_ABI, // Add the mint function that exists in the NERONFT contract 'function mint(address to, string memory uri) returns (uint256)', 'function tokenURI(uint256 tokenId) view returns (string memory)', ]; ``` ## Step 4: Set Up React State and Hooks The project comes with implemented wallet hooks and states. Add these state variables and hooks to manage the functionality: ```js const HomePage = () => { const [activeTab, setActiveTab] = useState('mint-nft'); const { AAaddress, isConnected } = useSignature(); const { execute, waitForUserOpResult } = useSendUserOp(); const config = useConfig(); const [isLoading, setIsLoading] = useState(false); const [userOpHash, setUserOpHash] = useState(null); const [txStatus, setTxStatus] = useState(''); const [isPolling, setIsPolling] = useState(false); const [nfts, setNfts] = useState([]); // Form state const [tokenName, setTokenName] = useState(''); const [tokenSymbol, setTokenSymbol] = useState(''); const [tokenSupply, setTokenSupply] = useState('100000'); const [nftName, setNftName] = useState(''); const [nftDescription, setNftDescription] = useState(''); const [nftImageUrl, setNftImageUrl] = useState(''); ``` ## Step 5: Implement Tab Handling Add a function to handle tab switching: ```js // Handle tab change const handleTabChange = (tab) => { setActiveTab(tab); setTxStatus(''); setUserOpHash(null); // If switching to NFT gallery, fetch the NFTs if (tab === 'nft-gallery' && isConnected) { fetchNFTs(); } }; ``` ## Step 6: Implement Token Minting Let's start adding the function to create ERC20 tokens. The fuction should call the createToken function from the token factory using execute function from useSendUserOp. ```js // Mint ERC20 token const handleMintToken = async () => { if (!isConnected) { alert('Please connect your wallet first'); return; } setIsLoading(true); setUserOpHash(null); setTxStatus(''); try { // Call the createToken function on the token factory contract await execute({ function: 'createToken', contractAddress: TOKEN_FACTORY_ADDRESS, abi: CreateTokenFactory.abi, params: [tokenName, tokenSymbol, tokenSupply], value: 0, }); const result = await waitForUserOpResult(); setUserOpHash(result.userOpHash); setIsPolling(true); if (result.result === true) { setTxStatus('Success!'); setIsPolling(false); } else if (result.transactionHash) { setTxStatus('Transaction hash: ' + result.transactionHash); } } catch (error) { console.error('Error:', error); setTxStatus('An error occurred'); } finally { setIsLoading(false); } }; ``` ## Step 7: Implement NFT Minting And similar goes for the NFT Mint functionality, expect that a different contract is being called here. ```js // Mint NFT const handleMintNFT = async () => { if (!isConnected) { alert('Please connect your wallet first'); return; } if (!nftName || !nftImageUrl) { alert('Please provide a name and image URL for your NFT'); return; } setIsLoading(true); setUserOpHash(null); setTxStatus(''); try { // Create metadata JSON const metadataJson = JSON.stringify({ name: nftName, description: nftDescription, image: nftImageUrl, attributes: [] }); // For this demo, we'll just use the image URL directly await execute({ function: 'mint', contractAddress: FREE_NFT_ADDRESS, abi: NERO_NFT_ABI, params: [AAaddress, nftImageUrl], value: 0, }); const result = await waitForUserOpResult(); setUserOpHash(result.userOpHash); setIsPolling(true); if (result.result === true) { setTxStatus(`Success! NFT "${nftName}" minted!`); setIsPolling(false); // Reset form setNftName(''); setNftDescription(''); setNftImageUrl(''); // Refresh NFT gallery after successful mint fetchNFTs(); } else if (result.transactionHash) { setTxStatus('Transaction hash: ' + result.transactionHash); } } catch (error) { console.error('Error:', error); setTxStatus('An error occurred'); } finally { setIsLoading(false); } }; ``` ## Step 8: Implement NFT Gallery with Direct RPC Calls Since we are minting NFT's , we will add the function to fetch NFTs directly from the blockchain. This can be in the "vanilla" style. ```js // Fetch NFTs for the gallery using direct RPC calls const fetchNFTs = async () => { if (!isConnected || !AAaddress) return; try { setIsLoading(true); setNfts([]); // Clear existing NFTs while loading // Create a provider using the RPC URL from config const provider = new ethers.providers.JsonRpcProvider(config.rpcUrl); // Create a contract instance for the NFT contract const nftContract = new ethers.Contract(FREE_NFT_ADDRESS, NERO_NFT_ABI, provider); // Get the balance of NFTs for the user const balance = await nftContract.balanceOf(AAaddress); const balanceNumber = parseInt(balance.toString()); if (balanceNumber > 0) { const fetchedNfts = []; // Fetch each NFT the user owns for (let i = 0; i < Math.min(balanceNumber, 10); i++) { try { // This is a simplified approach - in a real app, you'd need to get tokenIds owned by the address const tokenId = i; // Try to get the token URI const tokenURI = await nftContract.tokenURI(tokenId); // Add to our NFTs array fetchedNfts.push({ tokenId: tokenId.toString(), tokenURI: tokenURI, name: `NERO NFT #${tokenId}`, }); } catch (error) { console.error(`Error fetching NFT #${i}:`, error); } } if (fetchedNfts.length > 0) { setNfts(fetchedNfts); setTxStatus(`Found ${fetchedNfts.length} NFTs`); } else { // Fallback to sample NFTs setNfts([ { tokenId: '1', tokenURI: 'https://bafybeigxmkl4vto4zqs7yk6wkhpwjqwaay7jkhjzov6qe2667y4qw26tde.ipfs.nftstorage.link/', name: 'NERO Sample NFT #1', }, { tokenId: '2', tokenURI: 'https://bafybeic6ru2bkkridp2ewhhcmkbh563xtq3a7kl5g5k7obcwgxupx2yfxy.ipfs.nftstorage.link/', name: 'NERO Sample NFT #2', } ]); setTxStatus('Using sample NFTs for display'); } } else { setTxStatus('No NFTs found for this address'); } } catch (error) { console.error('Error fetching NFTs:', error); setTxStatus('Error fetching NFTs'); // Fallback to sample NFTs setNfts([/* Sample NFTs */]); } finally { setIsLoading(false); } }; ``` ## Step 9: Create the UI for Tabs and Content Let's add the JSX for the UI components: ```js return (Connected Address: {AAaddress}
)} {/* Tabs */} {/* Tab Content */} {/* Add content for each tab here */} ); ``` ## Step 10: Add Content for Each Tab ### NFT Minting Tab ```js {activeTab === 'mint-nft' && (