From Template to dApp: Adding NFT & Token Features to NERO Wallet Template
This tutorial will guide you through the process of enhancing the NERO Wallet template with NFT minting, token creation, and an NFT gallery. At the end of it, you should have a similar result like below:
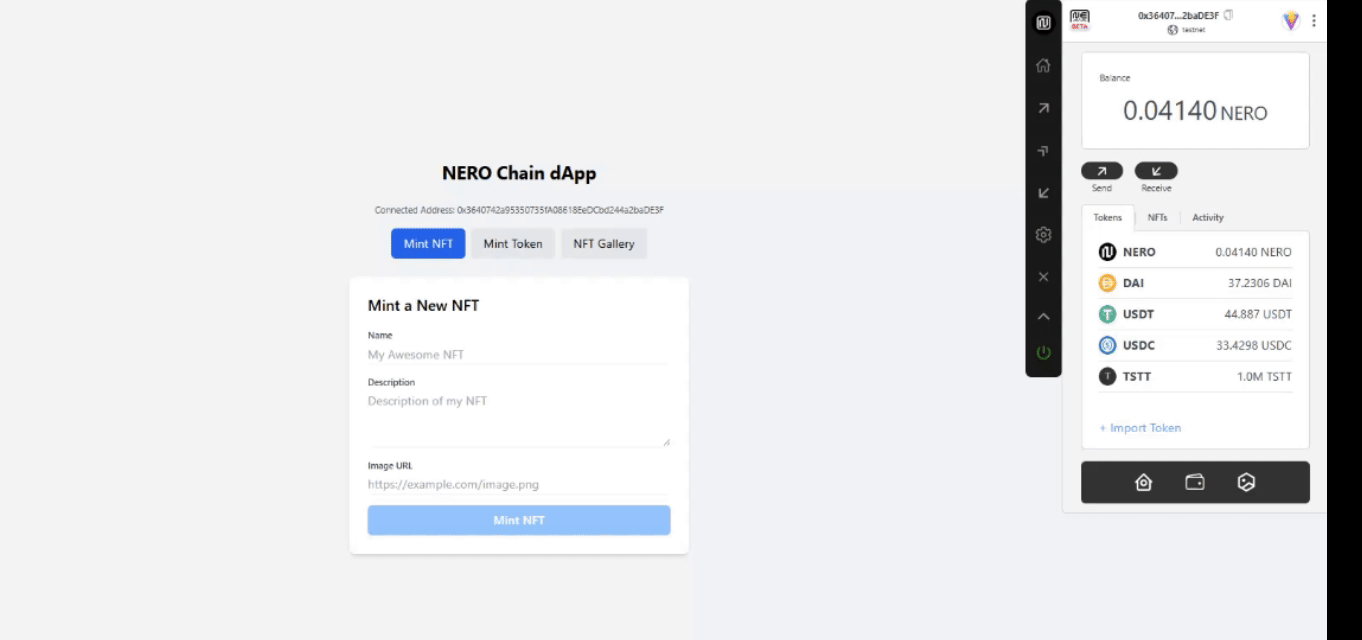
Figure 1: Application with a NERO Wallet
Requirements
- Create a project using our nero-aa-wallet template with:
git clone https://github.com/nerochain/nero-aa-wallet- Have an AA-platform API Key. See how to here:
Note: You can enable social logins in this example. Go to the web3auth website and generate a clientId with your desired social provider (Google, Facebook, etc.).
Step 1: Understanding the Project Structure
First, familiarize yourself with the project structure:
├── nerowallet.config.ts  # Wallet configuration with chain and API details
├── src/
│   ├── App.tsx           # Main application component
│   ├── Sample.tsx        # Sample implementation with a single button
│   ├── index.tsx         # Entry point for React
│   ├── main.tsx          # Main rendering
│   ├── abis/             # Contract ABIs
│   ├── components/       # UI components
│   ├── hooks/            # React hooks
│   └── constants/        # Constants like ABIs
Step 2: Create the HomePage Component
-
Create a new file src/HomePage.tsx . We will code it with three tabs: NFT Minting, Token Creation, and NFT Gallery.
-
Copy this starting imports for the on the HomePage.tsx:
import { useState, useEffect } from 'react';
import { useSignature, useSendUserOp, useConfig } from '@/hooks';
import { ERC20_ABI, ERC721_ABI } from '@/constants/abi';
import { ethers } from 'ethers';

// Import ABIs
import CreateTokenFactory from '@/abis/ERC20/CreateTokenFactory.json';

// Define contract addresses
const TOKEN_FACTORY_ADDRESS = '0x00ef47f5316A311870fe3F3431aA510C5c2c5a90';
const FREE_NFT_ADDRESS = '0x63f1f7c6a24294a874d7c8ea289e4624f84b48cb';
Step 3: Define the NERONFT ABI
Add the specific NERONFT ABI to include the mint function:
// Define NERONFT ABI with the mint function
const NERO_NFT_ABI = [
  // Basic ERC721 functions from the standard ABI
  ...ERC721_ABI,
  // Add the mint function that exists in the NERONFT contract
  'function mint(address to, string memory uri) returns (uint256)',
  'function tokenURI(uint256 tokenId) view returns (string memory)',
];
Step 4: Set Up React State and Hooks
The project comes with implemented wallet hooks and states. Add these state variables and hooks to manage the functionality:
const HomePage = () => {
  const [activeTab, setActiveTab] = useState('mint-nft');
  const { AAaddress, isConnected } = useSignature();
  const { execute, waitForUserOpResult } = useSendUserOp();
  const config = useConfig();
  const [isLoading, setIsLoading] = useState(false);
  const [userOpHash, setUserOpHash] = useState(null);
  const [txStatus, setTxStatus] = useState('');
  const [isPolling, setIsPolling] = useState(false);
  const [nfts, setNfts] = useState([]);

  // Form state
  const [tokenName, setTokenName] = useState('');
  const [tokenSymbol, setTokenSymbol] = useState('');
  const [tokenSupply, setTokenSupply] = useState('100000');
  const [nftName, setNftName] = useState('');
  const [nftDescription, setNftDescription] = useState('');
  const [nftImageUrl, setNftImageUrl] = useState('');
Step 5: Implement Tab Handling
Add a function to handle tab switching:
// Handle tab change
const handleTabChange = (tab) => {
  setActiveTab(tab);
  setTxStatus('');
  setUserOpHash(null);

  // If switching to NFT gallery, fetch the NFTs
  if (tab === 'nft-gallery' && isConnected) {
    fetchNFTs();
  }
};
Step 6: Implement Token Minting
Let’s start adding the function to create ERC20 tokens. The fuction should call the createToken function from the token factory using execute function from useSendUserOp.
// Mint ERC20 token
const handleMintToken = async () => {
  if (!isConnected) {
    alert('Please connect your wallet first');
    return;
  }

  setIsLoading(true);
  setUserOpHash(null);
  setTxStatus('');

  try {
    // Call the createToken function on the token factory contract
    await execute({
      function: 'createToken',
      contractAddress: TOKEN_FACTORY_ADDRESS,
      abi: CreateTokenFactory.abi,
      params: [tokenName, tokenSymbol, tokenSupply],
      value: 0,
    });

    const result = await waitForUserOpResult();
    setUserOpHash(result.userOpHash);
    setIsPolling(true);

    if (result.result === true) {
      setTxStatus('Success!');
      setIsPolling(false);
    } else if (result.transactionHash) {
      setTxStatus('Transaction hash: ' + result.transactionHash);
    }
  } catch (error) {
    console.error('Error:', error);
    setTxStatus('An error occurred');
  } finally {
    setIsLoading(false);
  }
};
Step 7: Implement NFT Minting
And similar goes for the NFT Mint functionality, expect that a different contract is being called here.
// Mint NFT
const handleMintNFT = async () => {
  if (!isConnected) {
    alert('Please connect your wallet first');
    return;
  }

  if (!nftName || !nftImageUrl) {
    alert('Please provide a name and image URL for your NFT');
    return;
  }

  setIsLoading(true);
  setUserOpHash(null);
  setTxStatus('');

  try {
    // Create metadata JSON
    const metadataJson = JSON.stringify({
      name: nftName,
      description: nftDescription,
      image: nftImageUrl,
      attributes: []
    });

    // For this demo, we'll just use the image URL directly
    await execute({
      function: 'mint',
      contractAddress: FREE_NFT_ADDRESS,
      abi: NERO_NFT_ABI,
      params: [AAaddress, nftImageUrl],
      value: 0,
    });

    const result = await waitForUserOpResult();
    setUserOpHash(result.userOpHash);
    setIsPolling(true);

    if (result.result === true) {
      setTxStatus(`Success! NFT "${nftName}" minted!`);
      setIsPolling(false);
      // Reset form
      setNftName('');
      setNftDescription('');
      setNftImageUrl('');
      // Refresh NFT gallery after successful mint
      fetchNFTs();
    } else if (result.transactionHash) {
      setTxStatus('Transaction hash: ' + result.transactionHash);
    }
  } catch (error) {
    console.error('Error:', error);
    setTxStatus('An error occurred');
  } finally {
    setIsLoading(false);
  }
};
Step 8: Implement NFT Gallery with Direct RPC Calls
Since we are minting NFT’s , we will add the function to fetch NFTs directly from the blockchain. This can be in the “vanilla” style.
// Fetch NFTs for the gallery using direct RPC calls
const fetchNFTs = async () => {
  if (!isConnected || !AAaddress) return;

  try {
    setIsLoading(true);
    setNfts([]); // Clear existing NFTs while loading

    // Create a provider using the RPC URL from config
    const provider = new ethers.providers.JsonRpcProvider(config.rpcUrl);

    // Create a contract instance for the NFT contract
    const nftContract = new ethers.Contract(FREE_NFT_ADDRESS, NERO_NFT_ABI, provider);

    // Get the balance of NFTs for the user
    const balance = await nftContract.balanceOf(AAaddress);
    const balanceNumber = parseInt(balance.toString());

    if (balanceNumber > 0) {
      const fetchedNfts = [];

      // Fetch each NFT the user owns
      for (let i = 0; i < Math.min(balanceNumber, 10); i++) {
        try {
          // This is a simplified approach - in a real app, you'd need to get tokenIds owned by the address
          const tokenId = i;

          // Try to get the token URI
          const tokenURI = await nftContract.tokenURI(tokenId);

          // Add to our NFTs array
          fetchedNfts.push({
            tokenId: tokenId.toString(),
            tokenURI: tokenURI,
            name: `NERO NFT #${tokenId}`,
          });
        } catch (error) {
          console.error(`Error fetching NFT #${i}:`, error);
        }
      }

      if (fetchedNfts.length > 0) {
        setNfts(fetchedNfts);
        setTxStatus(`Found ${fetchedNfts.length} NFTs`);
      } else {
        // Fallback to sample NFTs
        setNfts([
          {
            tokenId: '1',
            tokenURI: 'https://bafybeigxmkl4vto4zqs7yk6wkhpwjqwaay7jkhjzov6qe2667y4qw26tde.ipfs.nftstorage.link/',
            name: 'NERO Sample NFT #1',
          },
          {
            tokenId: '2',
            tokenURI: 'https://bafybeic6ru2bkkridp2ewhhcmkbh563xtq3a7kl5g5k7obcwgxupx2yfxy.ipfs.nftstorage.link/',
            name: 'NERO Sample NFT #2',
          }
        ]);
        setTxStatus('Using sample NFTs for display');
      }
    } else {
      setTxStatus('No NFTs found for this address');
    }
  } catch (error) {
    console.error('Error fetching NFTs:', error);
    setTxStatus('Error fetching NFTs');

    // Fallback to sample NFTs
    setNfts([/* Sample NFTs */]);
  } finally {
    setIsLoading(false);
  }
};
Step 9: Create the UI for Tabs and Content
Let’s add the JSX for the UI components:
return (
  <div className="flex flex-col items-center justify-center min-h-screen bg-gray-100 p-6">
    <h1 className="text-2xl font-bold mb-6">NERO Chain dApp</h1>

    {AAaddress && (
      <p className="mb-4 text-sm text-gray-600">
        Connected Address: {AAaddress}
      </p>
    )}

    {/* Tabs */}
    <div className="flex space-x-2 mb-6">
      <button
        className={`px-4 py-2 rounded-md ${activeTab === 'mint-nft' ? 'bg-blue-600 text-white' : 'bg-gray-200'}`}
        onClick={() => handleTabChange('mint-nft')}
      >
        Mint NFT
      </button>
      <button
        className={`px-4 py-2 rounded-md ${activeTab === 'mint-token' ? 'bg-blue-600 text-white' : 'bg-gray-200'}`}
        onClick={() => handleTabChange('mint-token')}
      >
        Mint Token
      </button>
      <button
        className={`px-4 py-2 rounded-md ${activeTab === 'nft-gallery' ? 'bg-blue-600 text-white' : 'bg-gray-200'}`}
        onClick={() => {
          handleTabChange('nft-gallery');
        }}
      >
        NFT Gallery
      </button>
    </div>

    {/* Tab Content */}
    <div className="w-full max-w-md bg-white rounded-lg shadow-md p-6">
      {/* Add content for each tab here */}
    </div>
  </div>
);
Step 10: Add Content for Each Tab
NFT Minting Tab
{activeTab === 'mint-nft' && (
  <div>
    <h2 className="text-xl font-semibold mb-4">Mint a New NFT</h2>
    <div className="space-y-4">
      <div>
        <label className="block text-sm font-medium text-gray-700">Name</label>
        <input
          type="text"
          value={nftName}
          onChange={(e) => setNftName(e.target.value)}
          className="mt-1 block w-full rounded-md border-gray-300 shadow-sm focus:border-blue-500 focus:ring-blue-500"
          placeholder="My Awesome NFT"
        />
      </div>
      <div>
        <label className="block text-sm font-medium text-gray-700">Description</label>
        <textarea
          value={nftDescription}
          onChange={(e) => setNftDescription(e.target.value)}
          className="mt-1 block w-full rounded-md border-gray-300 shadow-sm focus:border-blue-500 focus:ring-blue-500"
          placeholder="Description of my NFT"
          rows={3}
        />
      </div>
      <div>
        <label className="block text-sm font-medium text-gray-700">Image URL</label>
        <input
          type="text"
          value={nftImageUrl}
          onChange={(e) => setNftImageUrl(e.target.value)}
          className="mt-1 block w-full rounded-md border-gray-300 shadow-sm focus:border-blue-500 focus:ring-blue-500"
          placeholder="https://example.com/image.png"
        />
      </div>
      <button
        onClick={handleMintNFT}
        disabled={isLoading || !nftImageUrl}
        className="w-full px-4 py-2 text-white font-medium rounded-md bg-blue-600 hover:bg-blue-700 focus:outline-none focus:ring-2 focus:ring-offset-2 focus:ring-blue-500 disabled:bg-blue-300"
      >
        {isLoading ? 'Processing...' : 'Mint NFT'}
      </button>
    </div>
  </div>
)}
Token Creation Tab
{activeTab === 'mint-token' && (
  <div>
    <h2 className="text-xl font-semibold mb-4">Create a New Token</h2>
    <div className="space-y-4">
      <div>
        <label className="block text-sm font-medium text-gray-700">Token Name</label>
        <input
          type="text"
          value={tokenName}
          onChange={(e) => setTokenName(e.target.value)}
          className="mt-1 block w-full rounded-md border-gray-300 shadow-sm focus:border-blue-500 focus:ring-blue-500"
          placeholder="My Token"
        />
      </div>
      <div>
        <label className="block text-sm font-medium text-gray-700">Token Symbol</label>
        <input
          type="text"
          value={tokenSymbol}
          onChange={(e) => setTokenSymbol(e.target.value)}
          className="mt-1 block w-full rounded-md border-gray-300 shadow-sm focus:border-blue-500 focus:ring-blue-500"
          placeholder="TKN"
        />
      </div>
      <div>
        <label className="block text-sm font-medium text-gray-700">Initial Supply</label>
        <input
          type="text"
          value={tokenSupply}
          onChange={(e) => setTokenSupply(e.target.value)}
          className="mt-1 block w-full rounded-md border-gray-300 shadow-sm focus:border-blue-500 focus:ring-blue-500"
          placeholder="100000"
        />
      </div>
      <button
        onClick={handleMintToken}
        disabled={isLoading || !tokenName || !tokenSymbol}
        className="w-full px-4 py-2 text-white font-medium rounded-md bg-blue-600 hover:bg-blue-700 focus:outline-none focus:ring-2 focus:ring-offset-2 focus:ring-blue-500 disabled:bg-blue-300"
      >
        {isLoading ? 'Processing...' : 'Create Token'}
      </button>
    </div>
  </div>
)}
NFT Tab
{activeTab === 'nft-gallery' && (
  <div>
    <h2 className="text-xl font-semibold mb-4">Your NFT Gallery</h2>
    <button
      onClick={fetchNFTs}
      disabled={isLoading}
      className="mb-4 px-4 py-2 text-sm bg-blue-600 text-white rounded-md hover:bg-blue-700 disabled:bg-blue-300"
    >
      {isLoading ? 'Loading...' : 'Refresh Gallery'}
    </button>

    <div className="grid grid-cols-1 gap-4 mt-4">
      {isLoading ? (
        <div className="text-center py-10">
          <p className="text-gray-500">Loading your NFTs...</p>
        </div>
      ) : nfts.length > 0 ? (
        nfts.map((nft, index) => (
          <div key={index} className="border rounded-md p-4 bg-gray-50">
            <div className="flex flex-col sm:flex-row gap-4">
              <div className="w-full sm:w-1/3">
                <img
                  src={nft.tokenURI || 'https://via.placeholder.com/150'}
                  alt={`NFT #${nft.tokenId}`}
                  className="w-full aspect-square object-cover rounded-md"
                />
              </div>
              <div className="w-full sm:w-2/3 space-y-2">
                <h3 className="font-bold text-lg">{nft.name || `NFT #${nft.tokenId}`}</h3>
                <p className="text-sm text-gray-600">Token ID: {nft.tokenId}</p>
                <div className="mt-2">
                  <a
                    href={nft.tokenURI}
                    target="_blank"
                    rel="noopener noreferrer"
                    className="text-xs text-blue-600 hover:underline"
                  >
                    View Original
                  </a>
                </div>
              </div>
            </div>
          </div>
        ))
      ) : (
        <div className="text-center py-10 border rounded-md">
          <p className="text-gray-500 mb-4">No NFTs found. Mint some NFTs first!</p>
          <button
            onClick={() => handleTabChange('mint-nft')}
            className="px-4 py-2 text-sm bg-blue-600 text-white rounded-md hover:bg-blue-700"
          >
            Mint Your First NFT
          </button>
        </div>
      )}
    </div>
  </div>
)}
Step 11: Add Transaction Status Section
{/* Transaction Status */}
{txStatus && (
  <div className="mt-4 p-3 bg-gray-100 rounded-md">
    <p className="text-sm font-medium">
      Status: <span className={txStatus.includes('Success') ? 'text-green-600' : 'text-blue-600'}>{txStatus}</span>
    </p>
    {userOpHash && (
      <p className="text-xs mt-1 break-all">
        <span className="font-medium">UserOpHash:</span> {userOpHash}
      </p>
    )}
  </div>
)}
Step 12: Complete the Component
Finish by exporting the component:
export default HomePage;Step 13: Update main.tsx
Replace the Sample component with your new HomePage component:
-
Open src/main.tsx
-
Update the imports
import ReactDOM from 'react-dom/client'
import HomePage from './HomePage'
import neroConfig from '../nerowallet.config'
import { SocialWallet } from './index'
import '@rainbow-me/rainbowkit/styles.css'
import '@/index.css'- Replace
ReactDOM.createRoot(document.getElementById('root')!).render(
  <SocialWallet config={neroConfig} mode='sidebar'>
    <HomePage />
  </SocialWallet>,
)
Step 14: Update nerowallet.config.ts
Ensure the config has the correct type for the networkType field:
import NEROLogoSquareIcon from './src/assets/NERO-Logo-square.svg'
import { WEB3AUTH_NETWORK_TYPE } from '@web3auth/base'

const config = {
  // ...existing config
  chains: [
    {
      chain: {
        // ...
        networkType: 'testnet' as WEB3AUTH_NETWORK_TYPE,
        // ...
      },
      // ...
    },
    // ...
  ],
}
In the nerowallet.config.ts you should also paste the Paymaster API Key. If you enable social logins, you also have a place to paste your Client ID.
Step 15: Test Your Application
-
Run your application:
yarn install yarn dev -
Connect your wallet using the sidebar connector and try each feature:
- Mint a new NFT
- Create a new token
- View your NFT gallery
Key Points to Remember
-
Contract Addresses: The NFT contract address is set to 0x63f1f7c6a24294a874d7c8ea289e4624f84b48cb. Ensure this is the correct address on your testnet.
-
User Operations vs. Direct RPC:
-
Use User Operations (with the execute function) for write operations like minting
-
Use direct RPC calls (with ethers.js) for read operations like fetching NFTs
-
Error Handling: Always implement proper error handling and loading states for a better user experience.
-
Paymaster API Key: Make sure you have added a valid Paymaster API key in the nerowallet.config.ts file.
Congratulations! You’ve successfully enhanced the NERO Wallet template with NFT and token features! Use this foundation here to implement your own applications!